- Options for greenhouses made from scrap materials: what to do when there is an economic crisis in the country
- Review of available tools for building a greenhouse
- Branches for building homemade greenhouses
- Mesh made of steel rods for greenhouses from scrap materials
- Plastic bottles for making a greenhouse with your own hands
- Bags filled with soil for creating a greenhouse with your own hands
- Old window frames for a homemade greenhouse
- Pallets for the construction of greenhouses
- DIY greenhouse made from scrap materials: drawing and dimensions
- Recommendations for choosing material for a homemade greenhouse
- Necessary materials for building a greenhouse
- Tools for building a greenhouse with your own hands
- Stages of constructing a greenhouse from scrap materials
- Construction of a greenhouse from bottles
- Video: how to build a greenhouse from plastic bottles
- Making a greenhouse from plates cut from plastic bottles
- Video: greenhouse made of plastic sheet
- Tips for home craftsmen on making a greenhouse with their own hands
- Video: how to make a greenhouse from scrap materials
Options for greenhouses made from scrap materials: what to do when there is an economic crisis in the country
It happens that you really want to build a greenhouse in your garden, but you don’t have enough money for it. But this is not a problem: lack of finance is not an obstacle, but an opportunity to “turn on” your imagination.
Greenhouse made from plastic bottles: photos, videos, reviews, how to make it yourself (read more)
Glass greenhouses are environmentally friendly and light transmitting.
It’s a pity, but the sharp wave of enthusiasm is already waning: growing vegetables with your own hands is not so easy, and the climate is often to blame for this, but buying a greenhouse is no longer possible for those who decide to save on food.
So why not go for a purely Russian trick - build small greenhouses from scrap materials for seasonal cultivation? And improvised materials are what is already there, left over after construction or given for free. These include wooden blocks, plastic pipes, bottles, bags, glass fittings, fence mesh, and even branches! Now look carefully at your site: what is lying idle? Maybe you have long had the material to build a good greenhouse?
Do-it-yourself greenhouse made of agrofibre and reinforcement
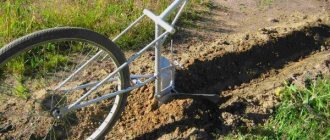
This type of greenhouse is most often found in summer cottages. Its creation does not require special skill and large material costs.
Step-by-step instructions for building a greenhouse from sunbond and reinforcement
Reinforcement or plastic arches can be used as available material, and agrofibre (spunbond) or thick film will serve as the covering material.
This option is convenient because it does not require the construction of a foundation, and the size of the greenhouse can be absolutely any depending on the area of the site.
If you choose reinforcement for work, then for a greenhouse 80 cm wide it is better to take six-meter rods, which can be easily cut in half.
Arcs are formed from the rods, which are dug into the ground every 1-1.5 meters. This method is the simplest, but less reliable.
Experienced gardeners recommend going further and putting a sheath of watering hose on each arc. As a rule, there are always hoses that are unused for various reasons. The hose is cut so as not to reach the end of the arc by about 10 cm.
Next, pipe cuttings are driven into the ground. If they are not there, then you can drill holes in the block in advance into which the reinforcement arcs will be inserted. These parts are driven into the ground at a distance of 20 cm from each other.
The resulting structure of fixed arcs is covered with film or spunbond. If you have a sewing machine and free time, then, having taken measurements in advance, you can sew the covering so that peculiar pockets for the arcs are formed.
Pegs are driven into the ends of the greenhouse at a short distance, and the covering material is pulled together on the sides with a thick rope and attached to the pegs using special clips.
You can leave the free ends of the film and hold it on the ground with a few bricks.
Review of available tools for building a greenhouse
A greenhouse can be built from different materials. Instead of expensive materials, to build a greenhouse you can take everything that is stored idle on the farm. The result is an inexpensive building in which vegetables can be safely grown from early spring to late autumn.
Polyethylene water pipes or rubber hoses are excellent materials for greenhouse frames.
Let’s just first take a closer look at what requirements there are for the design of any greenhouse:
Strength. Constantly breaking arches and supports are not even funny. These are endless nerves, not to mention crushed plants. If he overwhelms you, he may not get by with ordinary abrasions. Sustainability. If your greenhouse collapses from the first wind, or flies away to a neighboring plot, the design will have to be seriously modified.
Smoothness. If the film constantly tears against the rough frame, you will not buy it.
Access to all spectrums of light. If you covered homemade arcs with the remaining colored film from something, check in advance - will anything grow under it? For example, without the red spectrum they will not have a growing season, and without the blue spectrum they will not bear fruit. And your film or coating repels the color it is painted in - these are simple laws of optics.
No drafts. Sealing comes first.
Safety for humans. Thus, some types of plastic and slate release hazardous substances into the air even when heated slightly. Don't take risks!
Ecological cleanliness. Everything that is bad in the greenhouse soil will one day end up in the plants.
Anti-corrosion. It’s always humid in the greenhouse, and it’s bad if your frame starts to rust within a month. For this case, there are special impregnations for wood and paint for metal. But PVC water pipes feel best in a greenhouse - they were originally made of a material resistant to constant dampness.
If the material you find meets all these requirements, great! Then start construction to soon please your family with fresh vegetables.
Brief overview of building materials
If a gardener is thinking about how to make a greenhouse with his own hands from available materials, he needs to reconsider everything that is on the farm. There are always opportunities for a small frame. Beams, hewn stakes, steel wire are the most readily available materials from which it is easy to make a greenhouse. Often they also use lathing after transporting furniture or large household appliances, pallets, frames from old windows left over after the construction of the boards. Popular frames are made of plastic pipes of different materials - polyvinyl chloride and polypropylene. Watering hoses are also suitable for a self-made shelter.
The top and side protection are most often constructed from polyethylene film or sheets of cellular polycarbonate. Both materials are offered in a wide range, including those with UV protection. Glass is gradually losing its position, since this material at hand is fragile and heavy compared to polycarbonate.
The foundation will give the greenhouse strength and reliability. The design can withstand strong winds and heavy snow. A foundation is simply necessary if the available materials for the greenhouse have a significant weight - window frames, wooden or metal supports. Red bricks, logs, beams are used for the foundation, and the lower part of the trenches is concreted. Wooden parts in the ground will not last long; they must be systematically treated with bitumen and painted.
You must begin installing a homemade greenhouse by purchasing all the necessary goods for fastening.
Branches for building homemade greenhouses
If you take strong and bendable branches, then the greenhouse can be installed on the site in about 6 hours. In this case, the vine will act as the frame of the object, and its covering material will be plastic film.
Branches can be used as material for constructing the backbone of a greenhouse, as they are flexible.
Note! The strongest vine is the hazel tree. You can safely take branches from this tree if it is young, that is, it has only been growing for 2–3 years.
The branches that will be used to build the greenhouse must be long, not thick and even. The best time to cut them is the last days of February and the beginning of the first spring month. Before being used as the backbone of a greenhouse, the branches are processed - the bark is removed.
A structure based on branches can be used for 2–3 years. The structure will not last longer, as it is characterized by a serious drawback - poor stability.
Note! The wind can cause a structure woven from branches to sway. And a hurricane is even capable of breaking a thin tree and tearing the film stretched over it. To protect yourself a little from this, you should make the object low.
Rules for installing a greenhouse
When making a greenhouse, certain rules must be taken into account. First, you should determine the location where the structure will be installed, as well as its size.
- The greenhouse is installed facing south and its end facing north. Thanks to this, most of the side surface will be heated from the eastern side in the morning, and from the western side in the evening;
- Typically the structure is mounted from plastic pipes to a height of 1.2 meters. To install a greenhouse of this size, three-meter PVC pipes will be required;
- The length of the greenhouse is chosen arbitrarily, but the small height of the shelter should be taken into account and the structure should not be longer than 4 meters;
- The distance between the arcs is traditionally kept at about 0.5 m, but an increase to 0.8 m and even 1 m is allowed. It is impossible to make a gap between the arcs of more than 1 meter.
Step one: making the base
A box with certain dimensions is made as a base. Fasten boards or beams to the corners using self-tapping screws or corners. After manufacturing, the resulting frame is treated with an antiseptic solution and left until completely dry. Installation is carried out on a pre-leveled bed.
Step two: installation of arches
The reinforcement must be cut into pieces no larger than 50 cm. Three-meter PVC are also cut into 3 equal parts. Inside the resulting base, along the two longest sides, parts of the reinforcement are firmly buried in the ground. First, marks should be made on the walls of the box to maintain an equal distance between the arcs.
The reinforcement is buried in the soil using a hammer, after which a nozzle made of polypropylene pipe and secured with perforated tape to the base.
PVC pipes must be secured very firmly so that the structure remains stable even in strong gusts of wind.
Step three: screed
To prevent the arcs from deforming under the influence of different temperatures or over time, it is necessary to make a screed.
To create a screed, you need to screw the pipes to the center of the arcs (to the ridge of the greenhouse) with wire. It is recommended to make the screed along the entire length, but it is possible partially by connecting several tubes.
Step Four: Covering
The covering material or film must be measured in length and width with a margin. The excess will be required to secure the material on the sides and cover the ends, unless they are made of glass or other material. It is best to secure the film using a garden hose that has failed. It is necessary to cut pieces of no more than 15 cm from the hose, cut them lengthwise, and then put these parts on a pipe wrapped in film.
Recommendation! It is best to attach the covering material along the ridge; in this case, it will be easier to open or close one side or another, so that the plants evenly receive enough sunlight and heat.
To make the ventilation process easy, the ends are also made of film. Excess material is secured at the base with rubber bands or by tying it in a knot.
You can make a greenhouse without a base, using arcs.
Arcs made of rods or PVC pipes are driven into the ground, having previously made markings on the area in order to place the pegs evenly.
Rods or PVC pipes are tied in the center with a cord, and the outer parts of the material are sprinkled with earth. The cord is first tied to the pegs, followed by the film.
The resulting structure is secured with a cord, which connects subsequent arcs and is tied to pegs at the ends of the greenhouse. Then the film is stretched and the sides are sprinkled with earth.
Mesh made of steel rods for greenhouses from scrap materials
Even mesh - light and thin, welded from metal - or chain-link can become a construction raw material for a greenhouse. This material is usually used in combination with boards and wooden posts.
Chain-link is suitable for building a greenhouse because it is extremely durable.
The mesh is attached to wood elements and covered with polyethylene sheeting. The result is a design with the following advantages:
- low price;
- light weight;
- short construction time;
- a minimum amount of construction raw materials.
The noticeable disadvantages of a greenhouse made of metal mesh are:
- relatively poor stability;
- short operating time (several years).
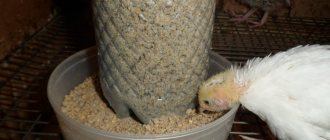
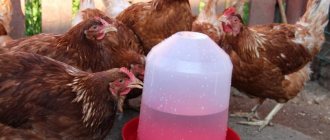
Plastic bottles for making a greenhouse with your own hands
The strangest thing that people have come up with is to make a greenhouse out of plastic containers. Mineral or soda water bottles are used as greenhouse material because they are lightweight and do not require the construction of a strong frame of thick wood at a high cost.
By taking plastic bottles, you can realize the most daring ideas for creating a greenhouse.
A greenhouse made from plastic bottles has the following positive qualities:
- looks interesting;
- transmits light;
- keeps warm;
- protects from rain and snow;
- can be used in winter;
- used for many years;
- is being built at a fast pace;
- promotes the growth of vegetables from March until the last days of autumn.
Doubts regarding the construction of an object from plastic containers are caused by:
- high risk of damage due to mechanical impact;
- the fragility of connecting bottles if you tie them with nylon threads, metal staples or a fishing net.
How to make a greenhouse from plastic bottles: (read more)
DIY window frame greenhouse
This method of building a greenhouse is very popular among gardeners. Old frames, as a rule, can be found in sufficient quantities on every third summer cottage.
This available material is excellent for making greenhouses of varying complexity and size, as well as greenhouses. The absence of several glasses can be compensated for by thick transparent film. Such a greenhouse will be light; if it is well sealed, it can be left on the site for the winter, and planting can be done from March until the end of autumn.
Read the article on how to make greenhouses from window frames with your own hands.
Step-by-step instructions for building a greenhouse from window frames
Large frames with three or two doors are used when installing side walls, and for the end it is better to choose single-leaf structures. All photos can be viewed in large size by clicking on them.
| Illustration | Steps |
| It should be taken into account that the construction will be quite heavy and massive, so you need to take care of the foundation in advance. In some cases, a strong strip foundation made of concrete is required, but most often it is enough to knock together a base of boards and push them a little into the ground. | |
| Waterproof the foundation with roofing felt. | |
| Before starting work, you need to make a drawing, having previously measured the dimensions of the frames that you will use. | |
| It is better to thoroughly sand old frames in advance and treat them with a special compound against rot, mold and pests. | |
| Next, you will need to build the frame of the future greenhouse. To do this, attach vertical supports of the required height to the base; the distance they are installed from each other (step) depends on the length of the greenhouse and the size of the frames. | |
| Attach the frames to the frame from the outside. Make sure that all windows open to the street. If there are not enough frames, the space between them can be compensated with dense reinforced film. If there is a large difference in the height of the window frames, it is compensated by boards of the required size at the base of the roof. Fill the seams and cracks with polyurethane foam or treat them with sealant. | |
| Make a roof from wooden slats. It is not recommended to place glass on top, as it will break under the weight of the snow. | |
| Put up a door. Cover the roof with film or polycarbonate. |
Advantages of a greenhouse made from window frames
Such a greenhouse has a number of visible advantages:
- decent appearance;
- cheap;
- frost resistance;
- high light transmittance;
- high strength;
- excellent thermal insulation.
Disadvantages of a greenhouse made from window frames
Among the disadvantages of the greenhouse, one can note the difficulty in creating a support and foundation for those who have never done anything like this, as well as the fragility of the glass, which is very easy to damage, but quite problematic to change.
Bags filled with soil for creating a greenhouse with your own hands
The idea to create houses from bags of earth belongs to Nadera Khalili. He was the director of the Cal-Earth Institute in Southern California, which was active in the development and training of earthen construction. This is how the concept of “super adobe” appeared, where the earth was put into bags, and a house was built from them. It was built quickly and easily, but it’s much more difficult to make straight walls from this material than curved or sloping ones.
A greenhouse on such a foundation and with such walls turns out wonderful - warm, strong, and the white color of the bags scatters light well between the plants. You only need to put damp soil in bags, place them on top of each other and tamp them down with your feet. The first row should be the widest, and each subsequent row should be narrower. If you need to make a door or window, then only during the construction process - simply leaving arched openings while laying the bags. When the building is dry, plaster it or cover the outside with cement mortar.
You can use sugar and flour bags as materials for constructing a greenhouse.
To construct the foundation of the greenhouse, also use bags, only not with earth, but with crushed stone - as in super adobe construction. For an area where there is always water, such a foundation is indispensable. Do you doubt the strength of such a greenhouse? Believe me, it will even turn out to be very durable. Here's how it works: the load creates membrane stresses, and the walls become no less strong than a greenhouse. And to be more sure, add a little cement to the soil mixture.
So you can build a greenhouse like this:
- Make a box frame from wooden blocks instead of a foundation. Calculate the dimensions so that it is convenient for you to work later in such a greenhouse.
- Along the entire frame on both sides, use a drill to make holes with a diameter similar to fiberglass pipes. Be sure to make sure that they are strictly opposite each other.
- Bend the reinforcement into arcs and insert their ends into the prepared holes.
- In order to strengthen the structure, install crossbars made of planks, which are fastened to the reinforcement with half-clamps.
- Cover the finished greenhouse with double film. It will surprise you, but such homemade greenhouses often turn out to be more durable than the industrial units of their neighbors!
Note! Instead of soil, you can use crushed stone when constructing a greenhouse from bags. This construction raw material will perform its task better than soil if the construction site is located in a very damp area.
From a distance, the bags resemble concrete blocks because they are laid in exactly the same way.
The undeniable advantages of the earthbag design are:
- elementary construction work;
- strength close to ideal;
- almost absolute heat retention;
- long service;
- the use of a small amount of materials and tools during construction.
The design made from bags has only one drawback: it is covered with a film that can tear at any moment.
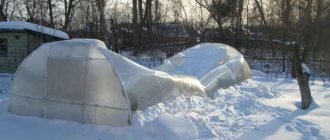
Do-it-yourself greenhouse or greenhouse made from bags of earth
This type of greenhouse is suitable for growing heat-loving but unpretentious crops, such as cucumbers. Light will penetrate inside only through the transparent roof.
Also read how to make greenhouses for cucumbers with your own hands.
Step-by-step instructions for building a greenhouse from bags of earth
This option is ideal for those who, after completing construction or, for example, digging a pond, have a lot of excess land left. You will only need 50 kg thick polypropylene bags. Filled with damp earth, they will serve as original bricks for the walls. Their number depends on the height and area of the structure being built.
The greenhouse will require the manufacture of a supporting base. Small crushed stone is suitable for it, which is packed quite tightly into bags, and they, in turn, are laid out around the perimeter of the base. For greater strength, the first row should be made 2-3 bags wide, and then you can put one or two bags each.
Sometimes it is advised to deepen the base of the walls a little by digging bags of earth or crushed stone half a meter into the ground, and sprinkling sand on the sides.
If you are worried about the integrity of the structure, you can strengthen the improvised walls with vertical support bars or steel reinforcement. At the corners of the resulting building, you need to drive beams into the ground slightly higher than the wall and fasten them with guides to which the roof structure will be attached. It can be made from reinforcement, rods or slats, and covered with a thick film on top.
If your greenhouse turns out to be wide enough, then in the center of the structure from the inside you need to make additional reinforcement for the roof by digging several support beams into the ground.
Advantages of a greenhouse made from bags of earth
This type of greenhouse has a number of advantages:
- cheap;
- Just;
- reliable;
- durability in use.
Disadvantages of an earthbag greenhouse
Disadvantages include limited lighting and not the most attractive appearance.
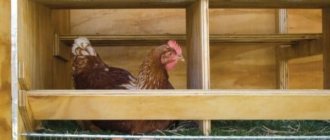
Old window frames for a homemade greenhouse
The greenhouse, the reliability of which is not in doubt, is constructed from used window frames. Thanks to this material, the facility can function year-round. The main thing is to install light in it for the winter and install a heating device.
Note! You won’t have to spend a lot on building a greenhouse from window frames, because additional materials, that is, paint, antiseptic, fasteners, as well as sand, crushed stone and cement for creating the base are sold at a reasonable price.
A surprisingly durable greenhouse is built from old window frames.
Among the positive aspects of greenhouses made from old window frames, the following are particularly noteworthy:
- resistance to strong winds;
- unsurpassed insulation from the cold;
- duration of operation;
- original look;
- ability to transmit sunlight.
The disadvantages of an object made from window frames include:
- high probability of glass breaking;
- complexity of installation work;
- the need to clean wooden frames from old coating;
- long time spent on construction.
Materials used for the construction of mini greenhouses for summer cottages
Speaking about materials for a greenhouse, it is worth paying attention to the fact that the structure should consist of two parts: lower and upper. The lower part is represented by a simple drainage system, which can be easily made from organic debris, fallen leaves, straw, etc. From above, all this is covered with earth. This is not necessary, but the presence of drainage will provide additional warmth to the plants.
Mini greenhouses for germinating seeds in open ground can be created using wire, film and a hair dryer to secure polyethylene.
As for the upper part, which is represented directly by the greenhouse box, there are many options. Today, in mass production, more and more preference is given to frames made of profiled or metal-plastic pipes. If we are talking about a do-it-yourself greenhouse made from scrap materials, the photos show us the incredible variety of available solutions.
For example, greenhouses made of plastic bottles, structures made of pipes and film, as well as greenhouses made of frames are very popular. It is not difficult to implement any of these options with your own hands, especially if you follow the step-by-step instructions for work.
It is especially worth noting the use of wood in the construction of such structures. This applies both to the construction of greenhouses with your own hands from old window frames, and to those cases when the frame is assembled from timber. This material is used quite often, despite the fact that it is more susceptible to rotting than others, as well as deformation as a result of drying out.
Mini greenhouses are convenient because they can easily be placed in any necessary place, even on the balcony of an apartment
As for covering materials, there are only three options: film, glass and polycarbonate. In the first case, the main advantage is low cost. By spending very little money, you can get a suitable covering material that will last one, and with care, even two seasons.
Glass is a completely different matter. It is much stronger, although it can break as a result of an impact. Of course, no one buys glass specifically for a greenhouse, since it is heavy and its use simply will not be justified, but if we are talking about using window frames with already built-in glass for this purpose, then this option is quite acceptable.
Today, polycarbonate is considered the ideal option. This material combines all the best qualities and allows owners of suburban areas to create light, comfortable and inexpensive greenhouses. Working with polycarbonate is easy, and its light transmission capabilities allow plants to receive enough sunlight and heat.
In the warm season, non-woven polypropylene fiber - spunbond, which allows fresh air to pass through well, but at the same time allows you to control the microclimate, can be used as a cover for a small greenhouse.
Helpful advice! One of the main requirements for covering material for greenhouses is high light transmittance. That is why, even if we are talking about homemade plastic greenhouses, it is worth taking care that the plants do not suffer from a lack of sunlight.
Pallets for the construction of greenhouses
For quick assembly of the greenhouse, pallets are used as material. Before construction, they are disassembled into separate parts, which become elements of a structure with a roof of one or two slopes.
The foundation of the greenhouse is created from entire pallets connected to each other using metal plates and screws. The walls and roof of the building are reinforced from the inside with a chain-link mesh. And on the front side, the structure is covered with plastic film, nailed to the main frame on wooden slats.
During the construction of a greenhouse, pallets replace beams.
Among the positive reviews about the greenhouse made from pallets, the following are mentioned:
- the structure is quickly assembled and disassembled;
- the object is ready to serve for many years;
- pallets allow you to create a building of any size, regardless of its shape;
- the structure will not tilt under the influence of wind;
- the greenhouse is well lit by sunlight;
- Pallets and other construction raw materials are inexpensive.
You can decide that a greenhouse made of pallets is not the best option if you remember that the covering made of thin polyethylene is susceptible to deterioration.
DIY greenhouse made from wooden pallets
Many summer residents have huge quantities of Euro pallets that can be adapted to make a small greenhouse. They can be used disassembled into separate boards. If we take into account that the size of the Euro pallet is 1200 by 800 mm, then after dismantling it we will get 11 boards and 9 bars of the optimal size for construction. Then everything depends on their number and your imagination.
Step-by-step instructions for building a greenhouse from wooden pallets
We offer you the option of assembling a greenhouse with a gable roof measuring 4x2.5x2 m. It will take no more than 15 pallets.
We make the base and side walls from the longest boards, fastening them together with corners and planks. We stiffen the walls with guide boards. To ensure the reliability of the structure, we sprinkle the outside of the wall with earth or “sink” the walls a little into the ground.
We make up the roof structure from wide boards, overlapping them and fastening them together using self-tapping screws and planks. We cover the top of the roof with a durable film and secure it with a construction gun.
Advantages of a greenhouse made from wooden pallets
- ease and speed of installation;
- strength;
- cheap.
Such a greenhouse will last for several seasons; the boards can be additionally treated with an antiseptic. The ease of assembly makes it possible to dismantle the greenhouse and put it away for winter storage.
DIY greenhouse made from scrap materials: drawing and dimensions
After weighing all the pros and cons of greenhouses made of different materials, they often choose plastic bottles. To create such a building, you do not need to make an overly complex drawing. A schematic representation of the wooden skeleton of the structure will help you understand the main points in the construction of a greenhouse from plastic containers.
In the drawing, it is important to indicate the height, width and length of the object. It should also reflect the shape of the roof and the distance between the load-bearing structural elements. It makes more sense to make a greenhouse made of plastic bottles small, equipped with a gable roof. The acceptable height of a plastic structure is 1.7 m from floor to ceiling, and the width is 3 m.
It is preferable to make a frame for a greenhouse made of plastic bottles rather than wood.
Before construction work, it is necessary to decide on the site for the future building. It is desirable that it be located on the south, southeast or southwest side of the residential building. From the north, a greenhouse made of plastic bottles should be protected from the wind.
Helpful advice! It is better to install the structure in a place where there is light throughout the day. Plants will not develop well in the shade.
Preparing for the construction of a greenhouse from plastic bottles involves removing debris and clearing the area of vegetation. The site for the construction must be leveled, focusing on the area of the future facility.
Preparing to build a greenhouse from plastic bottles: drawings and dimensions
We will build a greenhouse from plastic bottles, since they have become the most popular and cheapest available material.
In this case, a special project and complex drawings will not be required, since we will only have to make a wooden frame, and for this we need to know the height, width and length of the structure.
The length, width and length of the greenhouse will be 3x4x2.4 meters with a gable roof. Such a roof will allow snow and rainwater not to linger.
We will need about 500-600 plastic bottles, stripped of their labels. It is necessary to collect both transparent and colored containers so that they can be used on the north side of the greenhouse.
Plastic two-liter bottles for greenhouse
It is necessary to decide on a place for the greenhouse, as this is very important for the development and proper growth of plants. Typically, a greenhouse is built in the south, southeast or southwest of other buildings. This is necessary to ensure maximum lighting inside the structure and protect the seedlings from cold winds.
Drawing of a wooden greenhouse frame
The area must be cleared of excess vegetation, debris and leveled. The clearing area should be slightly larger than the area of the future greenhouse.
Recommendations for choosing material for a homemade greenhouse
To create a greenhouse, it is better to take 1.5 or 2 liter plastic bottles.
Note! Thanks to large plastic containers, the walls of the structure will be thick. This means that the greenhouse will not lose precious heat.
Both large and small bottles can serve as material for constructing a greenhouse.
Bottles that will become building material for growing vegetables must be cleared of labels. It is more expedient to create the southern side of the greenhouse from transparent containers, and the northern side from green or brown ones, alternating with colorless ones.
Selected plastic bottles must be inspected before use. They should not have holes or scratches.
The thickness of the material is also an important point. It makes more sense to build a greenhouse from plastic bottles with dense walls. Containers made from expensive lemonade, beer or mineral water have these characteristics.
Necessary materials for building a greenhouse
A greenhouse 4 m long, 3 m wide and 2.2 m high (including the roof) is constructed from plastic containers using certain materials:
- sand;
- roofing felt;
- bricks or other block material for the foundation;
- 600 plastic bottles;
- 4 boards with parameters 10x7 cm, length 3 m (short elements of the base frame and top trim);
- 4 boards with parameters 10x7 cm, length 4 m (long elements of the base frame and top trim);
- 12 beams 1.7 m long (racks);
- 2 rectangular wooden structures measuring 3x4 m;
- 2 triangular wooden structures measuring 3x3x3 m;
- 8 wind boards;
- 2 boards 1.7 m long and 2 boards 0.9 m long (for the door frame);
- metal corners (2 pieces per rack);
- a set of nails and screws;
- 2 door hinges.
Construction of a greenhouse from plastic bottles involves the use of durable beams.
Greenhouse made of vines
In the absence of material for the manufacture of greenhouse arcs, they can be made from willow twigs. To make a simple greenhouse from vines, do the following:
- A base box 30 cm high is made from thick boards.
- A water pipe with a diameter of 25 mm is cut into pieces 15 cm long.
- The pipe sections are screwed with plumbing clamps to the inner wall of the greenhouse after 60 cm.
- For the ridge, take a block with a cross section of 50 by 60 mm and a length equal to the length of the greenhouse. After 30 cm, through holes with a diameter of 20 mm are made in it.
- In the nearest bush, willow twigs with a diameter of 15-17 mm are cut. The length of the rods is equal to 1/2 of the arc plus 20 cm.
- To assemble the greenhouse, one end of the rod is threaded into the base tube, the other into the hole in the ridge bar, alternating the right and left sides.
- The outside of the greenhouse is covered with film.
Tools for building a greenhouse with your own hands
To make a greenhouse from plastic bottles, you need to find tools and fasteners:
- knife;
- cutter;
- thin awl;
- hammer;
- screwdriver;
- nails;
- self-tapping screws;
- sewing machine;
- thick fishing line (or strong nylon thread);
- level;
- tape measure 10 m long.
You can’t do without a thick fishing line when building a greenhouse from plastic bottles, so it acts as a connecting link.
Construction of a greenhouse from bottles
A greenhouse based on plastic containers is made by performing the following steps in turn:
- Pegs and a rope stretched over them mark the perimeter of the building. Along the lines of the resulting rectangle, a trench is dug 15 cm deep and 30 cm wide, which is covered with sand. Having compacted the trench filler, lay out roofing material. Bricks or other material (foam blocks, cinder blocks, beams) are placed on it, which will raise the greenhouse above the ground.
- A frame frame 3 m wide and 4 m long is made on the foundation. The boards are connected to each other with nails. The beams are attached to a rectangle of boards in a vertical position using metal corners and self-tapping screws. These racks are placed at a distance of 1 meter from each other.
- On a fully created frame, the top strapping is performed - the connection between the racks is strengthened with the help of boards. Wind thin beams are nailed diagonally between the posts.
- Create the first horizontal line of the wall from plastic containers. For this purpose, the bottles are shortened by cutting off the top part. The finished elements are attached with self-tapping screws to the base frame of the frame around the entire perimeter. Only one of the zones between the posts, where the door will be located, is left empty.
- The rest of the bottles are stripped of their bottoms. The cut is made in the area of transition to the wider part. Rows are created from the resulting elements, tightly inserting one fragment of the bottle into another. A fishing line or nylon thread is passed through each line of shortened containers.
- Each resulting column of plastic bottles is straightened and secured with a fishing line stretched between the posts. If the fishing line is considered a weak fixation, then the structure is strengthened by nailing wooden slats to it.
- All columns of bottles are connected to the upper frame frame using a fishing line stretched over driven nails. The finished work is assessed by checking whether the vertical lines sway from side to side.
- Triangular wooden structures are nailed to the top of the outer posts. The resulting roof gables are covered on both sides with rectangular frames. Sheathing boards are nailed onto them, leaving small gaps, so that the bottles do not bend under their own weight.
- The bottles are again made into columns strung on a fishing line. The finished rows are secured to the rafter system. Then they are covered with plastic film to prevent water from seeping through the gaps, which in any case will remain between the plastic bottles.
- The door frame is assembled from the boards. The space inside the resulting figure is covered with bottles strung on a fishing line and attached to the boards of the door frame. The product is inserted into the left opening using butterfly hinges.
Rows of plastic bottles can be attached to both wood and metal.
Types of greenhouses for beds
Mini-greenhouses for garden beds are very easy to build yourself. To do this, it is enough to select a covering material - film, agrofibre, polycarbonate or glass, prepare supports and correctly orient the entire structure.
Ground shelters for insulation
Beds under agrofibre warm up faster
One of the annoying problems of a gardener is the discrepancy between the timing of soil heating and the timing of sowing crops. This can be easily corrected with the help of ground shelters. This is done like this: after the snow has melted on the site, the beds are covered with greenhouse film or agrofibre.
The soil under the shelter warms up 10-14 days earlier, and the temperature under the film is 10°C higher than the surrounding temperature, which allows you to plant seedlings earlier, sow greens or vegetable seeds when the weather has not yet settled.
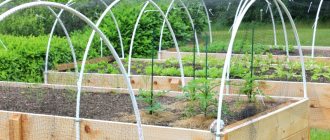
The simplest tunnel shelter on arches
Tunnel shelter on arches
This small “Snowdrop” type greenhouse can be easily built from available materials - agrofibre, PVC film or polyisopropylene. Suitable for growing seedlings, forcing greenery and for early planting of plants in the ground. Arches are used as supports, which can be made from thick steel wire, galvanized profile, metal-plastic pipe or long rods.
How to make a home mini-greenhouse with your own hands:
- Prepare a site for construction. If necessary, place compost or manure under the bed, and sprinkle 30-40 cm of fertile soil on top. It is better to make the width of the bed 0.6-1 m, length - 2.5-3 m, orientation - from north to south. You can fence the garden bed around the perimeter with boards to prevent the earth from sliding.
- Depending on the length of the ridge, prepare 6 or 7 sections of pipes about 2 m long and 12-14 pegs (50 cm) for driving into the ground and securing the arches. If there are no pegs, then it is better to take the pipes half a meter longer in order to securely fix them in the ground.
- Bend the pipes into arcs up to a meter high. You can make a special template on the board or use a large iron barrel of suitable diameter.
- Drive pegs every 50 cm along the long sides of the future greenhouse. Secure arches to them (or stick arches into the ground 25-30 cm below soil level).
- Install a connecting strip on the arches or simply tie the arches together with cord or wire.
- Secure film or agrofibre. You can use clips or just tie them.
- On the north side, collect the hanging end of the covering material, tighten and secure it, on the south side you can leave it free.
- Fix the film on the soil around the perimeter. It is better to take stones for this rather than cover them with soil, since periodically you will need to lift the film to access the plants.
Approximate installation diagram of a tunnel-type arched greenhouse
Box with transparent lid
The cassette mini-greenhouse is ideal for growing seedlings and early radishes. A box 40-50 cm high is made from boards; the width and height of the frame are chosen according to the size of the upper shelter. For early sowing of seeds into the soil, it is recommended to select soil in a box to a depth of 40 cm and fill the hole with biofuel. The fertile layer is 20 cm of ordinary soil. For pallets with peat tablets, it is better to make the frame small - 0.5 m * 1 m.
Cassette greenhouse with peat tablets
For the lid, you can take old window frames or cover the top with film (or better yet, agrofibre). You can also use thick glass or triplex, but in this case you need to ensure that the edge is sealed or carefully sanded. After seedlings, you can grow young greens under cover - onions, herbs, watercress.
It is better to orient such a structure from south to north.
Wooden mini-greenhouse under glass
A modification of the cassette greenhouse is a box with a transparent lid. Its difference is that the upper frame is installed at an angle relative to the soil surface. The length is arranged from east to west, the south side of the frame is usually half as low as the north. The dimensions of the box are arbitrary, and for better lighting of the plants it can be made of polycarbonate roof.
Drawing of a wooden greenhouse under glass
Butterfly house - a convenient portable shelter
A mini-greenhouse of the “house” or “butterfly” type is suitable not only for growing seedlings. Depending on the height, you can plant tomatoes, peppers, eggplants, cabbage, cucumbers and other vegetables in it to obtain early harvests. Such shelters can be assembled from available materials - boards, slats, film, agrofibre, polycarbonate.
Butterfly greenhouse diagram
The easiest way to make such a structure is to mount a frame from slats and cover it with film or sheath it with polycarbonate. Under polycarbonate, the frame can be assembled from a galvanized profile.
A distinctive feature of this type of greenhouse is that the gable “roof” is made movable on both sides. This makes it easier to ventilate and care for plants.
Cucumbers in a greenhouse “house” under film
To grow cucumbers you need a mini-greenhouse of a slightly different design:
- At the chosen location, prepare a bed for two rows of plants and make a wooden frame. Such a “house” can be arranged on the south side of the house, but the seeds in it must be sown in one row.
- Attach the racks for the side walls to the harness. The height of the central pillar is 1.5 meters.
- Connect the central posts with a longitudinal strip. Twine for gartering cucumbers will also be attached to it, so it needs to be made strong.
- Sew up the sides with film, glass or polycarbonate.
- A removable roof can be made in the form of a frame with sheathing, or a film, which, if necessary, is simply rolled up and tied up.
Making a greenhouse from plates cut from plastic bottles
To make a greenhouse from plastic plates, you need the following:
- Using a knife, cut off the bottom and upper narrowed part of the bottles. The middle of the container is cut so that a rectangle is formed.
- There are enough rectangles to cover the entire area of the greenhouse frame. It is taken into account that 4 plastic sheets are used for 12 m2.
- To make the plates curled at the edges straight, they are ironed with a warm iron through a thick piece of fabric.
- Rectangles are used to create solid canvases of the required length and width. To do this, the plates are sewn together with an awl and nylon thread, making overlaps of about 1 cm. Instead of hand tools, you can use a sewing machine to create the canvases.
- The same frame as in the previous instructions is assembled from beams and boards. To attach the canvases to the racks, use slats secured with self-tapping screws.
- 4 sheets of bottles are fixed to the gable roof. The rectangular frames of the rafter system are covered with plastic fabric with an area of 12 m2. And canvases are attached to the gables, the area of which is 3.9 m2.
A sheet of plastic plates can be quickly made using a sewing machine.
Popular types of greenhouses
Farmers with their own hands can easily make a greenhouse for the most common vegetable - cucumber. Simple shelters from improvised materials are created quite quickly. They can be made one-sided when the back wall is the wall of the building.
Shelter for cucumbers
To create the necessary conditions for the development of cucumbers, a film is suitable, which must be stretched over the frame. For a triangular greenhouse design for cucumbers, you need to select stakes, wire, and light pipes. For this:
- the rods are strengthened diagonally in the ground at a distance of half a meter from each other;
- the upper part is insulated with soft material so that the film remains intact;
- connect opposite rods with soft wire;
- stretch the film over the frame, securing it on pegs driven into the corners of the frame.
Most of the film is left for the inlet hole so that it can be closed without difficulty.
Arched greenhouses
It’s easier to make an arched greenhouse with your own hands. It is worth purchasing plastic pipes for it or taking old irrigation hoses. For spring use for seedlings, such a greenhouse made from scrap materials can be installed without a foundation.
The simplest design
This greenhouse is one of those that anyone can make with their own hands, spending very little time. The available materials are pieces of plastic pipes that bend well, and agrofibre with a density above 30 g per 1 m2.
- adjust the pipes to the required length;
- drawstrings must be sewn on agrofibre, with a distance of 50 cm between them, so wide that the pipes for the frame can pass through them freely;
- insert the pipes into the drawstrings;
- drive in reinforcement or thin wooden pegs and a base for pipes in the garden bed;
- place a frame made of pipes with agrofibre on the pegs;
- The edges of the agrofibre are wound on slats or sprinkled with earth, pressed down with bricks.
The shelter is easy to move or fold.
Warning! It is necessary to establish in advance a single step between the pegs and the drawstrings.
Greenhouse with base
If a greenhouse made with your own hands will be used in the summer, it is better to knock down a wooden box from boards that are available.
- The base is assembled from available materials: strong boards or beams. They are connected with nails or self-tapping screws, and the joints are reinforced with corners. You can drive pegs into the soil to strengthen the wooden base.
- The reinforcement is driven into the ground inside the finished box, making sure that the pins are located exactly opposite.
- Pipes of the required length are put on the fittings one by one.
- The arches are secured to the frame with metal tape clamps for strength.
- Film is laid on the finished arches.
- The film is secured to the arches with special clips, clamps for water pipes, or a piece of irrigation hose cut lengthwise.
- The opposite sides of the film are nailed to wooden slats or wound onto pipes. Sprinkle with earth to create the desired atmosphere in a greenhouse, carefully created with your own hands.
Important! The distance between the frame slats for the film should not exceed 1 m so that it does not sag.
In the absence of such available material as reinforcement for the stability of pipe arches, they are secured in a different way. Take a perforated metal strip, which is fastened with self-tapping screws using a screwdriver. The pipe is attached to a frame made of boards or to bars installed additionally.
Shelter for seedlings from window frames
This is a traditional material at hand for DIY greenhouses.
- For a greenhouse, a foundation of bricks is laid on one frame, deepening them slightly into the soil, or a shallow trench is concreted.
- A wooden box is made according to the dimensions of the frame, made so that one side is higher than the other with an inclination angle of 300C, and installed on the foundation.
- To impregnate boards or beams, use bitumen mastic or used motor oil.
- On the highest side of the box, the old frame must be secured with hinges so that it opens.
Comment! The underside of the shelter should face south.
Making a shelter for seedlings is relatively easy. And the result will please you with strong, healthy plants in the garden beds.
Tips for home craftsmen on making a greenhouse with their own hands
A greenhouse made from scrap materials will look more impressive if, after its creation, all wooden parts are treated first with an antiseptic, and later with a coloring emulsion or varnish. Special products will protect against rotting and a barrier to bugs that damage wood. As a result, the greenhouse will be able to last longer than several years.
Helpful advice! If you don’t like the option of making doors and windows from plastic bottles, then the latter can be replaced with pieces of plastic film. This material goes well with the plastic that will decorate the main part of the greenhouse.
There is no point in finishing a structure made of plastic containers in a special way. Instead of materials for decorating a greenhouse, enterprising summer residents are better off purchasing welded mesh or finding wire. It can be pulled from each side of the structure, thereby giving it greater strength.
A greenhouse made of plastic bottles does not need finishing, as it looks unusual due to the use of bottles of different colors.
To avoid skewing the door of a greenhouse made of plastic bottles, it is reasonable to take certain measures: attach lintels, that is, small bars, diagonally to the structure.
When constructing a greenhouse from plastic sheets, you should use a sealant. By lubricating the seams with it, you can achieve increased strength of the canvas.
Note! When creating an unusual object from plastic bottles, there is no need to tightly stretch the canvas onto a wooden frame. These actions will result in divergence and deformation of the seams, which will subsequently lead to the formation of holes, due to which the greenhouse will lose heat.
Anyone who lives in the northern part of Russia needs to take care of deepening the foundation of the greenhouse. The fact is that in areas where the wind is gusty, a lightweight structure made of plastic bottles without a reliable foundation can move.
Various available materials, including plastic containers from carbonated water, can do a good job. By using these things wisely, you can create an enviable structure. You can make a greenhouse with your own hands functional and interesting without large financial investments.
Advantages of an arched greenhouse: characteristics of the advantages (read more)
DIY stretch film greenhouse
Another low-cost way to make a greenhouse is to build a wooden frame and “cover” it in stretch film, the required amount of which is calculated based on the size of the frame.
Such a greenhouse does not need a foundation, and several layers of film transmit a sufficient amount of light and retain heat well. The main thing is to pre-treat the wooden elements from rot and mold, and also sand those places that could damage the film.
Step-by-step instructions for building a greenhouse from stretch film
- As the base of a future greenhouse, you can use a wooden frame fastened with steel corners.
- Load-bearing supports made of timber are attached to it with self-tapping screws, connected at the top by a screed beam.
- Adjacent beams forming an angle are additionally fastened with inclined sections of timber.
- Next, the frame for the gable roof is made. To add rigidity in several places, it is fastened with additional bars.
- The roof is attached to the upper beams of the walls using corners and self-tapping screws.
- After the greenhouse frame is ready, film wrapping begins. This is done from below to prevent rainwater from getting inside. The film is wound in several layers to avoid premature damage from ultraviolet radiation.
- A frame for the door is pre-built in one of the end walls; it can also be wrapped with film or covered with slats.