Operating principle
The key part of a manual hiller is the cultivator or plow. It is he who will do what is done manually with a hoe or hoe - plow the soil. This plow, using its sharp end (“nose”), digs slightly into the soil and distributes it on its sides, covering the potato rows with soil.
If the hiller is a homemade model made from a bicycle, then the cultivator will be mounted on its frame. By slightly changing the structure of the unit, grabbing the steering wheel, you can control the device, directing it in the desired direction. The movement of the hiller itself is carried out due to a single wheel in the front part of the frame.
The essence of the work of a manual hiller can be summarized more briefly using the following algorithm:
- the cultivator crashes into the ground;
- the operator of the apparatus, using the steering wheel, directs the hiller in the desired direction and moves it forward;
- movement is carried out due to the existing wheel.
Why is potato hilling required?
During the growth process, potatoes and ripening root crops will need to be regularly hilled, which can significantly improve yields. Doing this allows you to achieve the following:
- The oxygen supply to root crops improves, which has a positive effect on the size of tubers.
- By loosening the soil, potato roots receive the nutrients they need, which improves yields.
Important. It has been established that regular hilling of beds can improve the yield by 30%.
The use of such gardening tools will be relevant both for large vegetable gardens and for beds of several hundred square meters in size. Such hilling with the help of such a tool is not particularly difficult, so even older gardeners can cope with this work, for whom manual processing of potatoes, digging, harrowing and hilling poses a certain difficulty.
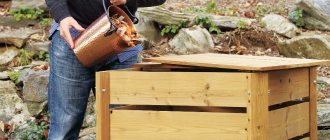
Preliminary actions
To begin with, prepare the bicycle frame: handlebars, saddle, pedals, and remove the rear wheel. The second wheel is disassembled and cleaned - only a metal rim is needed.
The metal rim penetrates the soil better, which is why the hiller will gain much greater stability and maneuverability than with rubber. Operating such a unit will become much easier.
Methods of planting potatoes
There are two planting methods. They differ in the tools they use:
- Hiller with regulator
- Mounted potato planter.
Both options are equally popular among summer residents. It’s just that the first option is used for a small area, and the second for a large area. But the first option is also cheaper. Good for those who like to save money. So, let's look at each of them.
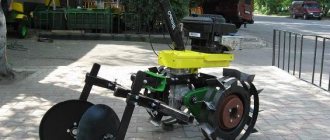
Walk-behind tractor with hiller
Its design consists of the following elements:
- Conveyor is a conveyor that supplies seed.
- Furrower - lays furrows.
- Distributor - with its help, tubers are planted in a strictly specified period of time.
- Hiller - loosens the soil and covers the crop with soil.
This tool works on the following principle. Before you start working, the unit needs to be configured: metal wheels and a special hopper are installed on the tool. Wheels create furrows. They should be even, then the growing process will be simplified.
Potatoes are placed in the hopper, which will fall into the holes when moving. After this, the wheels are replaced from lug wheels to rubber ones and adjusted to the track width. This will prevent damage to the root crop.
Next, the hiller covers the potatoes with soil, compacting it at the same time. Apart from manually adding tubers to the hopper, the entire planting process occurs automatically.
Mounted potato planter
Before using the planter, you will have to carry out the preparatory stage for planting. First you need to plow the land. Then carry out harrowing so that the crop receives the required amount of water and oxygen. After this, you need to moisten the soil (if possible).
This type of walk-behind tractor has the following design:
- furrowers;
- special bunker;
- disk device for filling potatoes with soil.
The structure of the walk-behind hiller allows you to plant potatoes in one go, since the tool simultaneously makes furrows, pours out the tubers and covers them with soil. Before use, you need to attach special wheels to grab the soil and an additional attachment - a potato planter. You can use a homemade unit or buy special equipment.
The process of creating a hiller
The manufacturing process can be divided into 5 stages:
- The mount on the rear wheel is cut so that in the end there is only a “triangle” from the bicycle frame.
- The cultivator will be placed instead of the wheel, and it must be fixed there.
- Screw or weld the cultivator. This should be done efficiently, because this part of the hiller will bear the greatest load.
If the cultivator will be screwed on, then tighten the nuts as tightly as possible, otherwise the manual hiller will not last even a couple of days. This is where both nut and bolt wrenches come in handy. By operating them simultaneously, you will be able to secure the parts firmly and for a long time.
- Next, the offset of the cultivator is adjusted (how far/close it is). This is done for the purpose of convenience during the hilling process, so as not to trip over the cultivator blades.
- The previously removed steering wheel is tightly twisted in place of the saddle.
Useful tips
Rules that must be followed when hilling:
- The weather should be cloudy for optimal effect.
- It is forbidden to loosen the soil when the potatoes are not yet ripe or, on the contrary, have grown so much that the stems lie between the rows.
- When using a two-row homemade cultivator, you need to take into account the size of the furrows made during planting.
- It is forbidden! Hill up if it's hot outside. There is a high risk that the plant will dry out and not produce a normal harvest.
Creation of a cultivator section
If you were unable to find/buy/remove a cultivator, you can make it yourself.
Creating a basic cultivator is quite simple. In fact, this is the same plow. Two plates are attached near the base, which form an angle directed forward (towards the wheel). As the hiller moves, the plates will divide the soil into 2 parts and hill up the potato rows with the raised soil.
However, the following requirements for this part should be adhered to:
- the total width of the blades should be equal to 2/3 of the row spacing of the potato bushes;
- the cultivator should go 10-15 cm underground;
- The angle of the blades should be close to 90 degrees - this way they will perfectly pick up the soil.
After carrying out a full range of work, you should end up with a full-fledged manual hiller that does its job perfectly while growing potatoes.
To familiarize yourself with the device in more detail and understand how to properly make such a homemade hiller, you can watch the following video:
Other tool types:
- To the tractor - process automation. This design can immediately remove all weeds from the treated area. In practice, it has been proven that after working with this type, potato yield increases.
- for a walk-behind tractor - also for automation of work. In principle, this is not a separate type, but the tool can be installed on this vehicle.
Which device is better is up to you to decide. It depends on your goals, the desired speed of operation and the functionality of the devices.
Other types of hillers
There are many schemes for creating hillers. Next we will consider other methods.
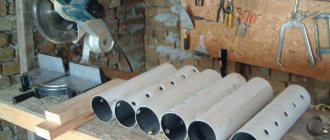
From a bicycle wheel and fork
If you have a front bicycle fork and a wheel for it, then you can create a hiller using the following technology:
- 2 pipes need to be welded at an obtuse angle;
- a bicycle handlebar is attached to a long pipe (it would be wiser to weld it so that it does not fall off during operation);
- A cultivator is attached/welded to the junction of both pipes, below.
The final output will look like this:
Creating such a hiller is much simpler than the one mentioned earlier. However, different types of units should be used for different purposes.
From a children's bike
You will need a metal bicycle with 3 wheels:
- the saddle and front wheel are removed and removed;
- cultivator blades are welded on the inside of the frame near the wheels;
- the angle of their placement is selected individually (it affects how the hiller will move: along the rows or between them).
It is recommended to weld the blades so that the angle is directed towards the worker’s feet and opens from the front. Thus, the hiller will move on the ground not between rows, like previous varieties, but along the row itself. The advantage is that each of the cultivator blades will process the row from two sides at once:
But it is important to remember that if the children's bicycle is too low, then the taller the potato plants, the more difficult the hilling process will be (damage to the sprouts will directly affect the health of the tubers).
This completes the creation of a homemade potato hiller, and you can begin the process of hilling the beds. Making this device is not difficult, especially in comparison: work a little with a welding machine and get great efficiency in your work, or hill up each bed yourself.
0
0
Copy link
DIY making
The stages of work are as follows:
1. Adjustment. It is best for a homemade hiller to be multifunctional. For this reason, it is worth taking regulatory functions seriously. The height is adjusted using a special telescopic device located in the central part. A smaller diameter tube is inserted into the larger tube and goes into the rear linkage. Thanks to this, the hiller can be adjusted to suit a person’s height.
2. Control of the attacking angle is ensured by tilting the stance in the center. This effect can be obtained by changing the difference in angle between the vertical bed and the front link.
There is an interesting article on how to use metal xenon.
If you are interested in how to make a table for a hand router, then read more about this in our article.
3. Next, the bed is set in motion. The front link must be attached with a hinge to the rack in the central part. Regulation is made using a turntable.
4 We weld the rear struts and discs to the rack.
5. Then attach the front link using a hinge mechanism and a long bolt.
6. The result should be a rear link in the shape of the letter “P” with a width of no more than 50 cm. The length of the handle should be at least 20 cm.
7. Next, a vertical tube should be welded in the central part of the fork. Due to the end of this tube, the entire structure is inserted into the vertical rod.
8. In order to be able to adjust the height of the stand, openings should be drilled in the upper part. The same holes should be made in the vertical fork.
Don't forget: before installing the discs, they should be cleaned from all edges. If you choose covers as disks, then they should also be bent with a hammer: on one side there should be a concave appearance, on the other - convex.
Thus, we have completed the assembly of the hiller. All that remains is to try it out at the dacha. A manual hiller is a convenient tool that can make the work of hilling potatoes much easier. It may seem to some that it is quite difficult to make this instrument with your own hands, but this is far from the case.
The most important thing is to have drawings and good ingenuity, then everything will work out. In addition, making your own does not require expensive tools - everything can be found at home.
Below, we invite you to watch a video on how to work with a manual potato hiller:
How to make a hand-held garden auger with your own hands: video instructions and manufacturing drawings
How to make a trailer for a walk-behind tractor with your own hands: drawings and assembly recommendations
Do-it-yourself diesel fuel drip stove: design features, manufacturing technology and video recommendations for assembly
Do-it-yourself hiller for walk-behind tractor - video drawings