Why I decided to try growing watermelons in a greenhouse
Although I do not live in harsh climatic conditions, there is always a risk of not waiting for the harvest of heat-loving crops - the same melons. Therefore, I try to play it safe - plant watermelons and melons in the greenhouse. I transfer the seedlings to a greenhouse as soon as the air in it warms up to at least 18 C - it will begin to fully develop at 20-25 C. Of course, in closed ground conditions it is easier to wait for such conditions than when growing in open beds.
But when deciding to plant watermelons in a greenhouse, I definitely take into account the following:
- Melons are drought-resistant plants that need to be watered with caution.
- Seedlings react painfully to high air humidity. The optimal indicators for them are 60-70%.
- For the harmonious development of watermelons, you need to observe a daily temperature difference: during the day - 25-30 C, at night - 18-20 C.
Keep in mind that only early-ripening varieties are suitable for greenhouse cultivation. It will not be possible to collect giants like the southern ones from them - with proper preparation and care, small, but very aromatic and sugary watermelons ripen.
Harvesting
They collect the fruits after first checking them for ripeness, so as not to make a mistake. On ripe watermelons, the spots should be yellow and make a hollow sound when tapped. Fruits are usually harvested four days after the last watering; dry fruits are stored longer. Watermelons are cut, leaving a few centimeters of the stem. The harvested crop is laid out in open cardboard boxes, covered with thick paper. By following the rules for caring for and growing melons, you can get a bountiful and environmentally friendly harvest of watermelons.
What varieties of watermelons are suitable for planting in a greenhouse?
When choosing a watermelon variety, I rely on two characteristics: fast ripening and small “berries” - pumpkins. It is this variety that will produce a harvest that will have time to ripen in the harsh northern and Siberian conditions.
I will present the most popular varieties of greenhouse watermelons among gardeners:
- Knyazhich. The first fruits are on the 70-75th day. Watermelons weighing up to 6 kg with thin skin and delicate raspberry pulp.
- Crimson Sweet. Harvest - on 70-85 days. Fruit weight – 3-5 kg. The variety is resistant to anthracnose.
- Suga Baby. The first pumpkins are 75-85 days from the appearance of sprouts. Watermelons weighing up to 5 kg with grainy and very sweet pulp.
- Gift from the Sun. Harvest - on 65-75 days. Watermelons are small (up to 4-5 kg) with an unusual orange skin.
- Orange Honey. Harvest - 70-85 days from germination. Miniature watermelons (up to 2.5 kg) with thin skin, unusual orange pulp with a high sugar content.
- Ogonyok. The harvest ripens in 70-90 days. The variety stands out for its very thin skin.
When choosing a variety, I always focus on the information for which Russian season it was bred.
growing watermelons in a greenhouse
How to choose a watermelon variety?
An important task for a gardener is the correct selection of seeds for sowing.
Not all varieties are suitable for seedlings, but only seeds that have a short ripening period, which guarantees a harvest.
It is better to choose seeds suitable for the climate of your region; you need to choose “fresh” material, it germinates better.
Small fruits ripen faster, there are more of them and they set better.
For the first experiment, the unpretentious and early ripening variety “Ogonyok”, which does not need careful care, may be suitable. It ripens small black-green fruits up to one and a half kilograms, very sweet and sugary in taste.
Varieties such as “Cinderella”, “Pannonia F1”, “Ultraearly”, “Gift to the North”, “Sibiryak” and some others also produce a good harvest.
When to plant watermelons in a greenhouse
When choosing the right time to move the seedlings to the greenhouse, keep in mind that watermelons develop at an air temperature of at least 17 C. I do not transfer the plants to the garden until the thermometer in the greenhouse stops at 20-25 C. I take into account that homemade The development of seedlings from seed to ready-to-move seedling takes at least 25-30 days.
By region
Soaking seeds can be roughly planned as follows:
- The middle zone is mid-April.
- North-West, Urals - late April-early May.
- Siberia, Far East – early to mid-April.
In about a month, when the greenhouse has warmed up properly, the watermelon seedlings are ready to move.
Pay attention to the most suitable watermelon varieties for middle latitudes:
- Creamstar;
- Rose Champagne;
- Gift to the North;
- Charleston near Moscow.
For Siberian conditions, I would recommend the following varieties:
- Ultra early;
- Siberian;
- Ogonyok;
- Pannonia.
Despite the fact that greenhouse conditions are much more favorable than open ground, under climatic conditions of mid-latitude and more northern regions, watermelons are grown only through seedlings.
According to the lunar calendar
Let me present the best dates for sowing and replanting watermelons according to the lunar calendar:
- April: 8-13, 15-19, 23-27, 29-30.
- May: 1-3, 7-11, 13-17, 21-25, 27-31.
- June: 1, 5-9, 11-15, 19-24, 26-30.
It is not recommended to sow on the following days:
- April: 5-7, 14, 20-22, 28.
- May: 4-6, 12, 18-20, 26.
- June: 2-4, 10, 16-18, 25.
Let me remind you that sowing day is considered the date the seeds are soaked.
Growing and care conditions
In order to get a good harvest, it is necessary to comply with the conditions for caring for this striped berry.
Disembarkation
Seedlings are planted around the end of May
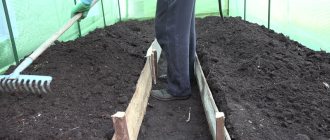
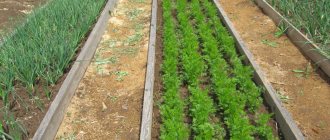
Seedlings are planted around the end of May in prepared soil. Along the length of the greenhouse, beds are made with a width of at least 1 m. Plants are planted to a depth of about 10 cm. You can put them in the holes directly with the lump of earth in which they grew. This will help them adapt better to new conditions. The lump should protrude slightly above the soil surface.
The distance between plantings should be approximately half a meter. It is best to make the holes in a checkerboard pattern. Remember that per 1 sq. m. there should be no more than three plants. In an unheated greenhouse, it is better to cover the seedlings with film material.
Humidity and watering
Watermelons need to be watered several times a week.
Watermelons need to be watered several times a week until flowering begins. It is best to do this in the evening, pouring plenty of warm water over each plant. After the first flowers appear, the frequency of watering is reduced and done only after fertilization. This is done to prevent the fruits from becoming watery or cracking. When watering, avoid direct contact of water directly with the plant and its leaves.
Top dressing
The best fertilizer is ammonium nitrate diluted in water.
For the first time, fertilizing should be done when the soil dries out a little and the watermelon lashes are about 25 cm long. This happens approximately three weeks after planting in the greenhouse. The second feeding is done before budding. The third is done when ovaries form on the seedlings.
The best fertilizer is ammonium nitrate diluted in water. For 10 liters of water take 20 g of fertilizer. Approximately 2 liters should be poured into one well. In addition, chicken manure can be used for feeding. It is dissolved in water in a ratio of 1 to 10. Approximately 0.5 liters of this fertilizer are consumed per plant.
Pollination
Spraying plants with sugar solution attracts insects for pollination
After flowering begins, the pollination period begins. There is no need for artificial pollination if you leave the greenhouse open. If there are no such conditions, then it is necessary to attract insects. Spraying the plants with a sugar solution will help with this. In addition, you can plant honey plants in the greenhouse.
It is advisable to carry out manual pollination in the morning
If you need to hand pollinate, you need to transfer pollen from a plant with male flowers to a female one. It is necessary to pick a large male flower. You need to carefully pick off the petals from it. Then it is necessary to bring its anther into contact with the stigmas of female plants. It is advisable to carry out hand pollination in the morning, when the temperature is approximately 20 degrees.
Garter
Placing watermelons in a net
The first garter occurs approximately 10–14 days after planting. To do this, strong wire is pulled along the length of the holes and trellises are made. When the watermelon stem stretches 35 cm, it needs to be tied to a trellis. When the fruits become heavy enough, you will need to place them in a separate net. The guideline should be a fruit the size of a large apple. The mesh is tied to a horizontal trellis. This is done so that watermelons do not break branches under heavy weight.
Pinching watermelon ovaries
When 2–3 fruits the size of a chicken egg appear on one branch, it is necessary to pinch the remaining ovaries. This must be done because a large number of fruits cannot ripen on one branch.
If the fruit appears on the lower flower, then it must be placed on the plate
Preparing to sow watermelon seeds
I consider the preparation of seed and substrate for planting to be no less important than care. After all, only a healthy sprout turns into a strong and productive plant.
Preparing seeds before sowing
I will present to you my algorithm for preparing watermelon seeds for sowing:
- Calibration I remove damaged, small seeds.
- Checking for hollowness. I prepare a saline solution (1 teaspoon of salt per glass of water), drop the seeds into it, and lightly mix them. I discard those that float, and wash those that have sunk in running water and dry them.
- Disinfection. I place the seeds in a pink solution of potassium permanganate for 20-30 minutes. I rinse and dry again.
- Soak. To improve germination, I soak the seeds for a day in warm (about 25 C) water. You can replace it with a solution of a growth stimulator - “Zircon” or “Epin”.
After such simple preparation, the seeds are ready for sowing.
Soil preparation
It is best to use medium-sized peat bowls (about 10 cm in diameter) for watermelon seedlings. But they can easily be replaced with paper drink cups or plastic dairy containers. I fill the prepared container with a simple soil mixture: garden soil (1/4 bucket) + ash (1 cup) + potassium sulfate (1 teaspoon). You can also use this recipe:
- garden substrate - ¼ bucket;
- potassium preparation – 1 tbsp. spoon;
- phosphate preparation – 1 tbsp. spoon;
- nitrogen preparation – 1 tbsp. spoon;
- humus - ¾ bucket.
If you use garden soil, do not forget to disinfect it first - heat it in the oven or microwave oven, pour it with a strong (dark pink) manganese solution.
Sowing seedlings
Planting watermelon seeds is not a difficult task at all:
- Fill each cup with nutrient substrate.
- Make small holes 2-3 cm deep.
- Place 1-2 seeds in each container.
- Fill with soil mixture, pressing it lightly with your palms for better contact with the seeds.
- Cover the bowls with seedlings with glass or wrap them in cling film.
preparing the soil for seedlings
After sowing, I take the containers to the warm windowsill of the southernmost window. I maintain the following temperature conditions:
- during the day – 25-35 C;
- at night – 18-20 C.
As soon as the first shoots hatch, I hasten to remove the shelter so that the young plants do not suffocate.
Seedling care
Watermelon seedlings do not require adherence to any sophisticated fertilizing schedule - 1-2 fertilizers with complex mineral compounds are enough. I usually carry out the first feeding when the first true leaf appears, and the second – by the 2nd week after sowing. For 10-15 plants, the following composition is sufficient (per 1 liter of water):
- ammonium nitrate – 1 g;
- superphosphate – 2 g;
- potassium chloride – 1.5 g.
Seedlings do not require frequent and abundant watering. It is enough to moisten the soil with a spray bottle or watering can for indoor plants as it dries.
I pay more attention to lighting - daylight hours for young watermelons should not be shorter than 12-14 hours. Otherwise, they grow weak and stretch out disproportionately. If there is not enough natural light, I solve the problem with the help of a phytolamp.
The seedlings are ready to move to the greenhouse already on the 25-35th day - the “control signal” is the appearance of 3-5 true leaves. Before “day X”, I harden the seedlings for a week - artificially lowering their temperature: during the day - to 17 C, at night - to 16 C. This is easy to do by placing the seedlings on a glassed-in balcony or loggia.
watermelon seedlings
Preparing seedlings
Growing watermelons begins with sowing seeds in separate cups.
Sowing seeds
Seedlings, regardless of variety, are planted in the ground about a month after sowing. Therefore, the seeds are sown in mid-to-late April, preferably in peat or coconut pots, so as not to damage the delicate root system. The diameter of the pots is no more than 10 cm.
When planting in peat pots, you don’t have to worry about damaging the roots, since the watermelon seedlings are planted in the greenhouse along with a biodegradable pot
If the central root is damaged, the plant will be very weak - it is this root that provides nutrition to the plant and fruit in arid regions. If you accidentally cut off the central root during transplantation, it is better to throw away such a seedling, because as soon as the fruits appear, the plant will not be able to provide them and will dry out. If you are confident in your abilities and can later replant young plants with a clod of earth without touching the roots, the container can be anything.
- Before sowing, watermelon seeds must be soaked in warm water, adding a growth stimulator (Epin, Zircon) according to the instructions for the preparation.
- Prepare soil from a mixture of garden soil, humus, sand (proportion 2:1:1) and any complex fertilizer for watermelon.
- The seeds are placed in the ground strictly on their side and sprinkled with earth. Planting depth - 2–3 cm.
- Water, cover the plantings with film, and inspect them regularly.
Watermelon seeds are placed in the ground strictly on the side and sprinkled with soil.
The temperature for germination is 23–25 °C, then can be reduced to 21–23 °C.
What to do if the seeds do not germinate? First, pay attention to the temperature - if it is lower than necessary, then the seeds, even if placed in a moist nutrient medium, will take a long time to germinate. Secondly, bubbling will help stimulate germination. This is the treatment of seeds with oxygen. At home, you can use a homemade bubbler made from a plastic bottle and an aquarium compressor.
A bubbler can be made from a regular plastic bottle and an aquarium compressor
- Watermelon seeds are placed in a strainer and poured over with boiling water (this is done very quickly, the seeds should not be cooked).
- Then they are placed in a bubbler at a temperature of 22–26 °C for a period that depends on the density of the peel. In the Ogonyok variety it is thin - enough for 6-12 hours. Seeds with thicker skins may require a day.
- After bubbling, the seeds are laid out for germination.
- Seeds germinate in 3 days. The maximum germination period is 7 days. If the soaked seeds have not sprouted after a week, they can be discarded.
Seedlings of sprouted seeds are pleased with their intensive growth, so the cups need to be placed freely so that the young plants do not come into contact with each other.
Grown young watermelon sprouts should not touch each other
Before planting in the greenhouse, two feedings are possible (if fertilizers were not added to the soil for seedlings): on the 10th day after sowing, then again after 10 days. Any complex mineral fertilizer for vegetable seedlings containing nitrogen, phosphorus and potassium (NPK) is used. You can limit yourself to ash fertilizing (potassium) 7–10 days before planting in the ground. Do not overfeed with nitrogen! Overfeeding the seedlings will not benefit future fruiting, so you should not be happy if the seedlings are very tall and dense. It should be healthy, compact and stocky.
Daylight should be at least 12–14 hours; use additional lighting with fluorescent or phytolamps. If the seedlings stretch out, no further measures will compensate for the lost time and effort. It’s better to throw away such seedlings; you won’t get normal fruits.
Video: about the nuances of growing watermelon seedlings from a practitioner
Planting watermelon seedlings
It is carried out only when the threat of frost has passed, in well-warmed soil. The air temperature during the day is 20–25 °C, at night - at least 15 °C. Planting dates for different regions vary from the last ten days of May to mid-June - the days when recurrent frosts have passed and stable summer warmth has established.
Watermelon seedlings are planted in a greenhouse only when the return frosts have ended.
If there is artificial heating, the seedlings are planted in the greenhouse in mid-May.
- Prepare the soil, if this has not been done already in the fall: remove the top layer of soil, lay down a layer of humus and hay, and spill with hot water.
- Place the soil back and cover with black film. The “pillow” will quickly warm the soil.
- Make small holes, fill them with compost, pour plenty of warm water (the temperature of the water should be close to the temperature of the human body - 35–40 ° C).
- Place the peat pot so that the ball of seedlings rises 1–2 cm above the soil. This is necessary to avoid rotting of the subcotyledon ring.
- Plants are planted at a distance of 70 cm from each other, with a row spacing of 50 cm. Two plants can be planted in one hole, only then you will need to skillfully guide them so that they do not interfere with each other.
- The seedlings are covered with a plastic bottle, cut on one side so that the neck faces up - this is ventilation to avoid too much humidity. If the greenhouse is heated or planting is carried out when the threat of frost has already passed, there is no need to cover the plants with a plastic bottle.
- Constant monitoring of the weather forecast is mandatory; watermelons will not tolerate even short-term frosts. If there is a possibility of a drop in temperature, young plants are wrapped with covering material.
Video: secrets of planting watermelon seedlings
Preparing the greenhouse for planting watermelons
When the watermelon seedlings arrive, I don’t forget to prepare the greenhouse. Keep in mind that the culture requires the following conditions: greenhouse height of at least 180-200 cm, stable air humidity within 60-70%. Make sure that tall perennial plants do not shade the greenhouse - young watermelons are painfully tolerant of a lack of sun. To restore the required illumination, you can install artificial lighting in the greenhouse - 4 LB-40 bulbs are enough.
Soil preparation
I start preparing the land for a watermelon bed in the fall - the crop loves a fertile, loose and airy substrate. For digging I add:
- cut grass (green manure is best);
- rotted manure - 1 bucket per 1 m2;
- sand – 1 bucket per 1 m2.
You should not plant melons in a greenhouse where watermelons or melons already grew last season. If there is no choice, change the top layer of soil to a fresh one. Watermelons will feel great next to:
- melons;
- tomatoes;
- bell pepper.
I try to prevent watermelons and moisture-loving crops from growing together - melons do not like overly moist soil. I make sure to plant watermelons on the north side of the smaller neighbors so that they do not shade the latter.
Watermelon planting scheme
For watermelon seedlings, I prepare earthen ridges in advance with the following approximate parameters:
- height – 20 cm;
- width – 0.5 m;
- the spaces “between the ridges” are 0.5 cm.
Another popular scheme for planting greenhouse watermelons is 70x50 cm:
- the distance between plants in one line is 50 cm;
- row spacing – 70 cm.
Sometimes, to save space, two watermelons are planted in one hole, artificially directing their shoots in opposite directions.
Sowing seeds and growing seedlings
Before you start growing watermelon seedlings, you should familiarize yourself with the features of planting seeds and their germination until the first shoots appear.
Preparing seeds
Only pre-prepared seeds that have been pre-treated should be planted in the ground. When preparing seeds before planting, be sure to warm them up. The procedure is carried out to remove all bacteria and pathogens from the surface of the seed. To warm up, you will have to use special heating devices.
For example, you can place the seeds in the oven for 5-7 minutes. The first few minutes it should be heated to 20-30 degrees, after which the heating temperature gradually increases to 60 degrees. During heating, all the seeds are periodically stirred so that they warm up more thoroughly.
Also, to disinfect seed material, use manganese liquid. To create a mixture, add 2-3 grams of manganese to 100 milliliters of water. Then the seeds are placed in a container and soaked in it for about half an hour. Some gardeners add wood ash to the solution during the procedure to speed up the process of seed germination. After removing the seeds from the manganese solution, they are washed with running water and dried.
Containers and soil
Experienced gardeners advise, to grow watermelon seedlings, to plant the seeds in bulk or peat-humus pots. You can also use cardboard egg trays or plastic cassettes for planting melons. However, some people use peat pots.
When using such containers in the future, you will not have to pick the planted plants, since they can be placed in the ground along with the pot.
Having decided on the most suitable container for watermelons, they begin to prepare the soil mixture for planting. Planting seeds should be done in previously prepared soil filled with nutrients. When creating a soil mixture, humus is added to the ground, which is made from rotted plants or manure. Peat is also considered an essential component, which is often used to improve soil fertility. It makes the soil looser, allowing moisture to penetrate into its upper layers faster.
See also
How often should watermelons be watered in open ground and in greenhouses, when, what to fertilize withRead
After preparing the soil, they plant the seeds. To do this, shallow depressions are made in the soil, into which 2-3 seeds are placed. When the seedlings grow to 5-8 centimeters, they are transplanted into a greenhouse.
How to plant watermelon seedlings: instructions
I plant watermelons in greenhouses no earlier than mid-to-late May - I always wait until the soil warms up to at least 12-14 C. A few hours before the procedure, I water the ridges with hot water.
Transplanting watermelons to a permanent place is a completely simple undertaking:
- Prepare holes on the ridges or ridges the size of the pot in which the seedlings sit. I make holes with an approximate diameter of 0.5 m. I dig the holes themselves in a checkerboard pattern at a distance of 0.5-1 m (depending on the spreading nature of the variety).
- Add 2 kg of humus into each hole.
- Water the holes with warm water until the substrate reaches a “porridge” state.
- Place an earthen ball with a root system in this liquid substance. If the plant was planted in a peat pot, it is planted together with the container; if it is in a plastic container, it is first removed.
- Cover the seedling with dry, fertile soil, being careful not to bury it above the root collar.
- If there is a possibility of a sudden cold snap, I advise you to additionally cover the seedlings with film.
After planting, established seedlings need to be provided with rest - do not water or disturb them for a week.
Growing seedlings
Before planting the seeds, they need to be sorted. Seeds are thrown into a saline solution (1 teaspoon per glass of water); those that float to the surface are not suitable for germination. The remaining seeds are washed in fresh water, then immersed in a one percent solution of potassium permanganate for 30 minutes and washed again. Sorted seeds are soaked in warm water (23-25C) to improve germination; water can be replaced with an immunostimulant (for example, Epin). As soon as the seeds hatch, they are immediately planted in seedling pots to a depth of 2-3 cm, and they need to be laid on their side, which also helps them to germinate better. In the room where seedlings are grown, the temperature should be maintained at 22-25C; after germination, the temperature is reduced to 21-23C. The containers are covered with film before the first shoots appear.
Daylight hours in the room where seedlings are grown are extended to 12-14 hours with the help of artificial lighting (LB-40 lamps), since with insufficient lighting the plants weaken and begin to stretch.
The pots are placed at a short distance from each other. Make sure that the leaves of the plants do not touch each other.
On the tenth day, the seedlings are fed with complex mineral fertilizers. If you do this earlier, the weak roots can be burned.
Seedlings are ready for planting within a month, during which they need to be fed twice. The finished seedlings should have three to five true leaves.
Caring for watermelons in a greenhouse
Planting is behind us - now all we have to do is provide our watermelons with proper quality care.
Watering
First of all, I’ll note that the statement “watermelon loves abundant watering” is a harmful myth. This is a drought-resistant crop that needs to be watered very carefully. The plant needs abundant watering only at the stage of flowering and ovary development. I pour about 10 liters of pre-warmed water (to room temperature) onto a bed (about 8-10 seedlings). Watering frequency is once a week.
The plant “speaks” about the need for watering by its appearance – it bends over and fades a little. An excess of moisture is also obvious - cracks appear on ripening watermelons. To prevent the plant from getting sick, I always heat the water and water the ridges in the evening.
When the pumpkin reaches the volume specified in the description for the variety, I stop watering altogether. This is what makes my watermelons unusually sweet - the lack of water forces the plant to accumulate sugar in the fruit. If you continue to water during ripening, the crop will be watery and tasteless.
Before each watering, I do not forget to thoroughly weed the watermelon beds - the plant reacts painfully to the dominance of weeds.
Top dressing
I don’t worry much about the nutrition of greenhouse watermelons planted in pre-fertilized soil - they require no more than 4 complex feedings over the entire season. I prepare a “treat” according to a simple recipe (for 5 liters of water):
- Azofoska – 1 tbsp. spoon;
- potassium sulfate – 1 teaspoon;
- superphosphate – 1 tbsp. spoon;
- preparation with a complex of microelements – 2 teaspoons.
You can also pay attention to this “menu”:
- The first feeding (when the vines reach 30-50 cm in length) is nitrogen. For 10 liters of water - 20 g of ammonium nitrate. For each plant - 2 liters of the resulting solution. Fertilizer is applied by root watering - along the circumference, 20 cm away from the stem.
- The second feeding is before the formation of buds. The same mineral fertilizer is being prepared.
- The third feeding is when the ovaries appear. The plant is fertilized with a solution of chicken manure (1:10). For one seedling - 0.5 liters of liquid fertilizer. The root watering circumference is removed 40 cm from the main stem.
I stop fertilizing, as well as watering, when the fruits reach varietal size.
Garter
Since watermelon is a climbing plant, you can’t do without garters. Unlike peas, the crop itself does not cling to a stretched string. Therefore, I independently unscrew the overgrown “tails” around the support and trellis - strictly counterclockwise.
In addition to garter, the plant also requires formation: in greenhouse conditions, watermelons lead into one shoot. I must remove flowers and stems that appear at a height of more than 40 cm. Otherwise, they will waste the plant's vitality and will not give me a chance to wait for the harvest.
As soon as the watermelons ripen to the size of a plum, count 5-7 leaves from the fruit and pinch the shoot. As a rule, large pumpkins are formed on the vine only alone - if there are several fruits, they grow tasteless and small.
Once the watermelon becomes the size of a tennis ball, place it in the net and tie it to a support. If this is not done, the plant may break under the weight of the filling crop. When the fruit has formed at the very base of the cane, there is no need to tie it up. Here I just place a thin plank under the pumpkin - contact with wet soil can cause the watermelon to rot.
But I don’t recommend thinning watermelon tops - cut leaves do not interfere with the plant’s lighting. The only thing I try to remove in a timely manner is the extra side stems. Their growth significantly slows down the ripening of the crop.
Pollination
Approximately on the 60th day from planting, the long-awaited flowers appear on watermelons: the male ones first, and about a week later the female ones. At this time I am planning an important event - pollination. Everything is quite simple - on a fine and warm day I open the doors and windows so as not to interfere with bees, wasps and other beneficial insects doing their work.
If summer is not pleasant with warm days, or you live in a harsh climate, then it is more advisable to carry out pollination yourself. Carefully pinch off the male flower and move its stamens along the female pistil. The “gender” of a flower is easy to determine: on the female, the outlines of the future watermelon can be seen. If you did everything correctly, the ovary will begin to bend and “fall” down. If the flower is not pollinated, it will stretch upward.
For the pollination procedure, it is best to use the largest male flowers - I always remove the petals, trying not to damage the anthers. I try not to delay such an event: the “life” of picked flowers is no more than a couple of hours. The most productive pollination is in the morning or on a not hot day at 18-22 C.
Temperature
For watermelons, it is important to observe the thermal regime familiar to the culture:
- During the day: 20-35 C.
- At night – 18-20 C.
Overheating, like hypothermia, negatively affects the plant. Therefore, on hot days, when the temperature in the greenhouse does not drop below 30 C, I make sure to ventilate the greenhouse - open the windows, throw open the doors.
Selecting and preparing a greenhouse or greenhouse for growing watermelons
Before you start growing watermelons indoors, you need to familiarize yourself with what materials a greenhouse can be made of for the following purposes:
- made of polycarbonate;
- from old window frames;
- from film.
A film greenhouse is the most common due to its affordable cost.
In addition to the choice of materials, a watermelon greenhouse has a number of requirements that it must meet:
- height should be 1.7–2 m;
- preparatory activities are carried out in the spring;
- when cultivating in the northern regions, warm beds are organized, which will avoid overcooling of the root system;
- for the convenience of temperature adjustment, additional heating sources are used;
- It is better to allocate a separate greenhouse for growing melons to create the most comfortable conditions.
In order for the watermelon not to experience a lack of light, the greenhouse must be installed in a place that is illuminated in the best possible way. You should avoid placing it near bushes, trees, and buildings. Since the northern regions are characterized by a lack of natural light, it is necessary to resort to the use of additional sources in the form of lamps.
Some gardeners are of the opinion that the best greenhouse for growing watermelons is a structure made of cellular polycarbonate. This opinion is due to the fact that the material can withstand heavy loads, retains heat, and transmits light well. Since watermelon is a climbing crop, the main condition for its cultivation is sufficient height. As the plants develop, they will become attached to the trellis, and if the height of the greenhouse structure is low, yields may suffer.
One of the important points before planting watermelons in closed ground is preparing the soil. First of all, you need to wait for the weather to become warm and stable: in the daytime the thermometer should not fall below +20˚С, at night - below +5˚С. When equipping the greenhouse with heating, the issue of warming the earth disappears by itself. The soil for watermelons should have an acidity within the pH range of 6.8–7, be fertile and well-drained. It is better if the soil mixture is prepared from components such as garden soil, humus and fine sand in a ratio of 3:3:4.
To determine the degree of acidity of the soil, you can use special strips. If the soil is alkaline, then manure, peat or compost are used to increase the acidity level. For acidic soil, use lime or dolomite flour to deoxidize.
Since watermelon prefers soils with an acidity pH of 6.8–7, it is necessary to bring the indicator to these values by deoxidation or acidification
Watermelons are quite sensitive to fungal diseases. This suggests that in the spring the soil should be disinfected, and the greenhouse frame should be treated with copper sulfate or Bordeaux mixture. A solution of vitriol is prepared at the rate of 100 g per 10 liters of water. After this, the film, polycarbonate, and glass are washed (depending on the type of greenhouse). Then comes the turn of the soil. For treatment, prepare a solution of copper sulfate at a concentration of 50 g of the substance per 10 liters of water. Approximately 2 liters of product are used per 1 m² of soil. The procedure must be carried out at least 2 weeks before planting.
Before planting seedlings in the greenhouse, check the lighting, heating and watering systems. If any malfunctions are detected, they must be eliminated. Since watermelon is a heat-loving crop, all cracks need to be sealed. If the greenhouse structure is unheated, you need to prepare covering material in case of cold weather. As such, you can use plastic film, rags, thick paper. A week before planting, the greenhouse can be covered with black film, which will speed up the warming of the soil.
What difficulties arise when growing watermelons in a greenhouse?
The main difficulties of growing greenhouse watermelons are as follows:
- Lack of ovaries. A direct consequence of improper pollination or lack thereof. Open the windows and doors to the greenhouse, spray the plantings with sweet water, plant honey plants in the greenhouse to attract pollinating insects. Or carry out pollination yourself according to my instructions.
- Rotting pumpkins. The main reason is high humidity in the greenhouse. Ventilate the greenhouse 1-2 times a day, remove condensation from the walls and glass with a soft cloth. And do not forget to place bedding under the fruits on the ground.
- Unsweetened harvest. The consequence of abundant watering during pumpkin ripening and high air humidity is that the plant does not receive moisture from the soil, but continues to absorb it through the leaves.
I will also tell you about the ailments and enemies that threaten greenhouse watermelons.
Disease Prevention
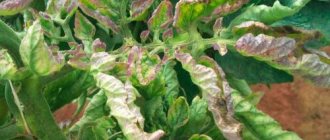
In a greenhouse, unpretentious melons mainly suffer from two diseases, the causes of which are the same - high humidity, low temperatures, lack of lighting:
- Powdery mildew. A milky coating appears on the tops, which darkens over time. I eliminate the problem by spraying with a 1% solution of copper oxychloride or Bordeaux mixture.
- Anthracosis. The leaves become covered with brown spots, the pumpkins shrivel and rot. I remove the affected fruits and tops as quickly as possible. In the future, I try to strictly follow the schedule of watering and ventilation.
As a disease prevention, I spray with a 1% Bordeaux solution twice a season.
Pest Control
Watermelons are fairly unpretentious plants that are not afraid of pests. But, like many greenhouse plantings, they sometimes become “prey” for spider mites. I fight the microscopic pest in two ways:
- Soap and tobacco solution for spraying. For 5 liters of water – 2-4 tbsp. spoons of tobacco, 2-3 tbsp. spoons of laundry soap shavings. To increase the effectiveness of the product, you can add a little colloidal sulfur to it.
- "Fitoverm". To treat plantings and subsequent prevention, I dilute the drug solution according to the instructions, spraying watermelons every 10-14 days.
spider mites on plants
Growing watermelons in a greenhouse is a feasible task for gardeners living in the harsh conditions of Siberia, the Urals and the Far East. The main thing is to properly prepare the seeds, soil, greenhouse, and provide the plants with the necessary care. Remember that watermelons should not be “drained” - this results in diseases and an unpalatable harvest. Do not forget that the plant is demanding in terms of temperature, light, air humidity, and needs pollination.
Care
Caring for watermelons consists of timely watering, loosening, fertilizing, proper formation of the bush and protecting plants from diseases and pests.
Watering
Watering is carried out in the evening, when the sun leaves its zenith. The water should be soft, settled, and heated.
While the seedlings are taking root and are still small, watering is carried out every 5 days. As the plant grows, watering is reduced to once a week. Optimal drip irrigation device.
How to feed a watermelon
With the beginning of flowering, fertilization begins. For convenience, it is combined with watering. Fertilizing ends when the fruit reaches a sufficient size. If the soil in the greenhouse is sufficiently “fat” and nutritious, fertilizing can be avoided.
Folk remedies include infusions of manure, chicken droppings, and fermented nettles. Watermelon responds well to yeast solution.
Solutions of complex fertilizers (Uniflor-micro) and mineral fertilizers (superphosphate, ammonium nitrate, potassium sulfate) are also used.
Fertilizing is applied every two weeks. More often on depleted soil.
Formation
The formation of watermelon lashes has its own characteristics. You need to know exactly how to shape a watermelon in a greenhouse.
Predominantly male type flowers are formed on the central stem.
The formation of a bush occurs according to the following principle:
- Pinching the central trunk after five true leaves;
- Pinching the lateral stepsons after five true leaves;
- 3-4 fruits are left on the plant, the rest are removed;
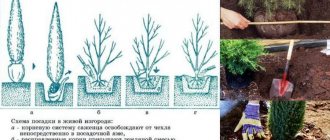
- As soon as the remaining fruits have reached the size of a large apple, all other stepsons are removed (Fig. 1)
Under natural conditions, watermelon forms a bush on its own, leaving the required amount of fruit for ripening. As a rule, there are 3-4 of them left on one bush, the rest of the fruits dry out.
Pollination
Watermelon is a plant that has both male and female flowers. It's easy to distinguish them:
- male flowers are larger, have a pronounced stalk, bloom from early morning until lunchtime;
- female flowers are smaller, have a fruit bud instead of a stalk, and bloom for three days.
Since in nature and in open ground pollination occurs with the help of insects, in a greenhouse this process is greatly hampered, in fact, by the absence of insects. Artificial insemination is used.
It is carried out in the morning when the male flowers open. They are collected, the petals are torn off and the male stamens are applied to the female pistil. It is better to play it safe and perform this procedure several times. Fertilized female flowers begin to form a fruit that unfolds downward. Five leaves are left on the vine above the set fruit and pinched.
Garter
Growing lashes are tied to a support, forming a vertical bush.
During ripening, the fruits become fuller and gain a lot of weight. When forming a bush vertically in a greenhouse, the saturated fruits pull back the vines and can tear them off. To prevent this from happening, still young watermelons should be placed in a net tied to a support.
The second condition is the right seeds ↑
Growing melons in a greenhouse, like watermelons, begins with sowing quality seeds. The wrong choice will ruin all your efforts. Refuse the help of kind people who are in a hurry to share. You only need products from trusted companies - buy them in good stores.
Choose varieties with medium-sized fruits - you are guaranteed to get an excellent harvest
Please note the following when purchasing:
- Place of seed production. Take material from your region, adapted to your climate.
- The period from fruit set to ripening. A short period guarantees fruit production, but with a long period you risk being left without a harvest.
- The size of the fruit. Do not believe the forecasts of an “unearthly” number of large watermelons and melons. Giant melons ripen only in the south! In a greenhouse, medium-sized berries will ripen faster; there are usually a lot of them - they set better.
- Best before date. Take seeds with reserve. Fresh material germinates better.
How to grow watermelons and melons in a greenhouse
If you have the time and effort, watermelons and melons can be grown in a greenhouse in our latitudes. Even though the size of such fruits will be small - from 1.5 to 3 kg, but they often grow sweeter and more aromatic than imported ones. An important advantage is the fact that it is possible to provide them with the necessary volumes of high-quality fertilizers and growth stimulants.
Formation of a watermelon bush.
Not every variety of watermelon and melon is suitable for growing in a greenhouse and will have time to ripen during this time. Time-tested, suitable varieties of watermelons:
- Search.
- Ogonyok.
- Suga Baby.
- Russian vegetable garden.
- Early ripening sugar.
- Russian size XXL.
- Gift to the North F1.
Scheme of planting watermelon seedlings in a greenhouse.
- Russian vegetable garden.
- Gavrish.
- Cappuccino.
- Zlato Skifov.
- A pineapple.
- Sweet pineapple.
- Zedek.
- Semko Junior.
- Cinderella.
- Joker.
When purchasing seeds, special attention should be paid to such parameters as the seed manufacturer and expiration date. It is better if the seeds are produced in the same region where they are planned to be grown, this means that they are adapted to the climate. Old seeds do not germinate well and may not germinate at all if storage conditions are not met.
The timing of maturation should also be monitored. If they are too large for these latitudes and climates, you may be left without a crop.
Small berries are in no way inferior in taste and benefits, and there are much more guarantees for harvesting.
Watermelon and melon seeds begin to be sown in April. Beforehand, they are soaked in warm water for a day, making sure that the water covers the seeds by half or a little more.
To ensure that your efforts in caring for plants are not in vain, and that you can harvest the harvest, you should learn the technological features of growing watermelons and melons in a polycarbonate greenhouse.
After studying the important points, you can safely get down to business.
Modern methods of plant care, certain varieties of seeds and the work of gardeners make it possible to obtain amazing results at the end of the season in a summer cottage.
The size of fruits grown in a greenhouse in Russia will be average (1.5-3 kg), but they are not inferior in taste to their southern counterparts. Often the resulting watermelons and melons are more aromatic and sweeter than imported fruits.
Let's consider the main features of these crops:
- Growing melon in a polycarbonate greenhouse requires maintaining a certain air temperature. At 18 degrees and above, seeds are able to germinate. The development of this culture occurs best at 28.. 35 degrees;
- To maintain the normal functioning of watermelons in the greenhouse space, a temperature level of 30 degrees and above is required;
- At night, in a polycarbonate structure, the air temperature for melons and watermelons should remain at 18 degrees;
- For good growth and development of watermelons in a greenhouse, the soil should not be too saturated with water; these plants tolerate dry soil better. Growing melon in a greenhouse follows the same principle - the soil does not need to be too moistened during development;
- Watermelons and melons develop well in conditions of moderate humidity - about 60%. This level applies not only to the air inside the polycarbonate greenhouse, but also to the soil;
- The seeds of melon plants must be adapted to the climatic conditions of a particular area, so the harvest of these crops will please you at the end of the season;
- Varieties with large fruits require especially careful care. During all months of active growth, maximum comfortable conditions should be maintained for melons and watermelons.
In order for the harvest of melons and watermelons in the greenhouse to please summer residents, the following conditions must be observed for these plants:
- It is necessary to protect watermelons and melons from late frosts in the spring;
- After the fruits have formed, the recommended amount must be left on the bush, which depends on the specific variety;
- Timely fertilization of the soil. Fertilizers must be selected carefully. With similar exposure, growing melons in a greenhouse and cultivating watermelons brings excellent results.
Growing watermelons and melons with your own hands begins with planting seeds in the spring (April). Before sowing melon seeds in the ground, you should soak them in warm water and leave for 24 hours. Experienced gardeners advise adding special substances to the aqueous solution, thanks to which the intensity of seed germination becomes better.
Basic measures for caring for seedlings with your own hands:
- Experts recommend placing in the soil only those melon and watermelon seeds that have cracked after swelling in water;
- Exercise special control of soil moisture; you need to maintain a certain level (about 60%). Avoid drying out of seedlings and oversaturation of soil with moisture;
- Provide comfortable air temperature and lighting for melon and watermelon seedlings, otherwise the height of the plants may become large - they will begin to reach for the light;
- On the eve of placing the seedlings in the ground, it is advisable to pick melons and watermelons on your own. This method promotes better plant formation and increases the growth rate of seedlings.
In particular, a number of measures should be taken in order to improve the condition of the soil in the greenhouse and ensure the reliability of the structure:
- At the beginning of spring, it is necessary to clear the greenhouse of snow and evaluate the integrity of the polycarbonate structure. If there are faults in the structure, it is better to eliminate them on the eve of planting;
- It is advisable to prepare some supply of material to protect the seedlings from sudden weather changes. You can cover melon and watermelon seedlings using dry branches or film material. These measures will allow you to preserve the plants on your own;
- Before planting melons, you can have time to grow parsley, basil, dill and even radishes in greenhouse soil. This effect warms the soil;
- It is advisable to place about 50 grams of minerals, as well as a handful of ash, in a hole made of soil until the seedlings are planted.
Basic principles for planting melons and watermelons:
- The ideal period for planting melons and melons in greenhouse soil is the second half of May;
- When planting seedlings, maintain a certain distance between neighboring melon bushes - about 600-700 mm; for watermelon, the optimal distance is 400-500 mm;
- Saving space in the space of a polycarbonate structure is possible if you place melon bushes on the ground in a checkerboard pattern;
- After planting, watermelon and melon should be watered very delicately - with a small amount of water and regularly.
Plant nutrition is carried out at each stage of growth.
The first saturation of the soil occurs when planting seeds, then the soil of the seedlings is filled with fertilizers at regular intervals during the development process and during the final formation of the melon plant.
Most often, organic and mineral-based solutions are used to feed melons and watermelons; sometimes similar fertilizers are used in dry form.
This fertilizer is excellent for root saturation of melon crops in a greenhouse. For the required concentration of substances, it is necessary to combine the following components in a certain amount:
- 10 liters of water;
- 30 g of potassium chloride;
- 10-15 g of ammonium nitrate;
- 40-50 g of superphosphate.
For the good development of watermelon and melon, the following minerals are necessary: nitrogen, magnesium, phosphorus, sulfur and calcium.
Moreover, the concentration of these minerals in the greenhouse soil must be certain so that there are enough nutrients for the development of plants and fruits.
Watermelons and melons consume vitamin elements at different rates; this directly depends on the period of growth during which feeding occurs.
It is best to fertilize moist soil. After the soil has been saturated with the beneficial composition, it must be thoroughly loosened. For melons and melons in a greenhouse, potassium is most important. The concentration of this substance determines the intensity of flowering, good rates of plant development, crop resistance to all kinds of ailments and the quality of the harvest.
There are two types of organic fertilizer:
- Animal character;
- Vegetable in nature.
These types are ideal for saturating melons and watermelons with a whole range of useful elements. These fertilizers contain all the necessary substances that are well absorbed by melons: phosphorus, potassium salts and nitrogen. Chernozem is excellent for fertilizing these plants, since it is obtained by rotting organic residues.
Bird and cow manure can be used to feed melons and watermelons. However, it is necessary that the composition of this fertilizer is completely rotted, otherwise the manure can harm healthy plants.
Cultivation of watermelon and growing melon in a greenhouse ends in August with the procedure for collecting ripened fruits. In the last 1.5 weeks before harvesting melons and watermelons, you can make their consistency more healthy and improve the taste of the fruit. This result is possible if you stop saturating the soil with moisture for a specified period of time.
Polycarbonate greenhouses are ideal for growing all melons. But still, there are conditions that a summer resident must meet to create a favorable climate:
- It is necessary to observe certain parameters of temperature and air humidity.
- The soil composition must be suitable for growing watermelons.
- Groundwater lying close to the surface can negatively affect the condition of the powerful root system of an agricultural crop.
The plant is also demanding on weather conditions.
If these conditions are met, then it will be easy to grow a watermelon in a greenhouse at the dacha.
A gardener who wants to plant a herbaceous plant with striped false berries on his plot needs to know the agricultural technology for growing watermelons at his dacha in a greenhouse:
- Melons are propagated only by seedlings.
- The greenhouse for growing must have a height of at least 2 m, since this is the distance the plant stems rise up along the trellises.
Landing dates
- Melons are propagated only by seedlings.
- The greenhouse for growing must have a height of at least 2 m, since this is the distance the plant stems rise up along the trellises.
Attention! The best greenhouse for growing watermelons is one made of polycarbonate. Such a cultivation room retains heat well and has no cracks into which cold air can leak. After all, drafts negatively affect the growth of melons. - Before planting seedlings, it is imperative to wash the greenhouse with soapy water and water the soil with Bordeaux mixture or copper sulfate.
When to sow tomatoes if you have a lot of space and light at home
You can start sowing tomato seeds for seedlings in mid-February and sow until March 10 (dates in the Moscow region, move the sowing to the south to February, to the north to the beginning of March). At the same time, give preference to tomato seeds of early, maximum mid-ripening period. Late varieties are suitable for cultivation in the southern regions. In the conditions of the middle zone, even with a warm polycarbonate greenhouse, the harvest of late varieties and hybrids will most likely have to be harvested green and you will not be able to appreciate all their advantages.
Accordingly, when sowing in February, you will have to add light to the seedlings and protect them from the cold. For more information about the features of growing seedlings on a windowsill and choosing phytolamps, read our detailed materials.
There can be several problems with early tomato seedlings:
- you don't have enough room to hold it,
- you will have to replant it additionally to provide the plants with more space and nutrients,
- Tomato plants that are too tall need to be tied up, otherwise you may break them during transportation (if this happens, take cuttings! For more information about cuttings, see our material>>>)
What's good is that TOMATOES easily take root after transplantation at any age . And if you have overgrown, long seedlings, then remove the lower leaves and plant the seedlings at an angle. Read more about planting overgrown seedlings>>>
Tying and shaping melons
If the ovary has reached the size of an average apple, then it is recommended to remove the barren loops. And one culture should have 4-6 ovaries left. It is worth pinching the vine when 5 leaves have formed above the fruit.
There are situations when the whip is covered with soil. As a result, an additional root is formed. To tie a watermelon, you need to string a wire along the bed. They should be located at a distance of 40 cm from each other.
As a result, trellises will be formed. When the length of the stem reaches 35-40 cm, it is tied to trellises. All shoots and ovaries that are below the specified mark should be removed. If the fruit becomes medium in size, then they need to be placed in a net. Its fastening is also carried out to the trellises.
What types of remontant strawberries there are for greenhouses can be found in the article.
How to plant and grow remontant strawberries is indicated in the article.
How to plant strawberries with seeds at home is indicated in the description of this article here: //gidfermer.com/sadovodstvo/yagody/vyrashhivanie-klubniki-iz-semyan-v-domashnix-usloviyax.html
In this video you can see how to plant strawberries with seeds.
To obtain a high yield, it is important to ventilate the heifer. If high humidity is present, there may be a risk of developing various ailments. Harvesting can occur 4 days after the last watering. A ripe watermelon is characterized by the presence of a yellow spot. The finished product should not be picked; it is recommended to cut it off.
Pollination
If the greenhouse will be ventilated, artificial pollination is not recommended. But there are situations when insects fly around the greenhouse. In this case, care must be taken to create artificial pollination.
It is necessary to find large male flowers, pick them carefully, tear off the petals and place them on the stigmas of the female inflorescences. It is recommended to repeat this manipulation several times. The best time to do it is morning.
Do not delay pollination. The reason is that male inflorescences live very little. If female flowers lack pollination, then there is no point in waiting for fruit. Growing watermelons in a polycarbonate greenhouse is a great opportunity to get a high and tasty harvest. You should not hope that the melon will turn out to be large. As a rule, in a greenhouse, even with proper care, the fruits are average, but the taste is excellent.