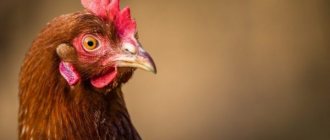
With the arrival of winter, schools and kindergartens made birdhouses for beautiful birds. Not only to watch them with interest, but also to take care of them. With the advent of newfangled gadgets, children began to forget about nature and caring for it, about our little brothers.
Wooden ones have been replaced by feeders made from plastic bottles, which can be easily made with your own hands in a couple of minutes. Don't put off until tomorrow what you can do today. Let's get started?
Value
The winged ones fly closer to people, hoping for help with food, because in cities you can always profit from something.
Don’t forget to tell your child why all this is being done. By teaching a little person such a virtue, responsibility and love for fauna are established. This helps to form a full-fledged personality.
Perhaps this will develop the skills of a naturalist. And he will more often spend time in nature, breathing fresh air, beneficial for a growing organism.
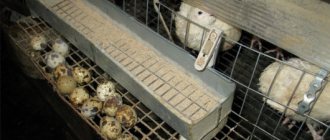
Making a feeder for bees
If you are a beekeeper, then feeding bees is also familiar to you. Thanks to the same 5 liter bottle, you will have a practical bee feeder. This is a simple and economical option. It will take record time to create the product – no more than 5 minutes. Surprised? It's all about simplicity of design. What do you need to do?
- Take a nail and heat it on fire. It should form holes 1.5 mm in diameter in the bottle.
- Step back a few cm from the bottom and start making holes. The more there are, the more bees can eat at the same time. The consumption will accordingly be higher.
- If you made a little extra, then seal them with tape.
- Immediately before installing and pouring syrup, cover absolutely all holes with tape.
- Now all that remains is to install the bottle in the hive and remove the tape. Due to physical laws, the syrup will not leak out of the bottle, and the bees will be able to feed on it.
If a 5 liter bottle is too much, you can use a 1.5 liter bottle. The essence is the same, so the principle of operation does not change. Everything is very simple and not ordinary. And thanks to this feeder, your bees will always have access to food. You will notice that all you need for the job is a nail and the bottle itself.
Advice! Since the nail will be completely hot when heated, you can hold it with pliers. This way there will be no burns on your hands.
You can see exactly how your bee feeder will work in this video.
Materials
Almost everything can be found at home. Therefore, there will be no problems. Buy the rest at the nearest supermarket.
If there are milk cartons left, you can build a birdhouse, as was done in the recent past.
And the school Trudovik taught me how to make a durable birdhouse out of wood with my own hands, and now you can make one from a plastic bottle.
What will you need?
- awl;
- One and a half liter container will be just right. There are five-liter versions;
- stationery knife;
- twigs;
- scissors;
- strings or ribbons for hanging;
- stickers for decoration;
- paints;
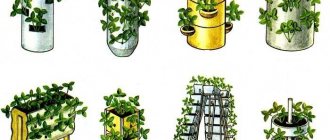
House made from 5-liter containers
Every home has a large 5-liter container of leftover water; you can also purchase it at any store. Making such a feeder will not take much time; the technology is simple and understandable to everyone. The large volume allows you to make several holes, which will make it possible to fit several birds at once. The holes can be cut horizontally or vertically, depending on how you plan to place the container on the tree:
- Vertically.
We count 5-7 centimeters upward from the bottom, mark the boundaries with a marker and make two holes in the shape of a square or rectangle. It is easy to tie the container to the tree using fishing line, cord or rope by the neck. Vertical - Horizontally. You need to make a fairly wide hole on the bottom side, then do the same on the neck side. To secure the bottle to the surface, you need to carefully cut two holes in the wall with a knife, you need to pass a rope through them in order to tie it later. The feeder can be swayed by the wind, so it is worth placing a small stone or piece of brick on the bottom to create balance and weight, and place the food on top.
Horizontal
If the edges turn out to be sharp, they can be sealed with electrical tape or tape so that the birds do not get hurt and fly away. Some people simply burn the edges with fire to melt the plastic and make it smooth. Holes can be made in the lid itself, which also makes it convenient to hang the product.
In these conditions, you need to use a thick lace, tying it with a loop and a large knot. How to make a bird feeder from a plastic bottle with your own hands is shown in the form of photo instructions in the video below.
Bright design
The container can be decorated with acrylic paints as you like. It is better to choose warm shades, adding stickers for decoration, if desired.
To make your creation stand out among the trees and snow, you can make a fly agaric feeder with your own hands from plastic bottles.
For such a simple and colorful creation you will only need 2 bottles of different diameters. We turn the lower third of the larger diameter cut from one bottle over and cover it like a cap on the cut two-thirds of the second.
We fasten both components of the structure together with a long ribbon, making holes in the upper part.
If you paint this cap red and chaotically draw large white circles, you will get a fly agaric birdhouse. Through windows are cut in the lower part and treats are poured in.
All that remains is to hang it on a powerful branch and wait for guests.
Let's get started
Tools you need are a bottle, a utility knife, rope, a felt-tip pen and tape.
Photo:
Master class on making a feeder. Plastic bottles must be clean, the volume does not really matter. Using a felt-tip pen, outline the outline of the future hole, or two, if desired. If you cut two holes, you need to leave 1.5-2 cm jumpers between them.
The larger the holes, the larger the birds will be able to fly to visit. It is advisable to seal the holes with tape so that the birds do not get hurt.
But there is another danger: birds can peck at the tape and die from it. It is best to tie the sharp edges with thick yarn or melt them with fire. Holes are made in the bottom of the bottle to drain water. The rope is tied to the neck, food is poured inside and the feeder is ready.
Article on the topic: Sleds on 2 knitting needles without a seam: diagrams with descriptions and videos
The best feeder with dosed food, then you don’t have to check every day whether there is still food for the birds. Stepping back a little from the bottom, a small hole is made in the bottle. The bottle filled with food should be placed on a flat stand or bowl.
Teremok
Not a tricky product for tits - for food in winter, and as a drinking bowl in summer.
Stages:
- The top is cut off; this will be the roof of our tower.
- The height of the bottom needs to be reduced by about a third.
- When cutting out the window, bend the “tongue” of the plastic outward, forming a kind of bridge for landing. Make a larger window so that not only small winged birds can enjoy the food.
- You can decorate the details if you wish. To do this you will need paints of any palette. They also use stickers or self-adhesive film, etc.
- Next, cut two holes in the bottom part of the house and one in the top part - the plug.
- We stretch a long rope through the top.
- Your creation is ready.
All that remains is to pour the food and hang it on a tree branch in the yard of the house or in the park. Now you can wait for guests and watch them. They will quickly fly in to feast on you.
How to make a bottle bird feeder
The plastic container must be rinsed and dried. Depending on the volume, one or more windows are cut out. First, a contour is applied to the cut sites - you can cut it by eye, but with markings the result will be more accurate.
Advice! Some containers initially have a relief from the drink manufacturer. You can use it instead of an outline and cut along the depressed edges of the plastic.
Before you begin, you should prepare a starting hole using an awl or a thin knife. If there are none, carefully pierce the plastic with a blade, trying not to create torn edges. However, you need to seal the borders of the windows in any case.
Colorless tape will do, but it’s more convenient to use electrical tape to handle the edges. Contrasting ends make the design more neat and aesthetically pleasing. Another option is to use offcuts of cable insulation.
The last step is to prepare the feeder for hanging. There are several mounting options:
- make through holes in the upper part, pass a rope through them;
- drill a hole in the lid, thread the twine, tie a fixing knot on the inside;
- hang it by the carrying handle on the bottle itself.
The whole process, with proper skill, takes no more than an hour. The total production time and labor costs depend on the volume of the bottle used and the design of the feeder.
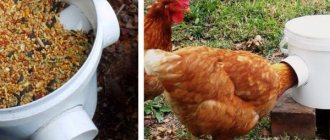
Simple bird feeder made from a plastic bottle
A universal option is a vertical design from a bottle of any capacity. Before starting work, it is better to put the plastic on its side and secure it so that it does not slip out of your hands. First, markings are applied to the surface. The bottle is pierced with an awl anywhere along the contour. An alternative is to make the cuts with a utility knife. Cut off excess plastic along the contour.
Getting started - preparing to cut out the outline
It is worth making small holes at the bottom - with a thick needle or the tip of a blade. They are needed to remove excess water from the feeder. If the holes are too large, the design will be of little use - patience and thoroughness are important at this stage.
Thread the rope. The length should be equal at both ends. The holes are not made too loose to prevent distortion from strong gusts of wind.
The rope must be strong enough to withstand loads and bad weather.
You're done - all you have to do is pour food into a homemade bird feeder from a plastic bottle and hang it on any tree in the yard.
The larger the capacity, the easier it is to work with. The smallest scope for possible improvements to the basic model is for small-volume bottles.
Attention! The finished feeder needs to be hung at a sufficient height. A safe level is 1.5-2 m above the ground, at a distance from thick branches.
Bird feeder made from a plastic bottle 1 liter
Liter and 1.5 liter bottles are not the best option for a feeder due to their small size. However, such containers are most often at hand, and creating a feeder becomes a successful method of recycling them. The manufacturing process is as follows:
- Place the bottle horizontally. Measure 5 cm from the bottom edge on opposite sides and make a mark.
- Make 2 punctures with any available object. A small container is pierced with a regular push pin.
- Insert a wooden stick into the holes. It is desirable that the sticks move with difficulty.
- Measure the same distance upwards, repeat the procedure, but this time perpendicular to the lower pole.
- Prepare drainage with a needle or thin cuts.
- Make round holes for feeding. The optimal height is 5.5-6 cm above each stick. Make the diameter sufficient for the birds to reach the food.
All that remains is to pour the seeds into the bottle and secure it in one of the following ways. It is better not to use a hanging lid in a liter bottle - it is convenient to fill the feeder through it.
If you hang it by the lid, it will become inconvenient to pour in food.
How to make a bird feeder from a 2 liter bottle
A two-liter bottle is a good option for a feeder. It is quite stable and less bulky than a larger container. Compared to a liter bottle, it is more comfortable both for birds and for handling. If the container is of a standard elongated shape, you can add an additional tier - another perch.
The barrel-shaped shape allows you to make through holes - there will be enough space at the bottom for food. It is worth choosing bottles with a handle on the neck - hanging a finished feeder from it is easier than making extra holes in the plastic and securing a rope.
Bird feeder made from a plastic bottle 5 liters
A five-liter bottle is the most suitable option for manufacturing. It has a wide bottom and sufficient dimensions to place the structure horizontally. Due to its dimensions, the container holds more feed and is easier to handle.
Windows are cut on all four sides - it’s more convenient if the body is rectangular. The dimensions allow them to be made as large as possible - the main thing is that this does not threaten the overall integrity of the structure. Unlike smaller containers, the perches can be placed along the windows.
Advice! It is not necessary to completely remove the plastic. If you make cuts on three sides and bend the edges up, you will get a canopy from bad weather - it will be more convenient for birds to use the feeder during rainfall.
Electrical tape around the edges protects the birds' feet from injury
Beautiful bird feeder made from a plastic bottle
Decorating plastic feeders is a fun activity for children and an opportunity to give the product a more aesthetic appearance. Over time, the plastic wears out - a dirty bottle with holes on bare branches looks unsightly. You can hide flaws with the help of imagination and additional design.
A simple option is to cover the container with colored tape. Using a colorless ribbon, you can wrap the bottle with tinsel and appliqués. You can also decorate the perches - instead of sticks, take colored pencils or wooden spoons, which will make a bird-friendly and unusual-looking perch.
With the help of paints and imagination, you can stylize the bottle to resemble any object of a similar shape - an architectural work of art, a rocket, and so on. Waterproof paints that can be additionally varnished are suitable for painting.
Bird feeder made from a plastic bottle Owl
One of the most common crafts is a bird feeder made from a 5 liter plastic bottle in the shape of an owl. There are few differences from the usual manufacturing scheme. Only 2 holes are cut - on the sides. Evenly bent plastic edges are the “wings” of an owl. The bottle can be painted in the color of feathers or made of a soft material. Eyes and beak - draw or build from scrap materials. For example, discs and buttons are used for the eyes.
To create an owl you don’t need special materials - everything is at hand
Hopper bird feeder made from a plastic bottle
The five-liter version is modified by adding a dispenser to it. The feed is topped up as the main container runs out. You will need to take an additional half-liter container.
- The dispenser should be smaller in volume, but the same height as the main chamber.
- The bottom of the smaller bottle is cut off, and several holes are made in the neck through which food can freely pass.
- The small bottle is inserted into the main structure with the neck down.
The bottom should rest tightly against the neck of the five-liter feeder - feed is poured into it through the open lid. In this case, the height of the holes in the walls is taken into account - the food from the dispenser fills the bottom without getting out.
Horizontal bird feeder made from a large plastic bottle
The version from a five-liter container can be placed horizontally due to its dimensions. In this case the design is different:
- holes are made along almost the entire length;
- the perches are threaded lengthwise, parallel to the bottle;
- 2 places for hanging are required - in the bottom and neck area.
Filling a horizontal plastic feeder is less convenient, but it turns out to be spacious and stable - the feed lasts a long time, and with strong twine or thick rope it does not swing even with strong gusts of wind.
Bunker
Quick and easy creation. One filling of food will last a long time. You don't have to cut the container at all. It is enough to make small holes and thread the twigs across and through. These are kind of landing perches.
Stepping back half a centimeter from the skewer, you should make small holes. Birds will get food through them. To do this you will need a hot awl or scissors.
Transparent plastic allows you to understand when food is running out and the wider the neck of the feeder, the more convenient it is to add food. One such bunker will feed a whole flock of hungry tits.
Instead of wooden perches, you can use durable disposable spoons for a more fun design. These homemade feeders made from plastic bottles look very colorful, photos of which can be found on the Internet.
And the coloring options will pleasantly surprise you, because there are many who create masterpieces from this. There is a huge field for creativity here.
Plastic house in the form of a bunker
We will need one 5 liter container and two 1.5 liter bottles. From tools and materials, you should prepare sharpened scissors or a stationery knife, a marker, cord (or rope) and electrical tape. Do it yourself:
- On the bottom of a large container, we make markings with a marker for future holes, through which feathered guests will enter the feeder. You also need to make a hole so that a 1.5-liter bottle can fit through.
- The largest hole should resemble the letter P in shape, while the upper part will be a visor that will protect the contents of the feeder from snow, dirt and rain getting inside. Be sure to cover all edges of the holes with tape, adhesive tape, or tape to prevent the birds from getting hurt. The plastic can also be slightly melted with fire.
- On a one and a half liter bottle, which we plan to place inside a large container, we cut holes only in places where it will come into contact with the bottom of a 5-liter container. From here the food will fall to the bottom of the container, which is very convenient for feeding birds.
- We make a round hole at the top of the lid of a large container so that the neck of a small bottle rises above it.
- For the second 1.5-liter bottle, you need to cut off the neck and a little of the top so as to get a funnel. We put this same funnel on the neck of another bottle that is already inserted. Then screw it in with a cork. A bird feeder made from plastic bottles is shown in the photo.
- Ready! We fill the bunker feeder with grain and tie it to a tree branch with a cord, rope or fishing line. All birds will definitely appreciate this dining room! You can see the manufacturing process in the video below.
- You can paint any pattern or ornament on the surface of the bottle with acrylic paints. If you are making crafts for children in kindergarten, you can draw animals, birds or flowers.
- The entire bottle can be decorated with bright patterns of any shade. Here you need to show a little imagination and creativity.
Acrylic paints
- If you decide to make a hopper feeder, paint the large container green. Then cut out several plastic bottoms from small bottles, these will be flowers. They need to be painted in different shades and glued to a large container. You should have a bright and colorful bouquet.
Plastic bouquet
- For decoration, you can use any available materials and even children's toys. For example, a flying plastic saucer can be used as a lid for a feeder. At the same time, you can also draw pictures or simple patterns on the bottle itself. Use markers, felt-tip pens or permanent acrylic paints.
Cheerful decor
- If you are a real needlewoman and know how to knit or weave macrame, be sure to make a beautiful case.
A bird feeder made from a five-liter plastic bottle can also be tied with multi-colored threads, fixing them to the surface with glue. Don't forget to let the masterpiece dry thoroughly before using it. This product can decorate any yard, park or tree. In a case - You can use a bee theme to decorate the fixtures. You can paint a large container brown, yellow and black, decorating this composition with glued toy bees.
Bee Feeder
- Decoration in Russian folk style is also welcome. To do this, you can use straws and strings.
- Don't be afraid to experiment with materials. Plastic dishes, milk cartons, old dishes and even tin cans are suitable for creating feeders.
From tin cans
Mass
A five-liter canister is suitable for a bird restaurant and resting place.
Types of fastenings:
- Vertical hanging;
- Horizontal fastening with a large slot in the center and a roof, or the top of the container is cut off to create a tunnel.
Large container sizes allow you to use your imagination and come up with your own custom birdhouse.
It is important to cover all cut, scratched edges of the craft with adhesive tape or tape so that the winged ones are not damaged.
Don’t forget to trample the snow under the feeding area; the titmouse may peck the spilled grains.
Automatic feeder
Using a similar principle, you can make an automatic feeder that does not need to be replenished frequently. It is slightly modernized, and to create it you need to take another bottle, only 1.5 liters. It will serve as a dispenser. As for the set of tools, it is identical.
So, the essence of the work does not change. The first preparation is made according to the same principle and with the same actions. You can make 4 windows, 3 or two, it’s up to you. As usual, it is better to insulate the edges. Having such a preparation, we can make the feeding process automatic. To do this, you only need to correctly cut the 1.5 liter bottle. Its bottom needs to be cut so that it fits inside a 5 liter bottle. In this case, its neck should rest against the bottom of the 5 liter bottle, and the top should be under the neck. So, you can replenish the dispenser by opening the lid and pouring food into it.
The neck of a 1.5 liter bottle needs to be cut so that the millet seeps to the bottom as it is eaten. To do this, vertical cuts are made and part of the neck is removed. This way, the contents will flow from the dispenser into the bottle. All that remains is to secure the structure and install it in the right place. In the old fashioned way, the product can be further decorated.
Treats
As a rule, such guests are not picky. They will be happy to taste your treats. Any cereals, seeds, or bread crumbs will do.
Or buy special food at the pet store, which contains a mixture of different grains that are so necessary for proper nutrition.
No matter how strange it may seem, birds love lard, which is simply suspended on strings, secured to tree branches.
Pedal feeder with dispenser
In principle, this is the same feeder made of plywood or wood, but with one special solution. A device is being created that the chicken will have access to only at the moment when it steps on the pedal. The bird steps on the pedal, and then the flap rises. While this flap is raised, the chicken can peck food; as soon as the bird leaves the pedal, the lid closes.
Attention!
When constructing such a feeder, you must understand that the mass of the tray flap should be less than the mass of the chicken itself. Otherwise, the mechanism will not work.
Thus, not only do you not have to worry about the grain being scattered throughout the house, but all the feed will not be exposed to any external factors, since it will be tightly closed in the feeder. Such a structure can be installed not only in the poultry house itself, but also in the yard, if it is treated with a waterproof solution so that nothing happens to it from the rain.
We believe that this is the most practical option, since by using it you can always be sure that the bird will have enough grain for a long time. But it is also much more difficult to make, since the entire structure is bolted. It is best to find video instructions and repeat them exactly, or buy a similar feeder in a store.
Gratitude
You don’t often see birdhouses in parks and squares. But now you know how to make bird feeders from plastic bottles with your own hands.
You don’t have to stop at just one, make several and hang them in different parts of the park or local area.
If you fill it with a small amount of food, so that you come every day and add more, then over time, the birds will get used to the place and time of feeding, and you will be interested in watching them.
With the arrival of spring and summer, the birds will definitely sing songs of gratitude to you.
Feeder with plastic saucer
Let's get acquainted with another original idea for independently constructing an autonomous bird feeder. For our work, we will need a bottle with a volume of up to 2 liters, as well as a plastic lid or plate so that the bird food can easily linger. Let's get started:
- At the central point of the plate you need to make a hole equal in diameter to the cap of our bottle.
- Using a soldering iron, we make holes at the top of the bottle, through which the grains will spill out in the future.
- We also make a small hole in the center of the bottom of the bottle, insert a wire through it, tying it into a knot from the inside.
- On the outside, you need to make a loop out of wire to make it convenient to hang the structure from the tree.
- We put a plate on the neck of the bottle, pour the grain inside and screw the lid on tightly.
With lid
- Don't forget to check that the plastic attachment fits snugly on the feeder. Also make sure that the grain spills out easily through the holes.
- We place our feeder where we planned it and wait for the birds to visit! Making a similar bird feeder from a 1.5 plastic bottle is shown in the video below.
Making feeders is a fun and at the same time useful activity. You can do this with your child too, decorating bird houses with beautiful designs and bright plastic flowers. Don’t forget that in this way you are doing a good deed and helping birds survive the winter.
Making bird feeders from plastic bottles: photos and videos
3.9/5 — Ratings: 38