Features of planting grapes from cuttings
Growing grapes is a very painstaking and complex process, especially if it is carried out in the Russian climate. Initially, you need to choose the right cutting - the yield and viability of the bush will depend on this aspect. So, you should pay attention to:
- A grape variety, in which case you need to focus not only on its taste, but also on adaptation to growing in a certain climate.
- Buy only well-ripened vines, this can be determined by its appearance: the minimum length should be 1 m, and the diameter should be approximately 6-10 mm
- You should try to bend the selected vine, and it should make a characteristic cracking sound. This is another proof of sufficient maturation, because... a similar sound is produced due to the rupture of cork fibers.
- There must be at least one bud on the cutting, otherwise it will be impossible to get a new bush from it.
We recommend reading
- Homemade grape wine
- What you need to know about grape propagation
- Rules for growing grapes - choosing a variety, location,...
- When and what to feed grapes?
- Preparing grapes for winter - a list of necessary work
- How to plant grapes correctly: tips and practical...
- Formation of grapes - from the simplest scheme to...
- How to grow grape cuttings at home
- Kilcher for grapes
Wine glasses
When is the best time to plant grapes?
If you decide to start growing grapes, then you need to understand when you can plant the crop in open ground in the fall or spring, as well as the calendar time frame for the procedure.
in spring
The timing of planting grape seedlings in the spring is determined by air temperature. Planting should begin when the thermometer rises to 15⁰C with a plus sign, and the soil temperature is +10⁰C.
Similar conditions are necessary when planting grapes from cuttings in the spring. When determining the planting day, you need to focus on the climate of the region in which the crop will be cultivated and the weather on the day of the procedure. The timing of spring planting differs in different areas. The optimal timing is:
- South of the country. Planting is planned for early to mid-April.
- Middle lane. In these regions, grapes are planted in the soil at the zenith of May.
- Ural, Siberia and Leningrad region. Planting here often occurs in late May-early June.
in autumn
According to established tradition, in most regions of Russia, planting grape seedlings in the fall is carried out in October.
Attention!
This month is also suitable for planting grape cuttings in the fall.
In October, the temperature ranges from 5 to 15⁰С, which has a positive effect on the planted plant. It is necessary not to be late with the start of planting work, postponing it until the frost period. If less than 3 weeks remain from the day of planting to a steady cold snap, there is a high probability that the young bush will not have time to take root and will freeze in the winter.
It is undesirable to plant grapes when the temperature drops sharply. If there is a need to carry out planting work in cold weather, you need to take care of good shelter for the young bush. The autumn planting dates for different regions are as follows:
- South of the country. Planting of shrubs begins between the second ten days of October and the end of November.
- Moscow region. Autumn planting of grapes is planned for the first half of October.
- Ural, Siberia and Leningrad region. Grapes are planted here at the end of the first autumn month.
There is no clear answer to the question of when it is better to plant a vineyard: in autumn or spring. Each of their terms has its own advantages and disadvantages.
Advantages and disadvantages of spring planting
| Strengths | Flaws |
| There is no need to be afraid that young bushes will die from frost. | It is difficult to purchase a good seedling of a zoned variety, because... the best copies are sold out in the fall, and the remainder are sold in the spring. |
| In spring, it becomes warmer every day, which has a positive effect on the adaptation and rooting of the cuttings. | A gardener has a lot to worry about; in the spring, he may not have enough time and energy for quality planting. |
| After the snow melts, the soil is saturated with moisture and nutrients dissolved in it. | The period of spring planting of seedlings coincides with the awakening of pests and various dangerous diseases, so preventive treatment will be required. |
| The planted bush may die from the effects of returning night frosts. |
Pros and cons of autumn planting
| Advantages | Flaws |
| You can purchase healthy planting material. | If the seedling has not taken root and the winter is harsh, it will most likely freeze. |
| Wide range of different varieties. | If it gets sharply cold in the fall, the outcome will be sad. |
| A gardener has a lot of free time in the spring. | |
| Thanks to frequent autumn plantings, you can reduce the number of waterings. | |
| Due to the slight temperature difference between night and day, the seedling takes root well. | |
| Autumn seedlings that survive the winter are hardy. |
Important nuances
To plant grape stems in the fall, you need to buy them or prepare them yourself. If the choice is made on the second option, then care should be taken in advance to obtain healthy and strong material. Cuttings are cut from mother bushes that have shown the best yield. They should also not show any signs of illness.
Cuttings that have even the slightest mechanical damage should not be used for autumn planting of grapes. Those with elongated internodes are also not suitable. Thin and crooked material should also be rejected. If we are talking about purchasing, then it is advisable to purchase cuttings from those plants that have shown good fruiting in the growing region. Acclimatized chibouks take root much better.
It is necessary to take planting material only from the vine that is ripe. There are several signs. With their help you can understand this :
- The branches of the plant become light brown.
- You can take the escape in your hand. The green one will be much cooler when compared to the one ready for cuttings.
- The minimum diameter of the pipes is 10 mm. They must have at least 3 living buds.
- You can check the readiness of the plant by placing it in an iodine solution. Mature shoots will change the color of the liquid. The solution will turn bluish.
- Fat shoots are not suitable for cuttings, as they will not be able to reproduce the root system.
- The length of the shoot should be about half a meter.
Important! Mother bushes need to be selected in advance so that in the autumn they are not confused; you can put some marks. Preparation of cuttings begins at the moment when all the foliage falls from the vineyard. They must be taken only from vines that have produced a good harvest this season.
Preparation of planting material
The length of the cuttings for planting should be at least 20 cm. The optimal cutting thickness is 8-10 mm. It may have 1-5 buds.
Preparation of planting material includes the following steps:
- Cutting cuttings.
- Storage.
- Preparing for landing.
When preparing cuttings for planting, special attention is paid to their storage. For planting, cuttings of only those grape varieties are selected that are intended for cultivation in the area planned for growing the plant.
Subtleties of propagating grapes by cuttings
Cuttings are beneficial both in terms of ease of execution and for the future harvest. Grapes take root on green and woody shoots. Planting cuttings are taken from them. In the spring, you can grow a young plant seedling from them.
Harvesting cuttings
The future propagation process depends on how the cuttings are prepared. Events are held in the fall, when seasonal pruning of bushes is planned. The preparations are selected from healthy plants that bear fruit. If the vine is without berries, it is likely that the new plant will not produce a harvest or it will be very meager. There are several nuances that need to be taken into account:
- cuttings are taken only from well-ripened, woody vines;
- the bark must be intact, without cracks or other damage;
- the bush and neighboring plants adjacent to it should not get sick;
- the donor branch should be green and 8-10 mm in diameter.
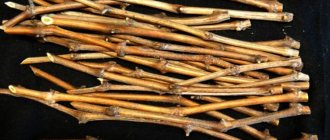
Grape cuttings are cut from the middle of the stem, because the lower part is rarely fertile, and the upper part simply does not have time to ripen sufficiently. The selected material must meet the following requirements:
- length of cuttings - 30-45 cm;
- branches are straight or with minimal bends;
- leaves and tendrils are completely removed;
- hard brownish bark;
- Each cutting must have at least 3 buds.
All collected seedlings are treated with potassium permanganate or iron sulfate.
Storing cuttings
For cuttings harvested in the fall, it is necessary to create suitable conditions for wintering so that they can be preserved until planting in the spring. They are folded evenly and tied to each other. If the varieties are different, a label with the name of the species is attached to each. Seedlings are stored in several ways.
A trench is dug in the ground up to 50 cm deep, with a length corresponding to the length of the cuttings. The location for the trench is chosen so that groundwater does not lie near the surface. A 10 cm thick layer of moistened sand is poured onto the bottom of the hole. Cuttings are laid on it and 40 cm of soil is filled. The wintering area of the branches needs to be insulated. Sawdust, straw, peat or dry leaves are laid on the surface of the ground. When frost sets in, the storage is covered with film.
Storing grape cuttings in autumn
Another option for storing grape cuttings is in the refrigerator. This could be in the door or on the top shelf. Before laying, the branches are soaked in water for 2 days, then placed in a bag so that there is access to air.
You can store cuttings in the basement. Plastic bags are filled with sawdust, into which the cut stems are placed vertically. The bag is tied, but not tightly, so that the branches can breathe. Throughout the winter, you need to ensure that the sawdust does not dry out and moisten it as necessary.
Cuttings
Planting material for growing grapes can be harvested in autumn and spring. Spring propagation of the plant is carried out by cuttings and seedlings. The difference between them is that the first ones are cut from a fruit-bearing annual vine, and seedlings are grown from cuttings. They are cut from two-year-old central shoots 30-40 cm long. The cuttings must have at least three living buds.
When choosing grape bushes for harvesting planting material, you should take into account the color and thickness of the vine. Its bark should be brown without dark spots. The thickness of the vine at the cutting site is 8-10 mm. The cut cuttings should not show any damage or signs of any disease.
General rules for cutting cuttings
Regardless of what time the planting material is harvested, certain rules must be followed:
- cuttings are taken from harvest-producing vines;
- the vine must be healthy, moist without mechanical damage;
- the maximum thickness of planting material is 1 cm, and the minimum is 5 mm;
- the number of living buds on a cutting is 2-5;
- cutting of planting material should be carried out only with clean and well-sharpened garden scissors;
- the cut of the plant was even and had smooth edges.
In addition, immediately after cutting, disinfect the planting material. To do this, they use some types of pesticides or treat them with sulfur dioxide. Treatment of cuttings with sulfur dioxide can be carried out by fumigating the plants or immersing them in a creamy mass. Good quality of plant processing can be achieved using methyl bromide.
Features of autumn cuttings
When harvesting planting material in the autumn, smooth areas of the vine located in its central part are selected for cutting it. A high-quality cutting should be hard. When bent, it makes a characteristic cracking sound. 2-4 live buds are left on the body of the cutting and all leaves and tendrils are removed from it. On the sides of the cut out areas of the plant, grooves are made with a sharp object.
Attention!
Autumn grape cutting is carried out after leaf fall.
Vine defoliation occurs at different times in regions. It often falls in the second month of autumn. In areas with early frosts, cuttings are harvested in September, in the southern regions - at the end of October-November.
Features of spring cuttings
For spring cutting, use a vine growing on the sunny side. It is more solid and viable. The cut is made at a distance of at least 2 cm from the kidney. Planting material designed for long-term storage should have a length of 1-1.3 m.
The cuttings selected for grape propagation must have at least two live eyes.
Attention!
A cutting cut in spring loses about 3% of moisture every day. If the vine has lost more than 20% of the moisture it contains, the cuttings should be soaked in water for 10-12 hours.
After cutting the planting material, it must be treated with a 3% solution of copper sulfate.
Questions from mail
Marina, 42 years old, Tver.
Please advise the easiest way to propagate wild grapes at home. It’s so beautiful at the neighbors’ dacha both in summer and autumn.
Ornamental wild or, as it is also called, “maiden” grapes take root without any stimulants with almost 100% probability.
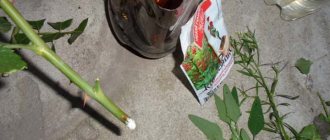
- In May-early June, when last year's shoot began to grow, it is cut into chibouks with 2-4 nodes. It is best to choose areas where there are already root primordia in the nodes (see photo).
- Practice has shown that it is most convenient to care for a seedling growing in an individual container. For cuttings of virgin grapes, this is a pot with a volume of 1.0-1.5 liters.
- For rooting, use a mixture of peat and sand in a ratio of 4:1.
- For cuttings without leaves, the lower node or the entire “heel” with last year’s wood is buried.
A seedling in a pot can overwinter even under snow. They are planted in a permanent place using the transshipment method in the spring, before the leaves bloom.
Nikolay, 49 years old, Tambov.
I want to grow Isabella grapes for juice, wine, and compotes. In our area it spends the winter without shelter. They advised me to cut grape cuttings in the fall and root them. Can I plant cuttings directly into the ground?
The Isabella grape variety is an unusually hardy vine that is not afraid of frosts down to 30 degrees, does not suffer from traditional fungal diseases and, what is very important, tolerates waterlogging without the formation of foci of rot. This is the only mid-latitude grape variety that can be propagated by planting directly into the ground.
You can’t count on a large yield of suitable seedlings (no more than 50%), but the lack of hassle with storage and rooting adds to the attractiveness of the autumn rooting method. When pruning the vine, you get plenty of cutting material - planting can be planned “with a reserve.”
In order for the planted chibuki to overwinter without problems, it is necessary to cover them for the winter with dry leaves, straw, spruce branches and cover them with burlap or spunbond.
Ruslan, 38 years old, Lipetsk.
I sprouted autumn grape stems every year, everything worked out well. For the first time I decided to try to root green cuttings and nothing worked, although I did everything according to the rules
The technology for rooting green (summer) and autumn woody grape stems differs significantly. The main difference is the requirements for environmental humidity:
- autumn chibouks require a minimal amount of water to form roots;
- green summer chibouks evaporate water from their entire surface and constantly require moisture, which is difficult to control in the summer.
Propagation of grapes by cuttings in summer requires constant attention. Controlling temperature and humidity in a greenhouse-school takes a lot of time; even professional winegrowers prefer to harvest chibouks in the fall.
Storage of planting material
The choice of method for storing cuttings depends on the individual capabilities of gardeners and their preferences. Before storing, the cuttings are put into bundles and tied. At this stage of preparing the material for storage, it is necessary to avoid loss of moisture from the plant. The same task must be performed during long-term storage of the material. Store cuttings at low temperatures:
- in a refrigerator;
- buried in trenches;
- in cellars or basements.
Each of these methods of storing material has its own advantages and disadvantages. The temperature in refrigerators and cellars is 4-5 ºC. At this temperature, planting material loses a significant percentage of moisture. To prevent the cuttings from drying out, they are wrapped with a damp cloth and polyethylene.
Attention!
At a temperature of 8 ºC, the plant begins the process of swelling of the buds.
When storing vines in cellars, they are placed in boxes with river sand, which are packed in plastic film. Periodically, the boxes are opened and the cuttings are inspected to identify mold on them. When inspecting the material, rejection is carried out. Dry moldy cuttings must be disposed of.
Kilching techniques
The ideal way to germinate autumn cuttings is by kilching - an artificial temperature difference. At a warm temperature, roots form, and a lower temperature prevents budding and the formation of root callus. Agronomists offer several proven methods for growing grapes from cuttings in the fall.
Use of plastic bottles
The containers are filled with cold and warm water, and the lower part of the cuttings is wrapped with damp cloth and film. The upper part of the material, cut in the autumn, is wrapped in polyethylene. The side with the roots is placed in warm water, and the top in cold water. Sprinkle sawdust on top and close. The water temperature is maintained. After 3 days, the stems are examined - the roots should be ringed with a white formation.
Technology of R. P. Radchevsky
Provides for the use of melt or rain water. It needs to be poured into a 2-3 cm container, put a piece inside and cover with polyethylene. The tank is placed on the south or southwest side of a well-lit room. After 14 days, shoots appear, and then roots. A strong shoot is pruned.
N. L. Puzenko's method
Propagate a separate piece by wrapping one side in a damp cloth with film. The tops remain open. The chubuks are placed on the cabinet, turning the top part towards the sun. The dried fabric is moistened with a spray. The roots germinate in 14-21 days.
Application of sawdust
Wood shavings need to be filled with hot water, cooled and squeezed out. Then the sawdust is placed in a container in a 2 cm layer. Grape branches, cut in the fall, are placed in them, a little more sawdust is poured in, and a film is placed on top of the container. The filler must be moistened once every 3-4 days. The formation of roots occurs unevenly - on some of the material they appear after 14 days.
Kilching in a jar
To propagate a grapevine, you will need a glass jar with a capacity of 3 liters. Place cotton wool at the bottom to a height of 2 cm and fill it with a solution based on water at room temperature, manganese and activated carbon. Check the amount of mixture and add if necessary. Several cuttings are placed in a jar, covered with a bag, insulated and placed on the windowsill. To preserve the quality of grape varieties, lamps or aquarium heaters are used for kilching.
Rooting grape cuttings
Different grape varieties have different rooting times, sometimes quite significantly. But most gardeners' advice is average.
In recent years, many amateur gardeners have been growing seedlings at home by rooting grape cuttings. This method of reproduction is not always simple, but is quite often used.
Cuttings (chubuks) - lignified, from a well-ripened annual vine - are harvested in the fall when pruning grapes, then they are placed for winter storage in sand in the basement or in plastic bags in the refrigerator.
Strong seedlings from cuttings - what you need to know
Even at home it is possible to obtain viable seedlings. Oddly enough, it will be necessary to minimize the manifestations of excessive “care”. It is enough to create optimal conditions for the manifestation of the plant’s potential:
- Roots require warmth to grow: a window sill above a radiator is ideal.
- The cool air from the cold glass helps inhibit the growth of the green shoots of the vine. This is necessary to maintain a balance between the development of underground and aboveground parts.
- Do not overuse watering ! Water only when the soil dries out. It is best to use bottom watering through a tray, so the grapes will take exactly as much water as they need.
- 2 weeks after planting for rooting, seedlings should be fed with complex water-soluble fertilizer such as Master or Kemira according to the instructions (1 teaspoon per 2 liters of water).
Such fertilizing is practiced at intervals of 2 weeks, until the seedlings are planted in a permanent place in open ground.
When to start rooting grape cuttings
Rooting begins in the middle, or preferably at the end of February. This is due to several reasons.
Grapes, like any other plant, have periods of development; in winter this is a dormant period. There is no need to disrupt the natural process. The rest period is divided into deep (organic) and forced. With deep dormancy, which lasts until mid-winter, the vine is less sensitive to frost.
Attention!
During this period, even an increase in temperature and the creation of favorable conditions cannot cause the awakening and blossoming of buds.
From mid-winter, the plant begins to awaken and enters a state of forced dormancy, which lasts until the onset of temperatures favorable for the start of the growing season in the spring.
In winter there are very short daylight hours, and grapes love a lot of light; shoots sprouted in winter without additional lighting will be thin, weak, very elongated and pale green.
Grapes are a fast-growing plant; if you start rooting too early and provide proper care, the shoots will be quite tall, so you will have to restrain their growth in different ways. And this will have a detrimental effect on the young plant.
Based on this, the most optimal time to start rooting grape cuttings is mid-late February, daylight hours are longer at this time, roots will appear by the end of March and by the beginning of May there will be normal, healthy seedlings with well-developed roots and shoots, and you can do without additional lighting and pay attention to the growth of the plant, rather than holding it back.
Methods and rules for propagating grapes
Grapes, like most plants, are propagated in several ways: by seeds, cuttings, layering, instillation and grafting. During vegetative propagation, the new bush takes on all the properties and qualities of the plant from which the donor material was taken. At home, seed propagation of crops is rarely used, because This method is quite labor-intensive and requires certain skills. Propagating grapes by cuttings or layering in the fall is the optimal solution for novice gardeners.
How grapes propagate
Harvesting woody cuttings is the most common way to increase grape planting. It is quite simple to do, although it will take some work. For propagation by cuttings, it is necessary to obtain blanks. You can buy petioles at the market or ask a neighbor.
Propagation of grapes by digging (layering) is chosen if you want to propagate varieties that are difficult to take root. Future seedlings receive nutrients from the adult plant, so they develop well and form a powerful root system.
There are also ways to propagate grapes by digging in woody or green shoots. But they are performed in spring and summer, respectively. The buried branches have time to take root and develop well during the season.
Reproduction by layering is the complete placement of a woody shoot into the ground. The method is used for poorly rooted grape varieties. The process begins in early spring. To do this, select a long shoot at the base of the bush and bury it along its entire length into a ditch up to 20 cm deep, pinning it with wire. The soil should be well fertilized. The ditch is filled in, but not completely. A layer of no more than 5 cm is made above the shoot. Earth is added as new shoots appear and grow and is always moistened. With the onset of autumn, the vine is dug up and cut into several parts.
Grapes can be grafted, but it should be remembered that not all varieties are compatible with each other. Therefore, before the breeding procedure, you need to study the characteristics of the selected species in order to understand whether they will become friends or not.
Preparing cuttings for rooting
For more successful rooting of cuttings, it is advisable to carry out some preparatory operations.
Cut cuttings from overwintered vines with pruning shears immediately before planting. Their length can be different (10-40 cm), which depends on the method of growing planting material.
Before planting, the cuttings are checked for the safety of the eyes and their freshness. The freshness of the cuttings is determined by the appearance of a drop of moisture on the cut when pressed with a knife. If you remove a strip of bark with a sharp knife, the tissue underneath should be green. When cut across the eye, there should be no darkening or blackening of the central bud. Only healthy cuttings are suitable for planting.
For better rooting, cut sections are renewed before planting. For disinfection, it is advisable to keep the pipes in a solution of iron (300 g per bucket of water) or copper sulfate (100 g per 10 l of liquid), potassium permanganate (2-3 g per 10 l) is also suitable.
Soaking cuttings before rooting
If the cuttings are dried, they are soaked before rooting. Soaking is one of the stages of preparing cuttings.
During long-term winter storage, cuttings lose part of their moisture; to replenish these losses, they must be soaked in clean water for 48-72 hours, which depends on the condition of the planting material. This must be done to increase the vital activity of the cuttings.
Soaking can be done in two ways: complete immersion in water or lowering the lower end. The water in the container should be changed twice a day.
Furrowing and blinding of the lower ocelli
There are other ways to speed up rooting, which should not be ignored: furrowing and blinding the lower eyes of the cutting. The essence of furrowing is to cause longitudinal wounds on one or two lower internodes, which increases the flow of nutrients to the wounded areas and activates cell activity. To do this, pull the cutting with its lower end along the teeth of a hacksaw file on both sides.
Attention!
The wounds should not be deep, otherwise the wood of the cutting will be affected.
Or make several scratches with the tip of a knife or pruning shears - this method of furrowing is more labor-intensive and is suitable for a small number of cuttings.
When blinding, the lower eye of the cutting is removed, which improves root formation.
Furrowing and blinding of the eyes is carried out immediately before planting the cuttings.
Root stimulants
Good results are obtained by soaking in solutions of stimulants. The amount of the drug and the soaking time are indicated in the instructions, which should not be deviated from.
Gardeners highlight honey as a natural root formation stimulant: 1 tbsp. on a bucket of water.
Cuttings that have been treated with a stimulant should be planted on the day of treatment.
Harvesting cuttings
Slicing
The harvesting of chubuks occurs during pruning of grapes in autumn or spring. When removing fruit-bearing parts of the bushes, a vine with a minimum thickness of a pencil is left as planting material. If there is a variety available that is of great interest, but the bush has developed poorly, then you will have to take what you have. In addition to the appropriate thickness, the vine must be mature, healthy and free of damage.
It is still better to collect the vines necessary for propagating grapes in the fall, since in the spring there is always a chance of cutting cuttings damaged by negative winter temperatures.
Planting material harvested in the fall is subject to storage procedures. If cutting was carried out in the spring, then the vine is prepared for planting.
Methods for rooting grape cuttings
The success of growing grape seedlings from cuttings depends on the timeliness of harvesting, the freshness and quality of the cuttings, their proper storage before planting and caring for them after planting. There are several methods for rooting grape cuttings that have proven themselves to be effective.
Rooting in the substrate
The lower cut should be straight, it should be made directly under the node, and the upper one 3-4 cm above the node. Next, proceed to furrowing, the purpose of which is to cause an influx of hormones to the wounded areas, which facilitates root formation. Cuttings can be treated with growth stimulants.
For rooting, it is better to use plastic transparent drink bottles. Place containers with cuttings on a tray, closer to the light and maintain the substrate moisture.
Suitable substrates include clean coarse softwood sawdust, coconut shavings, river sand, fine gravel, forest sphagnum moss has proven itself well, and cotton wool is also used.
Attention!
You should not use small sawdust from the saw - they quickly turn sour.
Fertilizer feeding can be alternated with watering with a light-straw-colored sodium humate solution.
As soon as the cuttings take root, they need to be carefully shaken out and placed in other containers or soil cuttings for growing. The new substrate should contain a large amount of river sand. Before planting rooted cuttings, water the substrate well with a pink solution of potassium permanganate.
It also shows a good method of horizontal rooting in a substrate - the lower part of the cutting is wrapped with a damp cloth or placed in moss or other substrate, then in a bag and placed on a cabinet.
Rooting in water
You can also root cuttings in water. This technique is simpler, but less reliable. It is advisable to use rain water, melt water or, in extreme cases, from the tap, but separated.
The cuttings are cut and prepared as usual, but the bottom cut is made 2-3 cm below the node, and placed in a container with a small amount of water so that the bottom node is at the border of water and air. Place the container in the light. The water temperature should not exceed 22-26°C, otherwise callus quickly appears, but roots do not form and the cutting dies.
Attention!
The water in the jar will turn sour over time, so the liquid needs to be changed approximately every 7 days.
You can put a few pieces of charcoal in the container to stop the water from souring.
There is no need to keep the cuttings in water for a long time. As soon as roots 1-2 cm long appear, they are immediately transplanted into a container with soil. Water and care as usual. Once every 10 days, feed with complete mineral fertilizer (1 g per 1 liter of water).
Pickling cuttings
To improve the quality of rooting of cuttings, the process of kilching is often used - maintaining an elevated temperature in the root formation zone while simultaneously cooling the eyes.
How to propagate grapes from cuttings
Propagation of grapes by cuttings consists of harvesting, storing and rooting planting material.
Blank
The preparation of grape cuttings begins with their selection and cutting.
High-quality material must meet the following criteria:
- Good maturity and development.
- Correct thickness. The diameter of the cut part should be 6–10 mm. Petioles thicker than the specified parameters in viticulture are called fattening, and they most likely will not take root. It is also impossible to cut out future seedlings whose diameters are thinner: they simply will not have the strength to take root.
- Hardness. The vine chosen for cutting should be hard, but flexible.
- Bark color. The bark of a mature vine is colored shades of brown. If the bark is green, then the shoot is not ripe.
- The color of the vine when cut. It should be green; brown color on the cut indicates that the vine has been damaged by frost.
- Healthy looking escape. Carefully inspect the vine for stains or damage. If such were found, then this vine is not suitable for cuttings.
- Length of planting material. Each cutting should be 40–50 cm long, and there should be 2–4 eyes on it, so it is recommended to cut them at a longer length. The fact is that during the winter their ends may rot or dry out, and the damaged parts will have to be removed, that is, the length of the shank will be significantly shortened.
Important! If the cuttings are not taken from your vineyard, inspect them carefully before planting to make sure they are not infected with fungus or phylloxera.
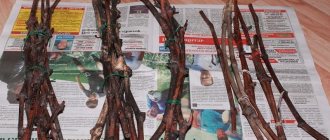
Winter storage
To get seedlings from cut chibouks, take care of their good wintering. Stepchildren, mustaches and remaining foliage need to be removed from their surface. Then the petioles must be folded evenly and tied (use soft wire or rope). Don't forget to attach a label to each bunch indicating the varietal variety.
You can store future seedlings in winter as follows:
- In trenches dug in the ground. The depth of such “ravines” should be 50 cm, and the length should correspond to the length of the cutting; the branches should not be allowed to bend. You can dig a trench in a hilly area. It is important that groundwater does not lie near the surface. The bottom of the recess must be covered with a ten-centimeter layer of moistened sand, on which the chibouks are laid horizontally. They are covered with soil (40 cm) on top and a small insulating hill is made of sawdust, straw, peat, and dry leaves. With the onset of frost, it is recommended to cover such storage with polyethylene film. If you plan to grow seedlings at home, then you should not store the chibouks in the ground, since it will be a lot of trouble to find and dig them up in the winter.
- In a refrigerator. The optimal place is the door. Before “settling” the matings of chibouks in the refrigerator, they should first be soaked in water (2 days), placed in a plastic bag and tied, leaving room to breathe. Experienced winegrowers advise wrapping bunches of future seedlings with a damp towel and making sure that it does not dry out. Also change the towel promptly if an unpleasant odor begins to spread when opening the package.
- In the basement. Place wet sawdust in plastic bags and place bunches of petioles on them. Then the bag needs to be tied, but not tightly, since the shanks need to breathe. Monitor the moisture content of the sawdust: if it dries out, moisten it.
Rooting grape cuttings
Can be carried out in soil, water, sawdust. But the chibouks need to be prepared for the upcoming planting.
Preparation consists of the following procedures:
- Refresh cut areas using pruning shears.
- Saturation of future seedlings with moisture: the petioles are completely immersed in water for 1–2 days. If their bark is covered with wrinkles, they must be removed immediately. Water should be taken from well, melted water or filtered. It is also recommended to add growth stimulants to the water, for example, “Heteroauxin”, “Epin”, “Zircon”, “Fumar”, “Gumat”, “Kornevin”. You can resort to the help of natural stimulants (honey, aloe juice).
- Refreshing the cut areas a second time. The bottom cut should be oblique. You also need to make furrows on the shank, that is, make horizontal cuts on its bark at a distance of 1 cm from the lower bud to the lower edge. This promotes the rapid appearance of roots.
Read more about rooting methods.
Important! During storage, the petioles must be protected from drying out, damping off, freezing or fungal damage. To prevent this from happening, it is worth monitoring the temperature conditions in which they will be stored. Optimal temperature
—
0…+5ºС.
In the sawdust
It is recommended to start the process in early spring.
The procedure for rooting seedlings is as follows:
- The lower edge of the properly prepared chibouks should be placed in a container (pot) with steamed and slightly damp sawdust. Such seedlings need to be watered every five days.
- The pots are placed in a deep container filled with water. The water in the container must be heated using a water heating tool. The ideal temperature for rooting petioles is +24ºС.
- Relocating the container with future seedlings and a heater to the windowsill. If you don’t have a heating tool, you can simply wait for the seedlings to root by placing them on a warm radiator.
Provided that all the growing features have been followed correctly, after just three weeks small roots (about 1.5 cm in length) will appear on your grape seedlings.
In the ground
The optimal time for the procedure is the beginning - mid-February. While the cuttings are soaked in water and growth stimulants, you need to prepare the necessary soil mixture. To prepare a high-quality substrate, you need to take equal proportions of garden soil, wood sawdust, humus and sand. You also need to stock up on containers - plastic cups or small containers (based on how much free space there is on your windowsills).
Important! The success of this method will depend on compliance with all growing rules. And the main rule
-
keep the top of the chibouks cold and the bottom
warm
.
This is why they are placed on the windowsill. After all, if the foliage appears faster than the roots, the seedling will dry out, not having the strength to develop the root system. Next steps:
- Draining the bottom of containers with expanded clay or pebbles.
- Filling containers with prepared substrate. It must first be moistened.
- Deepening the petioles into the soil. Only the top of the seedling should stick out from the substrate.
- Moistening the cuttings after planting in the soil.
- Place the containers in a sunny place (window sill, for example). Make sure that the temperature in which the seedlings are located is not lower than +22…+25ºС.
- Feeding seedlings 7 days after planting. As a top dressing, use wood ash or potassium (30 g of fertilizer for one seedling).
- Water the seedlings once a week using warm filtered water.
By following these simple rules, within a month you will receive rooted seedlings. The vegetative buds on them will begin to swell even faster - 2-3 weeks after planting.
In water
In early spring (late February - early March), the chibuki must be removed from storage and the rooting process in water must begin, which is carried out as follows:
- Filling glass containers with water in which rooting will take place. Water should be used distilled or boiled.
- Place the chibouk in a container (the water level should reach approximately 4–5 cm). Do not be alarmed if you see that cuts placed in water begin to release a colorless jelly-like substance (this will begin almost from the moment it is placed in water). While such discharge is present, you need to pull the stem out of the water several times and rinse the cut from below under running water to prevent rot from appearing.
- Daily change of water in containers. You can avoid such frequent changes in water by using activated carbon tablets that are dropped into the liquid.
- From the moment the lower cut of the petioles swells and brightens, it is necessary to increase the amount of water, raising its level to the second eye from the bottom. Such swelling indicates the formation of wound tissues that will protect the seedlings from rotting and promote the appearance of roots.
- Actively add water after two weeks, since during this time dormant buds will begin to bloom and the seedling will need more moisture.
- The appearance of roots will begin in about 20–25 days.
- When the length of the roots reaches 3 cm, they must be immediately transplanted into the ground, otherwise the roots will begin to rot due to the lack of oxygen.
Video: rooting grape cuttings in water
Planting seedlings in the ground
Experienced winegrowers recommend transplanting seedlings into open ground in mid-May, and several leaves should be present on the seedling.
Important! Do not feed the chibuki with substances containing nitrogen, as they will promote the growth of green mass, and this will have a bad effect on the formation of the root system.
The transplant consists of the following stages:
- Selecting a site in the vineyard. The ideal place is well lit and well ventilated, but without drafts. It is also important that the soil on the site is loose, water- and air-permeable, and well-drained.
- Site preparation. The soil on it must be dug deeply and, during the digging process, fertilizers consisting of humus, sand and nitroammophosphate must be added.
- Digging a planting hole, the depth of which should be 20 cm greater than the length of the chibouk. It is recommended to drain the bottom of the pit with sand (a layer about 10 cm thick).
- Placing the seedling in the ground. There should be a peephole above the ground at the top of the shoot (it should be 7 cm above the top soil layer). Place two seedlings in one hole, in case one does not take root. If both take root, then the weaker one must be removed. Provided that there is a 20 cm distance between the seedlings, you can leave both.
- Compacting the soil around the seedling.
- Abundant watering - about 20 liters of water should be spent on one plant.
- Mulching the soil around the trunk of seedlings. The optimal layer of mulch is 15 cm.
Important! Immediately before planting (mid-May), seedlings need to be hardened off. The seedlings are kept in the sun (but moderate) for 5 days before lunch, after lunch they are hidden in the shade, then after 5 pm they are taken out into the sun again.
Preparation of a mixture for waxing cuttings
During the process of rooting grape cuttings, the upper eye and internodes are paraffinized to prevent them from drying out and slightly delay bud opening. Pure paraffin is of little use for this, as it does not hold well and falls off quickly.
For waxing cuttings, it is better to use mixtures:
- paraffin and technical petroleum jelly - 9:1;
- paraffin and bitumen 3 - 4:1;
- paraffin and garden pitch - 3:1.
The components are heated in a water or sand bath and mixed until a homogeneous mass is obtained.
Dry cuttings are dipped into a mixture heated to 70 ºC for 2 seconds, then the waxed part of the cutting can be immersed in cold water to quickly harden the mixture.
How to preserve chibuki
Autumn cuttings involve long-term winter storage of planting material under certain conditions. One of them is the air temperature not higher than +4°C. Chibouks are also tied into a bundle with a rope or twisted with a soft elastic band.
Available storage methods:
- Planting material is buried in the cellar in a container with wet sand until the beginning of February.
- In the garden, they dig a trench along the length of the chibouks, its depth is 50 cm. A layer of sand (up to 10 cm) is laid on the bottom, and bundles of cuttings are laid on top, which are sprinkled with soil, straw, and fallen leaves. Cover the top with plastic film.
- Optimal storage conditions are created on the refrigerator door. Chubuki are soaked in cold water for 2 days, wrapped in cling film and placed inside kitchen appliances until January.
Planting chibouks in open ground without roots
Many grape lovers store prepared cuttings in the basement all winter, but planting blanks without roots in the fall has an important advantage - a very early growing season of seedlings in the spring.
Selecting a location
Grapes are a heat-loving crop. The optimal place for its cultivation in the country is the area along the south side of a brick house or barn. During the day, masonry accumulates heat from the sun's rays and gradually releases it at night. This creates conditions that are as close to natural as possible.
Soil preparation
The best for grape culture are light, fertile soils that quickly warm up in the sun: sandstone, gray soil, chestnut soil. Planting in heavy clay soils with a high level of groundwater has a negative effect on the crop. In such a place, the root system does not receive oxygen in the required quantity, withers and dies. Before planting, add sand, gravel, and broken bricks to heavy soil to organize drainage.
Attention!
Grapes are not planted in holes and depressions, under tree crowns and in areas with poor ventilation.
The most effective method of cultivating the soil on a site for planting a large number of chibouks is planting. It includes the following steps:
- Completely transfer the soil using a walk-behind tractor or manually.
- Prepare trenches 0.8-1 m wide for planting.
- Fertilize the soil with fertilizers of mineral or organic origin.
- At the bottom of the trench, install drainage from coarse crushed stone, expanded clay, and broken tiles.
- Fill the trench halfway with fertile soil.
- Plant cuttings.
- Enrich the topmost layer of soil for backfilling, 20-30 cm thick, with a mineral-organic mixture per 1 m2: 1 bucket of rotted manure; 100 g superphosphate; 100 g potassium salt.
It is better to prepare the site for autumn planting from mid-July. Until autumn, the soil will have time to subside naturally.
But different varieties have their own requirements for soil and place of growth:
- Table varieties grow and bear fruit better if they are planted in close proximity to the foot of the hills. This is due to the fact that the soil in such places is rich in humus, and groundwater usually flows at a depth of 3 m.
- Dark, rocky soil is well suited for growing any variety of grapes, since this type of soil actively absorbs all solar radiation.
- Wet soil is also suitable for growing grapes, but you will have to make efforts to loosen the soil and mulch it, because... otherwise, the root system will experience oxygen deficiency, which can lead to a halt in its development and subsequent death of the shrub.
- Soils that have a shallow level of still groundwater are also not considered the best places to plant, as they will require the same frequent loosening and mulching as in boggy areas.
- Sandy loam soil, as well as light or dark chestnut soil, is ideal for growing grape bushes, mainly due to its ability to warm up quickly and evenly under the influence of sunlight.
- South-facing slopes with direct access to sunlight but sheltered from cold winds are ideal locations for vineyards. If the soil in such areas is too heavy, then it should be further refined by adding sand, silt, broken bricks, a drainage layer or manure.
- Places where other grape bushes have been growing for a long time should not be used for planting young cuttings.
Planting process
The process of planting blanks without roots in the fall is extremely simple and is called “schooling.” During schooling, seedlings are rooted in moist, but not wet soil, tilted to the south. Boarding at school is organized as follows:
- Dig trenches 30 cm deep and 25-30 cm wide. Row spacing is 40-45 cm.
- Humus-enriched soil is poured into the trenches in a 1:1 ratio and watered with warm water.
- The cuttings are buried into 2-3 buds at a distance of 25 cm from each other, at an angle of 45°, oriented to the south. An arched shelter made of wooden supports and plastic film is arranged on top at a height of 40-50 cm.
- Cuttings planted in autumn are protected from prolonged winter frosts. Many gardeners protect with soil, but sudden winter temperature changes will lead to icing and death of planting material. The best option for covering seedlings without roots is spruce branches with a layer of 0.5 m.
In the spring, the cuttings are opened, inspected and transplanted to a permanent place. Excessive insulation stimulates premature awakening and growth of cuttings. If the forecast for a short and warm winter is favorable, the chibouks are planted immediately in a permanent place. The seedlings are buried two per hole, and in the spring the plantings are thinned out, leaving the leading sprout.
Is it possible to plant grapes from cuttings in the fall?
In autumn, you can plant seedlings grown from grape cuttings. You need to have time to plant the seedlings in the ground, two weeks before the first frost.
At this time, the earth has not yet had time to cool; with a significant drop in temperature, the earth remains warm and will not allow young sprouts to freeze. Their roots can bask in the warmth for a long time. The earth is in no hurry to release the heat accumulated over the summer months to the cold.
When transferring a seedling from a container into the ground, a small part of the roots die. During growth, which continues into the fall, the plant restores lost roots. A well-rooted sprout will go into winter. With the onset of spring, it, along with the rest of the vines, will begin to grow in due time.
Planting holes for grapes are prepared in advance, they are filled with fertilizers and fertile soil. After the seedling is planted in a permanent place, it is watered well, after a while the root circle is mulched with humus and dry soil.
Hurry up! A significant cold snap, as well as frost, give a signal to cover the vines in winter. The seedling's sprout is still small. This allows you to put it in a plastic bottle after cutting off the bottom. Then cover it with soil, a layer of 30 cm, and put a pole so that you can find it in the spring.
Planting cuttings
The quality of planting largely determines the entire subsequent process of growing the plant. There are several ways of rooting: in sawdust, in soil, in water.
In the sawdust
Sawdust, slightly damp, is placed in the container, in which bundles of cuttings are located. The container is placed in a warm place. The sawdust is moistened every 5 days. The root system appears after 20 days.
In the ground
The prepared container is filled with the prepared nutrient substrate. The soil mixture is prepared from:
- garden land – 35%;
- humus – 25%;
- rotted sawdust – 25%;
- sand – 15%.
Drainage is made at the bottom of the container. When adding soil mixture, the cutting is placed at a slight angle, so that only the upper eye is on the surface.
In water
Chubuki are simply placed in a glass jar with water.
Chubuk trees with regrown roots are planted in a special cardboard or plastic container with soil. Holes are made in them to remove excess liquid. Preferred container sizes: height no more than 25 cm, diameter - 10 cm.
When there is a large amount of planting material, greenhouses are used. The soil for rooting must be fertile. The thickness of the soil layer is up to 12-15 cm. At the top - up to 5 cm of river sand. Before planting, the soil is moistened until it is completely saturated.
Landing requirements:
- planting depth – 3-5 cm;
- planting frequency – every 10 cm;
- humidification and film coating are provided;
- the need for kilching.
The cuttings are placed in the soil mixture, covered, and watered.
How to germinate cuttings in spring
When to remove grapes from the shelter for germination depends on the climate of the region or the availability of a greenhouse. For the middle zone and the Moscow region, this time falls at the beginning of March, for the south - at the end of January - the first ten days of February.
Signs of cuttings suitable for further use:
- no dried or damaged;
- the ends remained green;
- a dark spot does not appear on the cut of a viable bud.
The material for disinfection is treated with a solution of potassium permanganate for 20–30 minutes. Then soak for a day in clean water at room temperature .
Rooting
New oblique cuts are made on each shank . A distance of 2-3 cm is left between the lower edge and the bud, the upper one is simply refreshed by removing 5 mm of the shoot. To stimulate the formation of roots below, additionally make 3-4 scratches across the cutting with a blade or needle. If desired, this part is dipped in the Kornevin solution.
Rooting methods:
- Sawdust . Lay soft paper in the box, add 2-3 cm of steamed sawdust, moisten it and place the bunches vertically. The container is placed on a heating radiator or heater. Water is added as it evaporates. Roots appear in 3-4 weeks.
- Soil . Prepare a mixture of equal parts of peat, sand, humus and turf soil. In small plastic pots or cut-off bottles with holes, make a thick layer of drainage and add soil. Plant the cuttings at a slight angle so that 1-2 buds remain at the top, and water.
- In water . Place a piece of cotton wool in a glass jar and moisten it. Several blanks are placed inside. During germination, maintain a water level of no more than 1.5–2 cm so that the cuttings do not release the green mass to the detriment of the roots. When the shoots reach a length of 2 cm or more, they are transplanted into a separate container with drainage.
- Germination in open ground for the Black Sea region and southern regions in late May - early June. Choose a place well warmed by the sun and prepare a bed with loose soil. The top of the cuttings is covered with paraffin to restrain the growth of the crown. Plant in holes with a slight slope, water as a dry crust forms.
Future seedlings are kept in the light and fed once a week with a weak potassium solution or wood ash tincture. Nitrogenous fertilizers cannot be used.
Landing
After 4–6 weeks, the root system will form and several leaves will appear. Step-by-step planting of grapes :
- The cuttings are taken out of the container and the roots are carefully examined; poorly developed ones are discarded.
- The elongated tops are pinched.
- They dig up the area using a spade, add humus and nitroammophoska. Heavy soil is loosened with sand.
- Make shallow grooves.
- The cuttings are laid out at intervals of 35–40 cm.
- Cover with earth so that the top bud is 7–10 cm above the surface.
- Compact the soil, water and mulch.
By next autumn you will get stronger seedlings , and after wintering they will begin to grow actively.
Landing in different regions
Planting grape cuttings also differs depending on the region of growth.
Siberia, Ural, Leningrad region
In these regions there are quite severe frosts in winter, so grape lovers face great difficulties. Not long ago it was impossible to grow crops in these areas. But domestic breeders were able to develop frost-resistant varieties, zoned in these regions.
When planting grape bushes in Siberia, the Urals and the Leningrad region, you must follow certain rules:
- buy and cultivate only early varieties intended for a given region. These are “Thumbelina”, “Pinocchio”, “Siberian cherry”;
- when grown in the first year after planting and in subsequent seasons, the bushes must be covered for the winter;
- It is better to plant in the spring, because In autumn there is a high probability that the seedling will freeze.
The distance between grape bushes when planting should be the same as in other areas.
Moscow region, Central Russia
Planting grapes from cuttings or seedlings in these areas is often done. The climate in these regions cannot be called mild, so frost-resistant varieties that do not require careful care should be cultivated. It is necessary to grow early ripening varieties that provide the recommended planting density.
Storage
Preparation for storage
You can store the grapevine whole or by cutting it into pieces. When cutting, depending on the chosen planting method and the length of the internodes (the distance between the buds), the size of the cuttings can vary from 2 to 10 eyes.
The vines or stems are grouped by variety, tied into separate bundles or bundles and labeled. The best option for marking is to use foil. Having cut it into strips, based on the degree of density, you can press or scratch the name of the desired variety on it. Of course, other materials can be used as tags. The main thing is that they do not deteriorate under the influence of moisture, and the applied inscription, after winter storage, can be read. The resulting tags are screwed with thin wire or other moisture-resistant material to the required bundle.
Storage methods
The best storage for grapevines is a cellar. If it is spacious and there is no problem of lack of space, then it is advisable to store it in its entirety. The fact is that if you store cut cuttings, then in the spring when they are removed, all the cuts are renewed. Thus, there is a loss of time for an additional operation and a reduction in the length of the pipes. If their size is only a couple of eyes and after storage significant drying of the edges is detected, then such a reduction in size can significantly reduce the number of planting materials.
The main conditions for successful storage are humidity and temperature. The optimal temperature is +4°C, deviations of a couple of degrees are permissible, both in one direction and the other. At lower temperatures, the vine may become unusable; at high temperatures, biological processes will be prematurely activated and the vine will come out of dormancy. Typically, in storage facilities of this type, the temperature in winter corresponds to the required standards.
If the cellar has sufficient humidity parameters, then the planting material is stored without any special tricks. Knittings or bundles are placed on the floor in a fenced off area and periodically sprinkled with water.
In order to minimize possible drying of the planting material, the fagots can be placed in plastic bags equipped with several holes for ventilation and drainage of excess moisture. The condition of the vine is sometimes checked; if necessary, moisten it; if fungus begins to appear, wipe it dry or with a rag soaked in copper sulfate solution and open the bags for ventilation.
To completely eliminate the possibility of the vine drying out, storage can be carried out in sand. The floor of the cellar, in the place allocated for storage, is covered with wet sand to a depth of 5-10 cm. Then the fagots are laid, if there is one layer of vines, then everything is generously covered with the same wet sand, if several, then each of them is sprinkled with another layer of sand. The resulting sand mound is periodically spilled with water.
If there is no possibility of storage in the cellar, planting material can be stored directly at the summer cottage. Having dug a trench 40-50 cm deep, the grapevine is placed in it and covered, forming an earthen mound in this place. It is advisable to leave the edges of the wire with which the vine is tied long, or better yet, to have them on the outside. In the spring, during the digging process, it will be more convenient to pull the bundles out of the trench by these edges.
When storing a small group of pipes, you can use the refrigerator. The cuttings are wrapped in a damp cloth and packaged in a plastic bag. The resulting package is placed in the vegetable section of the refrigerator. The care procedure consists of periodically moistening and monitoring the presence of fungus; if present, the cuttings are wiped with a dry or soaked rag in a solution of copper sulfate.
Planting rooted cuttings in the ground
The soil mixture is turf, humus and river sand in equal proportions. Often, after 2-3 weeks you can notice the first signs of root system formation. The bark in the lower part of the cutting begins to crack and root tubercles appear from under it, the bud may completely bloom, but at this stage this is already allowed and only stimulates further development of the roots.
After this, you can use any convenient container, a plastic bottle with the top cut off and holes in the bottom for water drainage, or just a plastic sleeve.
Attention!
A container with a volume of 1 liter is quite enough for the normal development of a seedling, while the height of the container is important, the roots grow downwards, so a high and narrow container is preferable to a low and wide one.
Fill the container with soil for seedlings and plant the planting material to a depth of 5-7 cm and lightly compact the soil on top.
The first watering can be abundant, further irrigation should be moderate and infrequent, otherwise the roots will rot.
Place the planted cuttings on pallets or boxes, place them in a bright, warm place and be sure to cover them with film to create a greenhouse effect. The seedlings remain in the container until planted in open ground.
Propagation by green cuttings
Lianas propagate by green cuttings. They are cut in autumn or spring and immediately placed in a bucket of water. Chibouks are prepared from green vines by cutting into 2 buds at an acute angle. Spring material germinates better than autumn material, but there is a risk of it freezing. This procedure is relevant for industrial greenhouses, but it is also available to amateur gardeners. Agronomists for self-cultivation recommend following the method of Yu. D. Lykov. According to the method, the plant is bred as follows:
- Planting work is carried out in mid-June.
- Chubuki with 2 or 3 eyes are taken from shoot or stepson branches.
- The branch is cut off above the eye, forming the tip. The root part will be 3-4 cm below the nodule.
- Place the green cuttings in a container with rain or purified water.
- Prepare a container with a soil mixture based on compost and fertile soil in equal proportions. You can use a “mole hole” - earth dug up by moles.
- If there is no special container, take a 5 liter plastic bottle. The upper part is cut off, and drainage holes are made in the lower part.
- Wood planks are installed into the container, creating a frame.
- For a cutting with 3 eyes, the leaf from below is removed, the upper ones are partially cut off. For green chibouks with 2 eyes, the top leaf is left. This reduces the area of water evaporation.
- 4 pieces are planted in a bottle or container, deepening them by 5-6 cm.
- A plastic bag is placed on the frame and tied with a rope.
The resulting structure is placed on the southern windowsill for 10-12 days. Once every 7 days, the grape plantings are ventilated and watered. The package is removed after 5-6 weeks. During this time, the material is completely rooted. The crop is planted in the ground at the end of summer. Mature seedlings 40 cm high can be obtained as early as October.
Caring for planted seedlings
During the growing season, you need to fertilize 3-4 times with diluted mullein (1 liter of fresh mullein per 10 liters of water). Among fertilizers of mineral origin, Kemira or Harvest are ideal, but they should be used carefully - they can cause rapid growth of the crop. At the beginning of August, watering should be stopped and fertilizing should not be given at all, so that the vines ripen better.
When 9-10 leaves appear on a plant, its top must be pinched to stop growth, as well as better ripening of shoots and buds. During growth, such pinching is done 2-3 times. To prevent the growing shoot from falling, it should be tied to a vertical support. This could be a thin wooden pole, 6 mm wire, etc. All stepsons, except one, the lowest one, must be broken off at the very beginning of their growth. Over the summer, such a plant grows up to 1.5-2 m and is distinguished by good root growth.
Attention!
Seedlings grown in this way take root before winter and will survive the winter with little shelter.
Caring for seedlings involves regular watering and spraying.
When caring for them, you should follow the following rules:
- Provide moderate soil moisture.
- Control emerging weeds.
- Use complex fertilizers to feed seedlings. After a week, feed the planted plants with potassium and wood ash.
- Observe lighting conditions.
- Carry out periodic pest control.
Correct rooting is indicated by the development of the root system before the appearance of foliage. If the process is reversed, then you are doing something wrong.
Humidity and watering
Care rules include ensuring high humidity. Therefore, spraying with warm water (20-25°) is recommended up to five times a day. Starting from 10-12 days, when root buds appear, reduce the number of sprayings to three per day.
Watering is carried out as the soil mixture dries (1-2 waterings per week). It is produced through a tray to avoid root rotting.
Temperature
To germinate cuttings in water, the temperature outside should be approximately 20°C, and inside the jar - no more than 38°C. At high temperatures during storage of germinated cuttings, the intensity of nutrient consumption increases. This may cause loss of viability by the time of rooting. And very low temperatures lead to freezing and drying out of the eyes. The optimal temperature for preserving cuttings is 0-5°C.
Light for cuttings
Containers with pipes should be kept in a bright place, but direct penetration of UV rays is not permissible. They can cause burns on grape leaves.
Hardening of seedlings
Before planting grapes in the ground, they are pinched and gradually hardened off in the fresh air over 5-10 days, and the planted ones are still shaded from direct sunlight.
Selecting a location
If you choose the right place on the plot, the planted grapes will develop quickly and produce a good harvest. This culture needs a lot of heat and light. It is best to plant on a hill so that surrounding plants do not shade the vineyard. To ensure uniform lighting throughout the day, it is advisable to place the bed from north to south.
Grapes do not like wind, so it is better to choose the most protected place. A good solution for a dacha would be to plant bushes along the walls of buildings or a blind fence. This will protect the plant from drafts and create a favorable microclimate.
Throughout the day, the walls of buildings absorb heat and retain it for a long time. Thanks to this, the temperature near the vineyard will be slightly higher, which will help it develop better.
The plant feels good on fertile loams. Swampy and acidic soils are not suitable for it. If the acidity is too high, you can add lime to the soil to reduce it. If the groundwater is high, then a drainage system must be installed.
To ensure good growth and large fruiting, it is necessary to maintain a distance of approximately 2.5 meters between individual bushes and rows. This will also allow you to care for the plant with greater comfort.
Planting is carried out in trenches or separate holes. When digging, you need to throw the earth in two directions. The top layer, which contains fertile soil, is thrown into one. The depth should be no more than 25-30 cm. All the rest of the earth is discarded in the other direction. It will then need to be removed from the territory. The minimum trench width is 80 cm.
When planting in holes, you need to maintain a size of 80 cm by 80 cm. The minimum depth is also 80 cm. A lot of space is needed for cuttings, since when grapes grow, a powerful root system is formed, and this requires space.
At the bottom you need to lay a drainage layer, for example, fine crushed stone. Several buckets of humus are placed on top and mineral fertilizers are added. Such a nutrient cushion can feed a young vineyard throughout the year.
Next, a layer of fertile soil is poured. You cannot plant cuttings directly in humus. The plant will get burns from this, which is why the root system will not begin to develop.
When to plant seedlings in a permanent place
Planting of vegetative seedlings in prepared holes is often carried out from the first ten days of May (if there is no risk of return frosts) until the first summer month, while it is advisable not to destroy the clod of earth and preserve the fragile root system.
During the summer, it is necessary to provide proper care for young grapes; it is important that by winter the bush has a good root system and several well-ripened buds, otherwise it will not survive this season.