October 20, 2021 ditim Home page » Reading Views:
Hosta is a godsend for an area that is in the shade most of the time. The plant is quite unpretentious in care, but there are two “buts”:
- Hosta does not like waterlogging, so in damp areas and where groundwater is high, drainage must be provided. However, the plant needs moderate amounts of moisture and watering.
- Hosta does not like frequent transplants. During growth, it forms a neat, solid, beautiful bush and develops a powerful root system. It is recommended to divide and replant the hosta once every 5-6 years. And in the first year of planting, it is better not to divide the hosts at all, otherwise the plant will become very weak.
When can hosta be replanted?
The hosta can be replanted throughout the season, but it is best to replant in early spring, from late April to late May, when young leaves begin to appear on the plant and new roots begin to grow, or from late August to late September: the transplanted rosettes must have time to take root before the onset of winter. cold weather It is not advisable to replant weak plants at the end of summer; it is better to postpone the procedure until spring.
Proper transplantation of hostas
The time for replanting a hosta depends on the species to which it belongs: some plants are best replanted in the fall, for example, hostas Zimbold, Tokudam and hybrids created on their basis. The reason that autumn planting is preferable to spring planting is that these plants do not grow roots in the spring.
Transplantation becomes advisable if the hosta has been growing in one place for 4-6 years: too young plants will take a long time to adapt after transplantation, and their development may freeze for two years, and those older than 6 years are difficult to dig up without damaging the root system. To carry out the procedure with the least harm to the plant, choose a dry, cloudy day.
Features of hosta care
Although the hosta is not demanding, it needs plenty of watering in the hot summer. Watering is done at the root, avoiding water getting on the leaves, because the liquid leaves unsightly stains on the foliage. In blue hostas, the host is able to wash away the waxy coating.
You cannot flood the crop, as it does not tolerate stagnation of water. In the places where hostas are planted, a drainage hole is made, and a drainage hole is made under each bush.
For comfortable growth:
- do not plant hosta in the place of previous adult plants; young seedlings in such places are constantly sick;
- for five years after planting the crop, the plant is not replanted or divided.
The hosta is fed 4 times per season. The last feeding occurs in mid-August. Usually a complex ready-made fertilizer is applied. Root feeding is carried out in the first half of the day, after rain or heavy watering. Foliar feeding is alternated with root feeding. On blue hostas it is carried out from the inside of the leaf.
Where is the best place to replant the hosta?
When choosing a site for a hosta, you need to take into account that it is not only a shade-tolerant, but also a shade-loving plant, although today many varieties have been bred that develop well in open sunny areas.
For hybrid hostas, the best place would be an area lit by the sun only until noon.
It should be borne in mind that hostas with green leaves are less light-loving than variegated varieties, and plants with blue foliage that prefer partial shade become green in bright sun or shade. Cultivars with golden, yellow and white leaves should receive direct sunlight only in the mornings or evenings. Hostas with dense, leathery leaves are much more tolerant of sunlight than species and varieties with delicate and thin foliage, which are best planted where the sun shines no more than 4 hours a day.
Secret No. 4: how to care for hostas in spring
Hosta sprouts emerge into the light quite late after winter. To avoid damaging them during weeding or other work in the flowerbed, plant primroses between the bushes. They will bloom earlier and mark the hosta planting site.
If you did not prune the perennial for the winter, then in the spring, free it from old leaves. Experienced gardeners recommend removing dry vegetation early. This way, young shoots will begin to grow faster and will not be subject to deformation.
After harvesting, the soil around the plants should be mulched with pine needles, which will prevent slugs from getting to the young leaves and “feasting” on them.
Hostas pruned for winter germinate earlier. They need to be weeded, loosened and exposed root collars mulched. In the future, when the bush grows, it will not need weeding.
Soil for hosta
Hosta is not picky about soil composition, but it grows better on some soils and worse on others. For example, when grown in nutrient-poor sandy soil, which also does not retain moisture well, the leaves of the hosta become small and it gradually withers, while in clay soil, on the contrary, water stagnates, and this leads to rotting of the root system.
The optimal soil for hosta is humus-rich loam with a pH of 6.5-7.5, but it can also be grown in other soil. The main thing is that it is nutritious, moist and drained.
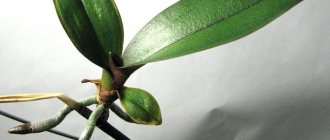
Hosta seedling (rhizome): how to select, preserve, prepare
Funkia is a fairly popular garden crop in our country, so it can be purchased in various centers and stores. It is most convenient to plant the hosta rhizome; most often it is sold in bags with a nutrient substrate (example in the photo below).
A high-quality funkia rhizome must meet the following requirements:
- The rhizome should have two or three growth buds (or at least one, no less)! However, such buds should not be overgrown.
- There should be a well-developed root system, the normal length of the roots is about ten centimeters.
- In this case, you should choose specimens with living, elastic roots.
- There should be no traces of mold or rot on the hosta rhizome, and it should not be dry.
- Also, the rhizome should not be too moist (that is, drops of condensation should not be visible on the packaging).
It is recommended to study the characteristics of the plant before purchasing. This will help you decide which variety is right for you.
It can be found on sale with a closed root system (in the photo below).
Rhizome processing
Before planting hosta rhizomes in open ground or in a pot for temporary storage, it is important to prepare planting material.
First of all, you need to carefully examine the seedling. If you find rotten, moldy, dead, diseased areas on the roots, they should be trimmed with a sharp, disinfected knife. After this, be sure to disinfect with a fungicide.
Also, roots that are too long should be trimmed a little , the cut areas should be powdered with wood ash or soaked in a fungicide.
In any case, it is useful to disinfect the rhizome by soaking it in a fungicide (for example, treat it in a solution of Fitosporin-M).
If the roots are too dry and look lifeless, then as a preparation it is useful to soak them in a solution of a growth stimulator (for example, Epin or some other).
How to preserve rhizomes before planting
Already at the end of winter or at the beginning of spring, planting material of this plant can be found on sale. Many summer residents and gardeners buy it in advance. If you are one of them, then you need to take care of storing hosta rhizomes after purchasing and before planting in open ground.
To store the rhizome, it should be planted in a temporary container.
The pot should have a volume of about one or two liters, and there must be drainage holes at the bottom of the container.
Soil for temporary planting can be used universally for seedlings, or you can make it yourself (mix non-acidic peat, sand, leaf or turf soil in equal proportions).
You can plant funkia rhizomes for temporary storage using the following technology:
- Place a 2-3 centimeter drainage layer (for example, expanded clay, perlite) on the bottom of the container.
- Fill the pot with soil, make a large hole the size of the rhizome.
- The rhizome should be planted in such a way that it fits normally in a pot of soil and the roots do not bend.
- The tip of the rhizome should remain slightly on the surface of the soil.
- Afterwards, generously water the soil with clean water. It is advisable to spill the soil with Fitosporin solution after plain water.
- It is advisable to sprinkle the surface of the soil in the pot with soil to avoid the appearance of an earthen crust.
To prevent the plant from starting to grow too intensively, it is recommended to place it on a northern windowsill or simply in a place with diffused light. It is also advisable that the place be cool enough.
Before planting hostas in open ground, the soil in the pot should not be allowed to dry out. If necessary, watering must be done. However, you need to water very carefully; the soil should be slightly moderately moist.
Note! Two weeks before planting, it is recommended to harden the rhizome; to do this, place the container outside, starting with a short period of time.
If you do not have the opportunity to plant the rhizome in a temporary container, you can put it in the refrigerator. However, they can only be stored in refrigeration if the kidneys are at rest! However, this storage method is bad because if the planting material is left in the refrigerator for a long time, it can rot.
How to transplant a hosta to another place
Preparing the hosta site
Dig up the area, removing the rhizomes of perennial weeds. In sandy soils, you need to add peat for digging, and in too heavy soils, rotted sawdust and sand. Poor soils are enriched with mineral fertilizers and ash. A few hours before transplanting, the soil on the site is watered with a pink solution of potassium permanganate.
The holes for hosta should be wide, since its root system is horizontal. The depth of the holes is about 40 cm. The distance between the holes depends on what kind of plant you will plant: between bushes of large types of hosta, the distance should be about 1 m, between medium-sized hostas - about half a meter, between dwarf plants - 20-30 cm.
Replanting hostas in spring
A layer of drainage material, which can be crushed stone or broken brick, is placed at the bottom of each hole, and a layer of humus is placed on top of the drainage.
If you are replanting the entire plant, it is advisable to dig it up with a large ball of earth on the roots and place it in this form in the prepared hole. A large hosta will have to be replanted by two people, since a plant with a lot of soil on its roots has an impressive weight.
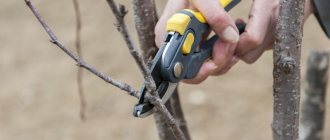
If the transplant is combined with dividing the bush, then the roots of the dug out plant are cleaned and washed from the ground, and then inspected to detect possible signs of disease or the presence of pests. All damaged, dry or rotten areas are removed with a sterile sharp instrument, the roots of the plant are shortened and, if necessary, dipped in a pink solution of potassium permanganate for 10 minutes for disinfection. Then the roots are allowed to dry and the bush is divided into approximately equal parts: first, an incision is made in the right place with a sharp sterile instrument, and then the rhizome is broken along this incision with your hands. Places of breaks and cuts are treated with a fungicide solution or sprinkled with ash.
Dividing hostas during transplantation
The cuttings are placed in holes and covered with soil so that the root collar of the hosta is at ground level. The surface around the plants is lightly trampled and watered abundantly, and when the water is absorbed, the area is mulched with humus or peat.
How to replant a hosta in the fall
Preparing the site for the autumn hosta transplant is almost no different from the same procedure in the spring, however, in the fall, fertilizers are not added to the holes: they can activate the growth of the hosta, which at this time of year needs strength to prepare for winter. Hostas planted in the fall begin to be fed only in the spring.
If you divide the hosta during the autumn transplant, before planting it in a new place, cut off all the leaves from it, leaving only petioles 10-15 cm long.
For the winter, the area with the transplanted hosta must be covered with material that allows air to pass through, so synthetic fabrics or roofing felt cannot be used: cover the surface with dry leaves and cover it with spruce branches.
Preparing hosta for winter
After flowering, the flower stalk is removed from the plant. This measure is necessary to ensure that the crop does not waste excess energy on seed formation. Before winter, they stop fertilizing the flower. Do not propagate or replant.
Preparing hosta for winter is divided into three main stages:
- Trimming. All foliage is cut off for the winter. The event is held in November 3-4 weeks before frost.
- Mulching. Helps preserve the root from freezing. Before mulching, the flower is treated with insecticides. Dry leaves, sawdust, hay, peat and spruce branches are used as mulch.
- Shelter. The culture needs shelter for the winter. The plant can be protected from cold weather by brushwood, burlap, spruce branches, branches, and agrofibre. You should not use film and roofing felt as a cover; under them the crop can rot.
First of all, the plant is pruned, then mulched. Then moving on to covering the root system.
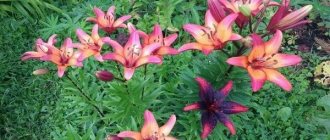
Hosta is an amazing perennial that, with proper care, can reveal all its beauty. Combines in landscape design with many garden flowers. Not only flowers, but also foliage are decorative. Used in flower beds in the foreground and background.
Secret No. 6: dividing the bush
Over time, mature plants grow and lose their attractiveness. Dividing the bush will help not only propagate the plant, but also rejuvenate it. To make this procedure painless for the perennial, it is better to carry it out in May, when bluish buds appear from the ground.
Dig up the bush and divide the rhizome into separate tussocks, which you then transplant to a new location. In order for the seedlings to take root better, do not forget to water them regularly. However, when dividing hostas in the spring, there is a great danger of destroying them during night frosts. Therefore, monitor the weather forecast or postpone the propagation of perennials in this way until the end of summer.
- Autumn division of hostas - how to propagate an ornamental plant yourself
Instructions for a beginner on how to propagate a hosta by dividing the bush.
Why is regular transplantation and division necessary?
As the hosta grows, it forms a solid, compact and beautiful bush, while powerful underground roots develop in parallel. In the first year after planting, when intensive development is underway, it is not recommended to divide or replant the plant. The frequency of transplantation is maximum 1 time every 5-6 years.
For each plant variety there is a specific period of growth in one place, after which it needs to be renewed - divided, replanted. Over 4-5 years, the flower draws from the soil all the components necessary for its development, as a result the soil becomes poorer, and there is no need to wait for active growth and flowering.