Signs that a baby is ready for planting in a separate pot
First of all, you need to determine how ready the baby is for independent life without feeding from the mother plant. The following parameters are signs of such readiness:
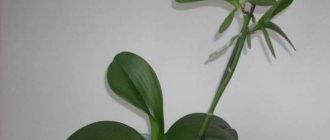
- presence of 2-3 leaves;
- presence of its roots.
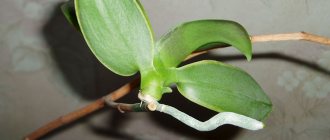
The best ones to take root and grow are the ones that have 2 or 3 roots of their own, up to 3-5 cm long. Such roots are already well formed, have a layer of velamen and can easily fit into a glass.
When the separation of the baby from the “mother” is delayed, and the offspring manages to grow longer roots, their careful placement in the pot can be problematic. Sometimes it happens the other way around: the grower receives a child that is too young, with only emerging roots or without them at all. In both cases, an individual approach to the young plant will be required.
Important! There is a positive practice of dropping off children with only one root. But such an offspring must be handled with extreme caution. If the root breaks, there will be nothing to replace it.
It is advisable that the roots of the children be “pupillary” - that is, actively growing, with a green tip. If the roots are tightly pupated, and there is not even a green dot at the end, signaling readiness to start growing, the rooting of such an offspring can be problematic.
When can I plant a small plant?
When can I plant a small plant? Several babies can be formed from one maternal specimen. First they will develop leaves, and eventually roots. If the root system does not develop, it can be stimulated. What is needed for this? Prepare cling film, sphagnum moss and strong thread. Next you need to proceed like this:
- Soak the moss in water. It should swell well.
- Roll a ball of moss and wrap it with thread. This will prevent disintegration.
- Next, attach the lump to the peduncle with a thread, but act carefully so as not to injure the plant.
- If necessary (if the room has low humidity), wrap the moss with cling film to ensure the creation of a greenhouse effect inside. But keep in mind that the film will need to be opened daily so that the baby can breathe.
- It is advisable to attach a support to the peduncle with moss. This is necessary to ensure that the plant does not tip over.
- Spray the moss with water every day. You can use Kornevin for spraying (a means for stimulating root growth), which is diluted with liquid according to the instructions on the package.
Now all that remains is to wait for the roots to form. This may take up to six months. Remember that you can separate the baby from the mother specimen only if it has formed 3-4 roots 5 centimeters long. If this does not happen, there is a high probability that the plant will not take root well in a separate pot and may even get sick. It's better to wait a little for the roots to grow.
Preparing cups for depositing babies
The next stage is preparing containers for planting children. At home, transparent plastic cups are most often used. They can be prepared in two ways:
- Make 1-2 holes at the bottom of the cup to drain excess water.
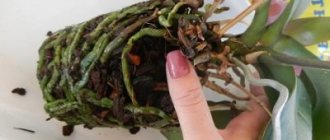
- Make a double cup. In one, make many holes along the walls and at the bottom. In the second, whole one, pour expanded clay into a quarter of the volume and insert a glass with holes into it.
The advantages of the first method are ease of preparation and long-term moisture retention in the substrate. On the one hand, this is good, because in small containers the soil dries out too quickly. On the other hand, the aeration of the roots deteriorates significantly, and the root system of the offspring, accustomed to the air environment, suffers while the baby was sitting on the mother plant.
The second method eliminates the shortcomings of the first. Air passes through the holes in the cup, and the baby's roots do not suffocate. And to prevent the substrate from drying out too quickly, the layer of expanded clay in the second cup is constantly moistened.
How to properly plant a shoot at home?
So, a shoot has formed on the peduncle, how to separate it and plant it, what do you need to take for this?
Required Tools:
- pruning shears or sharp scissors;
- substrate;
- pot;
- activated carbon or other antiseptic;
- alcohol to disinfect instruments.
Substrate and pot
As for the substrate, you can take the usual one for orchids and add sphagnum moss and peat to it. Use a regular plastic cup as a pot, since large containers cannot be used for an orchid. Holes are made in the bottom of the cup and on the sides for drainage.
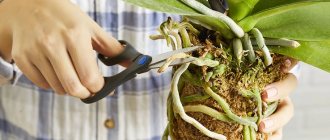
Determining the cutting point and separating
It is worth saying right away that the baby is cut off only with a peduncle . Using a sharp pruner, cut off the peduncle 1 cm above the baby and the same distance below. You will get a stump from the arrow, on which the baby orchid will sit in the middle.
If the baby has roots, then it is not touched until the root system develops. If there are roots, then you should carefully cut the baby from the junction with the mother plant. The sections are processed.
You can often observe the appearance of babies in the axils of orchid leaves. This cutting should be correctly cut off from the mother plant; to do this, use a sharp, disinfected pruner to grab about 1 centimeter of the mother plant and cut off the cutting. The cuts need to be processed.
All tools when working with plants must be sterile and sharp , since there is a high probability of introducing third-party infection into the wounds on the orchid. After this, you will have to treat the flower for a long time.
We invite you to watch a video on how to properly separate a baby from an orchid:
Treatment of the cut area
In order not to introduce third-party infection and bacteria that cause rot, it is necessary to treat the cut areas, both on the young plant and on the mother plant, for this you can use:
- wood ash;
- crushed activated carbon;
- cinnamon;
- regular greenery.
Before processing the cut, the cuttings must be dried for 30 minutes, during which time you can prepare a container with the substrate.
Placement in substrate
We prepare a container with the substrate, for this:
- Fill the glass 1/3 with drainage.
- Add some substrate.
- Carefully place the roots in the glass and straighten them to the sides.
It is worth remembering that they are very delicate and you need to try not to damage them. - The growth point of the cutting should be level with the edges of the container.
- Fill the substrate; to compact it, you need to gently knock on the walls - you cannot compact the soil with your hands, as you can damage the roots.
At this point, the planting of the shoot can be considered complete.
We invite you to watch a video on how to properly immerse a baby orchid in the substrate:
Read more about planting orchids here.
First watering
You cannot water the plant immediately after placing it in the substrate ; it is left alone for about 4 days. After this time, it is advisable not to water in the traditional way, but simply moisten the substrate with a sprayer.
Read about the secrets of choosing a Thai orchid and about growing a flower from Vietnam. We have also prepared materials for you about growing in a flask and being in a closed system, about the hydroponics method and whether it is possible to use seeds for cultivation, and how to grow a beautiful flower from seeds at home.
Preparing the soil for planting children
There are many soil recipes for planting baby orchids. Flower growers experiment with different materials, mixing them in different proportions. And yet, most orchid lovers prefer the classics - pine bark and sphagnum moss.
The combination of bark and moss gives the substrate the properties necessary for the rooting of children. The bark makes it loose and leaves many cavities for air. Moss serves to retain moisture and prevents the soil from quickly turning into “cracker”. The main thing is to choose the right proportions of these components. This is done based on where the baby was cut from:
| Place of formation of the baby | Percentage of pine bark in the substrate | Percentage of moss in the substrate |
| Peduncle | 70% | 30% |
| Stem | 50% | 50% |
| Pseudobulb | 50% | 50% |
This approach takes into account how accustomed the child’s roots are to the air environment and how much the offspring itself has learned to “feed” on its own.
It is better to purchase bark in a store rather than bring it from the forest. Various manufacturers of substrates for orchids offer pine bark of a more or less coarse fraction. For children you need a small one.
The substrate components in the required quantities are poured into a large bowl, filled with clean water without chlorine and discarded in a colander. If desired, you can add 2 drops of Radix rooting agent per 1 liter to the water.
Tip #1. Instead of the classic recipe of bark and moss, you can use the innovative material “ZeoFlora for orchids” for planting children. It consists of small pebbles of natural yellowish zeolite. Its advantage is that it absorbs water and holds it for a long time, giving it to the orchid “in portions.” The looseness and breathability of the substrate is not affected.
The substrate is moistened immediately before planting. It is not recommended to plant children in dry soil.
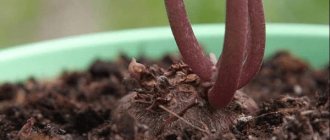
Technology for placing a baby in a cup
The procedure for planting a baby is very simple, but has an important nuance. At first, the root collar should not come into contact with the surface of the substrate. Therefore, the landing is done high:
- the baby is placed in an empty cup;
- a damp substrate is gradually poured into the cup so that the root collar remains “suspended”, 0.5 cm above the surface.
Such planting will not allow the neck to rot, but the young roots will actively hatch and grow.
One problem may arise during landing. Often the roots of offspring grow not downwards, but to the sides. In such a situation, planting the baby so that the root collar is raised is quite difficult. Therefore, you will have to very carefully, trying not to break off, bend the roots down.
If, in addition to horizontal roots, the baby has roots that grow downward, then the horizontal ones can be left outside as air roots.
Baby without roots: ways to grow the root system
Ideally, the babies are not separated from the mother plant until they have roots. If for some reason it happened otherwise, the offspring cannot be planted in the ground. First you have to help it give roots.
There are various tricks that help to achieve root growth in a baby orchid. The most effective of them are the following:
| Way | Description |
| Placement in a greenhouse |
|
| Foam rafts |
|
The greenhouse method is used in practice much more often. At the same time, the methods of attaching the baby or filling the glass may be different:
“I simply hang the children over a glass of water on bamboo skewers laid out in a lattice. I put a pebble at the bottom of the glass for balance, and I don’t add any moss there. I cover the top with a trimmed five-liter bottle. Roots appear very quickly” (Zhanna, Kislovodsk).
When the baby grows roots, it is planted in the substrate in the usual way.
In order for the baby to grow roots faster, the greenhouse must be very well lit. However, under no circumstances should you put it in the sun - this will cause the offspring to “cook”. Lighting should be done with special phytolamps.
How to plant a baby phalaenopsis orchid
The baby, ready for a new life, is planted by cutting it off from the mother plant. The resulting specimen will be a copy of the mother - the orchid.
A baby on a peduncle, how to separate it?
First you need to decide: is the peduncle needed, or can it be cut off along with the baby. Often the baby appears on the peduncle in such a way that there are several unopened buds between it and the main plant. They may well grow into another baby or flower stalk. In such a situation, separating the baby from the peduncle, you need to make a cut, not reaching it 2 cm.
If the peduncle has outlived its usefulness and is not needed, it is cut off at the base, and then the baby is cut off from its umbilical cord. The peduncle is cut on both sides to the point of attachment to the baby. The sections are treated with hydrogen peroxide and dried.
Root baby
The baby that appears at the root brings joy. After removing the top layer of the substrate, you should make sure that there are aerial roots. If they are small, then the plant grows and only then is separated. True, in this case you need skill and more precision. You need to try very hard not to damage the mother plant.
Surprise from the leaf axil
The stem can also give birth to a baby. It appears from the axil of the leaf. You shouldn’t leave everything to chance. You need to take more careful care of the mother plant, and you will get a healthy baby. It grows to the desired size and separates.
Kindergarten in the greenhouse
They create a kind of cocoon from sphagnum moss, wrapping it around the baby orchid.
Attention! Instead of water, it is recommended to soak sphagnum moss with any growth stimulant.
The resulting bundle is placed in a pot, or placed in any mini-greenhouse.
The essence of this structure is that a small enclosed space maintains its own microclimate, a more constant temperature and high humidity.
Comfortable in foam
This method is suitable for orchids with a small number of roots. Children sit on pieces of foam plastic. Good aeration and stability help to successfully grow the root system.
Basal cakes on the stem
Instead of a dead stem, basal babies often appear. They differ from the rest in the absence of their own roots. These kids don't stay away.
Caring for planted orchid babies
The cups with the planted babies are immediately placed under the phytolamp. The better and more correct the light, the faster the young orchids take root and begin to grow. No fertilizers or growth stimulants can replace good lighting.
In addition, plants need to be provided with a moderately warm and humid microclimate. The air temperature should be kept within +22-250C. Spraying with warm water or a solution of the drug “Epin-Extra” is useful, which helps children quickly adapt to new conditions.
Watering is not necessary in the first 10 days after planting. Subsequently, orchids planted in simple cups are irrigated as the moss dries in the substrate by immersion in water. Children placed in double cups can simply be watered from a watering can so that the flowing water covers the expanded clay layer.
How quickly can you grow a flower?
Young plants obtained from children take a long time to develop immunity and grow slowly. To speed up the formation of a full-fledged orchid ready for flowering, it is necessary to provide ideal conditions.
The gardener's task is to create a microclimate close to the tropics in which the crop lives in the wild. You will need a ready-made or home-made greenhouse, where you can maintain stable temperature (25-27 degrees) and humidity (80-90%). The greenhouse is ventilated daily so that the air inside is warm, humid and at the same time fresh.
One of the main conditions is bright, stable lighting (at least 14 hours a day). But the plant should not be exposed to direct sunlight, otherwise it will overheat and die.
Advice! To form a powerful root system and activate the development of a young plant, you can add a stimulant to the water for irrigation: Epin, Zircon, Heteroauxin. As soon as new leaves begin to form, the drugs are discontinued.
First transplant of older children: timing and methods
Baby orchids will spend as much time in the cups as they need for the roots to completely absorb the volume of the substrate. By this time, they are already well adapted to an autonomous existence and can be transplanted in one of the following ways:
- In a clear plastic pot with holes. If the condition of the roots of a young orchid is good, such a transplant can be carried out by transshipment. If there is any doubt, it is better to free the roots from the old substrate and disinfect them before planting in clean soil. The standard composition of soil when transplanting into a pot is 70% bark and 30% moss, or pure bark.
- In a hanging basket. You can buy it at a flower shop or make it yourself. Orchids are planted in baskets in the same way as in pots, and as the root system continues to grow, the roots come out into the cracks and hang down freely.
- On the block. The young orchid is removed from the cup, freed from the substrate and secured to a piece of wood with bark using soft elastic twine. The roots are covered with sphagnum, which must be kept moderately moist.
The choice of method for further growing grown orchids depends on the taste preferences of the grower. However, it is believed that placement in baskets and on blocks is most comfortable for the orchids themselves.
Some orchid lovers immediately place separated children on blocks, without first growing them in cups. This can be done if the offspring was separated from the mother plant late, and its roots are inconvenient to place in the pot.
Further care
Watering is not carried out for the first few days. This is done so that the microtraumas of the roots are healed. Then water it using the dipping or soaking method. The second method is more preferable, since fresh pine bark does not absorb moisture well.
The frequency of watering depends on the conditions of detention , the condition and type of the shoot itself. In summer it can be daily. Keep an eye on the substrate and plant roots.
Care for the shoot as if it were an adult, recently transplanted plant. You can, for example, treat the roots with a root solution for better rooting.
For the first 10-14 days, you need to choose a shaded place for the shoot , excluding direct sunlight.
After this period, the orchid is placed in its permanent place of growth and care is provided aimed at gaining green mass and expanding the root system.
Advice! To achieve better results and rapid development of young orchids, they can be grouped in a florarium/orchidarium - a place where high humidity and bright lighting are maintained.
Expert advice on choosing a container for transplanting grown orchid babies
To transplant children with a well-grown root system, you can use not only standard plastic pots or baskets.
“Now on sale you can find so-called “crowns” for orchids, reminiscent of a round fence. In terms of decorativeness, they are better than ordinary holey pots, and the aeration of the roots when planted in a crown remains at a high level. But I do not recommend using various colored pots made of thick transparent colored plastic. They look beautiful, but the orchids in them easily rot and suffocate.” A. Davydovskaya, owner of the greenhouse, candidate of biological sciences
What is a baby in an orchid?
This is the name given to a small shoot that forms on a peduncle, stem or at the root collar. The second name for babies is keiki, from the Hawaiian word “keiki” - translated meaning “baby”. By separating such a shoot from the plant, it is easy to obtain a new specimen of Phalaenopsis.
What do they look like from the photo?
Externally, a developed baby looks like a small plant with its own leaves and stem. As the shoot grows, a separate root system most often forms. The leaves completely repeat the shape and color of the mother plant. After planting, the shoot retains all the species and varietal characteristics of the orchid, including flowering characteristics.
How and why do they grow back?
The orchid forms daughter shoots for procreation. Shoots appear in the following parts of the plant:
- on the roots - they form independently (with proper care);
- on the peduncle - at high temperature and humidity;
- on the stem - they often grow due to the aging of the plant or problems with the root system.
Current questions about planting orchid babies
Question No. 1. How to properly prepare “ZeoFlora” for planting a baby orchid?
The required amount of material is poured into a bowl and filled with water. In this case, hissing and active release of carbon dioxide will be observed. You need to soak the pebbles in water for about an hour. After this, the water is drained, the soil is washed and used for planting orchids.
Question No. 2. Is it possible to drop off a baby in a closed system?
Yes, there is a practice of placing children in closed systems - according to the so-called “Cluvdia method”. To do this, take a tall glass glass or vase. A layer of expanded clay 3 cm thick is poured onto the bottom and filled with water. A small layer of moss is placed on top. Then the baby is placed in the glass and covered with a damp bark substrate. Practice shows that plants planted using this method very quickly grow roots and produce new leaves. They will need a transplant much later than children growing in cups. The only disadvantage of this method is the high risk of overwatering and root rotting. Therefore, the irrigation regime must be selected very carefully and do not forget about good lighting.
Types of children
Depending on the location, the following types of children are distinguished:
- basal;
- located on the peduncle;
- developed in the leaf axil or stem.
Most often, the development of shoots in phalaenopsis is observed on the peduncle. This may be due both to the creation of favorable conditions and to the approaching death of the mother plant. In most cases, they manage to develop into an independent plant without outside help.
The mechanism of development of root and stem children is somewhat different. It is not the dormant bud that participates in their formation, but the meristem tissue of the plant. Experienced gardeners associate the appearance of such shoots with the approaching death of the plant. Their appearance is also possible due to injuries to the trunk, death of a growing point, during a prolonged drought, or when a peduncle forms from the center of the rosette. Children that develop on the trunk or in the leaf axil may not produce roots for a long time, so their rooting is somewhat difficult.
Stem baby phalaenopsis orchid