Author: Natalya Category: Garden plants Published: August 09, 2019Republished: August 09, 2019Last edits: January 20, 2021
Tulips are spring primroses, the flowering of which ends in May. After flowering, gardeners dig up tulip bulbs and store them until autumn. But do you need to dig up the bulbs every year? And when is the best time to do this? And how to store dug bulbs before planting? We will give answers to all these questions in our article.
When should you dig up tulips?
Every year, each bulb grows with four to seven children, which feed on the mother bulb. If you want to enjoy the blooming of tulips every year, you need to give the bulbs a rest and promptly separate the children from them. In addition, bulbs that are not dug up for years gradually go deeper and deeper into the soil, and it becomes increasingly difficult for the sprout to break through the soil. It is for these reasons that gardeners dig up tulip bulbs after flowering, tidy them up and plant them again in the fall.
Watch a video about how and when to dig up tulips
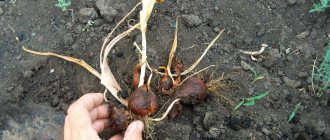
In the photo: Dug up tulip bulbs after flowering.
However, this issue should be approached selectively:
- Erantis: growing from seeds, types and varieties
- bulbs of simple and wild tulips, as well as varieties of Kaufman, Greig and Foster, can be dug up once every 4-5 years, and this will not affect their attractiveness in any way;
- Bulbs of modern hybrid varieties, Dutch and late-blooming tulips need to be dug up annually.
How to dig up tulip bulbs - procedure
The day you are going to dig up tulips after flowering should be sunny and warm. The soil in the flower garden should be dry. They dig up the flower with a pitchfork, moving further away from the stem in order to capture all the tulip children with a clod of earth.
Advice. In gardening stores you can purchase special baskets for bulbous plants. The basket is dug into the soil, tulips, daffodils, hyacinths and crocuses are planted in it. The resulting baby remains in the container, which makes it easier to collect.
Proceed as follows with dug up tulips:
- The soil from the roots and tubers of the flower is shaken, the stems and leaves are cut off.
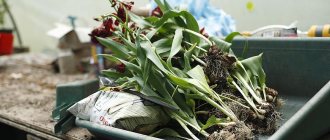
- The bulbs and babies are left to dry in the garden for a couple of days or put in a dry, ventilated room.
The bulbs are separated from the roots and sorted by size. At the same time, diseased specimens with traces of mold, brown spots, and cuts are selected. If a healthy onion is damaged by a shovel or pitchfork, the wound is cleaned and generously lubricated with iodine, brilliant green, or sprinkled with ash (wood ash).
To disinfect the bulbs and destroy invisible spores of fungi and viruses, planting material is kept in a saline solution for half an hour:
- 1 liter of warm water,
- 1 tablespoon salt.
To enhance the effect, you can add a teaspoon of baking soda. You can use a bright pink solution of potassium permanganate or Fitosporin.
Store tulip planting material for about three to four weeks in cardboard boxes, scattering the tubers in one layer. Storage temperature from +20 to +25 degrees, humidity about 70%. Preserved tubers do not require light.
Important! Don't forget to label boxes with varietal tulips to avoid confusion!
A common mistake made by novice gardeners is digging up tulip bulbs early. Yellowing leaves do not color the flower garden, and the beginner begins cleaning, trying to preserve the decorativeness of the flower bed. This is mistake.
When planting tulips, it is necessary to foresee in advance the possibility of decorating fading foliage. To do this, annual seedlings are planted among primroses, or the flower bulbs themselves are placed among late-blooming perennials (peonies, daylilies) so that their leaves hide the fading tulips.
It is wrong to trim the leaves of a flower after flowering has ended. From the fading tops there is an outflow of nutrients into the tulip bulb. An infection can penetrate into the bulb through wounds on cut leaves. But it is useful to remove faded buds from the flower stalks so that the plant does not waste energy on producing seeds.
Important! Immediately after flowering, tulips need to be fed with a solution of phosphorus-potassium fertilizer for better bulb formation. The concentration of the solution is made twice as weak as usual.
If the tulip bulbs were dug up early, their tuber did not “dress”, but the foliage remained juicy and green, there are several ways to correct the situation.
- You can return the plant to the ground and wait for the foliage to naturally wilt and turn yellow, then dig up the bulbs and dry as usual.
- You can do the same with the bulbs as with mature flowers - put them in storage. According to reviews from flower growers, both options show good results in the survival of tulips.
Is it possible not to dig up tulips for the winter?
Beginning flower growers often worry about the safety of rare and expensive varieties of tulips in frosty and harsh winters, fearing they will freeze, and want to know when to dig up tulips for the winter. However, it is extremely difficult to preserve dug up bulbs at home during the winter, so they are not removed from the ground for the winter.
Preserve flower plantings from frost by covering the flower bed with agro-fabric, spruce spruce branches, and peat.
Important. The flowerbed is not insulated with straw or plant debris, since mice are easy to breed in such a shelter - they are big hunters of flower bulbs.
Experienced gardeners preserve especially valuable specimens of bulbous plants in pots. When planting tubers in the fall, not in the ground, but in a spacious pot with loose, nutritious soil. With the onset of frost, dishes with flowers are put away in the cellar until spring.
Thus, you can prepare tulips for winter or early spring forcing for flowering at home. A couple of weeks before the desired flowering date, the pot with the tulip is taken out of storage, brought into a warm place, and watered. With good care, the plant will bloom no worse than in open ground.
Do I need to pick the flower to get a good bulb?
You can often see vast clearings of tulips, or more precisely, their leaves, in abandoned gardens. Without proper care and regular drying, the plant's bulbs gradually become smaller and a lot of babies are formed. The flower spends all its energy on maintaining the life of new bulbs, and there is no longer any left for flowering.
Advice. If a florist is faced with the task of obtaining high-quality planting material, the tulip is not allowed to bloom. The bud is removed as soon as it begins to fill. The forces that the flower would spend on flowering will be used to form a strong and full-bodied onion.
Simple or “wild” tulips can maintain their decorative properties for several years without being dug up. Modern beautiful varieties with unusual colors and glass shapes will not bloom without annual drying.
Useful videos from the Garden World channel
When to dig up tulips and how to do it correctly.
How to store tulip bulbs after you've dug them up.
When to dig up bulbs
A sign that the bulbs can already be removed from the ground is yellowed and withered foliage and an unbreakable tulip stem that has acquired elasticity. Typically, such signs appear by the end of June or the beginning of July. In the northern regions, tulip leaves turn yellow later - by mid-August. By this time, the leaves will already have time to transfer the necessary nutrients to the bulbs, and they will be able to restore their strength after flowering.
Growing tulips from A to Z - everything you need to know
Tuber harvesting time
There is no exact date for harvesting tulip bulbs. The choice of a specific number depends on many factors:
- climatic features of the area;
- bulbs are ready for harvesting;
- weather conditions;
- early maturity of the variety.
Only taking into account all the points, the optimal time is chosen. Tulip bulbs are planted in open ground in spring and autumn. The second method is often chosen.
Select date by region
For different climatic regions, the timing of harvesting tulip bulbs will vary. Depending on the region, the following deadlines are adhered to:
- in the southern regions they begin harvesting bulbs from the beginning of June;
- for the middle zone, the optimal time is the end of June - beginning of July;
- in the northern part, tulips are dug up only at the end of July.
More precise dates depend on the condition of the ground part, as well as on the early maturity of the variety.
Determining deadlines by appearance
Determining when the bulbs are ready for digging will inform the appearance of the out-of-this-world part. After flowering, tulips enter a dormant stage. The color of the leaves fades, they turn yellow and gradually dry out.
Such signs signal that the bulbs are ready; they have already collected all the nutrients. The ground part should not be allowed to dry out completely. If it falls off, it will be difficult to find the bulb nests. You can start digging up tulips from the moment when 1/3 of the foliage is dry.
Harvesting the bulbs early will prevent them from accumulating the required amount of nutrients. Next season this will affect the development of leaves and flowers.
When to dig according to the lunar calendar
The influence of the phases of the Moon on plants has been known since ancient times. If you carry out agricultural work in accordance with the lunar calendar, the flowering will be beautiful and the plants will be healthy.
You can dig up tulips in 2021 on favorable days determined by the lunar calendar:
- June – 23, 26-30;
- July – 2, 6, 9-10, 14, 17-18.
If you miss favorable numbers, you can carry out the procedure at any other time. Astrologers recommend avoiding only the periods of the New Moon and Full Moon.
Favorable weather conditions
If the bulb is young, the bud must be broken off until it opens. This point should not be ignored, because all nutrients will be spent on ensuring flowering, and not on the development of the underground part. In this case, there must be at least 2-3 leaves on the stem, otherwise photosynthesis will not be ensured.
How to dig
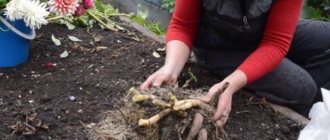
Remove the bulbs from the ground in good, clear weather. A week before the procedure, stop watering the tulips: you need to select the bulbs from dry soil. This must be done carefully, trying not to damage the small children - planting material for propagating tulips. Dig Deeper: If you haven't dug up your bulbs in a few years, they've probably sunk into the depths. It is better to use a fork rather than a shovel for this purpose to reduce the risk of damaging the bulbs.
How to properly dig up tulips after flowering
Having decided on the deadlines, you need to choose the right tools for the job. The gardener individually, taking into account the quality of the soil, chooses the appropriate option for himself. It is recommended to use a fork with sharp, wide teeth to avoid the risk of damaging the nest. This method is not suitable for sandy and loose areas, where it is impossible to turn out the entire earthball with a pitchfork. Shovels, scoops, and special devices are also used.
Do not clear the nests from the soil immediately after digging, as this can damage the roots and protective scales.
Advice! You need to clean the bulbs with a dry paper towel so as not to damage the protective layer.
The tubers dug up along with the soil clod are transplanted into boxes in a thin layer for ventilation. Leave outdoors for 1-3 days. After the foliage has completely dried, the bulbs are selected, cleaned and placed in cardboard boxes for ripening.
Nests that have not disintegrated are divided into bulbs and sorted according to the diameter of the seeds:
- “extra” – 4 cm or more;
- 1st analysis – 3.5-4 cm;
- 2nd analysis – 3-3.5 cm;
- 3rd analysis – 2.5-3 cm;
- children of the 1st category - 1.5-2.5 cm;
- children of the 2nd category - less than 1.5 cm.
For convenience, special calibration templates are often used.
Preparing bulbs for storage
Shake the bulbs off the ground, dry them in a sunny place, cut off the above-ground part and sort by size, discarding damaged, disease- or pest-affected specimens. Wash the planting material selected for storage with a saline solution - dissolve 1 tablespoon of table salt in 1 liter of water. You can also use a light pink solution of potassium permanganate for disinfection. Then dry the bulbs again, arrange them by variety in one or two layers in boxes or crates and attach tags with the names of the varieties. It is most convenient to store the bulbs in egg trays, placing them in cells.
Tulips have bloomed: when and in what month should I dig up the bulbs after flowering?
dug up tulips after they have bloomed.
Professionals in the field of tulip breeding dig up their tubers immediately after the flower stalks wither. That is, at the end of May - beginning of June.
Land owners who do their own landscaping leave the bulbs until the end of June - beginning of July.
Storing tulip bulbs
For three weeks, while buds are being laid for flowering in the next season, the bulbs should be stored at a temperature of 25-28 ºC and air humidity not higher than 70%. Then the planting material is transferred to a cooler, dry room and stored at a temperature of 20 ºC, and from September the temperature is lowered to 15 ºC.
Small tulip bulbs - babies - should not be kept warm: they can dry out. They are immediately stored in a cool place, and in early or mid-August they are planted in a school bed for growing.
- Cossack juniper: planting and care, description of varieties
Do I need to dig up tulips after flowering?
The opinions of many flower growers on the question of “whether it is necessary to dig up tulips” differ. Some argue that digging leads to injury to the tubers. But practice shows that as a result of wintering, irreversible processes occur in the soil:
- chopping onions;
- diseases and pest damage;
- reluctant growth;
- deepening into the soil.
In addition, in the event of a harsh winter, the bulbs can freeze, be destroyed by rodents and pests, and become infected with fungal infections. Every year the tubers go deeper into the ground, the flowers become crushed and lose their characteristic varietal characteristics.
Premature digging can affect the quality; if it is done too late, there is a risk of soil freezing or rotting in the event of heavy autumn rains.
There are varieties that definitely need to be dug up. Without this procedure, flowers may not correspond to varietal characteristics and sizes. It happens that plants are oppressed, get sick and even die.
Experienced gardeners give compelling reasons why to dig up tulips:
- separating the nest to ensure adequate nutrition;
- sorting and calibration;
- strengthening the immune system;
- prevention of rotting;
- soil preparation for future plantings.
After removing the tubers, the soil is easier to cultivate. They dig it up, remove weeds, and apply mineral and organic fertilizers. If desired, annual flowers are planted with seeds or seedlings in the place where the tulips grew. You can return the flowers to their original place next spring by controlling the distribution of vegetation in the flower beds according to ripening varieties, height, size or shades of inflorescences.
Advice! There is a folk way of determining the time for digging: the end of the stem is elastic and easily wraps around your finger.
If spring is cool and rainy, you should not expect complete yellowing of the foliage and stem; the plants are dug up and dried immediately after flowering. This is especially true for early varieties. This way it is possible to prevent rotting processes, the seeds will last longer.
Late tulips are pre-fed, 2 weeks before digging, to strengthen the immune system. Bulbs dug up ahead of time are placed in boxes with a fertile mixture for ripening. To do this, the foliage and peduncle are left on the plants, and the bulb is sprinkled with a dry soil mixture and left to ripen in a warm room with a stable above-zero temperature and a good ventilation system.
Some gardeners leave the tubers in the ground for 2-3 years. This is usually done in the southern regions, with a warm temperate climate, where the soil does not freeze deeply in winter.
Annual excavation helps improve the structure of the earth. For the full development of tulip tubers, loose, fertile soil is required. When digging, the area is freed from remnants of scales and weeds and is saturated with oxygen. Flower crops grow larger if the area has been fully fertilized since the fall.
What to do with tulip bulbs after digging them up
Before storing the bulbs for later planting, they need to be properly prepared. Processing of planting material takes place in several stages.
Sorting
First, sorting is done, separating small bulbs from large specimens. In the future, such material is stored and planted separately, at different depths. At the same time, diseased bulbs and those that were accidentally damaged during digging are rejected.
On a note! There should be no traces of rot or mold or suspicious spots on the planting material. A high-quality ripe bulb is covered with dense brown scales on top.
Disinfection
Before storing, the bulbs must be disinfected, killing pathogenic microflora. This can be done in various ways:
- soaking in a pale pink solution of potassium permanganate;
- disinfection using the drug “Fundazol”, which suppresses the development of fungal spores (1 g per 1 liter of water);
- dressing with “Maxim” fungicide (4 ml per 2 liters of water);
- use of copper oxychloride (4 g per 1 liter of water).
Keep the bulbs in any of the listed solutions for 30 minutes. After this, the planting material is dried.
Drying
It is convenient to dry the bulbs in cardboard boxes, where they are laid out in one layer. In order not to confuse the varieties, they are placed to dry separately, a label with the name is pasted on each box or simply signed with a marker so as not to be confused in the future.
Suspicious bulbs, the condition of which is in doubt, are placed in a separate box so that if the disease develops, healthy bulbs will not become infected.
Some people use nylon nets for drying, in which vegetables are often sold in stores. In them, the bulbs can simply be hung in the barn or attic.
The bulbs should be dried in a ventilated room without direct sunlight, or outdoors under a canopy.
After 2-3 days, the material can be stored.
When can you replant tulips?
The timing of transplanting tulip bulbs is determined by the individual characteristics of the plant variety and the climate of the area. Heat-loving species and varieties in the middle zone and more northern regions are best replanted in the spring. Cold-resistant tulips prefer autumn transplantation - from September 10 to October 10. In areas with a warm climate and mild winters, all types and varieties of tulips, including heat-loving ones, can be replanted during this period of time.
Autumn transplanting of tulips is more preferable than spring: after flowering, the bulbs had time to recover, were not stored for long, and 3-4 weeks will be enough for them to take root in the ground before the onset of cold weather. The main sign that it is time to replant tulips is a drop in soil temperature at a depth of 10-12 cm to 10 ˚C. If you plant the bulbs earlier, they may begin to grow after rooting and die during the first frost, and if planted later, they will not have time to take root and will simply freeze in the ground. Bulbs planted on time in the spring germinate and bloom without delay.
Spring replanting is required, as we have already written, only for some heat-loving species and varieties. The remaining tulips are replanted in the spring only if for some reason they did not have time or were unable to do this in the fall. The main disadvantage of spring transplantation is that only some of the transplanted tulips may bloom this year, but lush flowering can only be expected the next year.
Is it necessary to dig up tulips for the winter?
Inexperienced gardeners are often afraid for the safety of expensive and special types of tulips in the cold and terrible winter, worried that the flowers will not freeze, they want to know when it is tedious to dig up flowers for the winter.
In winter, tulip bulbs are not dug up, because they are very difficult to preserve at home in winter. Flowers can be protected from frost by covering them with a special cloth or peat. You cannot warm the flower garden with raw material residues and straw, because this can lead to rodents that like to gnaw on the bulbs.
Experienced gardeners store rare types of flowers with bulbs in pots. In autumn, the tubers are planted in a pot with loose and nutritious soil. The pot with the plant is put into storage and taken out in the spring. This way you can prepare the flower for blooming at home. A few weeks before the required time, water thoroughly. If you take good care of the plant, it will bloom just like outside.
How to store tulip bulbs before planting in the fall?
In August, tulip bulbs are transferred to a room where the temperature is 20°C. The temperature is reduced in September - to 15-17°C. In this case, it is necessary to reduce ventilation.
Temperature during storage is very important for tulips, since the buds of daughter and replacement bulbs are formed in them, and leaf primordia are formed. If the temperature regime is disturbed, “blind” buds may form during forcing. Throughout the entire storage period of tulips, it is necessary to carry out periodic inspection, removing damaged bulbs, as well as if they show signs of disease. In this case, the planting material will be healthy.
When to dig up tulips in the summer for replanting and plant again?
tulip bulbs ready for storage
The best time to dig up is when the leaves have yellowed. However, do not wait until they die completely, otherwise it will be difficult to find plant bulbs later.
Consider the climatic conditions of the area in which you live. For some, digging in June is appropriate, for others - at the end of July.
Place dried tulip bulbs back into the soil in the fall. The ideal option is during the first frost on the ground. Although many gardeners prefer to do this either:
- for the first school bell
- during the period of planting garlic for the winter
Taking into account the climatic conditions of your area, planting tulip tubers is allowed even in November.
Planting tulips in open ground in autumn
Storage of the bulbs continues until approximately mid-September. As soon as the soil temperature drops to +10-12 °C, you can begin planting tulips.
The specific timing of planting in the ground depends on the growing region and the weather. However, this work cannot be delayed too much; it is necessary to have time to carry it out 2 weeks before the onset of frost. The bulbs must have time to take root.
But planting tulips too early can also lead to trouble. In warm soil, the bulbs will begin to sprout, and then frost will destroy the emerging shoots, which can cause the bulbs to rot and disappear. Even if such a bulb survives, it may not flower or produce a bud too late and of poor quality.
- In the Moscow region, it is recommended to plant tulips from the twentieth of September to mid-October.
- In Siberia, bulbs are planted at the end of August.
- In the Urals, the landing can continue until the second ten days of October (Southern Urals) or end in mid-September (Northern Urals).
For planting, choose a sunny, flat or elevated place where water will not stagnate in the spring. In the shade, the quality of tulip flowering noticeably deteriorates. The bulbs are first placed in the refrigerator for 8 hours, and then treated with antifungal drugs and planted.
Tulips love loose, fertile soil. If the site has clay soil, its structure can be improved by adding sand and peat. The planting depth should be 3 times the size of the bulbs; the children are planted in a separate flowerbed.
Read more in the article: planting tulips in spring
Transplanting tulips in spring
In spring, tulips, previously germinated at home, are planted in the ground. This means you should dig up the bulbs after the tulips bloom and store them in a well-ventilated area until spring. At the end of March or April, sort out the planting material, keep it in the refrigerator overnight, pickle it for 30 minutes in a weak solution of potassium permanganate, then plant the bulbs at a distance of 2-3 cm from each other in containers or boxes filled with fertile soil up to 15 cm deep Sprinkle the bulbs on top with a 5 cm thick layer of soil and water.
When sprouts appear, transplant the bulbs into the flower garden. If you plant tulips in open ground without prior germination, seedlings will appear much later.