If you don't want your tulips to become shriveled and degenerate over time, you need to know when to dig up your tulips and store them.
Unfortunately, many gardeners neglect this agricultural technique. Dear readers!
For you, we have created communities on social networks in which useful articles and interesting ideas are published several times a day! Subscribe and receive useful content in a convenient format! But digging up tulips is very important if you want to preserve the varietal characteristics of specific plants, as well as propagate flowers to form a beautiful flower bed.
In this article we will talk about the timing of digging tulips in different regions and preparing the bulbs for storage. You will also learn about the features of storing planting material until the new summer season.
When to dig up tulips
It is advisable to dig up tulip bulbs in the northern zone from mid-July to the first days of August, in the southern regions (for example, in the Kursk, Lipetsk, Voronezh regions) - in late June - early July. In the middle zone (for example, in the Moscow region, Smolensk, Tver, Leningrad regions), the time for digging up tulips usually occurs at the end of June - beginning of July.
Is it possible to plant tulips in the spring, during flowering? In May and early June during flowering, it is not recommended to replant tulips with flowers. Digging up tulips immediately after flowering will crush the bulbs and lead to fewer flowering plants the following year. Therefore, the harvesting of tulip bulbs begins only after the leaves and stems have completely dried, and the early varieties should be dug up first, and the middle and late varieties should be dug up as the leaves fade.
There is no need to dig up tulips for the winter; they overwinter well in open ground conditions.
The best days for caring for tulips according to the Lunar calendar for gardeners and florists in 2021:
for digging: July 9-15; for applying summer fertilizing: 4–5, 8–14, 18–19, May 31, 6, 14–15, 30 June, 2–3, 6–7, 11–19, 29–30 July, 7, 9– 11, 15–16, 17–18 (organic), August 25–27.
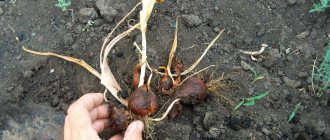
In the photo: freshly dug tulip bulbs.
How to prepare tulip bulbs for storage
The main goals of winter storage are to protect the tulips from drying out and to provide favorable conditions for the germ of a future flower to form inside. Bulbs are prepared for storage in the same way, regardless of the digging season:
- Etching . Planting material is disinfected. The simplest option is treatment with a pale pink solution of potassium permanganate. But the likelihood of mold occurring is less if you use specially designed formulations: “Fitosporin”, “Maxim” and others. The bulbs are dipped into the preparation and kept for 30 minutes.
- Drying . The tulips are laid out on newspapers and towels and left at room temperature for 5-7 days until completely dry. Turn over periodically to evaporate any water that gets inside.
- Sorting . The bulbs are packaged according to size. Small children are stored separately from ripe specimens. Release the bottom by removing the roots and the old mother bulb.
Are you digging up tulips for the winter?
Not really
The ability to be stored for a long time is affected by the condition of the tuber. Like lily bulbs, if there is mechanical damage, the quality of the flowers will be poor. Those unsuitable for planting are immediately removed. To preserve it in winter, it is not advisable to remove all the husks from the surface, as this will cause the bulb to dry out faster.
Is it necessary to pick a flower from a tulip?
To get good, strong tulip bulbs, do not let the plant waste energy setting seeds. Remove the flower head from tulips 3-4 days after the flower opens. When plants in a flower garden fade, it is necessary to remove only the seed capsule, leaving the maximum possible length of the peduncle and leaves. This will cause nutrients to flow from the aboveground part of the plant into the bulb and help it gain strength for flowering next year.
Tie the flower stalks of tulips with large double flowers to the support (for example, representatives of the Late Terry class)
Leave at least 3-4 leaves when cutting tulips for a bouquet. This will help the plants form large bulbs capable of flowering next spring.
What to do when the tulips have bloomed
Immediately after flowering, you should not disturb the plants, because in the next 2-3 weeks they will stock up on nutrients that will help them survive the winter.
And also at this time, the bulb is actively growing, and premature removal of the above-ground part can delay its development. For these reasons, you need to wait a while, not forgetting to care for the flowers - water and fertilize them, as well as remove weeds that take away some of the nutrients and moisture.
How to properly dig and store tulip bulbs after digging
Try to dig up tulip bulbs after flowering in dry and clear weather. To avoid accidentally damaging the bulbs, be guided by the remains of dried stems. Handle small tulip bulbs very carefully - this is planting material with which you can propagate tulips. Take special care to dig up small bulbs in which the replacement bulb becomes deeper.
Tulip bulbs must be sorted by variety, placed in boxes labeled with the names of the varieties and removed from direct sunlight in a utility room or under a canopy. After a few days, the tulip bulbs are cleaned of roots, soil residues and old scales, and taken apart. Healthy tulip bulbs should have light brown scales. Sorted and dried bulbs are laid out in a thin layer in boxes and stored in a warm room for about 20 days at a temperature of +23°C and a humidity of 70-80%. At this time, flower shoots, leaves and root buds are formed. If the temperature at this time is too low, about +5 degrees Celsius, then bud formation does not occur and the bulb does not bloom the next year. Gradually, you need to find a cooler room for storing the bulbs and, until planting, store them at +13...+15° and a humidity not higher than 70%.
How to sort tulip bulbs >>>
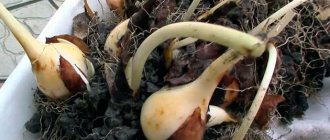
In the photo: newly dug bulbs and baby tulips with roots.
Methods for storing planting material at home
Planting material should be stored in a dark, warm place (about 20 - 23 degrees Celsius) without dampness. The room should be well ventilated. Boxes with holes made or baskets are ideal for containers.
ON A NOTE. It would be ideal to gradually reduce the storage temperature of tulips. Start with 25-27 degrees and end at around 20 degrees. But, unfortunately, not everyone can afford this storage method.
The bulbs are laid out in one layer. They need to be laid out so that they do not come into contact with their neighbors. Tulips folded in boxes can be sprinkled with dry sand or sawdust.
However, there are other ways to preserve planting material.
It is very convenient, for example, to store onions in egg cassettes. Then each bulb will have its own cell. No need to use bulk materials.
A cheap but practical option is to store the bulbs in nylon stockings, string bags and fabric bags.
IMPORTANT! Do not use iron or plastic containers, plastic bags or glass jars as storage containers. If there is no free air circulation, the bulbs will inevitably begin to rot.
Experienced flower growers advise periodically inspecting tulips during storage (once every 2 months is enough) in order to notice putrefactive processes in time and save the bulb.
ON A NOTE. There is a storage method called “wet germination.” Wet sawdust is poured into the container (preferably peat, if you have it). Onions are planted in them and again sprinkled with peat or sawdust. Then the container is removed to the basement and stored until disembarkation.
What to do with small tulip bulbs
Tulip bulbs should be stored in a warm room until autumn planting, and small bulbs - baby tulips - on the contrary, should be stored in a cool place, otherwise they dry out very quickly and may dry out completely. It is important to ensure protection from mice and periodically check the bulbs. At the beginning of August, baby tulips can be planted for growing - in a school or in a garden bed. If you do not have the opportunity to store small bulbs separately, you can plant them immediately - then do not forget to water and weed the plants.
Care after flowering in open ground without digging up bulbs
In regions with a fairly warm climate, tulips can be left to winter in open ground. But in the spring it is still advisable to dig them up in order to thin them out and plant them at a distance from each other. In this case, they will germinate and begin to bloom a little later, but will be larger than those not transplanted. In the summer, be sure to mark the places where the flowers were, so as not to damage them in the spring.
Did you know? At the beginning of the 17th century in the Netherlands, a whole house could be exchanged for one tulip bulb.
Do I need to dig up daffodils every year?
Many people ask why daffodils don’t bloom in the garden and whether they need to be dug up after flowering. Daffodils do not like frequent division and replanting. For lush flowering, they must remain in one place for about 5 years. You can dig up and divide the bulbs 3 years after planting, if additional planting material is really needed. Still, it is better not to disturb daffodils too often: some varieties may weaken and miss flowering the next year or even not bloom after the last transplant for 2 years in a row until they are “sure” that they have been left alone.
Read more: How and when to dig up daffodils >>>.
In the photo: a newly dug curtain of daffodils.
When to plant tulips
Before planting flowers, you should take into account the possibility of the leaves drying out in the middle of summer, which does not look very aesthetically pleasing. To do this, you need to plant the bulbs next to summer flowers so that their bushes will then cover the fading tulips.
You cannot trim the leaves immediately after flowering. The bulbs receive an outflow of useful substances that are needed for proper growth and the appearance of children. An infection can penetrate through the cut, because it is not protected by anything. Flower buds can be trimmed, this is even useful. Then they will not waste energy on seed generation.
This is interesting: Rose Elf (Elfe) - description of the variety and its features
The best time for planting is considered to be autumn, September and early October, when the soil temperature is 6-10°C. Planting is possible later in November. But then you should take care of covering the tulips with leaves or other equipment.
Planting too early can cause bulb disease, because higher temperatures promote the development of viruses. If planted later, the bulb may not have time to develop sufficiently.
For planting, it is better to choose a dry, windless place where the sun's rays penetrate. They grow well in any fertilized and cultivated soil. Loose soil containing humus is most suitable. It can also be planted in clay soils, but provided that it is fertilized with compost or peat. The main thing is that there is no stagnation of water, otherwise in winter the bulbs may be susceptible to disease or simply freeze.
Important! Fresh manure should never be used as fertilizer for tulip bulbs.
When planting, you can and even need to use special bulbous fertilizers. They can be bought in specialized stores. They contain all the essential minerals and nutrients needed for normal growth and development.
Before planting, you need to inspect all the bulbs for damage and diseases. Selected tulips need to be treated with a solution of potassium manganese for 1 hour. They should be planted in the garden immediately after treatment.
For extra-class plants, the planting depth is 17 cm, the second and third fences are planted at a depth of 13 cm, the children are even smaller - about 7-9 cm. You should not press hard into the soil so as not to damage the roots.
If planting is done on dry soil, then the furrows must first be watered generously, then fertilizer must be applied and covered with soil. Only after this is the bulb itself planted to a depth of 9-10 cm with the roots down.
Note! It is necessary to constantly change the planting site; they return to the previous one no earlier than after 3 years. When frosts begin, it is worth laying a little peat on top of the beds, then the flowers will be protected from frost. This layer creates favorable conditions for development. It is not removed in the spring.
When to dig up daffodils after flowering
You need to dig up daffodil bulbs and plant nests on average once every 4-5 (up to 6) years, when the bulbs begin to crowd each other and flowering weakens.
The timing for digging and planting daffodils differs from tulips and hyacinths. Although the narcissus foliage dies back after flowering, it does not have a pronounced dormant period. Nutrients move in the bulb, and organs form and develop. Daffodils should be dug later than tulips and hyacinths, as soon as the foliage turns almost completely yellow (June-July), and planted earlier - before the end of September. The optimal time to dig up daffodils is the second half of August, since the roots of daffodils grow most actively in September.
Do not rush to dig up daffodils until their foliage completely turns yellow. The bulb must have time to draw all the nutrients from the leaves and put them aside in reserve. For daffodils, this period can last almost 2 months, and in damp weather it can be even longer.
After waiting for the foliage to turn yellow, it is better not to delay digging up the daffodils: when the leaves dry out and fall off, the exact location of the bulbs will be difficult to determine, and you risk accidentally damaging them.
How to properly disassemble, divide and prepare daffodil bulbs for storage >>>.
The best days for digging up daffodils according to the lunar calendar for gardeners and florists in 2021:
for digging up daffodil bulbs - 6, 11-13, 16-18 (the most favorable days), June 28-29, July 10-15.
In the photo: dividing daffodils after digging.
Do all tulips need to be dug up every year?
Most tulips need to be dug up and replanted annually, but there are varieties for which this procedure can be carried out only once every 3 years or even less often. These are Simple early and late, Triumph, Greig, Kaufman, Darwinian hybrids, Foster.
When to dig up hyacinths after flowering
If tulips are planted among perennial flowers, they also do not need to be dug up every season. In this case, you need to focus on the appearance of the flowers: if the plants bloom magnificently and do not get sick, then you can leave them in the ground for another season, and next spring evaluate the condition again.
Note! If the tulips are in the soil in a planting basket, they still need to be dug up and sorted out. They cannot “go” to depth, but small onions not selected from the mother bulbs will interfere with full flowering, taking away nutrients and juices.
When to dig up hyacinths
Hyacinths must be planted and dug up every year, otherwise it will not be possible to preserve the varietal characteristics of the plants. In the conditions of the middle zone, for the normal formation of vegetative organs and inflorescences of the next year, it is advisable to dig up hyacinth bulbs annually. Without this, flowering weakens already in the second year, and then completely disappears.
It is best to dig up hyacinths in late June-early July, when the leaves turn yellow. The dug up bulbs are carefully cleaned of soil, the leaves are cut off and dried for 2-3 days. Then they clean off excess scales, roots, growths on the bottom, separate large new bulbs (babies) and put them away for storage. The total storage duration is about 95 days. Of these, it is advisable to store the bulbs for 2 months at a temperature of +25...+26°C, then for a month at +17°C. The humidity in the room where the bulbs are stored should not be too low so that they do not dry out. To maintain moisture, you can spray the bulbs with water from time to time.
In the photo: bulbs of dug up hyacinths.
How to grow large hyacinths >>>
Favorable days according to the 2020 Lunar calendar for gardening and gardening for digging hyacinths: 6, 11-13, 16-18 (the most favorable days), June 28-29, July 10-15.
How to store
Every professional in growing this crop knows how to store tulip bulbs at home before planting. In order to subsequently grow beautiful flowers, you need to comply with the extraction time (no earlier than July), the requirements for storage, sorting, and processing before planting in open ground in the fall.
Maintenance of tubers in winter
Important! In Holland, growing bulbs is tantamount to a cult; Amsterdam has its own tulip museum. The volume of flowers exported from the Netherlands accounts for three quarters of all tulips sold on the planet. Dutch farmers offer to buy bulbs of the main forcing varieties at cheap prices wholesale or retail.
How to preserve after digging before planting
The process of extraction and subsequent preservation is biologically necessary. The mother's mature bulb begins to die, subsequently preserving the young (children). This course of things resumes in the new season, accordingly, the issues of growth and development become worse: there is not enough food and space for seating. Flowers begin to fade, thin out, and lose their elegance.
Process of saving in a box
You also need to dig up tubers for the winter in order to prepare the soil:
- Add fertilizers, peat and sand to it,
- Increase its fertility
- Remove the roots of weeds without causing damage to the flowers.
Note! If, after digging, you remove the remaining scales from the bulbs, this will reduce the risk of infecting the flowers with caterpillars of pests and fungal diseases. Annual treatment of planting material with a mixture of potassium permanganate or “Fundazol” will also be useful.
Digging also promotes the propagation of valuable crop varieties. If you plant an onion and do not remove it for the winter, it will begin to go deeper into the soil, from where it will be more difficult for the sprout to break through.
Bulbs dug up
How to store correctly:
- At the time of extraction, the bulbs need careful care. If the top protective layer is damaged, a fungal disease may occur.
- Store optimally in a wooden box. Cardboard often becomes damp and does not allow air to circulate well, so fungal or bacterial infection may occur.
- If desired, planting tubers are placed together with wood shavings to remove excess moisture.
- The bulbs are laid in one layer.
- If you have a basement, it makes sense to place the bulbs directly on a dry shelf, but it is necessary to control temperature changes.
- Professionals store the bulbs in special thermal chambers, where the optimal temperature is maintained.
- In rare cases, bulbs are stored in the lower section of refrigerators, where the temperature is kept around 3-5 degrees.
After all the tulips in the garden are cut, the bulbs ripen for about a month. At this moment, the stems and leaves die off, and the bulbs begin to turn brown. They can be taken out already at the moment when two or three green leaves have turned yellow and withered. As a rule, this period begins in the third decade of July.
Important! You cannot remove the tubers ahead of time. In this case, they do not have time to ripen and form, so the protective layer will not become stronger, this will contribute to the development of fungal diseases. As a result, the bulbs will not be able to survive until planting. Even if they stay there, they won’t produce good blooms.
Processing the bulbs after digging
The processing process after digging has an important function - to prevent the bulbs from rotting and protect them from bacteria and fungus. First, the bulbs are dried, then processed.
Processing process
Note! In some cases, it is possible to rinse the tubers with cold running water immediately after digging. Then either disinfect it with karbofos or put it in 50-degree water for 10 minutes. A solution of potassium permanganate will also be a treatment option. In this case, the bulbs are sent after processing for drying and then for storage.
If the tubers were not processed before drying, then after a week they should be treated with sodium permanganate or a contact fungicide.
How to dry onions
When the bulbs are removed, you should not clean them of scales or soil. Place the tubers in baskets or well-ventilated containers in a dry, warm place for about a week.
Suitable places:
- Veranda,
- Canopy,
- Alcove,
- Shed with good ventilation.
Drying planting material
Note! When the bulbs are sent for drying, they should not be exposed to direct sunlight.
After a week, the tubers are cleared of covering plates and roots, rotten and damaged ones are removed, the rest are sorted by size. If there are minor damages, they can be cut off, removed with a sharpened knife, and then washed. Then the planting material should be processed.
When to dig up lilies
Lilies require replanting every 3–4 years. Due to the perennial subbulb roots, lilies have virtually no storage period: the loss of these roots can result in the plant not blooming after planting. Therefore, summer-autumn digging and dividing of lilies should coincide with transplanting and planting in a new place. If necessary, lilies can be transplanted at any time of the season without disturbing the ball of earth with roots.
Lilies from the groups Asian hybrids and LA hybrids
Lilies from the groups Asian hybrids and LA hybrids usually form a lot of children, so try to dig them up and plant them every year, otherwise they will greatly weaken the mother bulb, flowering will be weak and short-lived.
Lilies from the groups Oriental hybrids, Martagon, tubular and OT hybrids
Lilies from the groups Eastern hybrids, Martagon, tubular and OT hybrids usually produce few children per season. Therefore, lilies of these groups do not need to be planted every year; it is enough to plant them once every 5-7 years.
In the photo: lily bulbs prepared for sale after digging.
The time for transplanting lilies to a new place should coincide with the end of the growing season, when the lily bulbs get stronger after flowering. In the northern regions, the best time for transplantation is early autumn (late August - September), in the middle zone - mid-autumn (September - early October), in the southern regions - late autumn (October - November).
Timing for digging up lilies
In order for the plants to take root well in a new place and prepare for winter, it is better to divide the lilies at the following times:
— Asian and LA hybrids – from August 15 to 20;
— OT hybrids – from August 25 to September 1;
— Oriental hybrids – from September 1 to 5.
It is better to dig up non-winter-hardy tubular lilies every year for the winter, dry them and store them in a frost-free room.
Immediately plant all dug up lily bulbs in a permanent place.
If necessary, lily bulbs can be stored for a short time wrapped in sphagnum moss in a cool place, for example, in the vegetable compartment of the refrigerator. When digging up overgrown lilies, carefully separate all the resulting baby bulbs and plant them in specially prepared places.
How to plant lilies correctly >>>.
Storing bulbs in winter
If for some reason you did not plant the bulbs in the fall, you can try saving them at home until spring, but in this case they will bloom later. In addition, winter storage of bulbs is more difficult than summer storage.
Optimal humidity for winter storage is 40-50%, temperature – +1…+4 ℃.
For the winter, planting in a moist substrate is allowed - it is only important to maintain the temperature no higher than the specified temperature so that the leaves do not grow prematurely. Caring for planting material in the described situation consists of spraying the soil as it dries out and ventilating the room about once a week.
In spring, sprouted tulips need to be carefully transplanted into a flowerbed with a clod of soil.
Also, for the winter, the bulbs can be placed in boxes and covered with peat with a layer of about 10 cm.
If there is little planting material, it can be stored in the refrigerator on the vegetable shelf. In this case, each onion is wrapped in paper. Do not place them near pears or apples, which emit ethylene, which negatively affects the flower bud, and make sure that the temperature does not drop below zero.
Is it necessary to dig up and when is the imperial hazel grouse
Imperial hazel grouse bulbs can be grown in one place without replanting for 2–3 years. In nature, it grows in climates with hot and dry summers, and the bulbs need to warm up, just like in their homeland, in order to set a flower bud for next year. Therefore, to guarantee flowering, the imperial hazel grouse must be dug up every year and put away to dry at a temperature of +30°C until August. It is best to dig up bulbs when the above-ground parts begin to dry out - in mid-to-late June. You cannot delay cleaning; in humid summers there is a risk of bulbs rotting. Hazel grouse bulbs are devoid of covering scales, so during storage it is better to cover them with peat, sawdust or sand, otherwise they will dry out.
By the time storage ends at the end of August, hazel grouse bulbs begin to appear new roots and sprouts, long roots grow - this is a signal that it’s time to plant the bulbs.
In the photo: imperial hazel grouse bulbs prepared for autumn planting.
Bukhara hazel grouse (F. Bucharica) and stenantera (F. Stenanthera) also necessarily require digging and drying the bulbs every summer. This can be done by growing them in pots, removing the pot from the soil and putting it in a dry place until September.
The most popular and frost-resistant species of hazel grouse >>>.
How to propagate and keep different hazel grouse >>>.
How do tulips propagate?
Tulips can be propagated by seeds or bulbs.
Tulip seeds
The method is used to breed new varieties, as well as to harden plants and acclimate them to a more severe climate.
Tulip seeds
This is basically how tulips reproduce in the wild. The seeds ripen in up to two months and are ripe by the end of August. A ripe seed box begins to darken and crack.
To make the work easier, the seed pods are cut off at the beginning of August and given the opportunity to ripen in the house.
Knowing how to grow tulips from seeds at home, you can arrange a flower garden on the balcony: drainage is required at the bottom of the container, followed by fertile soil. The bulbs are planted two-thirds of the depth of the pot.
Propagation of tulips by bulbs
Bulb propagation is carried out every year. Deadlines must be met. If you dig up the bulbs early, they will not last until spring, and if you dig them too late, they are easily damaged.
Bulb
Usually, good, formed bulbs already have strong roots and protective scales - such specimens guarantee good flowering next year.
The selected bulbs are examined for sores and damage, leaving only healthy ones. They are washed with water and soaked for half an hour in a weak solution of potassium permanganate, then dried. More information about working with bulbs is written above.
For a good harvest, it is important to know the type of flowers in order to care for them correctly. It is advisable to dig up tulip bulbs every year, observing the conditions so as not to damage the planting material. Beginner flower lovers should better listen to the recommendations of experienced gardeners - this is the only way to grow beautiful tulips.
When to dig up crocuses
Spring crocus can be grown in one place without replanting for 3–4 years. There is no need to dig up crocus corms every year unless you need to propagate the plant and get large marketable bulbs. The rate of growth of crocuses and the formation of daughter bulbs varies, and varietal plants need to be divided more often. When the corms crowd each other and become smaller, the nests need to be planted.
The timing of digging up crocuses depends on the flowering time of the plants. Autumn-flowering species (K. Banat, K. Pallas, K. beautiful, K. Kholmovoy, K. pretty, K. Sharoyan, K. Kochi, K. yellow-white, etc.) can be divided earlier - in June-August. Spring-flowering (K. spring, K. yellow, K. reticulated, K. Korolkova, K. two-flowered, K. Heichel, K. Sieber, K. golden, K. Ankyra, K. Adam, K. Alataevsky, K. Tomasini) - in July-September, when the plants are at rest. The planting material is dried, freed from roots and defective scales, after which it is inspected, diseased specimens are rejected, mechanical damage is disinfected by sprinkling with crushed coal or ash. Store in cool, dry rooms for two to three months, then plant in the ground.
In the photo: crocus bulbs prepared for autumn planting.
Favorable days for digging up bulbs and dividing crocus nests according to the 2021 Lunar Sowing Calendar: July 10-15, 5-6, 12-14, 17-18, 21-22 August, 1, 9-14, 18-23 , September 26-27.
Tulip planting depth
How to plant tulips deeply is not an idle question and is very important. If the bulb is deeply buried in the soil, then it may not be possible to wait for shoots, and planting too shallowly is fraught with frostbite.
Important! There is a rule when tulips are buried in the ground when planting to a depth equal to three times the height of the bulb. This rule is relevant when growing crops in light, pre-prepared soil. If the soil is dense, then the planting material is deepened to a distance equal to two times the height of the bulb.
Planting material of different sizes is first sorted by size, because they are not deepened equally.
When to dig up small bulbous plants
Small-bulbous plants (white flower, candyk, scylla, muscari, snowdrop, scilla, pushkinia and chionodox) do not need to be dug up every year. They can grow in one place for 4-5 years. It is necessary to divide and plant muscari for replanting when the nests have grown greatly, so that they do not interfere with each other and the flowers are large. You can start working when the leaves of the plants begin to dry - in late summer-early autumn. If your muscari and other small bulbous plants are too young to divide and replant, simply trim off any yellowing leaves.
The dug up bulbs need to be cleaned of soil and roots, dried for several days in a well-ventilated area at an air humidity of 70% and a temperature of +17ºС. After this, the bulbs must be immediately transplanted to a new location. If planting is delayed, place the bulbs in a container of peat or damp sand to protect them from drying out.
Favorable days in 2021 for digging up bulbs of small-bulbous plants according to the Lunar sowing calendar of the gardener: July 10-15, 5-6, 12-14, 17-18, 21-22 August, 1, 9-14, 18-23, September 26-27.
In the photo: the process of digging muscuri during the flowering period.
Methods for storing tulip bulbs before autumn planting
After processing and drying the bulbs, they are removed to a warm, dry and well-ventilated room. The optimal temperature is +25-30 degrees.
Important! You cannot store tulips in the basement, cellar or refrigerator.
For storage, it is best to use vegetable plastic boxes with holes for good air circulation so that moisture does not stagnate. You can also use cardboard egg trays.
Interesting! Many people immediately plant bulbous flowers (tulips, crocuses, daffodils, hyacinths, lilies) in special boxes. It protects the flowers from mice and is then easy to dig up and store in it until the next time the bulbs are planted.
The main storage conditions are warmth, dryness and air circulation.
Advice! Closer to autumn, when the air drops to +20-25 degrees, the temperature in the storage area should be lowered to +14-15 degrees. Then the bulbs will tolerate planting well in cool soil.
Watch the video! How to store tulip bulbs
An interesting life hack for creating a multi-layer flower bed
Original multi-layer plantings of tulips save space in the flowerbed and also allow you to extend the flowering period. To create a multi-layered flower bed, choose tulips of different flowering periods and sizes.
Large onions of late varieties are laid out in a deep furrow at a distance of 15 cm, covering them with a thin layer of soil. Planting material of early tulips is laid out between these bulbs. You need to be careful not to get on the growth point of the first row of flowers. Lightly sprinkle the second row with soil, after which small-bulbed tulips, daffodils or other bulbous crops are planted in the free spaces.
You can plant tulips in layers in pots, alternating them with other bulbous plants: daffodils, muscari, crocuses.
Are there varieties that don’t need to be dug up?
Variety Johann Strauss
There are varieties whose bulbs do not require annual removal from the soil. These are mainly varietal variations of tulips from the group of Foster, Kaufman and Greig. These species are botanical and reproduce very slowly.
Pinocchio variety
Here are the most popular of these varieties:
- Johann Strauss;
- Giuseppe Verdi;
- Heart's Delight;
- Ali Baba;
- Princess Charmant;
- Sylvia van Lennep;
- Pinocchio;
- Passionale.
Variety Hearts Delight
But this does not mean that having planted botanical tulips in your garden once, you can forget about them. Bulbs of these species also need to be dug up, they just do this not annually, but once every 4-5 years.