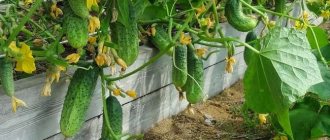
Cucumbers are liana-like plants. Under natural conditions, they seek support for themselves in the form of neighboring trees and shrubs, clinging to them with their shoots. In garden growing conditions, without proper support it will not be possible to get a good harvest - the bushes will not have enough sun and air for normal fruit formation. Therefore, a net for cucumbers is often used by summer residents; it not only allows the plant to develop normally, but also makes it easier to care for.
Purpose of trellis for cucumbers
Cucumbers will not be able to show high yields even with excellent care if they are not tied up correctly. Before planting them in a greenhouse or open ground, it is very important to think through the support structure in advance. Most often, summer residents use trellises.
They can be either stationary or portable. Their main task is to support the cucumber loops, which allows the bush to be evenly illuminated, breathe and form correctly.
What other advantages do trellis growing have:
- The stem has the ability to grow upward, which reduces the risk of developing putrefactive lesions and limits the access of some insect pests, such as slugs.
- The bush grows and develops faster, as a result of which it is possible to obtain the maximum possible number of fruits from it.
- If the vine is placed correctly on the trellis, the fruiting period can be greatly extended.
- The care of plantings is simplified.
If climatic conditions allow for growing cucumbers in open ground, then a trellis bed can become a decoration of the site and serve as a hedge on it with an aesthetic design.
Features of care
Cucumbers are not a fussy crop. If you properly care for the beds and take into account the developmental characteristics of the plant, it will not be difficult to grow a decent harvest.
Watering
Cucumbers are moisture-loving crops, so they do not allow the soil to dry out too much. Otherwise, the green mass will dry out, and the ovary will turn yellow and fall off. However, waterlogging the soil is also undesirable, since the root system will rot and fungal infections may occur. Basic rules of watering:
uniform watering promotes the formation of beautiful, even fruits
Alternating drought with waterlogging can lead to bitter fruits and their deformation; It is important to take weather conditions into account. In dry, hot weather, the beds are watered every day; If the plants have not been watered for a long time, the volume of watering is increased gradually.
It is advisable to water the bushes with warm water. Morning and evening hours are the optimal time for watering plants. The wet soil needs to be slightly loosened.
Mulching
The benefits of mulching cannot be underestimated: mulch maintains soil moisture, looseness and fertility, and prevents overheating and cooling of the plant root system. Different materials are used to mulch cucumber beds:
- depleted soils are mulched with an organic mixture (manure mixed with hay or straw);
- A common option is mowed grass. It is not recommended to use freshly cut greens (mulch cakes, does not allow air to pass through well and can rot), or grass with seeds. Dry material is applied in a layer of at least 7 cm, otherwise the soil in the cucumber bed will dry out quickly;
- mulch from rotted sawdust improves the structure of the earth;
- Cover the ground with a special black perforated film before planting cucumber seedlings. Holes for seedlings are marked in advance. To prevent the ground from overheating too much, a white covering material is laid over the black canvas.
The dug up beds are covered with mulch in the spring. Pre-litter is removed, fertilizer is applied and the soil is moistened.
Fertilizer
During the season, the beds are fertilized at least four times. When choosing top dressing, you need to take into account the fertility of the land, climate characteristics, and season:
- after planting, manure, saltpeter, and potassium salt are used to stimulate the growth of green mass;
- When the first flowers appear, ash and superphosphate are used. The composition is added to the soil or simply sprayed on cucumber bushes;
- to prolong the growing season, use organic matter or diluted urea (15 g of fertilizer is diluted in 10 liters of water).
If the soil was well fertilized in the spring or the area is fertile, then fertilizing the cucumber bed can be applied twice (at the beginning of the season and to prolong the growing season).
Trimming
Experienced gardeners know that increasing vegetable yields is possible not only by adding fertilizers to the soil. A simple pruning procedure allows you to reduce the growth of green mass and direct nutrients to the formation of the ovary and the growth of fruits. Basic rules of procedure:
- It is better to do pruning in the morning;
- use special sharp garden shears;
- if the growth of the stems has slowed down, you need to thin out the leaves - carry out lightening pruning.
In greenhouses on a cucumber bush below the 6th leaf, all stepsons and leaves are torn off. With further growth of the plant, you can leave several side shoots (no more than six), but you need to make sure that they do not grow longer than 25 cm.
In open ground, cucumber bushes form into several stems, since bee-pollinated varieties have male flowers on the central stem, and female flowers on the side shoots.
Advantages and disadvantages of growing cucumbers on a trellis
Experienced gardeners, subject to strict agrotechnical requirements, sometimes grow cucumbers in the garden using the spreading method. But it is not suitable for all regions and not for every type of soil. Therefore, most gardeners still use the trellis method.
Growing cucumbers using the spreading method
It provides:
- Uniform lighting of plantings, which accelerates the formation of sugar in fruits, making their taste richer and more pleasant.
- Good ventilation of the space inside the bush: moisture does not linger there, which minimizes the risk of rot and other diseases.
- Rapid evaporation of liquid used for watering or fertilizing: no drops remain on the leaves, which can cause burns.
- Uniform placement of lashes on supports. There is no need to disturb them once again, as when growing them in a spread bed. The less we touch the bush, the better for its growth and development.
- Simplifying the procedure for caring for cucumbers.
Read about common cucumber diseases and methods to combat them.
Cucumbers grown on trellises do not touch the ground, their surface is always clean, there is practically no rot on them, and it is more difficult for pests to get to their tasty prey.
The only caveat is that when growing trellises, more water and fertilizers will be required. But the harvest after good feeding and timely watering cannot but rejoice. Among other things, uniform lighting leads to the fact that the ovaries and fruits form faster, and accordingly, the harvest can be harvested earlier. If plants experience a lack of light, then only male flowers will begin to appear on them. This will lead to a lack of fruiting on the bush.
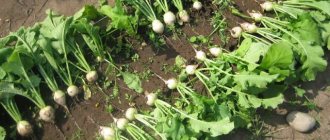
Features of harvesting
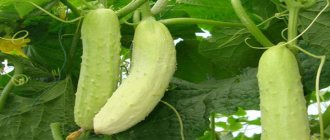
On average, the ripening time for cucumbers is 40 days. The time of harvest largely depends on the purposes of its further use:
- to preserve tiny cucumbers, they are collected at the age of 2 days;
- to curl gherkins 5–9 cm long, they are picked when they are 4–5 days old;
- For traditional fresh consumption, cucumbers are removed from the trellis when they reach 8–12 days, when their length is 10 cm or more.
The regularity of harvesting should be 2 days, since a delay in this process can lead to less intense fruiting. To do this, it is better to arm yourself with a knife and cut the necessary fruits. It is highly undesirable to pick, pull and twist the stalks, as this weakens the bush. It is better to pick cucumbers in the morning or evening, when solar activity is not very strong. The harvest is stored in a cool place.
Learn about ways to increase the yield of cucumbers.
At the end of the harvest, it is necessary to remove all remnants of vegetation from the trellis and destroy them, preferably by burning them. This will help prevent the spread of possible diseases in the future. The netting, twine or wire (whatever was used to support the stem on the trellis) is removed from the stakes. After which they are also removed from the soil, dried, and stored in a utility room for winter storage. After removing the trellis, you need to take care of the soil by digging and fluffing the soil, removing the roots of the bushes from it. After this, you can start preparing the bed for growing the next crop: fertilize it with manure and mulch it.
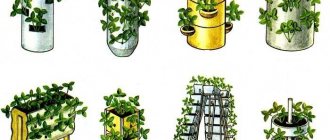
Choosing a design for gartering cucumbers
Each gardener chooses a trellis structure based on the individual characteristics of the garden bed or greenhouse. Before you begin constructing a support, you need to analyze the following:
- What materials are available.
- Where is the trellis planned to be placed: in an outdoor garden bed, in a greenhouse or greenhouse.
- What are the climatic features of the region, how often does it rain and wind?
- Where is the best place to place a garden bed on the site and is it possible to make it part of the decor?
Read how to make a greenhouse and greenhouse for cucumbers with your own hands.
When making a support, it is additionally determined what size passages should remain between plantings, how water will be supplied, etc.
In addition, it is very difficult to decide on the shape of the trellis, which can be square, round, arched, lattice, rectangular, cylindrical or other. It all depends on your capabilities, imagination and area of the site.
To make the structure, you can choose any available materials:
- Branches of different sizes, pre-treated and cleared of bark.
- Metal profiles, fittings, corners.
- Wire, synthetic, rope mesh.
Horizontal
This method is one of the most common. Beginning gardeners who do not want to spend a lot of time and effort on summer gardening are very fond of it. The structure is prepared simply: two metal or wooden posts are driven in at different ends of the bed, between which strings, ropes or thick wire are stretched.
The distance between the horizontal rows should be from 25 to 30 cm. For convenience, you can attach additional vertical ropes to which the growing shoots will cling. After they appear, you need to carefully attach them to the lower support, and then just adjust the direction of their movement.
Helpful advice! You should make the supports high enough in advance, focusing on the size of the bush of the selected variety. As soon as the stems reach the top bar, they will either have to be trimmed or carefully let along the back side of the trellis, which can thicken the plantings.
Vertical
This method is characterized by the absence of horizontal supports. Two iron or wooden supports are also dug into the sides of the bed, with one horizontal plank attached to the top. Vertical pieces of fabric or thick pieces of twine are tied to it. There will be as many of them as you plan to plant.
Young shoots need to be hung and attached to hanging ropes, and later you won’t even need to guide them, they will curl and grow as needed. Sometimes thin wooden supports can replace the fabric.
The vertical design makes it possible to plant a large number of bushes at once in one bed.
Using a grid
A special mesh can be purchased at a garden store. It is stretched between two support posts dug into the ends of the beds.
Plastic
Trellis
Wooden
In this case, the plant does not even have to be hooked to the support - the shoots will find their way and crawl up the structure. The mesh is sold in rolls. The standard cell sizes are 0.17x0.17 mm, but a smaller fraction of 0.1x0.1 mm can be used. You can purchase the size you need.
If you plan to make a decorative element out of a garden bed, then it is better to choose a wooden lattice.
Rectangular and bower type
The rectangular structure is constructed by digging in support posts at all four corners of the bed. If the distance between them is more than 2.5 m, then it is necessary to install additional supports in the middle.
The height of the trellises should be at least 70 cm. If there are no iron supports at hand, then dense wooden stakes can replace them. They are connected to each other like a hut, secured at the top with a tight rope. Most often this method is used in open ground.
Round and arched type
If you have free time and a desire to get creative, then you can create a round trellis. For it you will need one thick peg, two bicycle wheels and a rope. The support is driven into the ground, at the bottom and at the top it is crowned by two circles, between which ropes are stretched.
To create an arched trellis, you will need plastic pipes, for example, propylene, which need to be bent in an arc and dug into the ground. To make the structure more reliable, you need to secure the structure with vertical supports. The arch will look most interesting if it is made from mesh.
We recommend a video on how to make a collapsible trellis for cucumbers with your own hands:
Mistakes when gartering
Some difficulties and errors when tying have already been mentioned in the article, let us dwell in more detail on the main ones.
- Thin threads and artificial cords for attaching the stem to ropes. Thin material or nylon threads can damage the delicate surface of the plant and leave cuts on it. Such wounds can lead to death. Use a soft cloth. Ribbons 2 cm wide are perfect for garters.
- Too tight. Do not tie the stem to the main cord very tightly. A compressed bush will cripple the stem as it grows. It is much more convenient to tie the leash so that a finger fits between the loop and the branch.
- Incorrect timing of garter. It is impossible to be late with tying, since a stem more than 30 cm can break under the weight of the bush or from the influence of the wind. But you shouldn’t tie up the plant too early - this makes no sense, and as the bush grows, the procedure will still have to be repeated.
- Too frequent tying of new shoots. If a plant gets caught on a mesh or structure, then it can weave further on its own and you just need to guide its growth. Do not fix the whips at each new level.
Tying cucumbers is a necessary process. Proper formation of bushes provides the basis for healthy growth and fruiting of the bush. Therefore, a high-quality result of growing a crop will follow only with competent care and careful monitoring.
0
0
Copy link
Features of gartering cucumbers to a trellis depending on the growing location
The method of gartering cucumbers will differ depending on where the crops are planted: in a street bed, in a barrel, in a greenhouse, in a greenhouse or at home.
Open ground
There are two main methods of growing cucumbers - spread and trellis. The second method has become more widespread among gardeners because it has a number of undoubted advantages. But it will work only if all necessary agrotechnical requirements are met:
- The bed should be located in a well-lit place, where there are no drafts or cold winds.
- The acidity of the soil should not be high; cucumbers love slightly acidic or neutral soil.
- Choose places for future plantings where favorable predecessors were previously located - cabbage, nightshade or legumes.
Before planting seedlings in a permanent bed, you need to prepare the place in advance:
- Build a trellis structure.
- Feed the top layer of soil by adding compost or humus. For each square meter you will need from 10 to 15 kg of fertilizer.
- To protect the cucumbers from the wind, the borders of the plot are planted with tall crops, from which a hedge is formed - sunflowers, beans or corn.
- Depending on the type of trellis chosen, ridges up to 30 cm in height are formed for planting seedlings.
It is not necessary to make the trellis structure monolithic and welded. It can be as simple as two wooden pegs firmly planted in the ground. A strong twine is stretched between them; 2-3 rows will be enough. Some gardeners prefer to build a structure that resembles a hut.
You can use a barrel as a garden bed, place it next to the fence, and the chain-link will serve as a trellis for cucumbers.
Lately, there have often been beds in areas where the trellis is a special mesh with large cells of 15x17 cm. It is pulled between the supports using dense wire threaded through the cells.
You can plant seedlings in a permanent bed when 4 full leaves appear on it. Depending on the variety, different distances between bushes are used:
- 25-30 cm for weakly branching bushes;
- 30-40 cm for plants with strong branching.
The passage between the rows should be approximately 100 cm. This distance must be maintained so that the seedlings do not shade each other.
In order for the plants to take root faster and not die due to temperature changes, before the first shoots appear, they are covered with a thick film, thereby simulating greenhouse conditions.
As soon as the cucumbers take root and begin to actively grow, the covering material can be removed. To provide the necessary moisture, it is best to organize drip irrigation and cover the top of the bed with a layer of mulch or agrofibre.
After the adaptation period is over, you can begin to form the lashes. This is done in several stages:
- A little below the first leaf, a loose loop of twine or a piece of fabric 2-3 cm wide is tied to the stem.
- A peg is dug into the ground near the seedling. This must be done very carefully so as not to damage the delicate roots. The free end of the string is attached to it.
- The whip is wrapped with a rope so that the next circle falls on each internode.
- It is recommended to “blind” the 4 lower nodes, that is, remove all side shoots and buds beginning to form. This will help the cucumbers grow faster and gain strength.
As soon as the vine begins to grow intensively and move upward, it is necessary to form cucumbers on a trellis in the open ground.
The bush should be divided into three parts:
- from the ground to a height of 1.6 m - the first side shoot above the 1st leaf is removed;
- from a height of 1.6 m to 2 m - pinching is carried out above the second sheet;
- from 2 m and above - the vine is either pruned or thrown over the other side of the trellis and continues to develop into one stem.
This formation is characteristic of the parthenocarpittic type of cucumber.
Read about the formation of cucumbers in open ground and greenhouses on our portal.
Greenhouse
In greenhouse conditions, tied cucumbers grow better and produce more yield. And caring for such plants is much easier than when spreading vines in the garden.
Some novice gardeners make the mistake of tying a rope with a tight knot to the stem at the base of the shoot. And when it begins to grow, the loop can cut the stem, disrupting metabolism or even destroying it. It is best to bend the wire into a “daw” shape and tie the rope to it. After this, all that remains is to stick an improvised hook into the ground near the bush.
In greenhouse conditions, vertical, horizontal or mesh methods for creating trellises are most often used.
Advice! After the length of the stem reaches 50 cm, all tendrils and shoots that form above must be removed. This will help increase yield and reduce the risk of disease.
To ensure maximum illumination for the bush, you can tie the shoots in the shape of the letter V, and not parallel to each other.
The peculiarities of growing greenhouse cucumbers differ from street ones. This is due to a number of reasons:
- Seeds and seedlings can be planted according to a schedule convenient for the gardener, since this procedure is not tied to specific dates or certain weather conditions.
- The microclimate in the greenhouse is very similar to the tropical conditions in which cucumbers originally grew in their natural environment.
- In a greenhouse, you can artificially adjust the humidity level and temperature regime.
- When choosing bee-pollinated varieties, it is necessary to ensure that the windows are regularly opened so that insects have access to the flowers.
- By following certain rules, it is possible to increase the fruiting period of greenhouse plantings by 1.5 times.
- With fertilizing and fertilizers, it is possible to ensure that the yield in the greenhouse will be twice as high as in outdoor beds.
- Timely pinching will help increase the volume of fruits and increase the immunity of plantings.
- Cucumbers must be removed from the bush on time so that they do not overripe - this weakens the bush and reduces its productivity.
We recommend an article on how to make a greenhouse and greenhouse for cucumbers with your own hands, incl. made of polycarbonate.
Even if the greenhouse is not heated, it still grows much more fruit than in an open garden bed. The minimum temperature at which the crop continues to bear fruit is 15 degrees Celsius. This weather in the middle zone can persist until mid-October.
For most regions of our country, greenhouse cultivation of cucumbers is the only possible way to get a good harvest. This plant loves warmth, and it needs appropriate humidity. Such a microclimate can only be achieved in closed structures. And trellises help plantings to breathe better, receive more light and be evenly ventilated. All this contributes not only to the formation of fruits, but also to strengthening the immune system, thereby increasing resistance to pests. Beds with trellises are more compact and much easier to care for. Street plantings cannot always grow upward; some gardeners prefer spreading them due to minimal care with good yields in good weather conditions in the region.
Read about growing cucumbers in a greenhouse.
Home cultivation
At home (on the balcony, windowsill), tying can begin a little later, when 7-8 true leaves appear on the stem.
First you need to think about a horizontal support to which pieces of fabric, wire, and rope will be tied. Also, cucumber lashes should be secured, for example, with special clamps.
You can purchase a small piece of chicken wire and make a miniature trellis by stretching it between two support strips.
You can stretch any wire, wire, rope and tie it to a horizontally stretched rope. Then the cucumbers themselves will begin to cling to it and stretch upward.
Read about how to grow cucumbers on a window or balcony at home.
How to properly form cucumbers in open ground
There are many ways and methods for forming a cucumber bush, and new ones are constantly appearing. Let's look at the most popular ones.
With garters
Most methods of forming a cucumber bush require the use of a garter at least at the initial stage of growth. This is necessary, for example, when using a natural trellis.
When attached to a wire, the garter serves as a support throughout the life of the plant. The first procedure is carried out when the plant reaches 30 cm in height. At this time, the stem becomes quite strong and enters a period of active growth; 5-6 full-fledged leaves have already been formed on it. After 30 cm, growth without a garter is dangerous for the stem. This can lead to breakdown and death of the plant.
On the other hand, there is no need to tie up a plant that is too young, weak, and easily damaged. When the bush grows to the desired height, the support and tying will have to be redone.
Without garter
For short lashes, pinching and tying are not carried out. The procedure is necessary for varieties that form long vines. In this case, nets will be an alternative to tying. The lashes will attach to them on their own.
On the trellis
A wooden trellis can be designed in an original way, and it will not only support the cucumber vines, but also decorate the area. The lower shoots and 3 leaves are plucked off so that the cucumbers bear fruit well.
Using a natural trellis is a method that requires minimal effort. The bushes are planted at a distance of 20-25 cm from the fence of the site - a fence or mesh. From them, oblique ropes are stretched to the top of the fence. As a result, vines cover the hedge like a grapevine, and the summer resident reaps a rich harvest without interference. In the fall, however, you will have to work a little to clear the fence of dried lashes.
On a wire
One of the methods of formation is fastening on a wire. For this:
- Along the far edges of the bed, where the cucumbers are planted in 2 rows, drive 2 pegs about 1.5 m high.
- A wire is pulled between the supports.
- Twine is attached to each plant in the first row, thrown over the wire and tied to a plant from the neighboring ridge. Before this, all the lower shoots and 3 leaves are plucked off.
When the vines grow, a kind of green hut of cucumber greens forms in the beds. The plants in it will feel great without touching the ground, will be well ventilated and bear fruit abundantly.
On the grid
Using a mesh is one of the most aesthetic and comfortable ways for a plant to support and form:
- Mesh fabric of the required length is purchased in advance at a gardening store.
- Two strong vertical supports (beams or pipes) are buried deep in the soil at the far ends of the cucumber row.
- A mesh is stretched between the bases from the ground itself, slightly retreating from the stems of the bushes.
- Secure it to a vertical base using wire.
- Remove lower shoots and leaves from plants.
- Periodically direct the growing lashes in the desired direction and straighten them. The vines will attach themselves to the trellis mesh.
This method, like others, allows you to control the development of each plant, care for it and easily harvest.
DIY cucumber trellis
At every summer cottage there is always a lot of improvised means that can be used in the manufacture of trellises. The Internet contains a large number of photographs of the most interesting and simple solutions for plots of different sizes, open beds and greenhouses. You can build a monolithic structure that will last for more than one season, or you can make a simple trellis and remove it after fruiting is over.
Wooden
Creating such a design usually takes several hours. You can start building it already when the first cucumber seeds are planted in the garden bed, but the seedlings have not yet hatched.
Which shape to choose - elegant thin slats or durable bars in the shape of a staircase - is decided by each summer resident individually.
The main load falls on the side posts, so they must be solid. Strong beams with a cross section of at least 50 mm are most suitable for them. If the bed length is more than 2.5 m, it is advisable to make intermediate supports. For them, you can use less solid bars with a cross-section of up to 35 mm. The height of a standard trellis for a classic bed is 2.7 m.
If you plan to use the trellis for several seasons, then choose durable tree species to create it. But even with one-time use, it must be strong enough, because the weight of the lashes reaches several kilograms. Chestnut, ash, oak and mulberry are best suited for these purposes.
Before use, it is recommended to coat the bars with a special compound, for example, drying oil or any antiseptic, so that they do not rot from moisture. Do not use the following types of trees to create a structure: birch, poplar and maple; they rot very quickly even after treatment.
Many gardeners, instead of slats, use strands tightly stretched between support bars. This trellis looks airy and creates a feeling of space.
To make your own wooden trellis, you will need to perform several steps:
- Dig in support pillars. They are installed opposite each other at different ends of the bed. The recommended distance between them is 1.5-2 m. To ensure the stability of the structure, the posts must be dug to a depth of at least 60 mm.
- Secure the racks. It is best to place the supports at an angle of 70 degrees relative to the ground surface. To achieve this position, wire braces are made, their free edge is attached to a metal corner, which is dug into the bed at an angle of 90 degrees.
- Build a frame. The upper support points are connected to each other using a horizontal bar. The rest of the slats will be attached to it.
- Make a sheathing. It is best to take slats with a thickness of no more than 30 mm. First, vertical parts are attached at a distance of 15 cm from each other. Then the horizontal strips are also screwed at a distance of 15 cm. To ensure stability, additionally fasten the joints with waterproof glue.
If a trellis mesh made of wooden slats seems too boring to you, complement it with an arched structure. You can cut segments and arcs from scrap wood, fasten them together with bolts and glue, and then screw them to the support beams. This design will fit perfectly into the interior of your site.
To attach the trellis mesh to the supports, you can make hooks from nails. They are driven in at a distance of 40-60 cm from each other, but not completely, but in such a way that the cap can be bent. If you have staples, they are a great alternative to nails. Next, ropes are tied to the fastenings, which are pulled between two supports parallel to the ground.
Vertical supports are made in the same way. At the top they are attached to the transverse bar, and at the bottom to the pegs that hold them in the ground.
Important! To prevent rain and humidity from damaging your structure, be sure to treat it with an antiseptic or drying oil before use.
Metal
It is more difficult to make such a structure; additional tools and metal profiles will be required. But it will serve you for a very long time.
If there is not enough material, then it is allowed to place the supports at a distance of up to 4 meters from each other. But to be on the safe side, it’s still better to place them more densely.
For a metal trellis you will need:
- Iron pegs.
- Reinforcement with a length of 1.8 to 2 m.
- Thick steel wire.
- Thin metal pipe or profile for the crossbar.
- Welding machine.
- Hammer.
- Garden drill.
Cut the iron pegs to the required size. All elements of the future structure must be protected from corrosion by treating with a special compound or oil paint.
On the garden bed, make a schematic marking of their location. It’s good to make a drawing of the future structure. With the help of a garden drill, depressions of up to 45 cm are made in the marked places. Pegs are inserted into them; a hammer will help to “drive” them into the ground. The hole must be compacted by filling it with the remaining soil.
The main load-bearing beam or tube is attached at the top using welding, and then, again using a welding machine, vertical supports made of reinforcement are attached.
A braided fabric is created from metal wire. It is pulled between the support beams, passing between the vertical posts. Each row retreats from the adjacent one by 15-20 cm. The main load will fall on the top row; for it it is better to use wire with a diameter of 3.5 mm; for the lower ones, a diameter of 2 mm is suitable.
A metal trellis is created for several years; moving it around the garden will be problematic. Therefore, if you need to renew the soil for the next season, you can plant peas or beans there.
From tire and wheel rim
To make such a trellis you will need:
- An old large radius tire, preferably from a truck.
- A rim from a bicycle wheel from which all the spokes have been previously removed.
- Wire.
- Wooden block for the frame.
- Metal fittings.
- Sackcloth.
Here are the step-by-step instructions:
- The basis of the design will be an old tire, which must be cut lengthwise using a grinder. The cut part is placed on the garden bed.
- You need to dig a pole into the center of the circle; a bicycle wheel will be attached to it. If you use a wooden block, the fastenings can be wire. If you choose a metal support, you will need welding.
- To ensure the reliability of the structure, dig in two reinforcements that will connect the tire and wheel at the top, creating additional protection for the trellis. To complete the composition, all that remains is to thread the ropes from the upper rim, attaching them to the tire below.
- If you want the bed to look neater, at the preparatory stage, fill the space inside the rubber with soil and cover it with burlap, tuck it under the wheel. Next, to secure all parts of the trellis structure and to accommodate the seedlings, you will have to make holes in the fabric. This will take a little more time, but the appearance will become more aesthetically pleasing. If this intermediate stage is excluded, then soil can be added inside the tire even after digging in the supporting supports.
- At first, after planting young plants, you will have to additionally cover the plants with agrofibre or film to protect them from temperature changes. As soon as the plantings become stronger, grow to 15 cm, and night frosts are left behind, the shelter can be removed.
- When the cucumbers grow, they will cling to the ropes and crawl up, and the trellis will turn into a green tent on your site.
From a special mesh
Today, in specialized stores you can purchase a ready-made mesh 2 meters wide and with a cell size of 15x15.
It is very simple to build such a trellis:
- At different ends of the bed, two support pillars with a height of 2.7 m are dug in. The optimal distance between them is 2 m; if the bed is longer, then additional support in the middle will be required.
- At the top, a wire is stretched between the posts, to which the mesh will be attached.
- To prevent the bottom edge from sagging, a wire is passed along it between the cells.
- Using staples or nails, the mesh is tensioned to the support posts.
As soon as the cucumbers grow to 20 cm, they need to be directed to the net. If necessary, carefully hang on it and attach the stems to the cell with a loose loop of fabric. Then the shoots will find their way on their own, all you have to do is correct their path so that the lashes do not intertwine.
Types of nets for cucumbers
When creating trellises, you can use different grid options. There are several types of materials, each with its own pros and cons.
Below we describe the most common types of meshes.
Polymer
The design is very lightweight, has increased wear resistance and, with careful use, can last for several seasons. The main thing is to secure it well on the support posts and secure it with wire from sagging.
Metal
This type of mesh is not very popular among gardeners, even despite its super strength. It can last for several years and can withstand enormous loads.
But it requires additional treatment with anti-corrosion compounds, otherwise it will quickly begin to rust and lose its aesthetics. In addition, its price is relatively high. But for all other characteristics, metal mesh has no equal.
You can use a metal mesh, which is also called chain-link. It is often used as a fence.
There is also such a material as fiberglass. But this, like metal, is an expensive pleasure and gardeners say that cucumbers do not really like to climb on such nets.
Trellis
Used by gardeners due to the ability to vary trellis structures. It can be of the desired height, formed at an angle, or take the most bizarre shapes. The recommended cell size is 10 by 10 cm.
Usually created using two posts and slats, but if the bed is more than 10 m in length, then more posts will be needed to provide additional stability.
How to make a net for cucumbers with your own hands
If you have the desire and opportunity, you can make the mesh yourself, rather than buying a ready-made version in a store.
For this you will need soft wire or polypropylene twine. These materials are highly durable, they are not afraid of weather conditions, and they can last quite a long time.
Of course, the weaving process is slow. But if you practice and get used to it, then in a few evenings it’s quite possible to weave a mesh of the required size. You can learn more about the process of making it yourself in this video.
Another way to make a mesh with your own hands is shown in the following video. In this case, simple plastic bottles are used.
How to secure the mesh in the greenhouse
Usually in a greenhouse there is a crossbar running across the top. Gardeners attach the mesh to it using wire or synthetic rope. Next you need to fix the sides. One can be attached closely to the greenhouse frame at the end of the greenhouse, and the second can be attached to a block driven close to the wall. Then there will be a passage so that you can approach the garden bed from both sides. The mesh is attached to the ground at the bottom using hooks or staples.
How to install a mesh in open ground
You can use homemade trellises not only in greenhouses and greenhouses, but also in open ground beds. The installation process is very simple. Two pillars are dug in, connected at the top with a horizontal bar for reliability, and a mesh is stretched between them. To prevent it from sagging, a wire is placed at the bottom and attached to the posts. But it is better to tighten the mesh very well in advance; cucumbers have significant weight during fruiting.
The video shows how to tie cucumbers to a trellis located in an open garden bed.
The process of cucumber formation
To get a good harvest, you need to carefully monitor growth, guide the vines correctly, and tie up the cucumbers. The shaping process consists of pinching and tying. It comes down to removing “extra” side shoots that take away the strength of the main one. Pinching is carried out as follows:
- on a cucumber vine you need to remove 5 leaves growing at the bottom;
- remove the leaves that have formed adjacent to the first three leaves that appear;
- the lateral sprouts located after the 7th branch should not be removed, but they should be pinched into 2 leaves;
- a side shoot cannot have more than 4 leaves;
- once every two weeks, each sprout needs to be wrapped around a slats (threads);
- The tops of the plant are also wrapped around the slats (threads), they do not need pinching.
You can remove the cucumber whiskers. Pinching is carried out using sharp objects, near the stand in the greenhouse. This will avoid any damage to the plant. In extreme cases, the procedure can be done by hand.
Cucumbers are tied using flexible and soft threads. In this case, one end of the thread must be fixed on a special stand, the second is fixed on the top of the cucumber.
Advice! In accordance with the development of the central shoot, the rope needs to be tightened. This is done once every four days.