Seed selection
In order to soak cucumbers, they must be calibrated and disinfected. To do this, pour the seeds into a 2-3 liter jar and fill with a 5% solution of water and salt for 15 minutes. The water and seeds are thoroughly mixed for 1 minute, and then allowed to stand for 15 minutes.
After calibration, empty seeds will float to the surface, while good and viable seeds will remain at the bottom of the jar. The floating seeds are thrown away along with the water, and the settled ones are washed, dried and prepared for planting.
Choosing quality seeds
First of all, you need to carry out calibration, that is, select high-quality cucumber seeds suitable for sowing:
- Without regret, throw away seeds that are too small and deformed.
- Determine which remaining seeds are empty. To do this, you need to soak them in salt water for 10 minutes. A saline solution is prepared from 0.5 liters of water and one teaspoon of salt. Floating seeds are not suitable for planting.
- Seed material that has settled to the bottom should be rinsed under running water and dried.
You will be interested to know: Warm beds for cucumbers with your own hands - step-by-step instructions with photos
Seed disinfection
To properly soak the seeds after calibration, it is necessary to carry out disinfection. To do this, dissolve the solution of potassium permanganate or, more commonly, manganese, in water until it turns light pink. If the solution is darker, the manganese will simply burn the seeds.
Leave the cucumber seeds in the solution for 30 minutes, then remove them and place them in a dry place. You can also soak the seeds in a 3% soda solution, leaving them in it for 20 minutes. As in the first case, they need to be dried. After this, you can start soaking.
Pinching and tying cucumbers
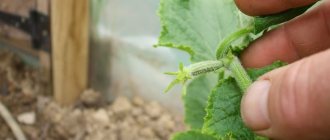
As soon as more than 6 true leaves appear on young plants, you need to pinch the main stem above the fifth leaf. This will lead to branching of the bushes, the appearance of lateral stems, and an increase in yield.
Also, do not forget to tie the seedlings to trellises, which will avoid diseases.
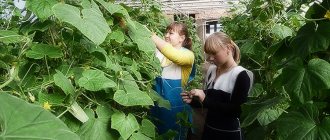
Growing various garden crops is not an easy and painstaking task, so gardeners are looking for many ways to achieve maximum results. Soaking cucumber seeds before planting in order to improve crop performance is one of the well-proven procedures that is often resorted to.
Germination test
To properly soak cucumber seeds, you need to check them for germination before doing this. To do this, select 15-20 seeds from the total quantity and place them on a plate, on a damp cloth, and place them in a warm place. Monitor the temperature and the absence of drafts.
Read here - Why cucumbers disappear - the stem dries out: what to do if cucumbers do not grow. 110 photos and videos of proper cultivation
Check the condition of the seeds once a day so as not to miss their germination; if the fabric dries out, moisten it again, just spray it with water.
Good seeds are those of which more than 50% have sprouted, that is, 6-7 seeds out of 10.
Methods for germinating cucumber seeds
On average, seed germination occurs in two to three days. But there are ways in which it occurs even earlier. The germination process begins at a temperature of 20–25 oC.
There are several ways to germinate cucumber seeds. Let's look at the most popular ones.
On a damp cloth
The most common way to germinate seeds is to use fabric made from natural fibers.
- The seeds are wrapped in damp cloth to keep them away from light.
- The package is placed in a plastic bag. Make sure that the fabric does not come into contact with the surface of the bag.
It is not advisable to use cotton wool or a bandage instead of cloth. This is dangerous for the hatched sprouts: they will get tangled in the fibers and you will break them when you remove them.
Another important condition here is water quality. It is better if it is soft: rain or melt, but not distilled. If such water cannot be found, then you need to use well-settled water. Its temperature must be at least 25 oC.
Video: the old “grandfather’s” method
In the sawdust
Popular video blogger Yulia Minyaeva shared this method on the Internet. She called it Japanese, since she came across it on one of the Japanese sites.
- Take hardwood sawdust (it’s better if it’s old) and fill a shallow container with a layer of 1.5–2 cm.
- The substrate is spilled with hot water so that it is well saturated.
- As soon as the prepared container has cooled a little, the prepared seeds are laid out on the surface of the substrate, lightly sprinkled with dry sawdust and compacted.
- The container is placed in a plastic bag and the temperature is maintained at about 20 °C.
After the sprouts appear, it is necessary to ensure that they do not have time to stretch out.
Sprouted seeds from sawdust are easily removed without damaging the root system. Some of the planting material can be left to grow seedlings. It can also be easily removed and can be planted directly with a lump of substrate.
An important “highlight” of this method is the opening of the seeds using scissors. To do this, each seed must be carefully placed with the sharp end (“beak”) between the handles of the scissors and gently pressed down with them. This should be done lightly so as not to damage the seed. The author shows this in more detail in his video.
Video: Japanese way of planting cucumbers in sawdust
If the question arises where to get sawdust, then a trip to the pet store can help you. There you need to purchase animal bedding in granules. Some of the granules are poured into a container and filled with hot water. After the sawdust swells, they are ground into crumbs and then seeds are sown in them.
On toilet paper
Typically this germination method is as follows:
- Cut strips of polyethylene.
- Place 2 layers of toilet paper on them and moisten them with a spray bottle.
- The seeds are placed closer to the edge at a distance of 4 cm from each other, covered with a layer of paper.
- Roll up and secure.
- The rolls are placed in a container with water. In this case, the side with the seeds should be at the top.
Seeds on toilet paper sprout happily
The method can be diversified and given originality. In this case you will need:
- plastic bottle;
- roll of toilet paper;
- strip of polyethylene.
Sowing of seeds is carried out in the following sequence:
- The bottle must be cut in half along its entire length from the bottom to the neck.
- Place plastic tape on the bottom of each half, and several layers of toilet paper on it.
- Soak the paper with water and place the seeds on it.
- Place each half in a plastic bag and place in a warm place until sprouts appear. You need to ensure that the paper with the seeds remains moist.
Comfortable conditions for seed germination are maintained under the film
You can plant the seeds in one half of the bottle, close the other half on top and seal the cut with tape. This option will also provide a greenhouse effect.
Advantages of this method:
- efficiency,
- simplicity,
- compactness,
- efficiency.
Video: germinating cucumber seeds on toilet paper
Soaking seeds before planting in the ground
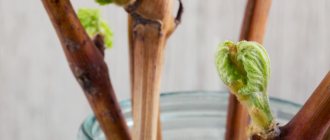
Having selected high-quality viable seeds, we proceed to soaking before planting in the ground. There are several ways to do them. We wrap the selected seeds in a breathable fabric, thoroughly moisten it and wrap it in polyethylene, thereby creating a greenhouse effect. Thanks to this, the seeds are well moistened and germinate quickly.
Instead of plastic wrap, you can use a glass jar. Take a cotton cloth, moisten it generously, and place it inside a hermetically sealed jar. Place it in a well-warmed place for 5 days, after this time you will remove the already sprouted seeds from the container.
Other soaking methods
Another way to soak seeds is to soak them in vodka. Dip the seeds wrapped in cloth into a bowl of vodka for 15 minutes, then, after taking them out, put them in a glass container, seal them tightly, and leave them for a day or two in a warm place. With this method, seeds germinate twice as much as usual, this has been tested experimentally.
But the most common is the simplest method, which is also considered traditional. The bottom of a shallow vessel is covered with cotton cloth and the seeds are laid out.
Having carefully leveled the seeds, cover them with the same cloth and pour water on top, preheating it to room temperature. The water should completely cover the fabric with cucumber seeds.
Some time later - about 10 minutes, the water will change its color to brown. This water needs to be poured out and clean, settled water of the same temperature poured in. This must be repeated until the water stops changing color.
Drain the water for the last time, cover the seeds with polyethylene, and leave for about one and a half to two days in a warm place.
First feeding of cucumbers: tips for choosing fertilizers and methods of their use. Step-by-step instructions for beginners
Self-pollinating varieties of cucumbers are the best varieties for greenhouses and open ground. Features of planting and growing self-pollinating cucumbers (90 photos)
Cold pickling of cucumbers: step-by-step description of the traditional cooking recipe, subtleties and tricks of canning cucumbers (125 photos + video instructions)
What to soak seeds in to make them germinate faster
Seed preparation
Soak in vodka
The first step is to take care of the quality of the water used. It is recommended to give preference to settled, rain or melt water.
To achieve maximum results, agronomists often use biologically active components. Using biostimulants is effective and completely safe. Such compositions not only stimulate the active growth of the plant, but also strengthen it, allowing you to grow healthy, more hardened and strong seedlings.
One of the most common compounds used before planting is Epin. The unique composition of the drug activates the protective functions of seeds against aggressive environmental factors. In addition, it increases the “stress resistance” of planting material in case of viral diseases, fungal infections, soil depletion, lack of sunlight, etc.
To check, take about 10 seeds and place them in one layer between porous materials: napkins, gauze or toilet paper. This combination is placed in a container and filled with warm water. It is topped up as needed. A week after germination, they calculate how many plants should be produced. If about 3 seeds have sprouted, it is not advisable to use such planting material.
Seed calibration
Another proven method is calibration. You need to keep the seeds in water with table salt for several hours. The salt concentration should be 3-5%. Viable seed will settle to the bottom of the container, and unsuitable seeds will float to the surface. After checking, the seeds should be washed and dried well.
Note! For such procedures, you must use only warm water.
To test the germination of seeds of hybrid cucumbers and ordinary varieties, sawdust is also used. Pour boiling water over the sawdust at intervals of 30 minutes until they swell. The resulting material is transferred to a separate container, and cucumber seeds are placed into it at short intervals. The seed material is covered with sawdust and compacted a little.
Thanks to the above methods, it will be possible to reliably determine the germination of cucumber seeds and select those that will provide the family with a harvest.
Note! If germination is less than half, it is better not to use such planting material; there is a high probability of being left without a harvest.
Cucumbers can be eaten fresh, added to salads, and can also be preserved for the winter. The culture is quite capricious, but having mastered the basic rules of planting and care, you will be able to reap a rich harvest. Through trial and error, an agronomist can become a real specialist.
To properly soak cucumber seeds, you need to check them for germination before doing this. To do this, select 15-20 seeds from the total quantity and place them on a plate, on a damp cloth, and place them in a warm place. Monitor the temperature and the absence of drafts.
Good seeds are those of which more than 50% have sprouted, that is, 6-7 seeds out of 10.
After we have figured out whether cucumber seeds need to be soaked, we need to start germinating them. Germinating cucumber seeds before planting has never been a priority for gardeners, and few knew how to do this procedure correctly.
Sprouted specimens were simply thrown aside. But recently, experienced summer residents have increasingly begun to use sprouted seeds for planting. According to reviews, this method significantly increased the level of fruiting.
Along with germination, it is recommended to treat seeds with growth stimulants to increase development rates. And the essence of the method is as follows:
- We make a solution of boric acid - dilute 20 mg of the substance per 1000 ml of water.
- We provide warm temperature conditions in the room.
To prepare a solution, it is quite possible to replace boric acid with other agents in the following proportions:
- 7 milligrams of succinic acid per 1000 ml of water;
- 5 grams of baking soda per 1000 ml of water;
- 300 milligrams of methylene blue per 1000 ml of water;
- 2 grams of zinc sulfate per 1000 ml of water.
For those who do not intend to use chemicals to treat cucumber seeds before planting, we have prepared one effective recipe with the addition of aloe juice. It needs to be diluted by half with water. Of course, this method is not as effective. The duration of soaking should be reduced to 6 hours, and the temperature should be constantly maintained at about 22 degrees.
Next, the material needs to be laid out on a piece of cloth in a thin layer, and sawdust or sand should be scattered around it. The temperature should vary from 20 to 25 degrees. If sawdust was chosen, then before use it must be treated with boiling water to remove resin and other undesirable substances.
How to prepare cucumber seeds for planting? If the cultivation takes place in open ground, then you need to worry about resistance to cold temperature conditions. In this case, seed germination can increase to 36 hours.
It will not be superfluous to carry out hardening. To do this, you need to slightly wet the cucumber planting material and keep it at a temperature below -5 for 3 days.
Before planting, it is recommended to soak ordinary seeds in a warm manganese solution. This pre-treatment of seeds allows:
- separate high-quality planting material;
- accelerate swelling and germination;
- disinfect them.
Do I need to soak processed cucumber seeds?
Pre-soaking of the seed is not done if the packaging indicates that the cucumber seeds:
- inlaid,
- coated,
- treated with insecticides.
When soaked, the applied beneficial substances will be washed off.
Seeds are soaked in a warm manganese solution
You can tell that seeds have been treated with chemicals by their color:
- green,
- red,
- orange.
The seeds take on the color of insecticides and chemicals applied to them. After soaking, the useful layer dissolves and is washed off.
Important! Seeds without a chemical external barrier become easy prey for harmful insects and infectious plant diseases. For this reason, hybrid cucumber seeds that are processed and colored are sown only dry.
The chemical layer allows the crops to adapt to external germination conditions. This quality is especially valuable for central Russia, where spring temperature changes are a fairly common occurrence.
With a sharp drop in temperature and prolonged cold rains, ordinary seeds rot within a few days. Seed material with a protective layer applied can provide protection for several weeks.
Processed cucumber seeds
Hardening cucumber seeds
Since our climate is changeable, and cucumbers are very heat-loving, it is advisable to harden them at the same time while soaking the cucumbers.
To do this, place the vessel with the soaked seeds in the warmest place for the first few hours, then place them in normal mode and after 12 hours put them in the refrigerator for a day. After this “temperature swing” regime, hardened seeds can be planted even in open ground.
Know all the features of the process
Before germinating cucumber seeds, they need to be properly processed and all low-quality seeds must be discarded.
Proper preparation has a number of advantages:
- All low-quality seeds are removed . As a result, almost all of the sown seeds grow, since preliminary culling is carried out and bad planting material is thrown away immediately. You save time and effort, because if you sow bad seeds, you will have to wait about a week for germination before it becomes clear that you need to purchase others.
- Shoots appear much faster . If you sow ordinary dry seeds, they can sprout in 23 days; I had such a case. But if you carry out the correct preliminary preparation, then at home, sprouts appear within 2-3 days, and when sowing in open ground, the period increases by a day. Due to this, plants develop faster and begin to bear fruit earlier.
- Productivity increases by an order of magnitude . This is due to the fact that low-quality seeds are discarded, and due to the early emergence of seedlings, the fruits ripen earlier and the plant produces a much larger harvest before the onset of cold weather. In addition, the use of growth stimulants makes plants much more resistant to unfavorable conditions, so productivity does not suffer even with temperature changes.
If you immediately check germination, then most of the low-quality planting material will be rejected
- Plants get sick much less often . If you treat the seeds with hydrogen peroxide or pre-soak them in potassium permanganate, then all viral infections, which often overwinter on the seed coat, are destroyed. Disinfection significantly increases immunity.
- Seedlings are much less likely to be damaged by soil parasites . The most dangerous period when growing cucumbers is the moment when the sprout makes its way out of the ground to the surface. It is often damaged by various insects. When preparing seeds and planting them sprouted, seedlings appear many times faster and the likelihood of their damage is greatly reduced.
- Soaking of seed material can be carried out in any conditions . All you need is any available utensils, a piece of fabric and room temperature. No expensive devices are needed. You can make do with what you have on hand.
To carry out the procedure for preparing seed material, it is enough to have a saucer and a piece of bandage.
The author of the video advises using hot water. Pour a cloth with seeds into it and leave for 15 minutes, this softens the shell and makes germination easier.