Increasing the productivity of your garden is not an easy task. But it is quite possible to do without herbicides and fertilizers while achieving a high yield. The article examines gardening technologies developed and successfully applied by Igor Lyadov, a summer resident from the Russian Far East.
In its pure form, the American method of vegetable growing did not suit Igor Nikolaevich.
First, he is a strong proponent of natural farming.
Secondly, spring floods and prolonged rains, common in the Far Eastern climate. Narrow beds and passages between them were simply flooded.
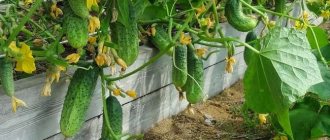
Igor Lyadov found a remedy for excess moisture - he covered the beds with boxes and raised them above the row spacing. The method of growing vegetables in narrow beds was developed by American specialist Jacob Mittlider. He came to the conclusion that the best harvest is achieved with careful geometric planning of the garden and the use of balanced mineral fertilizers. Mittlider's main find is narrow beds, no more than 45 cm wide and 4.5 to 18 m long, with 75 cm row spacing.
How to build raised beds yourself
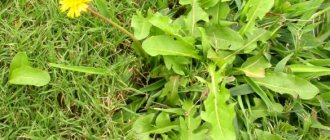
The traditional scheme for creating garden beds is based on the maximum possible development of a land plot - wide beds (1.5–2 m), separated by narrow paths (20–40 cm). In this option, according to many summer residents, the land does not stand idle in vain. But what kind of harvest is there in wide beds?
Plants along the edges develop more or less normally, but those planted in the middle rot and become sick and produce small fruits. The plight of plants is enthusiastically perceived by insect pests that feed on weak stems and fruits, laying offspring near them.
Igor Lyadov once drew attention to the plants along the edges of wide beds - they developed well, resisted diseases and did not rot. Realizing that free access of air is extremely important for vegetable crops, he built the first high bed and was convinced that he was right.
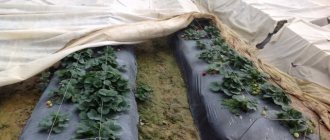
The box for the garden bed is made from boards. Its walls can also be built of stone or brick. After assembly, the outer walls of the box should be painted with breathable white paint (whitewash or façade VDAK) to reduce the heating of the box walls under the sun's rays.
Landing rules
To obtain a high-quality and rich harvest when planting crops in Lyadov’s beds, you need to follow some important rules:
- plants with large fruits or abundant green parts (beets, cabbage, tomatoes, melons) are planted in 2 rows in a checkerboard pattern;
- bulbous, tuberous and strawberry varieties are arranged in 3–4 rows;
- in tomatoes and other vegetables with a lot of foliage, excess leaves should be removed to increase access of air and light to the soil, roots and stems;
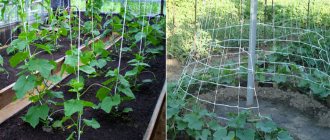
- for tall or climbing plants (tomatoes, cucumbers), it is necessary to install trellises from boards fixed at the top along the perimeter.
Related article:
How to lay out paths between the beds: 5 worthy options
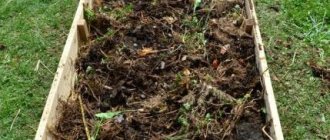
After harvesting, Lyadov’s beds are dismantled, rotted plant material is removed and used as mulch. Then the box is reassembled, covered with new cardboard sheets and filled according to the specified principle. In spring, the bed will be ready for new plantings.
The procedure for filling the beds:
- sheets of ordinary cardboard packaging are placed at the bottom;
- the second layer is sand filling. Thickness approximately 1.5–3 cm;
- the third layer is formed from plant residues - straw, last year's leaves, tops of tomato and potato bushes. Its thickness is 1.5–3 cm;
- the fourth layer (2–4 cm) is manure or compost. Can be replaced with herbal infusions spilled on plant debris laid earlier;
- the top layer is soil removed from the aisles between the rows.
The cardboard base blocks the growth of weeds and prevents insects from reaching the plant roots from underground. The sand layer will provide drainage. The next two layers are necessary to feed the root system of vegetables. The last layer - earthen - is poured much higher than the others (minimum 8 cm).
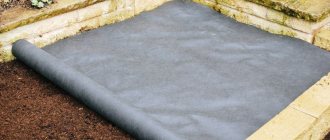
The paths between the rows should have a width of 60 to 80 cm, but not less. They provide access to air and sunlight to each bed on both sides. It is impossible to leave row-spacings in the form of an earthen area - they will be filled with weeds. Mulch of sand and sawdust is poured onto the surface, or roofing felt, plastic film, etc. is laid. To ensure that the garden is not only productive, but also beautiful, the plots are sown with lawn grasses.
Construction and filling of boxes
To create high Lyadov ridges you will need the following materials:
- lumber for the construction of the box - timber for the frame and boards for the cladding, or only logs if a log-type construction is planned;
- cardboard for lining the bottom;
- fillers: sand, remains of grass, vegetables and coarse fibrous plants (corn and sunflower stalks, cereal straw), as well as organic matter (humus, rotted manure, chicken droppings, wood ash);
- mulch for paths - sawdust, straw, paper waste or roofing felt.
Store-bought mineral fertilizers cannot be used as part of the soil mixture, since in a limited volume of soil they will act as aggressively as possible, and the substances they contain will negatively affect the acid-base balance.
Many gardeners build Lyadov’s beds on their own, since making them yourself is not at all difficult, even if you have only minimal skills in working with carpentry tools. Step-by-step instructions will be like this:
- Prepare the site taking into account that the beds must be located in the direction between south and north.
- Remove the fertile layer, remove the weed rhizomes from it and set it aside - it will be placed in the finished box.
- Build a frame 15–30 cm high and 60–80 cm wide (in regions with warm climatic conditions it can be expanded to 120 cm). The length can be any depending on the size of the area. The box itself can be made of logs laid around the perimeter and firmly connected to each other, or in the form of a frame made of timber covered with boards.
- Paint the finished structure with garden whitewash, which protects against fungi and pests.
- Cover the bottom with one layer of cardboard sheets to create a protective barrier against weed germination, penetration of microbes and pests remaining in the soil.
- Pour a layer of sand 5 cm high on top. It will provide drainage and will absorb excess moisture, accumulate it, and, if necessary, release it.
- Then lay down the coarse fibrous plant material, sprinkling it with a small amount of fertile soil removed from the site. After completing the installation, pour in one of the disinfecting herbal infusions, recipes for which are offered by Lyadov (given below).
- The next layer is soft plant material (tops, leaves, grass). When using weeds, you cannot plant them together with the seeds, as they will eventually germinate and clog the bed, interfering with vegetable crops.
- Place fertile soil removed when preparing the site on top. This completes the formation of Lyadov’s bed.
- To reduce moisture evaporation, it is recommended to mulch its surface by covering it with film, fallen leaves, peat or other suitable material.
Related article:
How to arrange beds in a 3 by 6 greenhouse
The contents of such a structure practically do not compact and do not settle, since coarse corn and sunflower stalks take a long time to decompose. Microorganisms formed during the processing of plant tissue destroy all pathogenic bacteria. Therefore, even if the material being laid contains fungi or infections, they will all be disinfected. Thus, the soil heals itself and becomes environmentally friendly. But for this it is important that there were no pesticides, herbicides or other chemicals in it.
Another stage of work is the arrangement of paths. Their optimal width is 80 cm, the minimum is 60 cm. This gap is necessary not so much for convenient passage between the boxes, but to ensure access to a sufficient amount of light and air to the plants growing on them. To ensure that the paths have a well-groomed appearance and are not overgrown with weeds, they are mulched with a mixture of sand and sawdust or covered with roofing felt, film, paper, newspapers, and other suitable material. If the aesthetics of the area is important, then you can sow trampling-resistant lawn grass, but it will have to be constantly watered and mowed.
Related article:
What do they plant after cabbage?
Nettle infusion
In the stems and leaves of stinging nettle, stinging nettle accumulates a significant amount of nitrogen, silicon, calcium, iron, potassium, sulfur, other trace elements and amino acids.
Only fresh nettle is suitable for preparing the infusion - you need to pick or mow it. The chopped stems are placed in a barrel 2/3 of the volume, warm water (ideally rain) is poured almost to the top edge, a lid is placed on top (a sheet of plywood or metal will do). During the process of infusing the nettle, oxygen will be released, so the lid should not fit tightly to the barrel, and the infusion must be stirred every day.
Fermentation of nettle infusion will take from 5 to 10 days, the exact period depends on the air temperature. The readiness of the infusion is determined by its appearance - no bubbles are released, the color of the liquid is lighter. To get rid of the unpleasant odor that occurs during fermentation, add 15–20 drops of valerian extract (sold in pharmacies as a sedative) to the infusion.
Before watering high beds, nettle infusion is diluted in proportions of 1 to 10, 1 to 5 or 1–2 liters per bucket of water and introduced into the ground, as with normal watering.
Advantages of Igor Lyadov’s smart vegetable garden
The main advantage of the method is that the yield on the site almost doubles compared to traditional technology, when crops are grown in wide beds located at soil level.
However, there are other positive aspects that attract more and more attention from summer residents to Lyadov’s experience:
- The boxes are durable and their maintenance does not take much time.
- Igor Lyadov’s amazing vegetable garden is easy to water and loosen.
- The moisture inside the box does not stagnate, but is not wasted on moistening unnecessary areas.
- No painstaking, time-consuming weeding is required, especially when mulching the soil under the plants.
- The plantings are well lit and actively ventilated.
- There is no leaching of useful substances from the box bed.
- Saves time and effort on digging up the site.
- The ridges need to be loosened to a depth of only seven or ten centimeters.
- The crop is not affected by pests and plant diseases.
- Every year you can easily change planting locations and plan the desired proximity of plants.
- Due to the height of the beds, Igor Lyadov’s smart vegetable garden gives the summer resident a real opportunity to plant seedlings much earlier.
- If you cover the box with film or install plastic arches, then the bed will allow you to grow vegetables in a homemade, but very effective greenhouse without additional effort.
A bed using the Lyadov method works for several years, and with regular replenishment of plant residues and properly fertilized, its service life is difficult to determine.
When the harvest is harvested, the author of the idea advises sowing fast-growing green manure, which will further enrich the soil in the box. When planting, there is no longer any need to add humus or fertilizers, because, in fact, the bed itself is a kind of compost storage.
As it becomes clear, Igor Lyadov’s garden has many advantages, but there is only one drawback. These are the costs of labor, money and time in the first year when switching to unusual technology.
Creating a box bed
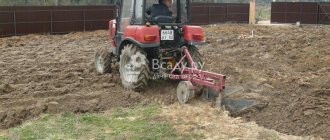
The beds in Igor Lyadov’s smart garden are built in the fall and stretch strictly from north to south, and for their manufacture you can use any available materials from slate and boards to bricks or building blocks.
During the master class, which was given by Igor Lyadov himself, he used old logs from which the house was once built, and cuttings of boards. However, before assembling the box, it is important to select a suitable platform and level it.
Then the walls of the future bed are firmly installed, perhaps slightly deeper, on the soil, observing the rule that the width of the box should not exceed 120 cm. The length can be arbitrary.
The walls must be knocked together or twisted together so that the structure gains strength, and cardboard is placed at the bottom of the resulting box, which will become a barrier to the ubiquitous, perennial weeds.
After the cardboard comes a thin layer of sand.
And then the box is lined with a layer of coarse plant debris. Do not forget about protecting the structure from moisture and pests. Therefore, the author of the technology advises treating the wooden frame with durable but safe water-based paint for exterior use.
When painting is completed, you can finally fill the bed with more succulent and smaller waste, tops and leaves of collected vegetables, grass or straw cut from the lawn, excluding perennial weeds with roots that could sprout. Manure and humus, compost are laid out on top and the nutrient mixture is poured with an infusion prepared according to Igor Lyadov’s original method. The top layer, about 10 cm thick, in the box is ordinary soil.
It should be noted that in the northern regions the boxes should be made higher, and in the southern regions, lower in order to prevent rapid loss of moisture.
Such beds come in handy in places where spring flooding is common.
Thanks to the large, about 30 cm, layer of organic residues in Lyadov’s garden, there is a constant process of overheating, which means that the temperature in the depths of the box turns out to be increased, but not critical. Plants sprout faster and begin to bear fruit.
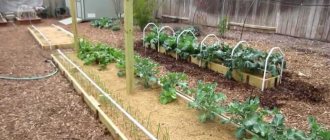
Arranging a greenhouse based on a bed using Igor Lyadov’s method
- Pegs are installed along the long sides of the bed opposite each other at a distance of no more than a meter.
- The ends of plastic pipes are placed on these pegs so that arcs are formed above the bed.
- The structure is covered with film or other material, resulting in a warm, covered bed for the early cultivation of a wide variety of vegetable crops and berries.
The system of narrow beds used in Igor Lyadov’s garden makes it possible to significantly lengthen the growing season of plants and obtain consistently high yields, regardless of the weather and the characteristics of the garden plot.
It is important that to ensure ventilation and adequate space, plants are planted in such beds in a checkerboard pattern. Large crops, such as cabbage or eggplant, are planted in two rows, and smaller ones, such as radishes or onions, in four.
Feeding the garden
The author of the method believes that the fertility of the mixture in the box can be restored not with the help of chemical additives, but with the help of personally prepared infusions, which include yeast fungi and lactic acid bacteria. The starter for the mixture can be ordinary mash.
For three liters of well water, take five tablespoons of sugar and a package of dry baker's yeast. After two or three days of fermentation, the liquid can be added to a common container, but it is better to store it in the cold so that the fungi do not die.
Feeding recipes from Igor Lyadov
All recipes are designed for a two-hundred-liter container. The compositions are infused for at least a week, and when used, they are diluted at least twice in the case of an herbal composition, and even more when using droppings or manure.
- For the first mixture you will need:
- a shovel of sifted ash;
- half a bucket of manure or bird droppings;
- a bucket of rotted straw bedding or fallen leaves;
- a shovel of turf soil, humus or rotted compost;
- a shovel of clean sand;
- one liter of fermented milk product or whey;
- three liters of mash.
- For the second infusion, fill the container two-thirds with weeds or mowed grass, add two shovels of sifted ash. Now you can fill the mixture with water and cover the barrel with film. After two weeks, the product is ready, but before use it is diluted 1 to 10.
- The third mixture includes a third of a barrel of dung or manure, which is filled with clean water and also infused for up to two weeks. The infusion of manure is diluted 1 to 10, and the mixture with droppings is diluted in a ratio of 1 to 20.
The roots of plants in Igor Lyadov’s wonderful garden are always provided with everything necessary for growth and fruiting, and the carbon dioxide produced by the bacteria is not wasted, but immediately goes to the roots. The heat generated also plays a role, making it possible to obtain guaranteed early harvests.
Organic farming, which Lyadov advocates, allows you to forget about chemical additives, carry out gentle cultivation of the soil and invariably enjoy the useful, high-quality fruits of your labor, without thinking that after growing them the soil loses fertility and will soon become impoverished.
Infusion with EM cultures
According to Igor Lyadov, to increase productivity it is necessary to use infusions containing “local” microorganisms, since they are more adapted to the composition of the soil and climate.
When preparing the EM infusion, place the following in an empty barrel:
- wood or grass ash (one shovel);
- fallen leaves or rotten straw (one bucket);
- chicken droppings, horse or cow manure (half a bucket);
- washed sand (one shovel);
- compost, humus or regular soil from the garden (one shovel);
- curdled milk or whey (one liter);
- mash (3 liters).
The mash is prepared independently. Her recipe:
non-chlorinated water (tap water that has been standing for 24 hours or clean and fresh rainwater) - 3 l;
sugar - 5 tablespoons;
yeast - a pinch.
The ingredients are placed in a three-liter jar, tightly closed with a lid, wrapped in cloth and placed in a warm place (not in the sun).
Fermentation, depending on the air temperature, will take a day or three.
The finished mash is poured into the barrel after adding the remaining components. Afterwards, warm rainwater is poured in and the lid is put on.
The EM infusion will be ready in about 7 days, the indicator of readiness is the cessation of fermentation processes.
During the aging period, the infusion must be stirred once a day.
A liter of the finished infusion is mixed with two to three liters of water, then the beds are watered with it.
Advantages and disadvantages
In order for you to immediately understand the relevance of the author’s method of growing crops for you, we will consider the advantages and disadvantages of vegetable growing technology. Let's start with the cons:
- Requires boards or decks that are not always easy to find;
- At the first stage, the work is quite labor-intensive.
You will hardly find any other disadvantages of Igor Lyadov’s technology! But there are much more advantages:
Caring for garden beds is as easy as shelling pears; difficulties may arise only in the first year of your dacha activity;
- Suitable for people who are used to saving their time;
- There is no need for weeding, digging, you only have to loosen it 10 cm deep, and there is no need for cleaning, as when planting in flowerbeds;
- You can easily protect your beds from external threats thanks to the possibility of strengthening them with arcs or even erecting a greenhouse;
- Seedlings do not suffer from lack of sun or ventilation;
- You can plant vegetables at a convenient time;
- There is no need to compost the bed;
- Using this method, you can plant a wide variety of crops: tomatoes, beets, cucumbers, eggplants, radishes, onions, garlic, legumes, as well as strawberries, watermelons and other berries.
Expert opinion
Chernyaeva Tatyana Dmitrievna
Absolutely loves gardening and grows only organic vegetables
Ask a Question
As you can see, Lyadov’s technique is really good; he promises very good results with a minimum of labor costs. When compared with classic dacha technologies, the proposed method is much simpler and more rational.
Simple nutritional infusions:
- the barrel is filled 2/3 with weeds, two shovels of ash are poured out, water is added, and a lid is put on. It takes 10–14 days to prepare. Diluted with water for irrigation at the rate of 1 to 10;
- chicken manure is poured into the barrel 1/3 full, water is poured in, and a lid is put on. The infusion will be ready in 10–14 days, it is important to dilute it with water at least 1 to 20;
- the barrel is filled one third with cow and horse manure, then water is added and a lid is installed. After about two weeks, the infusion can be used by mixing with water at a rate of 1 to 10.
What are the benefits of Lyadov’s beds
Compared to ordinary beds, high beds from the amazing garden of Igor Lyadov have a lot of advantages:
- reduction of labor costs for loosening, weeding, digging;
- protection of plants from pests and infectious diseases;
- almost complete elimination of weeds;
- ensuring quality drainage;
- less water consumption;
- refusal of artificial fertilizers;
- better warming of the earth in spring;
- increasing productivity;
- early harvest.
Plants illuminated from all sides receive the maximum energy necessary for the synthesis of organic substances; they are well ventilated and washed by rainwater.
Box-shaped beds are easy to install and just as easy to disassemble, make site planning easier and take less time than traditional ones; with their help you can easily level large slopes in areas.
To organize Lyadov's beds, much less fertile soil is required and they make it possible to grow vegetables, berries and herbs even in areas with poor soil quality (rocky or sandy soils).
Pros and cons of raised beds
Positive qualities of a high bed:
High beds easily tolerate long summer rains. Layer-by-layer placement of nutritional components into the bed box turns it into a ready-made compost box. A fenced garden bed does not lose nutrients, it retains moisture well after watering, and there is no threat of oversaturation with water. High beds do not need to be hilled up or dug up - just loosened to a depth of 7 cm. The result is a 100% increase in productivity.
The disadvantage of a high bed is the cost of its construction
For example, for a bed 6 m long, 30 cm high and one meter wide, it will take (with remainder) five boards of size 40x100x6000 mm (40 mm thickness). The cost of one such board is about 250 rubles, which means that to build one bed you need 5 x 250 = 1250 rubles.
A bag of rotted manure (50 liters) costs 150 rubles; for a six-meter bed you will need about one and a half bags. Taking into account the cost of nails and lime whitewash, a high bed 6x1 m will cost 1,650 rubles. But these expenses are paid off by high yields.
Let us note one more advantage of Lyadov’s high beds - they allow you to free up significant areas of the dacha plot from crop rotation and equip them for recreation without losing the volume of harvest previously obtained on “traditional” beds.
An easy way to create narrow beds
To change your traditional vegetable garden to a more progressive one, you first need to measure the total area of the plot. Level the area allocated for the vegetable garden and divide it into narrow beds with wide paths. The width of the beds should be no more than 40-50 cm. Wide paths should be left between the beds - 80-120 cm. The length of the beds is arbitrary and depends on the desire of the owner. It is better to direct the beds from north to south. This arrangement will extend the illumination of the plants in the beds. All grass and remains of garden plants (not affected by diseases) are dumped on the paths.
After 2-4 years, narrow ridges and paths can be swapped. In the middle of the wide path, select a narrow bed, and form wide paths from the waste beds and side parts of the paths. Over the years, a sufficient layer of semi-decomposed mulch will accumulate on them from weeds, tops and stems of garden plants.