Nowadays, many gardeners grow onions from sets, and break off the flower stalks during flowering so that all the nutrients go into the bulb. But just a few decades ago, growing onions for nigella was widespread. We will tell you what it is in this article.
Dear readers! For you, we have created communities on social networks in which useful articles and interesting ideas are published several times a day! Subscribe and receive useful content in a convenient format!
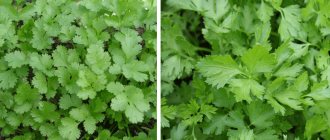
What is chives?
Nigella is the seed of an onion with which it reproduces. They got their name because of their color. Nigella ripens after the spherical inflorescence fades. Each seed is formed in a small triangular box in place of one flower.
While growing onions in your area, you may have noticed that at a certain time each plant shoots out an arrow, which then begins to bloom. Usually the arrow is broken off so that the plant uses all its energy to grow the bulb and not to flower.
But, if you let the inflorescence bloom and then ripen the capsules, then seeds will form in them - nigella. If you sow nigella, it will produce the most common onion set, which is what summer residents most often buy for planting in their gardens.
REFERENCE. You can buy nigella in the store, or you can collect it yourself. There is nothing complicated in this process, you just need to know a couple of tricks so that the grains do not scatter throughout the area.
Preparing nigella onion seeds for planting in sets
A month before planting and subsequent care of black onions, the seeds must be checked for germination. To do this, you need to take 15-20 seeds from the batch and keep them in a damp cloth for a couple of weeks. Based on the results of this test, one can judge whether these seeds are worth using for sowing. If seed germination is normal, then pre-sowing seed preparation is carried out. In order to avoid fungal diseases when preparing nigella onion seeds for planting, the seeds are dipped in hot water (45-50 °C) for 15 minutes, first wrapped in a cloth, and then in cold water for 1 minute. After this treatment, the seeds are soaked for a day in warm water (22-26 ° C). After soaking, the seeds are kept for 1-2 days at room temperature, still wrapped in a damp cloth, which must be moistened periodically.
Before growing onion sets from nigella, pre-sowing preparation can be carried out in another way. To do this, oxygen is supplied under pressure to a container of water and the seeds are soaked in it for 18-20 hours. After soaking, the seeds are dried and sown on prepared soil.
The average time for planting nigella onions in the spring for seeding is April 20-25.
Varieties of onions grown from nigella
In general, nigella is the seed of any onion. But it just so happens that in our country there are, as it were, special varieties that are grown directly from seeds. Therefore, when they say nigella onions, this is what they most often mean.
Before choosing a variety, you need to decide on the scope of use of the onion. For example, white onions are more suitable for salads, as they do not have a too pungent taste. Purple onions are not often used in canning, but they are indispensable in cooking to add a flavor accent. Yellow onions are good for canning.
There are many varieties of chives. We have selected the 5 most interesting.
- Neman . Mid-season white onion. It has a semi-sharp taste. If you prepare seedlings for seedlings, you can get an onion weighing about 150 grams.
- Centaur . Ripens in less than 4 months. The color of the bulbs is dark yellow. When growing seedlings, it grows up to 300 grams in weight. Shows good yield even in unfavorable conditions.
- Crimson Ball . Dark purple, almost red, early onion. Gives a stable harvest. Has a sweet taste. Good for fresh consumption.
- Myachkovsky . Variety with golden husk. Belongs to early ripening. The yield and size of the bulbs are not very large, but they tolerate storage and transportation well.
- Sterling . White onion with a delicate taste. Excellent for canning and fresh consumption. The bulbs are large and beautiful.
Also worthy of mention are the varieties Victoria, Volsky, Alibaba, Albion F1, Bennito F1, Vetraz, Zolsiky, Carmen MS, Odintsovets, Silver Moon, Sturon, etc.
REFERENCE. Of the foreign varieties of onions, it is worth paying attention to exhibition. This is a high-yielding variety. Its cultivation is described in detail in the article “Exhibition onions: growing from seeds, when to plant in 2021.”
Nigella onion, growing from seeds, when to plant
The beauty of onions is that they are a very unpretentious crop that grows even in relatively cold weather. In addition, onions ripen very quickly. Early varieties ripen in just a couple of months.
Nigella can be grown as seedlings or sown directly in open ground. First, let's look at the seedling method of growing vegetables.
How to determine the time of sowing nigella onions?
Onion seedlings need approximately 2.5 - 3 months to prepare for planting in the garden. Therefore, to determine the approximate time for sowing seeds, you first need to decide when you will plant the seedlings. If in May, then you need to sow grains in February, if closer to June or in the first ten days of summer, then planting should be planned in March.
The specific day for the work must be chosen in accordance with the lunar calendar.
How to prepare planting material for sowing
For the seedling method, late varieties are usually chosen that ripen in 120 - 140 days.
Before sowing the seeds, you need to prepare the planting material. You definitely need to process those grains that you received from your neighbors, collected yourself, or bought at the market from your grandmother. In general, all “non-store” seeds.
The fact is that spores of pathogenic fungi or egg clutches of onion flies may remain on the outer shell.
The easiest way to process nigella is to soak the seeds in a weak solution of potassium permanganate for 40 minutes. Potassium permanganate will destroy all disease carriers. In addition, the outer shell of the seed will soften, and the grains will germinate better.
After this treatment, the grains can be soaked for germination. You can use plain water, or you can add a drug to stimulate growth (for example, hydrogen peroxide, Epin, Baikal-M, etc.).
To soak the grains, place them in a cloth bag and moisten it. A 24-hour stay of onion seeds in a humid environment is sufficient. The hatched seeds can be planted.
When to sow chives for seedlings in 2021 according to the lunar calendar?
Gardeners who work according to the lunar calendar have a principle: all crops that grow upward should be planted on the waxing moon, and all crops that grow downward should be planted on the waning moon.
Onions grow downward (the bulb increases), so a waning moon is considered a favorable time for planting the seeds of this crop.
In 2021, this lunar phase fell on the following dates:
- In January - 1-12 and 29-31;
- In February - 1-10 and 28;
- In March – 1-12 and 29-31;
- In April – 1-11 and 28-30;
- In May – 1-10 and 27-31;
- In June - 1-9 and 25-30;
- In July – 1-9 and 25-31;
- In August – 1-7 and 23-31;
- In September – 1-6 and 22-30;
- In October – 1-5 and 21-31;
- In November - 1-4 and 20-30;
- In December – 1-3 and 20-31.
Bad days for sowing
Days when the moon increases in size can be considered conditionally neutral. Sowing in them is not recommended, but if there is no other choice, then planting can be done. But on the days of the new moon and full moon, planting is strictly prohibited; some gardeners do not advise sowing anything on days when the moon is in Aquarius. In 2021, these moon phases fell on the following dates:
- In January - 13, 14, 15, 28.
- In February - 10, 11, 27.
- In March – 9, 10, 11, 13, 28.
- In April – 6, 7, 12, 27.
- In May – 3, 4, 11, 26.
- In June - 1, 10, 24, 27, 28.
- In July – 10, 24, 25.
- In August – 8, 20, 21, 22.
- In September – 7, 17, 18, 21.
- In October – 6, 14, 15, 20.
- In November - 5, 10, 11, 19.
- In December – 4, 8, 9, 19.
When to plant depending on the region?
In each particular year, you need to choose the sowing date depending on the weather. But on average for the regions, the timing of planting nigella seedlings looks like this:
- In the south of Russia - from the end of February (can be grown without seedlings);
- Chernozem region, Moscow region, Southern Volga region - early March;
- North-West Russia, Volga region - mid-March;
- Ural, Siberia, Far East – March – April.
How to plant nigella onions step by step
Let's look at the step-by-step process of sowing onion seeds for seedlings.
Step 1. Prepare the soil. The ideal option is a special soil for onions and garlic, but if this is not available, then ordinary soil for seedlings or universal soil is quite suitable.
Step 2. Preparing the container. Planting nigella in plastic cups is not profitable. Peat tablets are also not very convenient. It is better to take long and wide containers or cassettes.
Step 3. Pour the soil into the container and “cut” grooves in it about 1 cm deep. Make the distance between the grooves at least 5 cm.
Step 4. Sow nigella. If you simply scatter the seeds, you will have to pick them later. Therefore, it is better to spend a little time, but do the sowing carefully. Use tweezers.
Step 5. Cover with dry soil and press down lightly. Next, we moisten the soil. Use a syringe or spray.
Step 6. Wrap the containers in cling film and place them under the battery for germination.
Step 7. Periodically moisten and ventilate the plantings.
Step 8. After the shoots appear, remove the film and place it on the windowsill in the light.
At what depth should I plant?
The planting depth of nigella is 1 cm. There is no point in burying it deeper. The seed needs to sprout. The greater the planting depth, the longer it will take for the seedlings to sprout. Sowing closer to the surface is also bad. The bulb must form in the soil and receive nutrients from it.
How many days does nigella onion sprout?
If the sowing technology has been followed and the seed material is of high quality, then the bulk of the seedlings will appear in about 15-25 days. The first shoots may hatch a little earlier.
Germination can be accelerated if the grains are soaked in a growth stimulator before planting. Now there are many of them in stores, but the most popular are Epin, Zircon and Energen.
What kind of soil and soil preparation is needed?
Onions do not have any special soil requirements. The main thing is not to overdo it yourself. For seedlings, buy regular universal soil or seedling soil. This is quite high quality land.
It is not advisable to use garden soil. This soil is literally teeming with fungal spores, pest eggs, bacteria and other infections that will destroy the seedlings. Plus, garden soil is heavy, and seedlings do not grow well in it. If you still want to save money and sow nigella in garden soil, then the substrate must be disinfected by calcining it in the oven.
Planting onion seedlings in the Urals in 2020
It is better to grow such onions in the Urals by sowing them directly into the ground. Seeds must first be prepared and disinfected. We have described this procedure many times in other articles. Let's repeat it here too. Pour onion seeds into a glass and add warm water. Stir with a spoon and leave alone for a couple of hours. The seeds floating on top can be safely thrown away, and those that have sunk to the bottom can be used.
Before sowing, soak the seeds in a gauze bag in a solution of potassium permanganate for 2-3 hours. Then plant the seeds in the previously dug and cleared of roots beds, to a depth of about 1 centimeter.
The most suitable period for sowing seeds in the soil will be the end of April or the first days of May. In the Urals at this time there is a high probability of frost returning, so it is better to cover the beds with film.
Then water the soil and gently loosen it to avoid the formation of a hard crust.
How to care for nigella seedlings, any tricks?
After about 2 weeks, the nigella will sprout.
Now the seedlings need to be provided with the necessary care.
Onions need to be watered infrequently, about once a week. The soil should not become waterlogged, so make sure that the water does not stagnate. Lighting should be at least 12 hours a day. By the way, this is why there is no point in planting seedlings in February. There is still little sun in the last winter month, and the seedlings will stretch out. The temperature should not be higher than 20 degrees. Optimally – 18. Therefore, boxes with seedlings can be placed on the windowsill.
Thin the seedlings occasionally if necessary. If you have to dive, dig up the seedlings carefully so as not to damage the root.
Is it possible to immediately sow seeds in open ground?
Nigella can be sown directly in the garden. Sowing can be done in spring or before winter.
When to plant in open ground
In spring, sowing is carried out in April, when the soil begins to warm up. Although in the south of Russia in warm years it is permissible to plant nigella as early as March.
Before winter, onions are planted in late autumn - early winter, depending on the weather. The main requirement for autumn planting is not frozen ground. Therefore, be guided by the weather. If frosts begin, do not delay planting. Don't be afraid to sow in November; the seeds will sprout in the spring only when the weather permits.
Preparing the beds
The vegetable prefers fertile, loose soil. Planting requires more meticulous preparation of the bed, because... the root system is underdeveloped and on heavy soils the plant head rots or grows small.
Optimal pH 6.5 – 7.0. If the pH is below 6.0, the soil must be acidified using liming. However, liming should not be carried out while applying manure, as this will lead to rapid mineralization of the fertilizer and the disappearance of nitrogen from the soil. Good growing results can be achieved on loamy or sandy loam soils. Clay areas are diluted with sand and compost, otherwise it will be difficult for seedlings to break through the dense compressed layer of soil.
When preparing the ridge, in the fall the following fertilizers are applied per 1 m²:
- humus / compost 3 kg;
- ash ½ kg;
- superphosphate 25 g;
- potassium chloride 10 g.
Fresh manure cannot be applied. Peat soil does not require nitrogen fertilizers.
Please note! After liming the soil, sowing nigella onions in open ground is possible only after two seasons.
After applying fertilizers, dig up the soil and leave it like that during the winter. In spring, the soil is carefully loosened to a depth of about 10-20 cm. It is necessary to completely destroy the earth lumps in order to saturate the soil with oxygen.
When to plant seedlings in open ground?
The timing of transplanting nigella onions into the garden depends on weather conditions:
- In the Middle Zone and Moscow region - this is the last ten days of April - the beginning of May;
- Southern regions – April;
- Ural and Siberia - May.
REFERENCE. In any given year, the date may shift depending on the prevailing weather.
Features of growing nigella onions in open ground
Black onion makes its own demands on growing conditions.
The place should be well lit and protected from the wind. The soil should be neutral, loose if possible. The bed is made on a hill, since the crop does not tolerate stagnant water.
The distance between the rows is 50-70 cm, and the crop itself is planted at a distance of 25-30 cm from each other so that the bulbs have room to grow.
Caring for young seedlings
Young seedlings need to be properly cared for: regularly weed the beds, loosen the soil and carry out preventive treatment against diseases and pests. You also need to remember to thin out, otherwise the bulbs will be small.
Watering
Onions need to be watered every week. In dry weather - more often, and if the summer turns out to be rainy, then it is likely that you will not have to water.
REFERENCE. Onions do not tolerate excess moisture, but even if there is a deficiency, they will produce small onions.
Watering is stopped 15 days before harvesting. Usually this is mid-July.
Top dressing
If you grow onions for greenery, you can periodically apply foliar fertilizing with nitrogen-containing fertilizer.
Also, stores now sell special fertilizer for onions and garlic. This fertilizer can be used twice per season.
You can feed it the old fashioned way with urea and potassium monophosphate. The proportions are the same - 1 tablespoon per 10 liters of water.
The first feeding is carried out after thinning, the second after the formation of the bulb.
ON A NOTE. You can also use ammonium nitrate, mullein or bird droppings for feeding.
Loosening
Loosening is an important process in caring for onion beds. The fact is that this culture does not tolerate stagnant water very well. The bulb begins to rot, fungal diseases develop, and pests actively multiply.
To prevent this from happening, after watering and heavy rains the soil needs to be loosened so that there is no crust.
Weeding
It is important to remove weeds from the garden bed. Without weeding, they will quickly “clog” the onion plantings, which is why the bulbs will be small and the feathers will be inconspicuous and gray.
Weed the beds regularly and avoid thickening. Another reason why weeds should not be allowed to multiply is that pests settle in them, which then attack the onion.
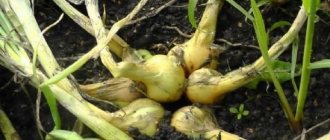
Planting onion heads for seeds and caring for “chernushka”
Planting onions from seeds in the photo
Onions in our climate are grown within two years. In the first year, onion seeds, the so-called “chernushka”, are planted in the beds, from which small onions – sets – grow by autumn. The sets are stored warm in winter, and in the spring they are planted again in the beds, obtaining from them large marketable bulbs suitable for food and winter storage by the fall.
To get “nigella”, you need uterine bulbs of a zoned variety that gives good yields in a given area. The bulbs should be equal in size: from 5 to 10 cm in diameter (depending on the variety). The best varieties of onions that can be grown through “chernushka” in the middle zone are considered to be Strigunovsky, Stuttgarten, Belovezhsky, Myachkovsky, Yantarny, Spassky, Bessonovsky.
To plant onion heads on nigella seeds after harvesting the turnips, select the largest, best and healthiest specimens of the bulbs. First of all, they need to be dried well and then stored. In winter, bulbs left for seeds should be stored in a room with a temperature of minus 3 ° C and a humidity of 75-80%.
Before growing black onion for seeds, three weeks before planting it is transferred to a warmer place (about 16 ° C), thereby accelerating the growth of the arrow inside.
In the fall, the site is dug up and mineral fertilizers are applied (potassium - 15 - 20 g and phosphorus - 30 g per 1 m2). In areas with stable winters, “chernushka” can be sown in the fall, covered with film to be sure. In the spring, the emerging seedlings are planted in new places.
Before planting, the neck of the bulbs is cut off, and the juicy part (up to 1 cm) is also captured. Pruning will speed up germination, ensure uniform shoots, and help identify and remove diseased bulbs (they are clearly visible from the sections). After this procedure, the mother onion for the “chernushka” seeds must be immediately planted in the ground. Plant as early as possible (approximately the 3rd decade of April), because the growing season of onion seeds has a long period - 130 days, and the seeds need time to ripen before frost. Before this, the ground is hoeed, leveled, and beds are made: 5 rows with 25 cm between them. The paths between the ridges are 60 cm, taking into account that it is possible to install the frame under the film cover.
The bulbs are placed in the prepared grooves with the bottom down at a distance of 15 - 20 cm (we look at the size of the bulb). The seeds are covered with soil, a layer of about 5 cm above the cut top part.
During the entire period of growth of seed bulbs, repeated weeding and loosening of the soil between the rows is necessary, because otherwise the seed yield is reduced and there is a high probability of plant disease with downy mildew. When the testes begin to grow en masse, they must be sprayed against peronosporosis with a solution of Bordeaux mixture (1%)1 or Ridomil solution (1%). When the arrows appear, one and a half meter stakes are driven along the edge of the ridge at a distance of a meter and a half from each other. Between the stakes (both across the ridge and along) you need to pull the twine in three rows: the 1st row - 40 cm from the ground, and the remaining two - 40 cm from each other. This will keep the arrows from breaking and falling to the ground if the wind picks up.
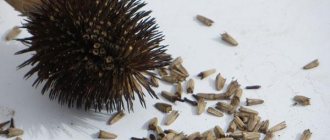
Onion seeds do not ripen simultaneously. First, the capsules of the upper part of the umbrella inflorescence ripen, then the lower ones. When the first single boxes open slightly and black seeds are visible in them, they begin to harvest the umbrellas. They are cut along with the arrow about 30 cm and tied in bunches (10-15 pieces). Hang in pairs on a wire stretched under a canopy or in the attic (so that they are well ventilated). A film or burlap is spread under them so that the ripe seeds from the bursting pods spill out onto it. To speed up the rash, the wire is sometimes shaken and passed through the bundles with a wooden stick, tapping lightly. Spilled onion seeds (scatter or obron) are considered the best in terms of germination and germination. They are stored separately.
If unfavorable weather conditions delay the development of plants, then the seeds do not ripen for a long time. For immature seeds, early frosts are dangerous. Then the seed plants, along with the bulbs, are dug up and transferred under the canopies, laying them obliquely on a stretched wire. Material is spread under them to collect spilled seeds, which will fully ripen due to the nutrients from the arrows and bulbs.
After winnowing, the seeds are poured into water, stirred, and left for about ten minutes. Frail seeds and particles of inflorescences remain on the surface of the water (they merge with the water), while full ones settle to the bottom.
Full-fledged seeds are scattered on burlap in a thin layer and dried quickly, often by stirring. To keep them better, they are dried to a moisture content of 7-8%. “Chernushka” is stored for no more than 2-3 years, in paper bags in a dry place, preferably at room temperature.
Next year, onion sets will grow from this material.
Disease and pest control
In general, onions can be called a crop resistant to diseases and pests. This vegetable gets sick much less than tomatoes or potatoes. However, if culture is not given due attention, then problems will not take long to appear.
Most often, onions suffer from fungal rot, which develops due to stagnant moisture. To prevent their development, preventive treatment with fungicides is carried out. The most effective is Fitosporin. Treatments are recommended to be carried out every 2 weeks. Especially if the summer is rainy and damp.
The most common pests you can find are onion flies, nematodes, leaf-mining moths and cutworm caterpillars. You can try to deal with the onion fly with a saline solution (a pack of salt in a bucket of water), but it is better to use the insecticides Iskra, Borey, Sherpa, and Metaphos. These drugs are much more effective in controlling insects.
To prevent the appearance of pests, you can plant carrot beds next to the onions.
How to prepare seeds for planting?
Freshly collected seeds for winter planting of nigella for sowing do not require preparation. Any stimulation of germination, on the contrary, is contraindicated. The whole point of pre-winter sowing is to plant at such a time that the seeds do not germinate before frost, but are hardened during the winter.
The only thing that can be recommended is to add a little crushed chalk or tooth powder to the nigella so that it is convenient to sow small black seeds.
Preparing nigella for sowing
It is advisable to prepare nigella for spring planting, this is especially important for home-grown seeds.
There are many recommendations for disinfecting seed material and stimulating germination. Many of them begin with advice to sort out the seeds: this is a completely useless waste of time - during processing, low-quality seeds will float up.
Pre-planting treatment of nigella - types and purpose
| What is processing | What result do we get? | |
| Pickling in potassium permanganate | Seeds for 20-30 minutes. placed in a pale pink solution of potassium permanganate; washed and laid for germination or immediately planted in the ground. | A good way to cope with spores of powdery mildew and other fungal diseases of onions. |
| Treatment with Epin and other immunomodulators | Prepare a solution of the drug according to the instructions (1-2 drops per 1 glass of water) and add seeds to it. After 30-40 min. Aged nigella, without washing, can either be planted or germinated in a damp cloth. | A special complex of microelements increases the plant’s immunity, including germination, resistance to diseases and adverse weather conditions. |
| Hot water treatment | Pour hot water +50-60 °C (criterion - holding your finger in the water hurts, burns). Add nigella and stir. Wait until the water cools completely for 20-30 minutes. |
Seeds treated in this way sprout within 1 week, compared to the usual 20-24 days |
Treatment with hot water shows excellent results on all vegetable crops: especially carrots, beets, etc. with a long period from planting to emergence.
It is not necessary to carry out manipulations to treat and disinfect seeds produced by trusted manufacturers. Usually the types of processing performed are indicated on the packaging. Granulated seeds (in colored glaze) are completely ready for sowing: the glaze is nothing more than a complex of microfertilizers for the first time of a seedling’s life.
How to determine collection time
When ¾ of the feathers have fallen, the onion can be harvested. The second sign is dried scales at the base of the onion head.
After harvesting, the onions must be dried. In dry summers, the harvest can be left directly on the garden bed, but in general it is better to dry the bulbs under a canopy, since the whole process will take at least 10 days.
You can also collect seeds for next year. In this case, there is no need to cut off the flower stalks. At the end of summer, they need to be covered with a stocking or a rag to prevent the seeds from scattering. In the fall, the inflorescences will dry out and the nigella will ripen inside, which can be sown the next year.
Planting dates for nigella - general rules
Onion seeds to obtain sets are planted in 2 terms - late autumn and early spring.
Pre-winter sowing
Nature itself has laid down the maximum germination rate of onion seeds immediately after ripening - almost 100%. Experienced summer residents use this property in practice - winter plantings produce the earliest possible shoots in the spring and a high-quality early harvest in the summer.
For pre-winter sowing of nigella, it is necessary to choose the planting time with special care so that the seeds do not have time to sprout before the beginning of winter.
If you follow the advice of experienced gardeners, it is impossible to make a mistake with the timing. What needs to be done ahead of time:
- Prepare the bed in advance - dig up, fertilize, mark furrows.
- Collect 1-2 buckets of dry, loose soil and place in a barn, basement, etc.
- After a steady drop in temperature to 0 °C, sow nigella into the frozen ground.
- Cover the furrows with dry soil with a layer of 1.5-2.0 cm.
In regions with unstable snow cover, it is advisable to take care of snow retention - for example, put cut branches from the garden on the garden bed.
in spring
All onions are cold-resistant plants; their growing season begins already at +2…+4 °C. It would be a mistake to wait until it gets warm to plant nigella. Early planting of seeds allows you to make maximum use of winter melt water, which is the most valuable for plants.
It is not recommended to delay the deadlines - as soon as the soil ripens (the dirt turns into a fertile bed), it is necessary to sow. The area for sowing must be prepared in the fall, so that in the spring you can only mark the rows, plant the seeds and level the bed.
Answers to frequently asked questions
What kind of onion can be grown from nigella?
Nigella is the name of onion seeds, so any variety can be grown.
How to make seeds germinate faster?
If you want to speed up the germination process, the seeds need to be soaked in a growth stimulator. The most popular drug is Epin.
Why doesn't nigella sprout?
Reasons 2: bad seeds and improper planting. If you are confident in the quality of the seeds, then provide them with proper care. If you planted deeply, you will have to wait for the seedlings to emerge.
Why does nigella turn yellow?
There may be several reasons. These include pests, bacterial diseases, and nitrogen or moisture deficiency. Depending on the cause, the treatment method is chosen.
How to grow nigella on a head?
Use large-fruited varieties. The best thing is the exhibition bow.
Growing vegetables before winter
When to plant nigella onions before winter? Autumn sowing is carried out with the arrival of persistent cold weather. In this case, the soil should freeze.
At a temperature of +2...-4 °C, seeds can germinate, which will cause the death of seedlings in winter. Therefore, planting is carried out in the fall - in October or November. The period is chosen depending on the climate of the region.
Preparatory work
The area should be dug up, cleared of roots and weeds and loosened. For onions, you can choose a place under fallow or on the site of a lawn. The dug up bed needs to be fed with a nutrient composition. Add sand or sawdust to heavy soil.
Sowing seeds on ridges
Planting nigella onions before winter involves performing the following steps:
- Check seed material for germination.
- Dig holes 2-3 cm in size. The interval between rows should be 20-25 cm.
- Scatter the seeds into the grooves and press lightly.
- Sprinkle soil on top. If thinning is subsequently planned, the seeds are planted quite densely.
Important! You should not water the beds after planting. In spring, melted snow will provide the required soil moisture.
Beds in areas with harsh climates should be covered with a mulch layer. It should include foliage, straw, spruce branches. In spring, it is recommended to remove the mulch and allow the seedlings to germinate.
Further care
After spring planting, subsequent care includes timely watering, weeding, and thinning. Fertilizers should be added as needed.
At the initial stage of root formation, onions experience a high need for moisture. Depending on precipitation, plantings should be watered 2-3 times a week. In this case, the soil should not be too dry or too wet.
Taking into account the rains at the stage of intensive growth, water should be supplied to the beds 2-3 times a week. It is better to use warm water for watering. Its temperature should be +14…+17 °C.
Water the onions with warm water.
Plantings need to be moistened along the grooves along the crops or between the rows: watering under pressure will lead to washing out the seeds. After supplying water, when the top layer of soil dries, the bed should be loosened. This is done at a depth of 2-4 cm. Thanks to this procedure, it is possible to improve soil aeration and prevent the formation of a crust. Irrigation is stopped 3 weeks before the seed collection.
Manure mixed with water in a ratio of 1:10 is used as fertilizer. You can also use a solution of wood ash or mineral products for onions. If the soil was enriched in the fall, it should be fed 2 times during the season:
- The first time this is done 2 weeks after the sprouts appear. At this stage, you need to add nitrogen compounds.
- The second feeding is carried out 3 weeks after the first using potassium and phosphorus.
Nutrition should be combined with watering or organized after precipitation. To assess the deficiency of certain substances, you should pay attention to the appearance of the onion:
- slow development and gray feathers indicate a lack of nitrogen;
- if the greenery at the top takes on a dark tint, this indicates a phosphorus deficiency;
- Yellowing and drying of feathers before maturity indicates a lack of potassium.