Description and characteristics of the family bow
Family onion (lat. Allium ascalonicum) has been grown since ancient times. This variety of onion is considered the most delicious and productive . The plant has other names - kushchevka, magpie, kvochka.
The most popular variety is shallot, with small oblong bulbs of white or white-purple color, delicate taste and aroma.
Main characteristics of the culture:
- Family onions differ from ordinary onions in structure - a nest with 3-12 small heads is formed from one onion. In some cases their number reaches 20 pieces.
- Average weight - 15-60 g.
- The shape is varied: oblong, cuboid, pitcher-shaped, round, ovoid, elongated.
- The color of the scales is golden, red, purple, bronze.
- The center on the cut is white, pinkish-violet, reddish.
- The greenery is dense, the leaves are softer and thinner than those of a turnip, with a slight waxy coating. Feathers can be cut or pulled out with the bulb 2-3 weeks after planting. They do not become rough and remain tender throughout the season.
- The height of the ground part is 30-50 cm.
- The taste is semi-sharp and does not leave a sharp aftertaste or bad breath.
- The heads ripen in 50-80 days depending on the variety.
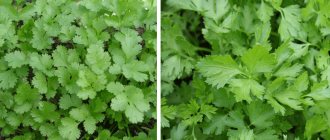
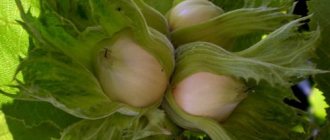
In the photo you can see what a family bow looks like.
Harvesting
The harvest time of family onions depends on the variety, but you can determine it yourself by external signs - the feathers dry out and fall off. Bulbs should be harvested under favorable weather conditions. This must be in the morning, since after harvesting the bulbs are laid out on beds in direct sunlight to dry.
In rainy weather, the onions are transferred to a warm, ventilated room, placed on woven material so that they can breathe from all sides. In this case, you need to turn the heads 2-3 times a day.
How to properly collect family onions?
In order for onions to be preserved for a long time, you must adhere to the basic rules of collection:
- it is forbidden to remove the heads by pulling them by the tops;
- first you need to dig up the vegetables;
- then gently pull, holding the base (neck) with your hand;
- lightly shake off dirt without hitting each other or other objects;
- spread out to dry;
- trim the green mass, leaving the neck 3-4 cm;
- dry again until completely dry indoors for several days or weeks depending on the humidity level;
- cut the roots by 1-2 cm;
- discard damaged bulbs.
Storage rules
After you have collected and prepared the heirloom bulbs, they are sent for long-term storage. The room can be an apartment (kitchen, pantry, drawers, balcony) or a cellar. Requirements based on storage location:
- In room conditions, the permissible temperature range is from +18 to +22°C, air humidity is 60-70%. You can store it in different ways:
- in a cardboard box;
- in old nylon stockings;
- in bags made of natural fabric;
- in wicker baskets;
- in paper bags;
- in polypropylene nets;
- in the form of braids that are woven from bulbs with uncut tops.
- In the basement, the temperature is 0-4 degrees Celsius, humidity is a maximum of 85%. You can store the heads in boxes made of wood or plastic, which are filled with sand and sawdust. A prerequisite is to drill holes to eliminate excess moisture and air penetration.
Drying heirloom onions
If the heirloom onions are not completely dried, in the future they will be subject to putrefactive diseases, so it will become impossible to preserve them for a year.
The first time the crop is dried in the beds, and secondary drying requires the following conditions to be met:
- Drying time – minimum 10 days, maximum 20 days.
- Place - attic, ventilated room, street (under a canopy).
- The method is to spread it on a woven material and hang it in a bunch.
Features of growing in open ground
Family onions are frost-resistant and not susceptible to bolting , so planting is carried out starting from the second ten days of April, subject to favorable weather conditions.
Long daylight hours and active snow melting are the best period for plant growth and development . The bulbs are literally saturated with melt water. Suitable air temperature is +18…+20°C. Seeds germinate quickly in soil heated to +4°C.
To obtain a large harvest, choose bulbs larger than 3 cm.
To prevent the spread of onion fly in the area, rows of onions are alternated with rows of carrots.
When growing heirloom onions, it is not recommended to apply fresh manure , otherwise you will get thick and tall greens instead of large bulbs.
To get large heads, it is important not to thicken the plantings and control their number in the bed. To do this, the earth is raked and excess specimens are twisted out. They can be used for food. The remaining bulbs get enough space to grow and develop.
In the greenhouse
Planting material less than 2 cm in size is used to force early greenery into heifers . Planting is carried out in January, taking into account the long dormant period characteristic of the plant.
Careful care
Of course, planted onions need to be carefully looked after if you want to get a truly rich harvest.
Many experts like that until the bulbs have long enough feathers (about 10 centimeters), they do not need to be looked after. Even if the soil is quite dry, there is no need to water the beds. Then the bulbs will grow longer roots that go deep into the soil for moisture. Consequently, the top layer of soil will be less depleted - subsequent crops will grow here much better.
Don't forget about mulching. You can use any material: straw, hay, sawdust, pine needles, mown grass. The main thing is that the mulch layer is at least 10 centimeters thick. Thanks to this, the bed is reliably protected from weeds, enriched with useful substances, and the moisture evaporates much more slowly. At the same time, the porous structure allows heat to pass through well and does not impede the passage of air.
In the future, you will have to water the onions about once a week (if there is no regular rain), approximately 20 liters per square meter.
For many summer residents, mulching is an unfamiliar, unusual technique. Well, you can do without it. But in this case, you will have to water the beds twice a week, and at the same time fight weeds and loosen the soil. Of course, no one will like spending extra hours in the garden beds, wasting extra strength. Therefore, the mulching option should still be studied in more detail.
The best varieties of heirloom onions
When choosing a variety of heirloom onions, experienced gardeners recommend focusing on varieties adapted for cultivation in a particular region .
The table shows the main characteristics of the best varieties.
| Variety name | Form | Bulb weight, g | Coloring | Keeping quality | Productivity, kg/1 m² |
| Albik | Transverse elliptical | 10-20 | Husk - yellow, scales - white-green | 7 months | 1,5 |
| Veliky Ustyug | Round | 18-22 | Husk - brown-red, scales - white-violet | 7 months | 0,8 |
| Guarantee | Transverse elliptical | 15-25 | Husk - yellow, scales - white-green | 6 months | 1,7 |
| Knyazhich | Elliptical | 20-25 | Husk - red-brown, scales - purple | 7 months | 1,2 |
| Sturdy | Round | 25-30 | Husk - pink, scales - red | 6 months | 2,1 |
| Krasnoselsky | Transverse-narrow-elliptical | 40-50 | Red husks and scales | 8 months | 3 |
| Earring | Round | 20-25 | Husk - yellow, scales - white | 8 months | 1,5 |
| Sophocles | Round | 25-30 | Husk - brown-violet, scales - white-violet | 7 months | 2,2 |
| Old Believer | Elliptical | 15-18 | Husk - brown-red, scales - white-violet | 6 months | 1,2 |
Most common varieties
Experts are constantly developing new, unusual variations of old plants. It is not surprising that today there are dozens of varieties of heirloom onions. If desired, you can find early-ripening, mid-ripening and late-ripening. Let's talk about the most interesting varieties of all types.
First of all, this is Emerald. An early ripening variety with bulbs of regular round shape. It has a brownish-pink husk. The nests are small - usually 4-5 bulbs weighing up to 30 grams each.
Another representative of early ripening varieties is Snezhok. The nests are about the same size, but the husks are white. The bulbs are slightly larger - up to 35 grams.
But they are easily overshadowed by the Sprint variety. The nests here are much larger - about 10 bulbs. And their weight is greater - up to 40 grams each.
Now let's move on to mid-season varieties.
For example, Albik. It is distinguished by round, slightly flattened bulbs, the weight of which ranges from 20 to 30 grams. Each nest usually consists of 4-5 bulbs.
The Kuban Yellow variety is similar in shape to it, but the husk here is rich brown-yellow. The nest includes 3-4 bulbs weighing up to 30 grams.
If we talk about late-ripening ones, then we should talk about the Siberian Altar, Kunak and Krepysh.
The first has large yellow bulbs - up to 30 grams each, about 6-7 pieces in a nest.
Krepysh's bulbs are much larger - up to 55 grams, about 3-5 in one family.
Finally, Kunak. The weight of the bulbs ranges from 25 to 35 grams; the nest, as a rule, consists of 3-4 bulbs.
Correct fit
Heirloom onions are grown by seeds - to renew planting material, and by heads - to produce large bulbs and greens . Spring planting is carried out throughout Russia in April-May. In the south it is possible to plant onions before winter.
About pests, problems and diseases of family onions
Reviews from many experienced gardeners indicate that this type of onion is resistant to many “traditional” diseases, as well as to pest damage. Prevention and compliance with the rules of agricultural technology is the guarantee that onion plantings will not be threatened by any misfortunes.
- It is required to plant heirloom onions as early as possible.
- For planting, it is necessary to select only high-quality and healthy seed material.
- The bulbs need to be soaked in special solutions for disinfection.
- Planting patterns and distances must be observed.
- To protect against onion flies and other pests, it is advisable to use the following measures:
- dusting of plantings with wood ash, tobacco dust, a mixture of black pepper and ash;
- plant onions next to carrot beds;
- regularly loosen the soil between the rows;
- Place wormwood, rosemary, and tomato tops between the rows of onions, which repel pests with their pungent odor.
Treating plants with Bordeaux mixture (1%) also helps. Usually one or two procedures are enough for prevention.
ON A NOTE! When using this drug, you cannot cut the feathers into greens. Two weeks before harvest, spraying with Bordeaux mixture is stopped.
It is advisable to avoid using chemicals on the site, using them only in the most extreme cases.
Why does the onion feather turn yellow?
The reasons for yellowing can be very different, and accordingly, the solution to the problem will be different.
- Plants may experience nitrogen deficiency. In this case, the tips of their leaves turn slightly white, and the surface of the feather acquires a yellowish tint. Solution: use organic fertilizers.
- Feathers may also turn yellow if there is a lack of potassium. The ends may even curl slightly. Solution: apply fertilizing with ash or potassium salt.
- Yellowing is caused by a pest - the onion fly, the larvae of which damage the bulb and feather. Solution: dusting plants and beds with ash, mixtures of tobacco, pepper, using Fitoverm or Agravertin preparations.”
- Severe waterlogging of the soil also causes yellowing of the feather. You should regularly loosen the beds and make small grooves to allow moisture to escape (this usually happens in rainy summers).
- If the feather begins to lie down and turn yellow at the end of July, this means that it is time to harvest the onions.
The bow has gone straight
The family bow is used only if the storage conditions have been violated. The only correct solution is to maintain temperature conditions in winter and low humidity levels. The flower stalks of the plants are carefully broken off.
The bow doesn't tie
It happens that the onion “goes” into the feather, building up a powerful green mass, but the onion does not set well. This may be due to violations of the planting time of the crop (planted late and in warm weather), improper care, or an excess of nitrogen in the soil.
To avoid this, you must:
- plant heirloom onions as early as possible;
- do not water the plants in the first 7-10 days after planting in order to build a good root system;
- do not overfeed with nitrogen, otherwise the “family” will only grow feathers;
- approximately two or three weeks before harvesting, it is necessary to rake the soil from the bulbs, slightly exposing them for better ripening;
- choose healthy and high-quality planting material for growing.
Family onions are an unpretentious and productive crop that has long been grown in many Russian regions. If you follow very simple recommendations, even inexperienced gardeners will be able to grow good harvests and get full-fledged bulbs of this wonderful vegetable.
Planting dates in regions
Timely sowing is the key to successful growth and development of the plant, the formation of a nest with a large number of bulbs . Considering the cold resistance of family onions, in most regions of Russia they begin planting in the second ten days of April. Greens tolerate frosts down to –7°C.
In the south, spring planting is carried out in early April, winter planting - at the end of October.
In the Urals and Siberia, the dates are slightly shifted. Planting of family onions is carried out taking into account weather conditions - in late April-early May. Pre-winter planting is rarely carried out due to the risk of losing more than half of the crop. If warm weather persists longer, heirloom onions are planted before winter in November, covering the beds with a thick layer of mulch (about 10 cm).
Planting scheme
To plant the family, they build a bed by making grooves in it. Many gardeners prefer to plant seed material in a checkerboard pattern. If the variety produces large onion heads, then the sets are planted at a distance of 25–30 centimeters from each other. Small bulbs should be planted at a distance of 15 centimeters.
The planting material should be buried 5–8 centimeters into the ground. A shallow location of the sowing will lead to drying out of the roots.
How to grow large family onions in the middle zone? It is necessary to correctly determine the timing of planting and choose a variety that produces large bulbs. It is important to place the planting material on the bed so that medium-sized heads are formed.
According to the lunar calendar
To obtain large bulbs, planting is carried out on the waning moon , to force greenery - on the growing one.
Favorable days for forcing greenery according to the lunar calendar for 2021:
- April: 2-7, 24-29;
- May: 1-6, 23-29.
Favorable days for receiving heads according to the lunar calendar for 2021:
- April: 9-14, 16-22;
- May: 8-13, 15-21.
There is an opinion that it is better to complete the planting of family onions before May 5th. Popularly it is Luke's day, or Lukov's day.
Watering
Until shoots 8-10 cm high appear above the soil, family onions do not need care at all. Even when watering. It is very important not to water the plant during the first period of growth. This will stimulate the roots to grow deeper. In search of moisture, the onion will take root well and gain a foothold in the ground. Long roots will allow it in the future to receive more nutrients from the deeper layers of the substrate.
When the onion has reached its 10-centimeter height, on the contrary, you need to start intensive watering and under no circumstances allow the soil in the beds to dry out. If plants experience drought, their growing season will be shortened sharply. The bulbs will be underdeveloped.
1 month before the planned harvest, you need to update the mulch layer, water it abundantly and stop watering completely. The moisture that the mulch retains will be enough for the onions.
Preparation of planting material
Medium sized seeds are best for planting . They form an average number of large bulbs. Large seeds produce a large number of small specimens.
The bulbs are cleaned of scales to reduce the risk of infection by fungi and disinfected in a solution of potassium permanganate, salt (50 g per 2 liters of water), and the drug “Maxim”.
Then they are washed with clean water and soaked in nutrient solutions (optional) :
- 50 mg of boric acid per 1 liter of water;
- 1-2 g of succinic acid per 1 liter of water;
- 1 g of potassium bromide per 1 liter of water.
Before planting, the material is dried in the open air.
The seeds from the bag are pre-soaked in water for 48 hours , changing it periodically. Then the material is dried until it flows and is sown in furrows at intervals of 8-10 cm. The width between the grooves is 15 cm. 2-4 small bulbs are formed from one seed. This makes it possible to grow family onion sets, which can be used for planting next season.
If there is not enough material to fill the prepared area , planting is done in halves or quarters. For large bulbs with a diameter of 3 cm and weighing 30-50 g, cut off the dry scales and the bottom to the roots. The bottom is covered by a hard part, popularly called the “heel,” which must be carefully cut off. This stimulates the appearance of roots.
The prepared material is soaked overnight in water at room temperature , and before planting, it is divided into two or four parts with a sharp knife along the bulb.
Note! The roots of heirloom onions are located unevenly on the bottom, so when cutting, make sure that approximately the same number of roots remain on each part.
Site preparation
To grow family onions, allocate areas on the south side of the garden , well heated by the sun, without drafts. The soil should be loose and nutritious. Acidic and clogged soil is not suitable for onions.
The best crop predecessors are pumpkin, squash, zucchini, legumes, potatoes, rye, flax, and lupine. The plant is replanted in the same place no earlier than after 3 years.
If necessary, increase soil fertility by plowing and adding up to 5 kg of humus per 1 m², 200 g of wood ash, 40-50 g of superphosphate.
Heavy clay soil is loosened using river sand - 5 g per 1 m².
The soil temperature during planting should not be lower than +5°C.
Landing instructions
A bed is formed on the site and 2-3 deep furrows are made . Planting material is laid out in a checkerboard pattern. A distance of 25-30 cm is left between large bulbs, 15-20 cm between medium-sized bulbs. If the task is to force greens, the interval between seeds is 10-15 cm.
Planting depth is 5-8 cm , the top is sprinkled with a 3 cm layer of soil for better rooting. When planted shallowly, the root system dries quickly and does not develop.
Small bulbs with a diameter of 1-2 cm are left for winter planting in October . Before the onset of frost, the planting material will take root and overwinter without negative consequences. In early spring, you can cut young greens or leave the onion on the head.
Preparing the bulbs for planting
Now you know enough about family onions - varieties, descriptions, photos. So you can move on to practical advice. Let's start by preparing the bulbs for planting.
First you need to clean the planting bulbs from dry husks. The next stage is etching in copper sulfate. To prepare the solution, it is enough to take only 1 tablespoon of copper sulfate per 10 liters of water. Upon completion of the procedure, be sure to rinse the bulbs with clean water.
You should also soak the onions in complex fertilizer. Then it will absorb moisture that was lost during months of storage, and the supply of nutrients will be replenished. There is no need to soak for a long time - 10 hours is enough.
The next stage is germination. After preparation, the bulbs are placed in a box or other suitable container, covered with a lid and left in a room at a temperature of about +5...+15 degrees. Germination stops when roots about 0.5 centimeters long appear.
Finally, cutting the onions. Some gardeners skip this stage, while others consider it extremely important. The bulbs are simply cut lengthwise. As a result, fewer rudiments remain in each half, but especially large bulbs are formed in the nest, because they are not squeezed by neighboring ones.
Further care
Rules for caring for heirloom onion plantings:
- Abundant watering at the beginning of the growing season. Lack of moisture leads to the end of the growing season; the bulbs will not be able to grow to the desired size. Watering rate is 200 liters per bed. Three weeks before harvest, watering is stopped.
- To retain moisture in the soil, the beds are mulched with sawdust , straw, dry leaves or peat. This coating inhibits the growth of weeds and reduces the amount of weeding.
- In beds intended for producing large heads, greens are not cut . If you want to use a green feather for cooking, the ground is raked off and the head is carefully unscrewed from the middle of the nest.
- At the beginning of July, the nests are unearthed - part of the soil along with the mulch is raked away, leaving the heads ½ in the open air for drying and rapid maturation.
- If the previous crops were not fed , an additional 10 g of urea, 40-50 g of superphosphate and wood ash are added.
Disease and pest control
Family onions are less likely than other turnip varieties to suffer from fungal diseases and are subject to attacks by onion flies.
Sometimes there is wilting and yellowing of the greenery . The culprit of such changes is aphids. To destroy the pest, use infusions based on hot pepper (chop 2-3 pods and pour 1 liter of water), yarrow (300 g of dry raw material, pour 5 liters of water) or wormwood (0.5 g of herb, pour 10 liters of water). 25-30 g of liquid or 50 g of laundry soap shavings are mixed into the liquid for better adhesion of the solutions to the leaves. The biological product "Verticillin" is highly effective.
To repel onion flies, fresh branches of wormwood, tansy and yarrow are laid out on the beds. Once every 7 days, the above-ground part is watered with saline solution (200 g of salt per 10 liters of water).
If the rules of agricultural technology are violated, family onions are affected by powdery mildew, downy mildew, and neck rot. Infected plants are removed from the beds, healthy ones are treated with Quadris, Mikosan, and Pentophage.
Preventive measures:
- disinfection of planting material with “Maxim” and “Fitosporin” preparations;
- crop rotation;
- weeding.
The onion nematode bends the bottom of the bulbs . Infected planting material infects healthy plants. For prevention, before planting, the bulbs are treated with a 4% Formalin solution.
Plant care
Mulched beds retain moisture for a long time, and the bulbs develop without watering or fertilizing. Fertilizers are applied for onions in open ground when the leaves grow ten centimeters. Here the soil will require watering, and feeding the vegetable is required.
It is better to water the family generously once a week. As soon as the bulbs are separated, the excess ones are removed, leaving 3-5 pieces in the nest.
In early July, watering of the beds is stopped. The soil is removed from the bulbs, leaving the vegetable heads in the sun. This way they ripen faster and produce larger yields.
In addition, caring for family onions includes:
- loosening the soil 1–2 times a week;
- weed removal;
- feeding with manure in a ratio of 1:10 or bird droppings - 1:15;
- application of mineral fertilizers.
Fertilizer promotes the growth of green mass, so before harvesting, stop feeding the onion beds a month before harvesting. Then all the energy will go into forming large bulbs.
Harvest and storage
Family onions usually ripen in the second half of July and early August . Signs that the crop is ready for harvest: withering and lodging of greenery, dry scales on the bulbs, dry necks.
onions in the soil due to the risk of the nest breaking into heads. In a humid environment they re-root, resulting in a shorter shelf life in winter.
Harvesting is carried out in dry sunny weather : the soil is shaken off, the roots are cut, the bulbs are laid out on nets for drying, ripening and disinfection under the sun's rays.
In rainy weather, the heads are dried under a canopy, in an attic or in a barn for 10-12 days. The dry feather is trimmed, leaving 10 cm. This is the most convenient way to weave “onion braids.”
It is convenient to store heirloom onions in a suspended state in the house at a temperature not exceeding +20°C.
In the cellar, onions are stored underground, in wicker baskets or spacious boxes. This storage method involves the complete removal of dry feathers. The optimal air temperature is 0…+2°С.
It is not recommended to store heirloom onions next to potatoes , beets, carrots and other vegetables that require high air humidity.
Soil preparation
All varieties of heirloom onions are demanding on the quality of the substrate. They love to grow in fertile soil. Since the bulbs are small, they need turfy, loose soil. This crop requires neutral soil and grows very poorly in acidic soils. As a rule, the onion begins to rot. Before planting heirloom onions, you can prepare the soil in the fall. Add humus to the ground at the rate of 5 kg per 1 sq.m. It would not be superfluous to add potassium salt (10 g per 1 sq.m.) and superphosphates (25 g per 1 sq.m.). An important point is to thoroughly loosen the soil immediately before planting.
Crop rotation rules:
- Family onions can be planted in beds after legumes, potatoes, beets, and carrots.
- It is not advisable to plant onions in places where pumpkins grew (zucchini, cucumbers, melons, squash, pumpkins).
- After the family onions, plant strawberries, all types of cabbage, radishes, mustard, salad vegetables (spinach, arugula), cucumbers, peppers, tomatoes.
How to plant family onions before winter
Before planting shallots before winter, you need to select and prepare planting material and prepare the soil for planting.
Before winter you can plant seeds and sets. Seeds must not be expired. With proper planting, seedlings appear in mid-autumn, quickly take root and winter well even in regions with an unstable climate.
To get a large and healthy harvest, the choice of seedlings must be taken with full responsibility:
- large bulbs (5-7 cm in diameter) shoot arrows in the spring, form numerous families of small heads - the crop ripens with low commercial quality;
- bulbs 2 cm in diameter are ideal for planting before winter - with proper care, the plant will produce about 10 large juicy heads.
Planting material must be well dried, healthy, without damage or rot.
Not all varieties of heirloom onions are suitable for planting before winter. Most suitable:
- Sprint is a variety with early ripening and a sharp taste. The plant produces up to 9 bulbs weighing 35 g. Sprint is one of the best varieties for early harvest.
- Catkin – the plant forms 7 large heads with a very pungent taste.
- Garant is a mid-season variety. During the growth process, onions produce a lot of greenery, up to 200 g per bush. Productivity is high, up to 11 large flat heads of bright yellow color.
- Ural purple is a mid-season variety. The rhombic bulb is large, the scales are colored red-violet. Ripening – 90%, shelf life – up to six months.
- Krepysh is a medium-late variety, ripening occurs 70 days after rooting. The oval bulb is large, weighing up to 50 g. The variety is frost-resistant and can grow in all regions of Russia.
Soil preparation
To grow a rich harvest, heirloom onions are planted in an open, sunny place. A month before sowing, the soil is dug up and fertilizers are applied. Per sq. m add 6 kg of humus and 80 g of double superphosphate. Wood ash is used as phosphorus-potassium fertilizer.
Important! Before planting, check the acidity of the soil. If it is high, then add lime.
For better rooting, it is necessary to carry out regular watering: from the moment of planting until the first snow falls. A large amount of water will allow the plant to accumulate moisture for the winter and quickly grow roots.
Preparation of planting material
Preparing the seedlings for planting begins with drying them. This process consists of 2 stages:
- The planting material is kept for 2-3 weeks at a temperature of +20 degrees;
- then the sets are heated for 9 hours at a temperature of +30 degrees.
To prevent diseases from occurring, the seeds are soaked in a weak solution of potassium permanganate (3 g per 10 liters of water). For better rooting, they are treated with a growth stimulator or kept in water at a temperature of +50 degrees. After 15 minutes, it is removed and immersed in cold water for 10 minutes.
Planting by seeds
Landing rules:
- Before sowing, the seeds are soaked in water with a growth stimulator solution.
- Seeds are sown in dug up beds in rows, with an interval of 20 cm from each other, to a depth of 1 cm.
- After sowing, the soil is compacted, watered and mulched.
When sowing seeds in the second half of August, the first shoots will appear in mid-September. At this time, the seeds form a set, which takes root, builds up the root system, which gives high winter hardiness and a good harvest in mid-July.
Advice! Deformed heads grow from buried seeds.
To obtain a large harvest, it is necessary to observe the interval between plantings and adhere to simple rules of care.
Planting seedlings
Technique:
- Before planting, the seedlings are disinfected and treated with a growth stimulator. Thanks to this, family onions will be less susceptible to diseases, and germination will occur 2 weeks earlier.
- Family onions need to be planted in rows, at a distance of 25 cm and deepened by 3-4 cm. It must be remembered that family onions form up to 11 heads, so thickened planting affects the yield.
- After planting, the ridges are watered and mulched. Mulch will provide additional nutrition, retain moisture and prevent weeds from growing. Straw, dry leaves or humus are used as mulch.
- With the arrival of spring, the mulch is removed. This must be done so that the seedlings do not wither and the earth begins to warm up under the rays of the spring sun. You should not be afraid of spring frosts, since the bulb will grow a root system over the winter and will be able to withstand a slight drop in temperature well.
In the Northern regions, with the arrival of the first snow, they protect against freezing (the beds are covered with snow). To form a snow cap, you can make a canopy of shields that will trap snow on the bed, as a result of which the crops will not be able to freeze.
Black onion: planting
Growing onions from seeds in one season is becoming increasingly popular. This is a fast and cost-effective method. The Strigunovsky variety, which is distinguished by its rounded shape and yellow scales, depending on the method of growing from seeds, can be used to obtain a full onion harvest, as well as for growing sets.
There are many varieties of annual onions:
- spicy: Chalcedony, Mayak, Globus, Lugansky;
- semi-sharp: Rossa de Ferencé, Amphora;
- sweet salads: Russian size, Exhibition and others.
You can get seeds for planting yourself by planting mother bulbs on your site.
Preparing the bed
Beds for sowing chives in open ground should be prepared in the fall. The soil is dug up, carefully removing the roots of the weeds. If this is not done, then in the spring the weeds will choke out the fragile shoots. Weeding the beds at the beginning of the growing season is difficult, since most of the seedlings can be removed along with the weeds.
Onions prefer loose, fertile soil, so during digging it is necessary to add humus or peat to the ground at the rate of half a bucket per 1 m². It is impossible to use fresh manure instead of humus, as young shoots will get burns, get sick or die outright. On dense, heavy soils, it is advisable to add sand.
Ribbon ridges should be marked on the prepared area. It is most convenient to make them 1 m wide. Carefully level the soil with a rake, breaking up lumps. Cut shallow furrows with row spacing of at least 20 cm. In order for the burning vegetable to please you with a high yield, it must be grown following a number of rules.
Sowing
Sow nigella in early spring, when there is still enough moisture in the soil. The seeds have time to hatch and begin to grow before the dry period begins. It is advisable to start sowing in the February and March thaws so that the onion heads have time to form. A bulb grown in an annual crop from seeds weighs approximately 80-120 g.
Before sowing, you can mix nigella with crushed chalk - this technique makes the work easier and reduces the consumption of planting material. To make it easier to care for the seedlings, you need to throw a lighthouse seed (for example, radish, lettuce) into the furrow every 10-15 cm. They will sprout much earlier than the onions and mark the rows.
After planting, the furrows are covered with a small layer of moist soil (1.5-2 cm), compacted and mulched. Vegetable growers solve the question of when to plant nigella in different ways. Many people successfully use winter crops. Nigella seeds are not afraid of the cold, and with the advent of the first warmth they grow together.
Planting onions in the ground
The planting scheme depends on the planting material through which the vegetable crop is cultivated.
Sowing seeds
It is produced according to the following scheme:
- width between holes – 1.5-2 cm;
- distance between rows – 12-18 cm;
- embedment depth – up to 1.8-2 cm.
After sowing, the soil must be watered and mulched using sawdust or straw. The planting itself must be covered with a dark film to prevent it from drying out.
Planting sets
Before planting, you need to prepare the beds at a distance of 25-30 cm. The distance between the grooves depends on the size of the heads:
- large – 10-12 cm;
- medium – 8-10 cm;
- small – 6-8 cm.
Sevok should not be immersed too deeply in the ground. With the appearance of roots, it will be drawn even deeper into the soil, so you will have to wait even longer for seedlings, and the harvest will be small and weakened. The optimal depth for planting bulbs is 4.5-5 cm, so that a layer of soil of 2.5-3.5 cm remains above the onion hangers.
The intricacies of sowing onion sets throughout May are described in the video below:
Planting onions in the spring - onion passions!
Planting onion sets in spring - what is a set?
Planting sets or planting on a head is the same process, characterized by planting small bulbs obtained by planting seeds a year earlier. Experienced gardeners can grow a crop from seeds in one year, but this process requires a lot of time and effort, so the vast majority plant seedlings. Potatoes, peas and beans, cabbage are excellent precursors for onion beds, but they cannot be replanted in the same place even within two years.
Even in one season, pathogenic bacteria and microorganisms are concentrated in the soil under the onion, which harm this particular plant. Pests also join the whole “bouquet” of diseases. Against this background, the depletion of the top layer of soil after the onion does not seem to be such a big problem. Therefore, plan your beds so that the onions change their place of “residence” every year and are planted away from the previous place, at least through one bed
Garlic and carrots will be undesirable predecessors for it; they cannot be planted in the places where cucumber seeds grew, so it is very important to carefully plan the garden
When to plant onions in the spring - loose soil and warm sun!
Of course, there cannot be identical landing conditions for each region, but you can navigate by weather conditions. If frosts are no longer expected, spring turned out to be early and warm, you can plant onions as soon as the soil warms up a little. In later spring, planting occurs throughout April and even at the beginning of May; the same dates are also relevant for larger bulbs. The recommended planting depth is 7-10 cm, that is, it will be enough to take a glander and dig a furrow with its edge.
In this matter, it is important not to overdo it with waiting - if you are late with planting, the onion will begin to release a lot of feathers, while the root system will lag behind the upper part. After some time, the greens will, of course, wilt, but the bulbs will no longer be able to achieve greater growth
But you should not plant the bulbs too early, when there are frosts in the mornings, otherwise they may suffer from being in the ground for too long without growing. The first shoots can appear within a few days or a week, depending on the soil temperature.
Do I need to cook the bulbs - what are gardeners afraid of?
When planting onions on the head in the spring, gardeners are frightened by the possible sprouting of “arrows” - rough stems with a flower ovary. It’s okay when there are only a few of these flowers in the whole garden bed, but a large number of them can significantly reduce your harvest, because the ovary will take all the strength and the bulb will grow completely inconspicuous, but besides this, its core will be hard. Such an onion will not survive until spring - the core, as a rule, dries out and begins to rot, and the bulb rots along with it. Large onions grown from seeds are most prone to the appearance of shoots. Therefore, before planting, sort the future harvest by size.
You can correct the situation even before planting - experienced gardeners recommend dipping large specimens in water heated to 50 °C for one minute.
Then they should be kept in a warm, damp cloth for a day, and another two days in water at room temperature. It won’t hurt to keep the rest of the planting material near a heating radiator for three days, since even small bulbs can sprout without warming up. You can also soak the seedlings for 10 hours in a solution of complex fertilizers. If you want to decorate the table with homemade onions in the spring, you can cut off the tops of large onions.
nasotke.ru