Transplanting and dividing a bush: how to plant cuttings correctly
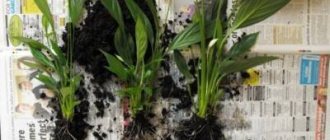
The roots of Dieffenbachia grow well and eventually fill the entire pot. If Dieffenbachia has produced several sprouts from the root, they can be separated from the mother plant and planted separately.
You can easily separate the sprout from the mother bush and plant it separately
You need to take out the plant and check whether the daughter bushes can be separated. This is usually easy to do and leaves little damage to the roots. If you can’t separate it with your hands, you can cut it off with a sharp, disinfected knife. Try to cause as little damage to the roots as possible!
This bush can be divided into two
The trunk of spotted dieffenbachia grows quickly and can tilt the plant. In this regard, it is better to plant it in a heavy pot slightly larger than the size of the roots, so that there is somewhere to pour soil. Excess roots can be trimmed.
When planting, there should be a free space of 1.5–2 cm to the top of the pot.
When a transplant is required:
- growth stopped;
- new leaves grow small;
- the soil dries out very quickly;
- The plant has grown too much and needs updating.
Prepare for transplantation:
- new soil;
- disinfected scissors;
- antiseptic (charcoal powder, turmeric or brilliant green);
- drainage to the bottom of the pot.
Instructions for transplanting and dividing the bush
- Place drainage at the bottom of the pot.
- Remove the plant from the pot.
- Inspect the roots and soil.
- Separate the daughter shoots from the main bush.
- If necessary, free the roots of the mother plant from the old soil and remove all dark, dried and rotten roots. If the soil and roots are not sick, then it is better not to release the soil from the roots.
- Treat all sections with an antiseptic.
- Place the roots in a pot and add soil. Holding the Dieffenbachia by the trunk, add soil, compacting it a little. The trunk can be buried.
- Sprinkle a mixture of sand and charcoal on top and lay sphagnum moss on top of the mixture.
- Water the plant a little and spray the leaves with warm water.
- Plant the separated Dieffenbachia sprouts in the same way.
The first month you need to keep the plants in a shaded place, especially if you cut the roots. Next, place the Dieffenbachia in a more illuminated place.
Air layering
This method is not so simple, but also quite effective. An incision is made on the bare stem into which a small support (match, toothpick, etc.) is inserted. Some gardeners remove a circular strip of bark 1.5–2 cm wide.
Then the open areas need to be treated with a root growth stimulator, wrapped in moistened moss and wrapped in polyethylene. The film is secured at the top and bottom using wire or rope. After 1.5–2 months, when the roots appear, the branch is cut off and planted in the ground. The sections are pre-dried a little and sprinkled with charcoal.
Dieffenbachia description
Fatsia flower: home care and methods of propagation
Dieffenbachia is an evergreen plant from the Araceae family. It grows in tropical areas of America.
Dieffenbachia is grown for its decorative leaves. Its leaves are large, mostly variegated green, but there are also white, yellowish or plain green. The trunk is straight and thick.
Dieffenbachia looks great in the interior
There are about 40 varieties of this plant, the leaves of which vary in variegation and pattern color. Most species grow up to two meters in height. Dwarf varieties do not exceed more than 40 cm.
There are many types and varieties of Dieffenbachia
A young plant rarely blooms, but as it ages it begins to bloom more often. The flowers are inconspicuous, in the form of spadixes, with a faint odor. Seeds do not ripen under room conditions.
Dieffenbachia flowers are inconspicuous, but original
The most common variety in home cultivation is Dieffenbachia spotted, which comes in different varieties.
Is Dieffenbachia poisonous?
There are many rumors about the toxicity of this plant. In fact, it is not that poisonous. There was a case in one children's hospital that refutes rumors about the deadly danger of this plant for children.
The children ate all the leaves of the Dieffenbachia that grew there. But not a single child was harmed. No stomach pain, no cramps or anything else. I have never seen all these terrifying stories about severe swelling, blindness and muteness in reality, only on the Internet.
But the milky juice of Dieffenbachia can still irritate the mucous membrane, so it’s better not to do questionable experiments with it! Everyone's body is different, allergic reactions and skin burns are possible.
Safety regulations
- Do not touch the mucous membranes of the body (eyes, mouth) if the milky juice of Dieffenbachia remains on your hands.
- Carry out all operations with this plant with gloves to avoid allergies and burns.
- Animals and birds should not gnaw the stems or chew the leaves.
- Explain to children that the sap of this plant is poisonous and keep it out of the reach of small children and animals.
If these rules are followed, Dieffenbachia is not only a safe, but even a useful plant. Of course, you shouldn’t eat its leaves! They are a good air filter.
Dieffenbachia leaves contain phytoncides that disinfect the air. Wide leaves humidify the air and cleanse it of chemical compounds such as Formaldehyde, Xylene, Benzene.
Dieffenbachia is also a “rain indicator”. Before rainy weather, sticky droplets appear on the leaves.
This is interesting: Dieffenbachia spotted - care at home
Propagation of a plant by part of the root
Spotted Dieffenbachia can be propagated by dividing the rhizome. This procedure is most effective to carry out in the spring. You need to remove the bush from the container and moisten the soil with the roots. Gently straighten them and divide them into several equal parts. Place all the roots in separate containers and wait for complete engraftment.
Note! This propagation method is suitable when it is necessary to rejuvenate the flower and when the old soil is depleted.
In addition to vertical rooting, the horizontal method is also used
When is the best time to propagate Dieffenbachia?
Dieffenbachia - home care, reproduction
Under favorable conditions, Dieffenbachia grows so quickly that a new leaf appears at its top every week. The trunk stretches upward, and its lower part becomes leafless and bare.
This deteriorates the appearance of the plant. And then you have to cut off the top and transplant it into a new pot. And the trunk can still be rooted and also replanted.
Transplantation is carried out in February - November. Moreover, Dieffenbachia does not like heat. The plant transplanted at this time does not take root well. In winter, when the dormant period begins, it is better not to disturb the flower. This will be of little use. In this case, rooting will be protracted.
In other cases, propagation of Dieffenbachia will be successful. As a rule, it produces new roots equally well both in soil and in water. Therefore, even inexperienced gardeners can grow this plant.
other methods
Experienced flower growers also practice more original methods of propagating and renewing Dieffenbachia. For example, by digging in the apical shoot of Dieffenbachia. Or you can lay a whole piece of stem with buds flat and dig in. Then not one, but several bushes will sprout in a row, which looks very original.
You can also not throw away the remaining stump, cut off on all sides, but water it and in a few months young Dieffenbachia bushes will sprout again from the mother’s base.
- Nepenthes: growing at home
How to properly propagate Dieffenbachia by apical layering
Features of care and propagation of the Pike tail flower at home
You need to make 2-3 small cuts on the trunk. The incised areas need to be wrapped in damp sphangum moss, then wrapped with plastic wrap. And use a thin rope to tie the polyethylene.
During the rooting period, it is necessary to look after the moss so that it is constantly moist. When you see young roots, you need to cut off the shoot, remove the film, and plant the plant along with the roots and moss in the soil.
Place a pot of young Dieffenbachia, best on a western or eastern windowsill. Watering must be done 2 times a week. Use standing water at room temperature. In addition, it is recommended to constantly spray the plant and wipe the leaves with a damp cloth.
If you can see grown roots from the drainage holes, then it’s time to transplant the young flower into a new container. The plant grows at a fairly fast pace. It is also recommended to lay out a drainage layer, thanks to this, the ground will allow air and water to pass through well.
Now you know about all the ways to propagate Dieffenbachia at home. With a little effort, you can get several young plants that will delight you with their beauty for a long time.
Propagation by leaf
For this method of propagating Dieffenbachia, we use a leaf. It should be well developed, without visible damage or disease.
- – we determine the leaf that we will use for propagation and cut it off.
- – the sheet needs to be dried.
- – decide on the container and place the sheet in the water.
- – with the appearance of the first roots, transplant into prepared soil and a pot of the required size.
You can also root a Dieffenbachia leaf directly in the soil, but this is a riskier option and does not always lead to the desired result.
General information
The plant is named after the Austrian gardener Joseph Dieffenbach, who lived in the 19th century and worked at the Imperial Botanical Garden in Vienna.
Under natural conditions, Dieffenbachia grows up to two meters in height, but the leaves in the lower part of the trunk gradually fall off, which is why the bush loses its attractiveness. At home, Dieffenbachia does not grow tall; its height rarely exceeds 50-70 cm.
Dieffenbachia.
The stems of Dieffenbachia are succulent, thick, with lush large leaves located in the upper part. The leaves of the plant are distinguished by their original color, which looks different in different species and varieties of Dieffenbachia.
In some varieties they are green with white veins, in others on the leaves nature has painted other leaves with large teeth with light colors. A leaf drawn on a leaf - this is how this feature can be characterized.
Dieffenbachia is grown precisely for its decorative leaves, since it rarely produces flowers at home. Her flower is a small spadix wrapped in a petal, like calla lilies, anthurium, monstera and other representatives of the aroid family.
After flowering, a fruit begins to form on the peduncle - a red or orange berry. Under natural conditions, Dieffenbachia reproduces by seeds that fall to the ground after the berries ripen.
If you decide to grow Dieffenbachia at home, you should know that this is a poisonous plant, the juice of which can cause dermatitis, as well as burns to the skin and throat.
Transfer
Before transplanting Dieffenbachia, you need to prepare a new pot. For Dieffenbachia, replanting is associated with a high risk of affecting the root system. Step-by-step transplant algorithm:
- Pour a mixture of turf, peat and sand into a new pot;
- Carefully remove the dieffenbachia along with the soil from the old vessel;
- Carefully inspect the roots, trim and disinfect them if necessary;
- Transplant the flower to a new location, slightly deepening the stem.
You should not replant during the cold season. The best time for this procedure is spring. After a correctly performed transplant, the flower begins to grow faster and more actively.
During replanting, the root system must not be damaged, otherwise the flower may die
Pests and diseases
The flower is extremely rarely susceptible to disease, but pests can seriously harm it. Most often it is affected by thrips, spider mites and scale insects.
Inspect the leaves of the plant daily. If you find a pest, immediately treat the flower with special products.
As a preventive measure, thoroughly wipe the leaves of the plant and spray it regularly.
FAQ
Is it possible to keep Dieffenbachia in an apartment?
Of course, the home beauty is a very poisonous flower. For an adult, the flower poses virtually no danger, but for children and animals it is very dangerous. As a result of juice getting on the mucous membranes, blindness or loss of speech may occur.
Beneficial properties and harm of the flower
The juice of the flower is poisonous, so be sure to wear rubber gloves when working with it.
Beneficial properties include the ability of the plant to absorb substances harmful to the human body and purify the air.
Why do the leaves turn yellow?
The cause of yellowing of leaves in young Dieffenbachia is improper care, namely non-compliance with the temperature regime.
Yellowing of leaves in an adult plant is a natural process. In this case, it is not recommended to pick the yellow leaves; you must wait until they fall off on their own. Premature cutting of leaves causes great harm to indoor flowers.
Dieffenbachia is a very popular, but demanding indoor plant. The key to success when growing it at home is strict adherence to the rules of care. Having created comfortable conditions for Dieffenbachia, it will delight you with its beauty.
Dieffenbachia - signs
People who are accustomed to looking for an explanation for their problems and troubles in the position of the planets, a horoscope and some mystical laws, often ask what, in an esoteric sense, threatens the appearance of Dieffenbachia in the house. It is better to contact a fortune teller, psychic or astrologer with this question, but there are a couple of signs about Dieffenbachia that many people know about. So, for those who don’t know these signs: they say that Dieffenbachia, along with hibiscus, is the strongest “husband-killer”. That families who grow this flower in their homes do not have children because men lose the ability to conceive. And in general they lose the ability to be men.
I could refute these stories with many examples, but it is unlikely that people who believe in omens will listen to me. They also say that you should not keep Dieffenbachia in the bedroom, because it absorbs oxygen. To this I can answer that such nonsense contradicts the law of photosynthesis and common sense. In addition, if you look for a bad sign or bad omen in everything, you thereby attract problems, misfortunes and other negativity to yourself. Dieffenbachia is just a beautiful plant, and that is exactly how it should be treated. Pay attention to cats: they happily eat Dieffenbachia leaves, since for them it is just an anthelmintic.
Description of the plant
Dieffenbachia is widespread in Europe, Asia and America. In appearance, the plant has a juicy and fleshy stem, which turns into a crown of oval leaves. It is kept at home due to its decorative properties.
When growing it, you must be careful: the sap of the plant is very poisonous and can cause the development of dermatitis if it comes into contact with the skin. When replanting or other work carried out with a flower, rubber or medical gloves should be used.
The flower is not recommended to be kept in apartments where there are small children and pets.
Humidity must be maintained within 65%, otherwise the flower's leaves will begin to fall off and it will begin to react negatively to watering and replanting. A plant can reproduce in a variety of ways, from the simplest to the more complex.
Propagation by seeds
Dieffenbachia - species, how it blooms, poisonous or not
This method is not used at home, only by scientists during breeding work. Before planting, seeds are first soaked in a nutritious and strengthening saline solution, which will help increase their germination. They need to be deepened into the ground by 1-2 centimeters. Sprinkle the soil with water on top and cover with a glass dome or a regular plastic bag. After 1-1.5 months, the seedlings will grow and become stronger.
A step-by-step algorithm on how to plant Dieffenbachia after germination:
- Carefully remove each seedling along with a lump of earth without damaging the roots.
- Prepare separate pots with substrate and make holes in them.
- Place one seedling at a time and cover them with soil.
- Compact the soil and water it.
Propagation using stem cuttings
For this propagation method, you need to cut cuttings 10 cm long. And then root them; this procedure can be performed in 3 ways.
Place the cutting 1.5 cm deep into the soil, cover it with glass or film, and constantly moisten it. The first roots will appear in about a couple of months.
The second method of rooting is to place the petioles horizontally and press them slightly into the ground, then create greenhouse conditions, and do not forget to regularly water the seedlings. It is necessary to properly care for the cuttings so that they take root well. After some time, buds with young shoots will appear, which will lead to the formation of a lush bush.
Rooting stem cuttings in water. This rooting procedure takes about a month. When roots appear on the cuttings, they are planted into a permanent wide reservoir. The cuttings should be cared for correctly in order to grow a healthy and strong Dieffenbachia.
Professional flower growers do not throw away an old plant whose trunk is cut into petioles. They save the remaining “stump”, place the pot with Dieffenbachia in a bright room, and continue to moisten the flower. After 2-3 months, the plant will develop young shoots.
How does it reproduce by side shoots?
There are two options for propagating Dieffenbachia:
- vegetative - using parts of a plant, for example, a stem;
- generative - through pre-pollinated seeds.
Of the two options, the first is considered the simplest. Rooting side shoots is an excellent way to propagate and rejuvenate a plant. These young formations create serious interference with the life of the mother plant.
The breeding procedure consists of several stages:
- separate the side shoot from the trunk, and then place it in a container with water and activated carbon dissolved in it;
- wait 14–17 days before rooting;
- prepare a pot for planting;
- place drainage pebbles on the bottom;
- prepare a soil mixture that will include peat, leaf or turf soil, sand and humus;
- make a recess in the center of the pot with soil for the trunk with roots, it should be at least 10 cm;
- Place the young Dieffenbachia in a hole, cover it with soil and water it with water at room temperature.
During the rooting process, the bottom leaf of the shoot will turn yellow, which will need to be cut off after planting the flower in the ground.
Important! This propagation method does not provide for the creation of greenhouse conditions for the perennial, since the side shoot is a ready-made plant.
Growing new specimens
Reproduction of Dieffenbachia occurs in the spring, as well as in early summer. Autumn and winter cuttings take root poorly. Stem cuttings take root better in soil, and apical cuttings take root better in water. The easiest and most reliable method of propagating Dieffenbachia at home is with stem cuttings taken from the middle part of the trunk. This material is easy to root using any method.
Soil for planting rooted cuttings can be made at home, or you can buy universal soil with sand, vermiculite and peat. The pot must have drainage made of expanded clay or small stones.
You can take a spacious container for planting Dieffenbachia; its root system grows very quickly and quickly fills the pot.
Dieffenbachia is propagated in several ways: apical cuttings, apical layering, stem cuttings.
Apical cuttings
Propagation by apical cuttings - how to root Dieffenbachia? This is not at all difficult to do; apical cuttings take root very quickly in water or soil.
To root in water, cut off the apical stalk 15-18 cm long and place it in a glass of water. You can add 1-2 tablets of activated carbon to the water so that the water does not spoil and the cuttings do not rot. Roots on cuttings in water will appear within 1 month, when they grow to 2-3 cm, the cuttings can be planted in the ground.
Propagation by apical cuttings.
To root in the ground, the cutting site is treated with activated charcoal or charcoal powder, after which it is deepened into the ground and covered with a jar, plastic bottle or film. The cuttings need to be ventilated regularly, watering is carried out every 2-3 days. With this rooting method, the roots will appear after 2 months, when young leaves begin to appear on it, the cuttings are transplanted into a permanent pot.
Stem cuttings
Propagation by stem cuttings is another method that can be used at home. In this case, the bare stem of an old plant that has lost its leaves is cut into cuttings. Cutting pieces should be 10-14 cm long. Stem cuttings are also carried out in three ways - in water and in soil, as well as by laying them on the surface of the soil.
Propagation by stem cuttings
Rooting of stem cuttings in water occurs in the same way as rooting of apical shoots; roots appear after 3 weeks. The cuttings are transplanted into the soil after the roots have become stronger.
Rooting stem cuttings in the ground looks like this: the cuttings are placed in the ground with the lower end, deepening by 2 cm, covered with a transparent cover and placed in a warm place, constantly ventilated and watered. Rooting of cuttings will occur in 2 months.
When rooting cuttings horizontally, they are placed on the soil and lightly pressed into it. The container with the cuttings is covered with a transparent cover, which is removed for watering and ventilation for several hours a day. When the cutting takes root, buds and shoots will begin to grow from the stem, resulting in a lush bush. After 1.5-2 months, the rooted cuttings can be transplanted to a new place along with a lump of earth.
The stump that remains in the pot after the trunk has been cut into cuttings does not need to be thrown away. It needs to be watered and placed in a bright and warm place; after a few months, young shoots will appear on it, and the plant will begin a new life.
Apical layering
Reproduction by apical layering. The process looks like this: several small horizontal cuts in the form of circles are made on the trunk, the cut areas are covered with damp sphagnum moss, wrapped in plastic film, and then tied with ropes.
The moss must always be moist so that the roots grow faster. When they appear, they can be seen through the transparent film. The apical stem is cut off along with the roots and planted in a separate pot along with moss.
Reproduction by apical layering.
Caring for young plants should be the same as caring for adult plants - they are watered twice a week with warm, purified water, constantly sprayed, and the leaves are wiped with a damp sponge.
Dieffenbachia growing at home is fed with nitrogenous fertilizers 1-2 times a month. This indoor flower grows quite quickly, so it has to be replanted every year.
Propagation by cuttings
The most proven and well-known of the reproduction methods. For propagation by cuttings, you should choose a suitable Dieffenbachia stem. It is enough to take a stem at least ten centimeters long. The ideal time for reproduction is spring. But given the unpretentiousness of the plant itself, this can be done throughout the year. Cuttings are part of the stem of the main shoot that we cut. It must be in good condition, without signs of rotting, stains, or other diseases. If you find damage, it is better to cut it off and use the healthy part of the cutting.
You can also use the simplest method for rooting cuttings. We put our cuttings in a container with water. You can take a transparent jar. This way the light will also fall on that part of the shoot that is in the water. The water should be disinfected. To do this, you can dilute activated carbon in the water where you plan to keep the cuttings. The container should be in a warm and bright place - usually a windowsill. Given the peculiarity of this cutting method, the water must be changed to avoid its attenuation and rotting of the cuttings.
Tip: try to root one cutting at a time. It is not advisable to place several cuttings in a container with water; in close contact, the cuttings may begin to rot. You can use stimulating solutions and preparations for better rooting of cuttings.
After some time, roots begin to form on the cuttings. Don't rush to plant them, let them grow. It is enough to maintain their length of about five centimeters. Next, prepare containers for planting. Fill them with soil and carefully plant the cuttings. The roots are very fragile, so this procedure should be carried out very carefully. It is better to fill half the pot with soil. Place or position the cutting so that the roots are in light contact with the soil. And carefully add soil to the level you need.
You can also root the cuttings directly in the soil. For this process to be more successful, the soil must be prepared. Or rather, we will take peat as the basis of the soil and add perlite or vermiculite to it. Mix everything into one common mass. Everything is taken in equal parts. You can also use sphagnum when rooting cuttings. Take half of it, and half will consist of peat and vermiculite or perlite. The peculiarity of sphagnum allows you to improve the rooting process. Sphagnum provides such qualities as soil porosity, which in turn promotes the evaporation of excess moisture. The soil turns out to be loose and crumbly, this allows young roots to germinate unhindered, and its light texture provides good oxygen saturation. We also use activated carbon, as in the case of reproduction in water. This will prevent and prevent the shoots from rotting.
- – we cut the cutting, it should be strong and healthy, without signs of damage or disease.
- – you need to let it dry, a day is enough.
- – take the root and make a solution, then keep the cutting in this solution for about five to nine hours.
- – the cuttings should be planted in a prepared container, to a depth of no more than five centimeters.
- – we create a greenhouse effect, for this we use a bag or film.
Advice: the greenhouse effect is only good if you take cuttings in winter, since you need to maintain an optimal temperature. If you are cutting in the summer, then there is no need to cover the container with a bag or film.
Special requirements
As many gardeners have noticed, different parts of the mother plant taken for propagation take root and take root in different ways. Cuttings taken close to the top take root better in water. And sections from the lower part of the trunk take root better directly in the ground. It is best to take stem cuttings from the middle of the plant trunk.
Watch literally 1 minute of the beautiful “Video about Dieffenbachia”
– Reproduction and rejuvenation are best carried out in spring and summer. Winter apical cuttings can sit in water for a long time and not take root. It happens that they even drop all their leaves. Don’t let this upset you - if there are buds, they will definitely sprout.
– To plant Dieffenbachia, light soil is needed. You can also use universal soil mixed with vermiculite. Also, when planting in a pot, be sure to provide drainage.
– You can immediately take a spacious pot, since Dieffenbachia quickly takes up all the free space of the pot.
Well, the end of my story is that I took for myself (“by inheritance”) a scion of Dieffenbachia, which my mother-in-law nursed. Thus, I got this amazingly beautiful and unpretentious flower.
After this article they usually read
We propagate during transplantation
This is the easiest way to reproduce. This method is usually used when replanting a plant. This is a good reason to divide the mother plant and separate several shoots. This procedure promotes freer development of the roots of the main plant.
- – when transplanting, remove the plant. We try to preserve the earthen ball with Dieffenbachia roots.
- – to unravel the roots and understand where and how to separate them, we wash the roots with water. Or place the plant in water and carefully wash off the soil.
- – the roots should be inspected for rot and damaged roots. If any are found, we clean the roots.
- – separate the plant and dry them.
- – after a day, you can plant the plants in a ready-made pot with soil.
Propagation of Dieffenbachia by cuttings
To do this, you need to take a piece of stem (or better, for safety reasons, several pieces) about 10-15 centimeters long. This is a stem cutting. If there are no leaves on this piece of stem, it doesn’t matter, the main thing is that it has at least one or two buds.
Sometimes an adult Dieffenbachia produces side shoots. They can also be used to grow young plants.
What are we doing?
We immerse the cut piece of the trunk (cutting) in warm water for approximately 1-3 weeks. As a rule, roots appear on the cuttings during this time. The time the roots appear depends on where the cutting is taken from (from the apical, middle or lower part of the trunk).
We take a mixture of peat and sand in a 1:1 ratio. Pour into a pre-prepared pot. We plant the germinated cuttings, sprinkle them with soil and cover them with a plastic cap or jar so that the plant feels like it is in a greenhouse. In order for Dieffenbachia to take root, it needs a temperature of at least 25˚C. Once Dieffenbachia has taken root well and may have produced its first leaf, it can be transplanted into a larger – permanent – flowerpot.
If a cut cutting placed in water does not want to take root for a long time (this happens if cuttings are done in the fall, before the dormant period), then immediately dig it into the ground two to three centimeters. For optimal germination conditions, cover the shoot with a transparent cap made from a plastic bottle or jar (this is the same greenhouse).
In a couple of months, expect the first leaves.
Dieffenbachia reproduction and care. How to care
This plant belongs to the aroid family. The plant itself, in its homeland in Asia and America, reaches impressive sizes. Among indoor floriculture, this plant is valued for its decorative qualities. The plant itself consists of a powerful stem and many leaves. They come in different sizes and colors. It all depends on the variety and type of Dieffenbachia. You can read about the types of Dieffenbachia here.
This plant prefers enough light, which should be bright and diffused. Direct sunlight can damage the plant, leaving it with sunburn. If there is not enough light, the color of the leaves may change. Decorative qualities are lost. You can use additional lamps or phytolamps.
The plant has no particular requirements for soil. Or rather, ordinary soils for indoor plants are suitable. You can add some peat and sand to them. Or choose a similar soil that contains peat.
Watering must be well organized, it must be abundant and timely. We do not allow the earthen clod to dry out, and excess moisture should be removed from the pan. Over-wetting the soil can lead to the death of the plant or infection with fungal diseases.
Plant species
The most common types are:
- Dieffenbachia is lovely. It grows successfully in rooms with central heating and is a shade-tolerant species. Huge dark green long leaves, reaching 50 cm in length, have a white striped color along the veins. Look at the photo of the lovely Dieffenbachia, and you will certainly want this flower to decorate your home. Moreover, its reproduction at home has been practiced for a long time. This dieffenbachia is very successfully used to decorate offices and residential premises.
- Dieffenbachia Leopolda (see photo) is characterized by its small size. It has a short stem up to 5 cm with a diameter of 2 cm. The petioles are pale green with purple spots and are much shorter than the leaves. The leaves are dark green in color and have a massive white vein 35 cm long and 15 cm wide. The flowers collected in inflorescences are wrapped in a white leaf-spread and have a length of 17 cm. This flower first appeared on the territory of Costa Rica. It is one of the most decorative varieties and is readily grown at home. Caring for it is quite simple.
- Dieffenbachia Camilla is very loved by many gardeners. Its height can reach 2 m. South America is considered the birthplace of its growth. This is a tree-like, upright plant with large light green leaves of an elongated oval shape. The only drawback is the gradual exposure of the lower part of the trunk. Camilla, grown at home, practically does not bloom.
- Dieffenbachia mix (see photo) is an evergreen plant that grows in the tropical and subtropical climates of South and Central America. Today there are about 50 varieties of this variety. This light-loving plant has light green leaves with patterns of various colors. It is highly decorative and widely used.
- Dieffenbachia bush is not a whimsical plant. This is a low-growing flower, reaching 70 cm in height. It has light green leaves with a large white vein in the middle. Bush Dieffenbachia is very similar in appearance and color to Leopold's Dieffenbachia.
Types and varieties
The most common cultivated species are spotted Dieffenbachia (Dieffenbachia maculata) and or Dieffenbachia (Dieffenbachia picta) - plants with large succulent stems and elongated oval leaf plates with obvious venation, reaching a width of 12 cm and a length of up to half a meter. Their bright green leaves are dotted with white spots and stripes. They differ from each other in that variegated Dieffenbachia grows up to two meters in height, and spotted Dieffenbachia does not exceed a meter, but its leaves are slightly larger in size and they are more pointed at the top. It was Dieffenbachia spotted that became the basis for most varieties and hybrids bred by breeders.
Here are some of the most popular cultivated varieties of Dieffenbachia spotted:
- Vesuvio variety is an elegant medium-sized plant with narrow, delicate white leaves and green specks on white petioles;
- Dieffenbachia Camilla is one of the hardiest bushy varieties, which is why it has earned popularity among amateurs. Lanceolate, creamy-white leaves are edged with a light green rim. Young leaves have a greenish tint;
- Dieffenbachia Compacta is a neat, dense bush with green leaves with light specks along the central vein.
Dieffenbachia leopoldii
A low-growing plant native to Costa Rica with a short and thick stem, pale green short petioles with purple spots and dark green elliptical leaves up to 35 cm long with a pronounced white central vein.
Dieffenbachia amoena
Flower lovers like it for its unpretentiousness and excellent adaptability to home conditions, since it tolerates dry air and the proximity of heating devices better than other types. In addition, its decorative qualities are beyond any criticism: height up to one and a half meters, large dark green oval leaves up to 60 cm long with white stripes along all veins.
Dieffenbachia seguina
Which amateurs often confuse with Dieffenbachia spotted, has wider – up to 16 cm – leaves with fewer lateral veins than Dieffenbachia spotted. This species has also produced many varieties and hybrids, for example, “Tropic Snow” - a never-out-of-fashion cultivar with a regular pattern on the leaves formed by yellow spots, while the central vein and edges of the leaves remain dark green.
- Fatsia – care, photos, types
Dieffenbachia oerstedii
A species with solid green, heart-shaped or pointed leaves with a distinct light-colored midrib. The length of the leaves is 30-35 cm. The most famous hybrid of this species is “Green Magic”, a dense bush of small size with unusually colored leaves: they are dark bluish-green with a white central vein. There is a form with small light specks along the leaf blade.
Magnificent Dieffenbachia (Dieffenbachia magnifica)
The species is light green in color with white dots on the leaves and petioles.
Dieffenbachia macrophylla
The only species with uniformly green leaves and veins, the shape of the leaf blade is ovoid, the midrib is thickened. This species grows up to one meter in height.
Dieffenbachia bowmannii
A species with the largest leaves among Dieffenbachias, up to 70 cm long, dark green in color with small light specks.
Dieffenbachia bausei
It has yellowish-green leaves up to 35 cm long with a marbled pattern of dark green and white spots.
Tips for caring for a young plant
In order to grow a healthy, beautiful ornamental plant in your home, you need to know how to care for a young seedling placed in a new place.
Here are some recommendations for caring for Dieffenbachia:
- The plant prefers an eastern or western direction. He likes bright, but not direct lighting. This is especially true for variegated species, which become monochromatic in low light conditions.
- Summer temperatures should not be higher than 30 degrees, and winter temperatures should not fall beyond the 15-degree mark.
- The Tropicana is afraid of drafts, otherwise she will experience increased leaf fall.
- The plant needs regular watering, but there should not be stagnation of water.
- To maintain comfortable humidity (65%) it is necessary to regularly spray and wipe the leaves from dust. For this you can use only settled water.
- The perennial loves a warm shower, but during this procedure you need to cover the ground with film.
- In the summer, it is necessary to feed the flowers with liquid mineral or organic fertilizers (without lime) once every ten days, reducing the dose by half from that specified in the instructions for them. Nitrogen substances are contraindicated for specimens with white leaves. They are fertilized only with mineral fertilizers, applied once every three weeks.
Attention! In the winter cold, the time of rest for flowers comes. During this period, you should reduce watering and stop fertilizing.
Otherwise, the appearance of the plants may suffer, with small and weakly colored leaves appearing.
Sometimes plants begin to get sick, lose their attractiveness, the leaves turn yellow and fall off. How to deal with this?
Ways to solve problems:
- If the stem loses its elasticity and rots, then you need to reduce watering and increase the temperature. Cut out the damaged areas and sprinkle the sections with charcoal powder. The soil should also be changed.
- Leaves turn yellow and curl when temperatures are too low or drafts occur. These harmful factors must be eliminated.
- Discoloration of leaves is observed in too bright or direct light. In this case, you should slightly shade the plants or move them further from the window.
- Leaves fall off when the soil dries out and air humidity drops. Perhaps the culprit is a draft. These care errors should be eliminated.
Carefully! Heat-loving ornamental plants have dangerous enemies - spider mites, scale insects and aphids. These pests can be controlled using solutions of green soap, soap and tobacco, or using systemic insecticides. Reproduction of Dieffenbachia occurs easily and quickly
At home, it can grow up to two meters in height. If you pay a little attention to the plant, colorful and picturesque bushes will bring comfort, joy and beauty to your home.
Reproduction of Dieffenbachia occurs easily and quickly. At home, it can grow up to two meters in height. If you pay a little attention to the plant, colorful and picturesque bushes will bring comfort, joy and beauty to your home.
Home care
Dieffenbachia care at home means proper watering and intensive feeding. The list of mandatory events also includes:
- Maintaining proper temperature conditions;
- Control of diseases, pests and parasites;
- Trimming;
- Preparing for winter.
Watering requires special attention. It must be moderate, otherwise the stem will quickly rot.
Temperature
The recommended room temperature is above 17 degrees, ideally from 20 degrees. When it is frosty outside, it is strictly forbidden to ventilate the room, because Dieffenbachia does not tolerate drafts. While airing, the flower is taken to another room.
Lighting
Experts do not recommend placing the plant on a south-facing window because it does not tolerate direct sunlight. Lighting should be good, but diffused. If the flower remains in the shade for a long time, the stem will become very long and fragile.
Watering
During periods of intensive growth and development, abundant watering is recommended. However, when growth slows, the moisture supply must be reduced. During the period of physiological dormancy (winter, late autumn), watering the soil in the pot is reduced to a minimum. Neglecting these rules can lead to the death of the flower or its long top.
Spraying
Dust constantly accumulates on the large fleshy leaves of an adult plant, in the center and along the edges, so the plant needs to be given a warm “shower” at least once a week. Dieffenbachia can be sprayed with water at room temperature from a spray bottle. This procedure is an excellent prevention of diseases, pests and parasites.
Humidity
In the wild, the flower grows in the tropical rainforests of South and Central America, so you need to constantly maintain high humidity in the room. In winter, when the air is dry due to central heating, you can place a pan filled with warm water on the windowsill. The moisture will evaporate, having a beneficial effect on the growth and development of Dieffenbachia.
Do not allow the soil to become waterlogged
Priming
The flower is undemanding to the composition of the soil, so it is best to use regular soil for indoor plants. You should not bring soil from the street - it often contains dangerous pests and parasites. Charcoal can be added to pots as an adsorbent.
Feeding
Since the plant develops intensively, Dieffenbachia needs to be fed daily. Any complex fertilizer for indoor flowers is well suited for this. The plant needs nitrogen, potassium and phosphorus most of all. To compensate for calcium deficiency, crushed eggshells can be added to the soil.
Care in winter, during the dormant period
With the onset of cold weather, the plant enters a period of physiological dormancy. If autumn turns out to be warm and sunny, the room temperature is constantly maintained at a high temperature, this period begins later. With a lack of light and heat, on the contrary, the flower may “retire” earlier than usual. Before leaving for the winter, it is recommended to prune Dieffenbachia. In order for a flower to survive the cold period well, it is necessary:
- Reduce watering, but regularly loosen the soil;
- Periodically give the flower a warm “shower” from a spray bottle;
- Inspect the leaves and stem as often as possible so as not to miss the appearance of dangerous diseases or pests (parasites);
- Before wintering, prune to form the crown and get rid of dry, deformed, diseased shoots and leaves.
The end of winter is a great time to replant. It is usually carried out in the third or fourth decade of February. However, if February turned out to be frosty and the apartment is cold, it is better to wait until the onset of real warmth. The main thing is not to replant the flower in extreme heat.
Advice! Sick, weakened plants do not tolerate wintering well, so such specimens need to be given special attention during cold weather.
In winter, watering must be reduced
Trimming
Dieffenbachia is a flower that grows very quickly and at the same time has a fragile, brittle stem, so improper formation of the crown and neglect of pruning and replanting can cause the death of the plant. Pruning should be done regularly as the trunk and leaves grow. Before pruning and replanting Dieffenbachia, you need to make sure that the plant is absolutely healthy and not weakened by diseases and pests.
Caring for Dieffenbachia is not difficult, but pruning is a troublesome task that requires certain skills. The step-by-step algorithm of the procedure is as follows:
- Wear gloves to protect your hands from the milky juice of Dieffenbachia;
- Armed with a sharp knife, carefully trim the top with leaves. There should be a small compact stump left;
- Cover the cut area with plastic wrap;
- Reduce watering. When the kidneys begin to awaken, the moisture supply will need to be activated again.
The cut trunk with leaves, if it is completely healthy, is placed in water and wait until it takes root again. Then the plant can be replanted. If the trunk is affected by diseases (pests), it is burned, otherwise re-infection is possible. You can also divide the cuttings into several parts and then use these cuttings for propagation.
Pruning is known to have a significant anti-aging effect. The plant begins to develop faster. Sometimes, after proper pruning, Dieffenbachia suddenly begins to bloom; its flowering is a rather rare occurrence even in natural conditions.
Basic propagation methods
Some lovers of green plants are wondering how to propagate Dieffenbachia at home. There are several methods:
- Seeds.
- Cuttings.
- Rooting the top.
- Rooting a leaf.
- Division (seating).
It should be borne in mind that propagation using seeds is a rather tedious and time-consuming process, and it is impossible to guarantee the result. Rather, this method is suitable for specialists and breeders who develop new plant species. Therefore, at home, Dieffenbachia practically does not reproduce by seeds. The simplest and most effective methods are:
Propagation of Dieffenbachia by leaf. You need to choose a strong, healthy and resilient leaf, take a sharp knife and disinfect it. Cut the selected leaf and divide it into pieces. Dry the leaf particles on the balcony or terrace. Then they should be treated with a growth stimulator and placed in light nutrient soil. Cover the pot with greenhouse film and place it on a well-lit windowsill. After fourteen days, roots will appear on the leaves. After this, the particles can be transplanted to a permanent place. For propagation, it is best to choose those leaves that are closer to the root, as they are stronger. This method cannot guarantee a 100% result, since young shoots may die for various reasons. Propagation of Dieffenbachia by cuttings. Dieffenbachia cuttings are best done in the spring. First you will need to cut a piece of the plant stem about ten centimeters long, with two or three buds. Place the cuttings in water for two weeks. During this time, small roots should appear. Transplant the cutting into a pot with nutritious soil, cover it with a jar and place it on a well-lit windowsill. For rooting to be successful, it is necessary to maintain the room temperature at about twenty-five degrees. After the seedling gets stronger, the jar can be removed. Cutting Dieffenbachia is simple and easy. From just one stem you can get quite a large amount of planting material. Rooting the top. The flower grows quickly, so it happens that the lower part of the trunk becomes bare and the plant requires rejuvenation. In this case, you can propagate by the tip: cut off the top of the trunk with several leaves and one bud. The cut cuttings need to be rooted in one of two ways: placed in water or nutrient soil. A cutting placed in water will produce roots in about ten days. After this, it can be planted in a container with soil. Before placing the shoot in the ground, the cut site must be dried. It happens that when rooting, Dieffenbachia begins to shed its leaves. There is no need to worry, this way the plant gets rid of sources that consume the energy currently needed by the root system. Division. An old and overgrown Dieffenbachia bush can be divided into several parts. The process is simple and consists of the following: remove the main bush from the pot, shake off the soil from the root ball
Carefully divide the bush into parts and plant them in different containers. Sprinkle the root with soil and tamp it down a little
Water the plants generously with water at room temperature.
We propagate by shoots
This method is good if the main plant has developed side shoots. Which over time began to grow, preventing the main plant from developing and growing well.
- – the young shoot should be cut so that it already has several leaves. Two or three will be enough.
- – Next we carry out the rooting process in water in which coal must be dissolved.
- - wait for the roots to appear
- – we plant the young plant in a permanent place in a pot with soil. Be sure to take care of drainage.
- – there is no need to make a greenhouse from a bag, since this is a ready-made and formed plant.
How to get young Dieffenbachia plants
Reproduction of Dieffenbachia is not a complicated process and is accessible to everyone. Its cultivation at home is carried out using stem apical cuttings, sometimes by air layering. It is best to propagate the flower in spring or summer, i.e. when the leaves turn yellow and the plant trunk becomes exposed. To root the cut apical cuttings with leaves, wet sand is used, which is the ideal soil for this. In order to ensure successful rooting, it is recommended to create greenhouse conditions for the seedling.
The second propagation method is also effective if carried out from May to September. On an old plant with a bare trunk, make small cuts of 5 mm each below the leaves. Then you need to take a wet match and dip it in the powder used for cuttings. A match is inserted into each cut so that the cut does not close. Each cut is wrapped in damp moss and covered with film. After 2-3 months, the first roots will begin to break through the moss. As soon as the young shoots become stronger, they are carefully cut off just below the root system and planted in separate small pots.
The remaining stem is cut into several parts so that on each part there remains a compacted place where there was once a leaf. It's called the peephole. So, sleeping buds are hidden in these eyes.
The cut cuttings must be sprinkled with coal and left to dry. Then they are planted in a substrate with the correct direction of stem growth. To do this, you can build a small support. After abundant watering, they should be covered with polyethylene or a jar. Daily ventilation is also necessary. The ideal temperature for rooting is 25 degrees. If it is not possible to create such temperature conditions, then it is better to build a small greenhouse.
Both growing methods are quite effective. For more detailed information about growing Dieffenbachia at home, you can watch video instructions and photos of this process.
Popular seating methods
There are two groups into which reproduction methods are divided:
- vegetative, when the bush is divided together with the rhizome into several parts, cuttings, layering or leaves are rooted;
- generative or seed sowing.
Dieffenbachia tolerates the propagation procedure normally
To the question of how Dieffenbachia reproduces, the answer is obvious - the most popular methods are vegetative methods. Moreover, not only parts of the bush with the root system, but also segments of shoots or leaves are suitable for rooting.
Note! The flower cannot be propagated by seeds due to its very rare flowering.
Benefits of Dieffenbachia
Dieffenbachia has a lot of useful properties, for which it is highly valued all over the world.
- Its large leaves accumulate moisture, which evaporates, humidifying the air in the room. People who are indoors with this plant feel the effect: it becomes easier to breathe and the air is fresh, as if outside.
- The leaves release biologically active substances, phytoncides, into the atmosphere, which reduce the activity of harmful bacteria. This is why Dieffenbachia is found in hospitals and clinics. Phytoncides also destroy compounds of benzene, formaldehyde and other harmful substances.
Leaf propagation
This method is used less frequently than others in indoor floriculture due to the length of time and the optional survival rate of planting material.
In this case, healthy and undamaged leaves with petioles are first kept for a couple of hours in the Stimulin solution.
The top leaves are sent into water. And the lower specimens are placed in an earthen mixture. The use of mini-greenhouses, maintaining comfortable temperature conditions and sufficient soil moisture is mandatory.
How to choose Dieffenbachia in a store
To begin with, we recommend that you read our article about the types and varieties of Dieffenbachia to find the most suitable specimen in the store. The choice of the bush you like in the store should be taken with full responsibility. Choose a plant that is strong and healthy in appearance, with succulent, bright leaves that should not have any yellowing or drying areas. If the substrate is wet and the plant is drooping, it means the root system is damaged by rot. Do not buy such a flower, it will be very difficult to revive it. Inspect the lower surface of the leaves - this is where pests can hide. If you do not notice them, then by bringing a plant affected by sucking parasites home, you risk infecting all your plants.
We recommend buying Dieffenbachia in the spring, when it becomes warm outside and the daylight hours lengthen sufficiently. Then the plant adapts to new conditions faster - the adaptation period will not take more than three weeks. To help it, do not over-water the soil; it is better to spray the leaves with warm, settled water more often.
How to care for Dieffenbachia
For more than 150 years, this tropical beauty has been growing not only in its historical homeland, but all over the world, decorating apartments and offices. But Dieffenbachia never got used to the cold climate. It still needs warmth, humidity and bright light. Only in such conditions will a guest from the tropics show all her splendor. We will tell you in more detail about the conditions for its comfortable maintenance.
Location and lighting
Dieffenbachia is classified as a shade-tolerant indoor plant. If you have a specimen with uniformly colored foliage or with a minimal number of specks on them, then it can really be grown in relative shade. Windows in northern directions or places away from windows in other directions in the apartment are suitable. However, for Dieffenbachia species with spotted leaves, bright but diffuse lighting is simply necessary. There is a direct relationship here - the brighter the light, the more impressive the pattern on the variegated leaves of Dieffenbachia looks. Wide window sills facing south-east or south-west are suitable.
At the same time, it should be remembered that direct sunlight is harmful for such flowers: the leaves may turn yellow or discolored, they may even wrinkle and fall off, and they may become covered with gray spots from sunburn. Therefore, at midday in the summer season, try to protect the crown of the flower from the sun with light curtains or blinds. Or place the pot deeper into the room at a distance of one or two meters from the window.
Dieffenbachia loves space and clean air. In the warm season, you can take the pot out onto the loggia or veranda, but make sure that there are no drafts or sudden changes in temperature at night.
In winter, variegated varieties of Dieffenbachia may lose their attractiveness due to lack of natural light: the stem of Dieffenbachia will stretch, young leaves will become smaller, and the lower old ones will dry out and fall off. And most importantly, the beautiful spotted pattern will disappear from the leaves, and they will become monochromatic and unattractive. To prevent this from happening to your beauty, we recommend that in the evening, from 18:00 to 22:00, you illuminate the flower with phytolamps or other fluorescent lamps.
This may be interesting: Caring for arrowroot at home
Watering
The tropical guest needs regular watering with soft water (filtered, settled or rain) at room temperature. The lush crown of Dieffenbachia consists of large leaves that require a lot of water. It should be watered as the top layer of soil in the pot dries a couple of cm. If there is a lack of moisture, the leaves will begin to wither and fall off. When the soil in the pot dries out completely, the growth of the flower will stop. But remember, the root system of Dieffenbachia is underdeveloped, and if there is excess moisture, it can rot. Therefore, it is important to stick to the golden mean and not overwater the flower.
If you plan to leave home for a long time, consider a watering system for Dieffenbachia, otherwise, when you return, you will see a dried flower that you are unlikely to be able to revive.
One more nuance. In the summer, we advise you to carry out the procedure of washing the soil substrate once a month to remove the salts that have accumulated in it. To do this, the pot with the plant should be immersed in a basin of settled water for 15 minutes (to the middle of the pot, not higher). During this time, the earthen lump will be well saturated with water, which should then be poured through the drainage holes in the bottom of the pot.
In winter, when the plant enters a dormant period, it is necessary to reduce the amount and frequency of watering and do it as the soil in the pot dries halfway.
Humidity
Dieffenbachia grows better in rooms with high air humidity. Watering alone is not enough for her. Large leaves of Dieffenbachia need regular spraying, preferably daily. Use the same water as when watering.
On hot summer days, you can give your flower a tropical shower in the bathroom or in the fresh air. In this case, the soil should be covered with polyethylene to prevent it from being washed out of the pot. And the root system should not be flooded, so as not to provoke its rotting.
Once a week, it is advisable to clean the leaves from dust with a damp soft cloth.
If the air in the room is dry, we recommend placing an open, wide container of water, such as an aquarium, next to the flower to increase its humidity. Or place the pot itself in a deep tray with wet expanded clay or pebbles on a wire rack. Then, from the evaporation of moisture from the pan, the leaves will breathe freshness, and the roots will not touch the water and will not rot. If you have a household humidifier, turn it on when necessary.
Temperature
Dieffenbachia loves warmth, but does not tolerate sudden changes in temperature. A temperature of 22-28 degrees is considered comfortable for her. in summer and 18-22 degrees. in winter. If the temperature stays below 17 degrees. heat, the plant will get sick, and at 10 degrees. and below - will die. Dieffenbachia loves fresh air, but is afraid of drafts. This should be taken into account when ventilating the room. In summer, you can take its pot to a terrace or veranda under a canopy, where there are no drafts and no direct sunlight.
Soil and pot
For Dieffenbachia, slightly acidic, loose, air- and moisture-permeable soil should be used so that nutrition, moisture and oxygen freely flow to the roots of the plant. You can buy ready-made soil in a store for Dieffenbachia or prepare it yourself from 3 parts of turf soil and 1 part of leaf soil, peat and sand. For looseness, you can add perlite or crushed bark, to prevent fungal infection - pieces of coal.
The pot for Dieffenbachia must be stable and twice the size of the root system of the flower. The bottom should have good drainage holes, and at the bottom there should be a thick layer of drainage material: expanded clay, pebbles or river pebbles.
Top dressing
Dieffenbachia is a fast-growing plant. Therefore, the soil in its pot is quickly depleted, and regular fertilizing with mineral and organic fertilizers is required. Nitrogen-organic mixtures are best suited for Dieffenbachia, as well as special additives for variegated plants, which are sold in flower shops. The flower should be fed from mid-spring to mid-autumn. Once every two weeks is enough. Alternate organic and mineral fertilizers. Use liquid fertilizers or add them to water when watering. In winter, the plant does not need fertilizing.
This may be interesting: Scindapsus - a tropical vine in your home
Transfer
Dieffenbachia grows quickly. As a rule, young plants are replanted annually. Older plants are replanted less often and when necessary: for example, when the root system fills the entire pot and peeks out from the drainage holes. This usually happens 3-4 years after the last transplant. Perform this procedure at the end of winter or early spring, when the plant is still dormant.
Replant by transferring a clod of earth from an old pot into a new container, slightly larger in size, with drainage holes and a new layer of drainage. If you find blackened or dried roots, carefully cut them off with a clean tool, and treat the sections with an antiseptic and antimicrobial agent, for example, crushed coal. Sprinkle fresh soil on the sides and top, suitable in composition and nutritional value for Dieffenbachia. Pour in settled water at room temperature. There is no need to feed for a month after transplantation.
In those years when replanting is not planned, you should simply replace the top layer of substrate in the pot as much as possible.
Pruning and rejuvenation
Young plants should not be pruned. But over time, Dieffenbachia becomes very elongated, its trunk becomes bare, and it loses its decorativeness and attractiveness. You can restore its aesthetic appearance in two ways:
- Trim the crown at a distance of about two cm from the node where the dormant buds are located, and try to root it. Blot the released juice with a napkin, then sprinkle with activated carbon. We described below how to root an apical rosette. The juice of this plant is poisonous, so carry out all manipulations carefully and wearing rubber gloves, and there should be no children or pets in the room. For pruning, use clean tools: a sharp knife or pruning shears. We recommend not watering the Dieffenbachia for four days before pruning in order to reduce the amount of toxic juice released from the wound.
- You can cut the bare trunk of Dieffenbachia at a height of about 10 cm above the soil. The cut should be horizontal, with smooth edges. The stump should have 2-3 buds for future shoots. Remove any drops of juice that appear on the cut with a napkin. Then sprinkle the cut with crushed charcoal or activated carbon. The stump should be covered with a glass jar or polyethylene to create a microclimate. The cover should be removed periodically for ventilation. When new sprouts appear, the shelter can be removed completely.
Do not be alarmed if, when pruning Dieffenbachia, its juice gets on your skin - wash it off immediately with cold water, and lubricate the area with some rich cream or oil.
Problems when growing a flower
Violation of simple rules for caring for Dieffenbachia sometimes leads to flower disease. We recommend that you inspect your plant more often in order to notice the problem in time and decide how to deal with it.
Dieffenbachia leaves turn yellow and fall off. There are many reasons:
- insufficient watering;
- water with high hardness;
- long exposure to direct sunlight;
- sudden changes in room temperature;
- cold;
- draft;
- lack of micronutrients in the soil;
- damage by root rot (especially with excessive watering).
The leaves dry out and fall off.
- If the top, side or young leaves fall and dry, this is due to a violation in care (see above).
- When the lower and older leaves fall off and expose the trunk, there is no need to worry, this is the natural aging of Dieffenbachia.
Root system rotting. This is often accompanied by the appearance of a gray coating on the leaves. In addition, the edge of the leaf dries, and a white coating appears on the substrate in the pot.
The first measure should be replacing the soil. In order to kill the fungus, we recommend watering the soil with a weak solution of potassium permanganate. Remove damaged leaves. Treat all cuts and wounds with activated carbon. Then you need to treat the flower itself with a suitable fungicide.
Common diseases
Dieffenbachia can be affected by various infections. Let's look at the most dangerous ones.
- Root rot. Affects the roots of the flower. Its development is provoked by excessive watering. Replant the plant in new soil. Remove affected roots. Treat the sections with activated carbon. Add Fitosporin to the water for irrigation.
- Soft rot. The stem cracks at the base. The leaves turn pale and wither. Flower growth slows down. The soil smells like mold. It is impossible to cure. Try rooting the crown.
- Bacteriosis. The cause is bacteria. It appears as watery areas with clear boundaries on the leaves. Poor treatment. Try treating with fungicides.
- Anthracnose. The top of the plant is affected, first wet and then dry spots form on the leaves, and Dieffenbachia begins to lose its foliage. The affected parts of the plant should be cut off. Systematically treat healthy parts of the plant with a fungicide. Reduce air humidity.
- Late blight. Dark rot rises up from the root. The flower weakens and withers. This disease has no cure.
- Fusarium - damage to the roots and the entire plant. The roots turn black, and the leaves and stems begin to dry out. There is no treatment.
- Viral diseases. Virus carriers are insects. Dieffenbachia leaves become covered with brown spots, curl and gradually dry out.
Pests
Red spider mite. It can be detected by cobwebs on leaves and stems.
Shield. It can be detected by light-colored bumps or plaques, which then turn brown with sticky discharge.
Mealybug. Its activity is detected in the form of white fluff, which seems to be sprinkled with flour (hence the name).
Aphid. By sucking out cell sap, it infects plants with dangerous viruses that provoke tissue death.
Thrips. They also feed on sap and infect tissues. Their activity is detected when light spots first appear on the leaves, which then darken. The leaves wither and wither.
How to deal with these and other pests:
- Isolate the affected plant from others.
- Rinse the parasites off the leaves in the bathtub shower.
- Spray with one of the following insecticides: Fitoverm, Vertimek, Actellik, Karate, Konfidor, Karbofos, Intavir, Aktara, Kleschevit and others.
If you are in doubt what kind of pest is on your bush, take a photo of it. The seller in the store will definitely offer you the most suitable drug based on the photo and tell you how to use it.
Prevention of pest infestation
Follow the rules for caring for your plant, regularly inspect its leaves, and wipe them from dust. Do not allow the soil to dry out or become waterlogged. Maintain high air humidity, since dry air is a favorable condition for the proliferation of pests.
Other methods of reproduction
How to propagate Dieffenbachia, can this be done in other ways? This is also worth mentioning.
Experienced flower growers know the original method of propagation by dropping the top of the stem, which has buds .
She bends down to the ground and covers herself with a small layer of it. After a few weeks, young plants appear.
Dividing a bush with roots into several segments is also used . And the rarest and most ineffective way of propagating perennial tropicanas is propagation by seeds.