Garlic is considered a popular vegetable among many peoples of the world. Its fame is due to its pungent aroma and unique taste. This crop is indispensable in cooking, so amateur gardeners constantly plant and cultivate it in their beds. Due to its strong antiseptic effect, the plant is also widely used in medicine. As a rule, garlic is planted with seeds and cloves.
When to plant garlic seeds
This plant also differs from other crops in that it can be planted both in autumn and spring. In the first version it is called winter, and in the second - spring. In cold countries, vegetables are mostly planted in autumn, and in hot countries - in spring. In the first case, the cloves are deepened into the soil, already slightly germinated. Spring planting must be done as soon as possible. Ideally, the soil should not yet dry out after the snow melts. Only in this case can you get fairly large heads.
Growing vegetables from cloves
This method is the most famous. And how to grow garlic from seeds? To do this, first of all you should choose the right location. The best crops are considered to be beds after legumes, cucumbers and cabbage, the worst - after potatoes and onions. It is recommended to plant a garlic plant in the same place only after 3-4 years.
Before planting, you will need to add fertilizing (rotted manure or compost) to the soil. This should be done in the fall. Then you need to prepare the bulbs, carefully examine them, remove the spoiled ones and separate them. This is done just before landing. The vegetable is planted approximately a month before persistent cold weather. This should be done so that the crop has time to take root, but does not sprout.
Preparing the bed
They begin to prepare the place for sowing in advance. Since it is impossible to grow garlic in one place every time, they select a site in a sunny place, with loose and nutritious soil. The crop grows well where peas, beans, pumpkins, and cabbage were planted.
Before preparing the beds, they think about how to plant garlic from bulbs.
If the soil is poor in nutrients, then add five kilograms of humus per square meter, adding potassium chloride (20 grams), superphosphate (30 grams). Wood ash will supply the soil with phosphorus.
See also
Description of the garlic variety Reliable, features of cultivation and careRead
Garlic requires soil that is neutral in acidity. The acid level can be reduced by adding slaked lime. If you are going to plant one-toothed trees in October, then in the spring you need to prepare an area for sowing.
Before planting, the bed is divided into rows sixty to ninety centimeters wide. The length can be several tens of centimeters depending on the number of bulbs.
Choose the planting time, taking into account the temperature around zero degrees. Warm weather will give impetus to the development of seed material. The seedlings will appear quickly and will be killed by frost. And low temperatures in the soil will destroy the seed material, preventing it from surviving until spring.
How to plant plants
In order for planting garlic seeds to be successful in the future, you need to prepare the beds a week in advance. This is done so that the soil does not have time to sink (in damp soil the cloves will settle very deeply). The interval between the cloves should be at least 8-10 cm, the space between the lines should be 40-50 cm. After planting, it is ideal to cover the ground with sawdust or peat, so the vegetable will better survive the frosts. However, if the winter is warm and not very severe, you can do without powder.
Spring planting is not very different from winter planting: only its approximate depth is 5 cm, and the distance between rows is 25-30 cm.
Care
Growing garlic from seeds occurs without abundant, let alone daily, watering. Its frequency is once every 6-7 days. The first watering along with fertilizer is carried out at the end of April or with the onset of May. The second fertilizing is done in June, and 2-3 weeks before harvest, fertilizing must be completed.
When arrows form on a vegetable (some of them can be saved for seeds), they need to be removed. Moreover, this should be done carefully so as not to spoil the vegetable. We must not forget about timely weeding, because garlic, like any plant, loves freedom. Therefore, there should be no weeds on the ridges.
Propagation of garlic by bulblets
You can propagate garlic using bulbs constantly, leaving shoots with aerial bulbs every year. Planting is done twice a year. You just need to decide when to sow the garlic bulbs - in autumn or spring.
And the family will eat vegetables all year round, nourishing themselves with vitamins and beneficial elements. The diet can include both leaves and stems of the vegetable, which contain many microelements. With this method of propagating garlic, the gardener will not be left without a useful vegetable.
How to grow a crop from seeds
Growing garlic with seeds (bulbs) is considered one of the best ways to obtain high-quality seed raw materials that are free from various vegetable diseases. Some even specially cultivate bulbs to have one large tooth. To grow them, you can resort to one of two methods: plant in spring or winter. By and large, the effect will be the same, except that the winter bulbs will be a little larger.
How to prepare for landing
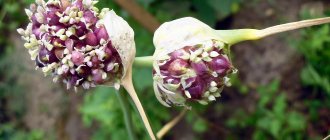
First of all, you need to understand how best to get the expected bulbs. First you need to shorten the arrows of the winter plant, just so that they are well ripened. The vegetable itself germinates in March, and numerous shoots form by the end of May.
It is best to cut off the arrows with the arrival of June, since this is the ideal period for the seeds of winter garlic to grow freely, and for the crop itself to be larger in size. To obtain high-quality bulbs, the shoots should be cut off somewhere at the end of June, after the 20th. By this period, the film under which the aerial bulbs form will dry out and crack - this is a sign to remove the stems. When finished, you will need to dry them thoroughly in the shade. Bulbs can be stored for 2 years without losing their qualities.
What is the difference between spring garlic and winter garlic?
I didn’t want to write about this at the beginning of the article. Still, these are nuances.
Spring varieties are good because they are simply delicious - they go well in the fall in any preparations, giving them the necessary, good spice. It stores well all winter and even more (up to one and a half to two years), does not deteriorate and does not lose its appearance. Another plus is that it does not shoot, you don’t need to monitor it in order to remove the arrows in time.
Although, in the warm regions of our homeland, where winters are mild, it can be planted before winter! Everything will be fine with him and you will get an early harvest.
But, traditionally, in most regions it still lands when it is warm.
Among its disadvantages: reduced winter hardiness and the heads themselves are still quite small and the size of the cloves - not everyone likes to tinker with them. And peeling such garlic is sometimes a real punishment - its husk is thin, soft, and sticky. By the time you dig it out, you’ll already be hungry.
Here he is in the photo, see how rich, multi-rowed his head is? But the teeth are small.
Winter - winter varieties are planted before winter due to their high cold resistance, such as garlic. It calmly withstands frosts, sitting in the ground all winter, and in the spring, as soon as it gets warmer, its green feathers already appear from under the ground.
Of course, this is a matter of taste, but many believe that winter is inferior in taste to spring. I probably agree with this. In addition, winter crops tend to not be stored very well - they soften, shrink in size and spoil.
It is also very suitable for preparations, as well as for food. The bulbs themselves are usually large, with large, few teeth. It's easy to clean - remove the tough skin and you're done. The photo below is winter.
Many people confuse winter and spring garlic and do not want to make a mistake when purchasing planting material.
There are characteristic features that will allow you to distinguish them. Although with reservations.
One of the main differences is considered to be the central arrow; in winter it is rigid and sticks out like a stick in the center. Spring varieties never have it, you can’t go wrong here. It would seem that a simple way to distinguish has been found. Everything would be fine, but the picture is spoiled by varieties of winter garlic that do not bolt. Yes, there are such things too.
That is, the garlic seems to be winter, but it does not have a hard arrow and it looks like spring garlic, besides, such varieties are also multi-rowed and have many cloves. This is where things can get confusing. The only point by which you can recognize that they are trying to sell you non-shooting winter garlic instead of spring garlic is its husk. In winter crops it will always be hard (it needs thick husks in order not to freeze in winter), but in spring crops it is always thin and soft, there is no confusion here.
Well, another indirect sign is the color of the husk. Spring varieties are usually snow-white or with a very slight anthocyanin (pink-purple) tint, while winter varieties have a pronounced anthocyanin color.
I hope this will help you avoid getting confused and falling for the tricks of unscrupulous sellers.
Well, friends, we have touched on all aspects of planting garlic in the spring. Whether it is spring or winter, now you should not have any questions about how to plant it.
And if there are any left, then write in the comments, we will definitely answer.
We wish you all wonderful harvests! And see you in new articles!
13
How to plant garlic using arrow seeds
Before sowing, the aerial bulbs must be removed from the inflorescence, choosing the largest ones. Sowing should be done from September 7 to October 15. In July next year, from all the bulbs, a large-volume one-tooth will form, which will be an excellent seedling for planting a crop before winter, so that large bulbs can be grown.
First, you should create beds for growing vegetables from bulbs approximately 12-15 cm in height and up to 90 cm in width. The soil is prepared in this order:
- per 1 sq. m add 3-4 kg of humus or compost and 1 tbsp. l. superphosphate;
- dig up everything and level the ground on the ridges;
- then make paths opposite the beds to a depth of 3-4 cm;
- the intervals between the recesses should be 10 cm;
- the bulbs must be placed in the groove at a distance of 1-2 cm from one another;
- then you need to cover the paths with soil and leave them all winter.
If there is a harsh winter ahead, you can mulch the beds with sawdust in a layer of 2-3 cm. With the arrival of spring, when the ground thaws, the sawdust should be removed. Now many people have probably already understood when to plant garlic seeds.
Pros and cons of using bulbs
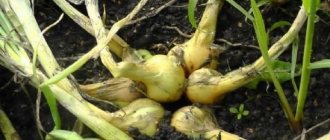
Winter garlic produces good yields of large heads with large cloves. They are more convenient and economical to use than spring ones, but are poorly suited for planting, because there are no more than 10 such teeth in the head.
To preserve the entire harvest, it is recommended to use aerial bulbs for sowing - bulbs that appear on the shoots of garlic during its growth. They are collected at the top of the stem in peculiar inflorescences, covered with a film and in appearance resemble tiny cloves. From two garlic arrows you can get more than a hundred full heads of garlic in the future.
But more important than saving crops when using this method of cultivation will be the improvement of seed material and its improvement. If you plant garlic with cloves that have grown in the soil and pulled out all the existing pathogens from it, then the new crop will be initially infected.
Some gardeners specifically grow garlic from bulbs in order to obtain one large clove, which is easier to peel. The planting process itself is also much easier, because the cloves need to be planted separately, and the bulbs can be sown. Garlic with one clove can be planted the next year, resulting in a regular, multi-clove harvest.
Garlic bulbs for planting
The main disadvantages of this growing method are:
- the duration of the process, since a full harvest can only be harvested in the second year;
- obtaining a low result due to a violation of the technology for sowing bulbs or due to their freezing or drying out.
These negative aspects can be successfully avoided if you choose the right method for cultivating garlic from this seed, and also follow all the details of the process.
Care
To prevent the plant from freezing and rotting, there must be enough snow on the ridges in winter. If you have a winter with little snow, you will need to shovel the snow onto the vegetable bed. Then in the spring, as soon as the snow thaws, the shoots of the crop will immediately appear.
If there is practically no rain in spring, the garlic needs to be watered. A young plant also needs fertilizers, after which it is necessary to loosen them. The first time you should feed the vegetable with nitrophoska (15 g per 1 sq. m.) in mid-April, the second fertilizer with ammophoska (the same dosage) is applied in June, at the stage of bulb development.
It is necessary to finish watering the crop 3 weeks before harvesting. In June, you will need to cut off the shoots from the plant that reduce the yield. This must be done when its height reaches 5-8 cm. The arrows should not be pulled out, but carefully broken under the third leaf so as not to damage the seeds of winter garlic.
Taking into account the excellent bactericidal properties of the vegetable, it can be planted next to other plants to prevent their diseases.
Autumn planting of bulbs
In autumn, sowing of seed material is carried out at the same time as planting winter garlic. For Central Russia, it is recommended to carry out such work from the end of September to mid-October.
Soil preparation
Before planting, you need to prepare the beds where the seed will germinate in the future. Primary requirements:
- desirable predecessors: legumes, tomatoes, peppers, eggplants, carrots;
- undesirable predecessors: onions, garlic, cabbage, cucumbers, zucchini, pumpkins, potatoes;
- loose soil with a neutral reaction, pH = 5.0...6.0;
- the depth of the fertile layer is at least 18 cm, the average size of soil particles is 10...20 mm;
- the presence of humus, the presence of high-moor peat is allowed.
Sequence of bed preparation.
- Deep loosening using soil cutters or a “Mole” ripper.
- Adding gypsum (at pH = 6.0...7.0) or slaked lime (at pH = 4.0...4.5), at least 30 g per square meter.
- Adding boric acid, 10...12 g/m2;
- Urea addition, 25…35 g/m2;
- Adding superphosphate, 20...25 g/m2;
- Addition of potassium nitrate, 8…12 g/m2;
- Mix all mineral supplements with a rake.
Seeds can be planted in a strawberry bed. They also conduct training there.
- Deep loosening is carried out in the middle of the ridge, as well as along the edges, using garden forks.
- Add the mineral supplements shown above.
- Stir, after a week you can plant.
Planting bulbs
Before planting, seed material is prepared. It is soaked for 10...15 minutes in a solution of potassium permanganate (light pink solution).
It is useful to treat in a heteroauxin solution: roots are better formed. The tablet is diluted in 1 liter of water. Then the bulbs are immersed for 15...20 minutes.
- For planting, small grooves with a depth of 4.0...4.5 cm are created at a distance of 12...15 cm.
- Spill with a solution of potassium permanganate. Some vegetable growers recommend pouring boiling water from a kettle to completely get rid of the infection.
- Place the seeds at a distance of 8 cm.
- Then sprinkle peat, humus or loose soil on top.
Planting in holes is also possible. To do this, use markers with pegs 4 cm long and 2...3 cm in diameter. Holes are made with a marker, and then the bulbs are laid out in the holes. Then they sprinkle or rake to level the soil layer.
The bed is covered for the winter. Straw (4...8 cm) or hay (up to 15 cm) serves as a good shelter. Some gardeners use covering material (agrospam). Fixed using staples made of steel wire.
Harvesting
You need to dig up the bulbs after ¾ of the inner leaves have withered. Winter crops, as a rule, ripen by the end of July. Dig out the vegetable after the main area of the lower leaves turns yellow. To check in advance, you need to remove 2-3 heads of garlic from the soil. The bulbs should be sufficiently developed and firm. Harvesting is carried out with a pitchfork, prying up a lump of soil with a plant and pulling it out with your hand.
The dug up vegetables need to be laid along the length of the bed for several hours to dry. It is not worth trimming the leaves right away so that you can plant garlic seeds next year. Any arrows present should be cut off. And the leaves themselves are shortened after drying.
The roots of a crop intended for food are removed. Experienced gardeners believe that it is better to underexpose the plant in the ground rather than overexpose it. It’s just that unripe bulbs can absolutely ripen even after uprooting, while overripe ones fall apart and are preserved much worse.
Advantages and disadvantages of this method
Garlic seeds ripen in bulbs, which are located above the leaves of the crop. This propagation method has advantages and disadvantages that you should know before planting.
The advantages of such cultural propagation include:
- seeds are rarely susceptible to diseases, so there is no risk that there will be no seedlings. If all the sowing characteristics are observed, the product turns out to be fragrant and does not lose its quality even after long-term storage;
- with the help of several bulbs you can get a large harvest;
- if the garlic cloves are damaged, using seeds allows you to avoid losing the variety;
- using such planting material, large heads can grow;
- planting seeds is simple, just sow in the ground;
- Properly collected planting material gives a high level of germination.
However, like any method of propagating cultivated plants, this method has the following disadvantages:
- You can get a big harvest only after 2 years;
- In severe frosts, seeds can be damaged and germinate poorly.
Also, in some cases, under dry weather conditions, the bulbs may dry out, which reduces the germination rate. Planting material can deteriorate if the bulbs are collected incorrectly. Unripe grains are not suitable for crop propagation.
Important! One of the features of the bulbs is the large number of grains inside. Properly collected seeds can be stored for a year without reducing their characteristics. Both large and small grains produce seedlings.