Advantages of the method
This method of sowing garlic is becoming increasingly common among summer residents. The method has its undeniable advantages if you follow the technology and know how to plant garlic bulbs correctly.
Advantages of planting garlic bulbs:
- To obtain one two hundred seed samples, only one plant is needed. The main criterion is strong, stable garlic arrows.
- Aerial tubers are characterized by high resistance to fungal and bacterial diseases. Thanks to this property, seeds are used as a source of rejuvenation and renewal of varieties and prevent the degeneration of vegetables.
- The seeds have a high survival rate.
- High yield.
Garlic seeds are bulbs
This culture is designed in such a way that garlic seeds are not actually cloves, which are usually buried back in the ground, but something else that forms on the stem of the so-called “arrow” after flowering. The airy bulbs of garlic are usually removed during the formation of the “arrow”. They interfere with the ripening of the heads, so it is important to break them out in time. But a few are worth keeping.
It is important to know how many bulbs there are in garlic in order to plan in advance the planting of healthy seed material. So, there are about 80 buds in one inflorescence. Not everyone gives a bulb. Most often, about half of the full-fledged, ripened seeds remain. Those. in one “arrow” there are 40 – 50 bulbs. If you plan to plant in the fall, remember that approximately 30% of the seeds freeze in the winter. Those. 35 pieces remain. Until spring, approximately the same number of viable seeds will remain in an apartment. If you plan to get 100 pieces of one-toothed ones with updated genetic qualities, then leave 3 “arrows” for the seeds.
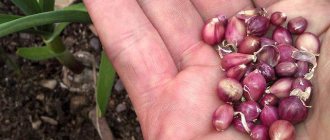
See what garlic bulbs are in the photo, which illustrates their appearance during flowering, ripening and storage:
This is how seeds grow
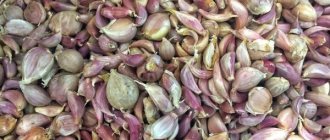
This is what the dried bulbs look like
Ready to plant in open ground!
Deadlines
When to plant garlic seeds in bulbs in the ground? Seed material is planted in the soil until the temperature decreases steadily. As a rule, this is the end of September, beginning of October . All planting work must be completed by mid-October. This is due to the fact that before the onset of cold weather, the seeds must strengthen in the ground.
This method is optimal for regions with temperate climates. Severe frosts can destroy seeds. For Siberia and the Far East, it is better to plant tubers for growing seed samples with the onset of spring, when relatively warm weather sets in and the air warms up a little after a harsh winter.
It will be possible to obtain complete samples for sowing only after one or two seasons.
Methods for sowing garlic seeds
Multi-clove commercial garlic can be produced from sets in different ways:
Planting in autumn before winter
Sowing before winter is more suitable for regions with a temperate climate, since severe frosts can cause a significant portion of the seedlings to die. When exposed to low temperatures, small bulbs can be pressed to the surface by frozen soil.
- Deadlines.
Winter sowing for the production of cloves is carried out at the same time as planting winter cloves. Depending on the region and weather conditions, the optimal time occurs at the end of September - October, 30-40 days before the onset of frost.
- Landing scheme.
Gardeners in small areas practice sowing bulbs in rows 3 cm deep for small ones, up to 5 cm deep for larger ones, with row spacing from 20 to 30 cm. 4-6 rows are formed on one ridge. Such crops are easier to weed and loosen. 30-40 g of small seeds and 70-80 g of larger ones are sown per 1 m2.
- Soil preparation.
Suitable for planting are loamy and sandy loam soils, without waterlogging, filled with humus 6-10 kg/sq.m. m. and phosphorus-potassium fertilizer (potassium monofostat 15 g per 1 sq. m. or something else). Wood ash works effectively, you can add 1-2 cups per 1 square meter. m. The soil can be disinfected with a weak solution of potassium permanganate or copper sulfate.
The soil is prepared a couple of weeks before planting, dug to a depth of 20-25 cm and left to compact. When planting in freshly dug soil, it is difficult to determine the planting depth.
- What to cover.
Plantings are protected from freezing by mulching with peat, humus, fallen leaves, grass, and spruce branches. Tree branches and bushes are used for snow retention. In early spring, the mulch is removed and the soil is harrowed.
How to plant in spring?
- Deadlines.
Spring sowing of aerial bulbs is carried out at the earliest possible date. Since the crop is winter-hardy, cool spring weather will not harm, and soil moisture will allow the bulbs to quickly take root and form a good harvest of one-toothed bulbs by July.
- Landing scheme.
The bulbs can be sown in wide-line strips (6-8 cm) with a distance between the stripes of 45-50 cm, in strips of 5-10 lines each and row spacing of about 70 cm and in a simple row method, as when sowing before winter.
- Soil preparation.
It is carried out in the fall, filled with humus and phosphorus-potassium fertilizers. In the spring, you can add ash, loosen the soil with a pitchfork, make rows and sow aerial bulbs to a depth of 3 cm.
The resulting single-clove bulbs, after drying and preparing, are ready for the production of a full-fledged multi-clove bulb by planting before winter, in the same way as the cloves.
In order to obtain multi-toothed heads during spring planting, the sowing must be of a fraction larger than 1 cm in diameter.
Direct method
There are ways to grow garlic by sowing aerial bulbs without digging up the resulting single cloves. Seeds are sown in the usual way, but seed consumption is halved.
- With the annual winter method, sowing is carried out at an earlier date - in June-July. The seeds should sprout and form good foliage before winter, but not the head. Next year the plants will begin to actively develop and produce multi-toothed bulbs by mid-summer.
- With the two-year growing method, the seeds are sowed at the same time as the cloves are planted. Depending on the region, this is the end of September - October. Onions are sown half as many as cloves. In the summer of next year, the one-toothed ones will be ready, but they are not dug up, but left to overwinter in the ground. In the spring, the garlic will sprout and be grown like a regular crop. In July, the main part of the one-toothed bulb will produce a full-fledged multi-toothed bulb.
In the video, the agronomist shows how she plants and propagates garlic bulbs.
How to grow bulbs from seeds
To get selective, large bulbs, you need to select the largest cloves. The selected samples must be healthy, without visible signs of plant diseases. The material for sowing is grown in compliance with all the rules.
How to grow bulblets:
- Selected samples are placed in growth restrictors.
- In the spring, the seeds will begin to germinate, and arrows will appear in early summer.
- The resulting arrows are curled into a spiral.
- Once the spiral threads are straightened, it is time to collect the seed material. This is evidenced by yellowing of the green part of the plant.
- For harvesting, you need to dig up the tubers along with the roots.
- After collection, drying is necessary.
- To do this, summer residents hang them on the fence. To avoid drying out, hanging in the hot sun is not recommended. An attic with good ventilation is suitable for high-quality drying.
Everyone can make height limiters with their own hands using unnecessary couches and folding beds. They are tubes made of metal and plastic. The diameter of the tubes approximately corresponds to the size of the clove. Such devices do not allow earthen bulbs to grow. All nutrients are directed to the growth of flower threads. In this case, the arrows grow much larger and more powerful than with traditional crop cultivation.
Bulbs are grown similarly to ordinary vegetable tubers. They require watering, loosening the soil, and periodic fertilizing with minerals.
Garlic bulbs - what are they, how to get them?
Garlic arrows with bulbs or aerial bulbs
Bulbs are small, very small cloves of garlic that grow inside a translucent box at the very top of the garlic arrow. Look at your garlic in early summer: the garlic arrow (which we usually break off) is crowned with a spherical “box” in which those small cloves or bulbs ripen.
These are the vegetative reproductive organs of garlic, sometimes called seeds, but since this plant does not produce flowers, it will not produce seeds. Therefore, botanists will say that calling bulbs seeds will not be correct. But for us, simple gardeners, this is accessible and understandable in an everyday sense.
Box with bulbs, photo:
Ripe bulblets
This method of propagating garlic is especially good because fungi and infections are not transmitted through the bulbs. Harmful bacteria are mainly found in the soil, so cloves planted in the ground are susceptible to infection. The bulbs do not come into contact with the soil and therefore represent clean seed material not contaminated with infections.
As we know, garlic can be spring or winter. Spring varieties do not produce arrows (except for the Gulliver variety), but winter varieties actively produce arrows.
To get aerated garlic bulbs, i.e. bulbs, you need to look in advance for the most powerful bushes and leave arrows on them.
When to collect garlic bulbs? It is difficult to give an exact answer. Harvesting time depends on the region where the crop is grown. Follow the arrows. As soon as the boxes begin to crack, you can cut off the arrows. In Kuban, this is usually closer to mid-summer (late June).
When the time comes for harvesting, plants with arrows, in which the boxes (heads) have already begun to crack, are removed from the beds. After this, they are dried well, the head is carefully separated from the stem, the bulbs are removed and transferred to paper bags. This seed is perfectly stored at room temperature (+18..+20°C) and in a dark place.
But keep in mind that some of the bulbs may dry out during the winter, so leave a few more cloves for storage than you need for planting.
Before planting in the ground, about three to four weeks, the bulbs are sorted, removing dried ones.
First you need to select viable seeds. To do this, about 24 hours before planting in the ground, they should be soaked in clean water or in an infusion of ash. The bulbs that have sunk to the bottom of the dish are selected for subsequent sowing, and those that float on the surface should be removed.
Collection and storage of bulbs
Propagating garlic by bulbs in the fall allows you to collect high-quality material for planting. To get a good harvest in the future, you need not only to grow it correctly and collect it on time, but also to be able to save the seeds.
It is necessary to collect the tubers when the stem is completely straightened and slightly yellowed. At this point, the head begins to crack and expose small teeth. When opened, they acquire a color scheme that determines their belonging to a particular variety. It is important not to miss this moment and collect samples at the initial stage of disclosure. Otherwise, when fully opened, all the samples will simply be lost.
The tubers must be dug up with roots, and the stems must be cut off at the branching point. If several variations of a vegetable are planted at the same time, collect identical varieties together to avoid confusion.
Collect the collected inflorescences in bunches and hang them on the fence in a shady place or under a canopy. A place where the seeds can dry. After drying, put the bunches in a dark place with good ventilation. The optimal storage temperature is +2 – +15.
Preparation of seed material
Regardless of whether garlic bulbs will be sown in spring or autumn, in summer it is necessary to take care of preparing the seed. You can grow it in your own garden bed or borrow it from a neighbor who has an interesting variety in stock.
To propagate garlic by bulbs, it is better to take the following varieties: “Gribovsky Jubilee”, “Aleysky”, “Dobrynya”, “Lyubasha”, “Komsomolets”, “Gulliver”, “Orlovsky” and others.
During the period of formation of the “arrows”, you need to select the required number of the strongest ones and save them until the flowers bloom and the seeds ripen.
Note! It is recommended to leave at least one “arrow” even if there is no goal to update the planting material. Based on the condition of the head with bulbs, one can judge the degree of ripening of the garlic heads in the ground. At the moment when the “shirt” has dried out and begins to burst, it’s time to put the winter garlic away for storage.
After harvesting, the bulbs are not cut off, but remain along with all the tops. It is not right. Over the next 2-3 weeks, the head of garlic will take nutrients and moisture from the tops and shoots, gaining its own mass. Therefore, the arrows need to be cut off and stored separately.
When dry, the seeds are collected and placed in a paper bag in a cool, dry place until planting in the fall or spring. Before planting, preparation consists of soaking for 30 minutes in a solution of weak potassium permanganate and for 2 hours in a solution of Epin. Please note that floating seeds should be discarded and discarded. They will not sprout.
Planting bulbs before winter
Planting seeds in open ground is carried out in several stages. The process begins with site preparation.
Soil preparation
First you need to choose a place for the garlic bed. It is better if it is a flat piece of land where access to sunlight is not difficult. The culture does not really like excessively wet soil. A few weeks before planting, dig up the bed, add humus and mineral fertilizers.
In a few weeks the soil will settle, and you can safely plant the seeds without fear of making a mistake with the depth. You can add wood ash at the rate of 1 cup per 1 square meter.
Before planting the tubers, it is recommended to treat them with a fungicide solution. This is necessary to prevent disease.
Planting scheme
Before sowing the crop, it is necessary to sort it. Separate all seeds according to variety and seed size. The most optimal clove size is 3-4 mm.
There are several schemes for planting tubers.
| Scheme | Characteristic |
| Chaotic location | Involves transplantation of single teeth. I lower the tubers into the ground to a depth of no more than 30 mm. After germination, in early August they are dug up, dried and replanted according to an orderly plan. |
| Orderly arrangement | Before placing the seed in the ground, lines are drawn along its surface along which the rows will be made. The distance between the lines is 15-20 centimeters. The seed should be immersed in the ground to a depth of 30 millimeters, in light types of soil - 40 millimeters. Water the marked furrows with water. Place the bulbs in them at a distance of 4-5 centimeters from each other. Carefully fill the holes with soil. |
Gardeners recommend lightly compacting the soil with a board or hand after planting. Water the planting area on top again and sprinkle with straw and peat.
Deadlines
When should you plant winter garlic bulbs? Compliance with planting dates directly affects the quality and survival of tubers. If you plant them too early, they may sprout. If, on the contrary, it is late, they will freeze and will not germinate in the spring. The best option is the end of September, beginning of October.
Pros and cons of the method
Like most agricultural technologies, growing garlic from bulbs has its own disadvantages and advantages. Among the advantages the following is noted:
- the ability to independently grow planting material;
- preservation, renewal and rejuvenation of garlic varieties;
- obtaining healthy “seeds”;
- direct sowing of bulbs in open ground;
- easy care during growth period.
The main disadvantage of the method is that to obtain a harvest you will have to wait two growing seasons. In the first year they get single teeth, and only in the next year they get full heads.
With the early onset of winter, the likelihood of planting material freezing increases.
How to plant in spring
Deadlines
When to plant garlic bulbs in open ground? The best option is early spring. The crop's resistance to winter cold will not interfere with germination; humidity will allow the seeds to take root in a timely manner.
Soil preparation
The garden is being prepared for planting seed cloves in the fall. The soil is loosened, humus and fertilizers are added to it. In spring, the top layer of soil needs to be loosened and wood ash added.
Scheme
Several options are used.
- In ordinary rows, similar to planting before winter.
- Wide stripes. The width of the strip is 5-7 centimeters, the distance between the strips is 40-50 centimeters.
- Ribbon fit. Each tape has 6-9 rows. The distance between the lines is 60-75 centimeters.
How to grow and collect bulbs
The process of growing bulbs is simple. They form independently on the stem of a winter variety of garlic. After the ovary appears on the shoot, you should wait until a box with airy “seeds” forms and the protective translucent film on it bursts. After this, the shoots are cut and dried for 10 days.
It is best to do this 1-1.5 months before the intended planting. In the middle zone, this period falls on the month of September-October.
How to store and sort
There is no need to create special conditions for storing bulbs. They tolerate temperatures of around 15 degrees Celsius well throughout the winter. About 2 months before the intended planting, it is necessary to transfer the “seeds” to a cool place.
It is ideal for subsequent storage to maintain a temperature of no higher than 5 degrees Celsius. Under such conditions, natural hardening of the bulbs occurs. It is recommended to sort aerial “seeds” by diameter (large, medium and small). After the soil warms up to +7 degrees, they can be planted at a distance of 5-6 cm from each other.
Caring for Garlic
To be able to grow winter garlic from bulbs, you must follow the rules of caring for the crop.
Watering
The culture does not like excessive moisture. In case of drought, it is enough to water it once every 7-10 days.
Loosening
With the onset of spring, it is necessary to remove straw, peat, or humus from the garden bed, which was used to cover the garden bed. Loosen the top layer of soil using gentle movements. There is no need to go deep so as not to damage the tubers. It is necessary to loosen the soil after the seeds have sprouted and after each watering or rain.
Top dressing
Over the entire season, it will be enough to feed the vegetable twice. The first time the crop is fed is after the first shoots appear. The second time - 10-14 days after the first. Chicken manure (concentration 1:20) or mullein (concentration 1:10) can be used as fertilizer. The bed is fertilized at the rate of 2 liters of fertilizer per square meter. You can also use saltpeter, nitrogen for the first feeding and wood ash for the second as fertilizers.
Practical experience in growing garlic from bulbs
Many gardeners have extensive experience growing garlic from bulbs. But the works of Andrei Aleksandrovich Panin, a gardener from Kuban, deserve special attention. His technology was described in one of the specialized magazines in 1997. He developed a technique for growing commercial garlic bulbs in the second year by obtaining large bulbs.
Andrei Aleksandrovich grew garlic in aluminum tubes no more than 4.5 cm long. He put the clove on one side and immersed the other in the ground. In the spring, one could observe the appearance of arrows. The essence of the technique is that due to the limited diameter of the tube, the head of garlic does not grow large, and the plant uses all its strength in arrows.
After the garlic leaves have turned yellow and the shell of the box with the bulbs is almost cracked, the arrows are cut off. For subsequent ripening, they are hung in the form of small sheaves in the shade. After about a month, the husks are removed from the “seeds” and only those bulbs that are at least the size of a bean are selected for planting. Otherwise, the process of hardening, planting and harvesting is standard.
Collection
Harvest occurs when the foliage begins to turn yellow and dry out. You need to collect on a sunny, not rainy day. The plant is dug up by the roots. After this, the tubers are cleaned of sand. Then the vegetable is dried and the dry tops are cut off. Dried garlic is placed in wooden boxes, rag bags, and wicker baskets for storage.
If you know when to plant garlic bulbs before winter, care for them properly, and harvest in a timely manner, you can grow a high-quality and very healthy vegetable. Growing in this way always allows you to get healthy tubers. With its help, you don’t have to worry about the fact that high-quality, rare varieties will simply degenerate in your garden. The only caveat is waiting for two seasons until you can produce healthy, strong seeds ready for planting.
How to prepare
To protect planting material from fungal infections, before sowing it is kept in a solution of potassium permanganate, Fitosporin, Maxim for about 20 minutes. You can spray the bulbs with Trichodermin.
Bulbs taken from healthy plants do not need to be pickled.
Seeds that are fully ripe are suitable for planting. They are covered with a hard lilac-violet or light brown shell, the size of the bulbs is 4-6 mm.
Garlic bulbs
Important! You can cut off the garlic seeds when the covers on the seed head burst. Until this moment, the bulbs are not yet mature. If you are late with cutting, the seeds will simply spill out onto the ground.
Advantages and disadvantages of the growing method
This method of propagating spicy vegetables has a number of undeniable advantages:
- when sowing with aerial bulbs, diseases whose pathogens are in the soil do not spread;
- the speed of reproduction of a rare variety - up to a hundred bulbs are formed on a seed plant, versus 5-6 cloves in the head;
- plants grown from arrow seeds have good growth energy and are less sick.
The main disadvantage of this propagation method is that full heads of garlic are harvested only in the second growing season. In the first year of sowing, one-tooth is collected - a bulb consisting of one tooth, with a diameter of 0.9 mm to 2.5 cm. This one-tooth serves as planting material for obtaining a marketable head in the next season.
Some gardeners note the difficulty of sowing aerial plants compared to planting cloves. The bulbs are quite small and more difficult to position at the required distance and depth. Sowing before winter is fraught with freezing of the bulbs, so it is necessary to reliably insulate the bed.
Conclusion. Sowing of aerial bulbs is resorted to when it is necessary to renew garlic plantings, that is, to plant healthy planting material. Such planting is relevant for the rapid propagation of rare varieties.
LiveInternetLiveInternet
I do not give advice on changes to your plant growing technologies - I collect information for myself and share my findings, observations and experiences. Winter garlic can be propagated by cloves (the head of garlic is divided into cloves), sets (obtained from aerial seeds) and aerial bulbs (collected from the peduncle capsule). In any area, the method of propagating garlic by bulbs is very promising. As a result of research, it has been established that with this method of planting, its viability and productivity increase, and the reproduction rate increases significantly. Growing winter garlic from aerial bulbs contributes to the production of healthy and high-quality planting material, which in the future, over the course of 3 to 5 years, has a very positive effect on its growth and, ultimately, the yield and yield of marketable bulbs. It is better to use garlic varieties with low shoots and a small number of bulbs in the inflorescence. In such varieties, the weight loss of underground bulbs is less than in varieties with high shoots and a large number of very small airs. After harvesting, tie the garlic into a sheaf and hang it in a dry, cool place with good ventilation. Avoid exposure to direct sunlight. Do not separate the arrow from the box and the bulb for better ripening of the bulbs. It is necessary to store in this condition until autumn sowing. At least three months should pass from harvesting the aerial bulbs to sowing. In my region there is not enough time for it to fully ripen. I prefer to sow in the fall at the deadline for the region, between October 15-25. The bulbs will lie until spring and will sprout only when conditions are favorable for their development and growth. In winter, the aerial bulbs do not freeze out. In the first year of life, one-toothed bulbs weighing 5 - 20g are formed from the bulbs. (sewing), and from the planted one-toothed one the next year - a full-fledged bulb. Growing good garlic from bulbs is not difficult. Aerial bulbs can be sown in several ways, depending on the soil and climatic zone of residence and the desire to work with them. The first method is to sow before winter and obtain one-toothed plants in late July and early August. After a complete selection of one-cloves from the soil, dry and plant in the fall, at the usual planting time for winter garlic. The second is to sow in the spring and obtain one-tooth in August. The third is a direct method of obtaining marketable bulbs, if you do not harvest the bulbs after spring and autumn planting of bulbs, simply “forget” them in the garden. The fourth method is to obtain garlic from bulbs using non-transplant technology in one year, but this method is acceptable only in the southern regions. But during periods with “milder” snowy winters, you can take a chance and experiment. To do this, it is necessary to sow last year’s bulbs at the end of July and beginning of August and leave them to winter, and mulch the soil with garlic leaves well.
Photo 1. After calibration. I read that it is necessary to preserve the bulblets in inflorescences and shoots until spring. After three months of drying and subsequent rubbing of the bulblets from the inflorescence in the fall, I did not observe poor germination. Regardless of the time and methods of sowing, always 10-25% of the air does not emerge - this depends on the conditions of their harvesting, ripening, storage, preplant preparation, planting depth and natural reasons. There were cases where the sown bulbs sprouted in the fall or a year later, in the spring. You can, of course, achieve maximum germination, but there will definitely be a fallout. Some are disingenuous when they talk and write about 100% germination, all this has been verified by many years of practical experience. The larger the bulb is planted, the greater the likelihood of getting not a one-toothed bulb, but a completely full-fledged medium-sized bulb in one season ranging from 25-30 grams. What to do before sowing: 1. Separation from the frog, rubbing from the inflorescence, sifting and winnowing through a large mesh, calibration by fractions through special meshes with different holes. 2. Pre-sowing soaking in Rostock, Gumi-Omi, Gumat +7 humates for 12 hours is advisable. Dry and sow. 3. You can moisten it with the following composition: For 1 liter of water, a few grains of urea, 2-3 drops of 5% tincture of iodine, a little boric acid and a few crystals of potassium permanganate. Dry and sow. 4.Soak in a solution of wood ash for 12 hours, half a glass of ash per 5 liters. water. Dry and sow. 5. Soak for 12 hours in water. Dry and sow.
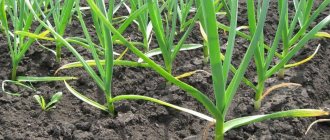
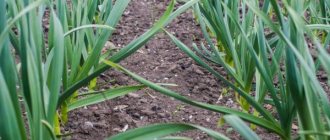
Photo 2,3. Soil preparation. I prepare the soil for sowing three weeks in advance. I add ash to the soil at the rate of 1 liter jar per sq. m. and use a ripper to follow the markings. Loosening depth is up to 20 cm. The width of my beds varies, depending on the planting location. The maximum width is 0.9 m for 6-7 line sowing, the width between lines is 15 cm. After loosening, I level the beds with a rake. In the future, I watch the weather and wait for landing days. Before planting, I make furrows 7-8 cm deep with a flat cutter. I add sifted humus to the furrows and sprinkle with dry, coarse sand and ash. I don’t use any more fertilizers until spring shoots. In the spring, after germination, I water it with humic fertilizers or use Sprout. After another week, I spill mullein diluted 1:12 or bird droppings 1:20 at a rate of 2 - 3 liters. per linear meter. About one and a half to two months after germination, I spill it with phytosporin for prevention (not necessary). At the beginning of July, it is useful to feed the beds with ash or any complex fertilizer for onions and garlic (optional). Single teeth with this technology are full-sized, from 2 to 4 cm in diameter, with a very small number of small ones.
Photo 4. Planting without sand. The sowing pattern is multi-line - from 3 to 7 lines. Between the lines there are 12-15 cm. The planting depth is always the same, from 4 - 6 cm. The seeding rate of bulbs is approximately 50 - 100 g. per 1 sq.m. I place the bulbs along the bottom of the groove at a distance of 3 - 5 cm from each other and press them slightly. I sow small ones in a fan method and thin them out after germination. After sowing, I fill the furrows, lightly compact the soil and sprinkle another 1 - 2 cm with humus or one-year-old, weathered peat.
Photo 5. Planting to a depth of 4-6 cm. After planting, I mulch the beds with 5 cm of straw. After the onset of stable frosts, in case of lack of snow, I increase the mulch layer from 10 to 15 cm.
Photo 6. Mulching with straw. Caring for crops before harvesting consists of weeding and fertilizing. In dry years, I water at the rate of 20 liters per 1 sq.m. If necessary, repeat watering after 15 days. When the tips of the leaves begin to turn yellow and after that the tops lie down, this is a signal for harvesting and you cannot delay it because... the leaves die off quite quickly. Searching for lizards in the soil is a very painstaking task.
Photo 7. Storing air bulbs. Puffed garlic bulbs are stored in warm and cold conditions. When cold they lose 15-18% in weight, and when warm - up to 50%. To increase germination, the best storage is in linen bags, boxes or paper bags at a temperature of +18 +20 degrees, and two months before planting - 0+3. Dry basements can be used.
Photo 8. Sevok. The sets are left for spring planting, stored in the lower compartment of the kitchen table. It is necessary to sprinkle a layer of flour on top and place it in storage. Before planting in spring - expose to low temperatures 0+3 for 2 months.
Photo 9. Spring 2013. Seedlings of bulblets planted on one-toothed grass in the fall of 2012.
Photo 10. The harvest was harvested on 07/28/13.
Photo 11. Garlic sets.
Photo 12. Diameter 32 mm
Photo 13. The weight of a large single-toothed fish is 16 g. Mustard and barley were sown in the garden bed after the garlic.
https://blogs.mail.ru/mail/alexsf-2b/32D366E1B82BEC28.html
Planting garlic bulbs - when and how?
Growing garlic from bulbs is more of a necessity than an indulgence. Experienced and experienced gardeners understand that such agricultural technology makes it possible to preserve the seed fund and protect it from the accumulation of genetic mutations. If you constantly, year after year, plant garlic cloves obtained on your plot from a previous winter planting, then nothing good will come of it. As a result, the seed material will accumulate a large number of mutations, due to which the yield will sharply decrease. The penetration of fungal, bacterial and viral infections will not allow the cloves to be preserved until the next harvest. They will rot already in October-December.
Planting garlic bulbs is a great opportunity to save money and get material that is absolutely healthy from a genetic and infectious point of view. The most important thing is to know when and how to properly compress in spring and fall. The article also talks about the rules for organizing a hoopoe during the growing season.
Preparation of planting material
In order to get friendly plant shoots, the bulbs must be properly prepared for planting.
- Fully ripened aerials can be used as seed material. It is large in size and has a dense, shiny lilac shell.
- Garlic seeds ripen almost simultaneously with the filling of the head. Collecting bulbs can be combined with digging up garlic heads. They need to be cut from the stem before digging so that the onions do not fall off or get lost.
- Aerial bulbs with a diameter of 4-5 mm are suitable for sowing. They will produce a large, good one-toothed fish. The seed material is calibrated, and the fines are sifted out.
- From sorting to sowing, the bulbs are stored in the cellar or in the refrigerator at a temperature of +2 +5 degrees. This hardening is necessary for better seed germination.
Immediately before planting, some gardeners resort to soaking the bulbs in warm water for 2-3 hours to speed up their germination. This method is used only when planting garlic in the spring; the bulb is sown dry in the fall.
What are bulbs
There is spring garlic, planted in the spring and bearing fruit in the year of planting, and there is winter garlic - it is planted in the fall and a harvest is expected the next year. The difference between the winter type is that the cloves are located around the base of the arrow. Air bulbs called bulbs are formed on this rod.
Aerial bulbs are excellent propagation material. In addition, they have several other useful properties:
- preserve the varietal qualities of the crop;
- provide the future plant with disease resistance;
- allow you to save on the purchase of planting material.
Over time, after about 3–5 years, garlic begins to degenerate, that is, its heads become smaller. With the help of bulbs, you can rejuvenate a crop without depriving it of its varietal characteristics. And if you consider that more than 100 bulbs are formed around the arrow rod, then the costs of planting are simply unnoticeable.
Did you know? French microbiologist Louis Pasteur proved in the 19th century that garlic contains antibiotics that are active against many infections, bacteria, in particular salmonella and staphylococcus a .