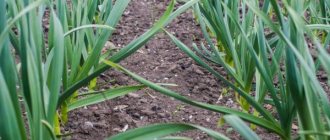
What is the difference between spring garlic and winter garlic?
Gardeners know that there are winter and spring garlic, and you will see the differences between them in the table and photo:
| Spring garlic | Winter garlic |
| There are more cloves - from 12 to 30 pieces, but they are smaller | An arrow sticks out in the middle of the bottom, which is surrounded by 4-12 large cloves |
| The bulbs are smaller in size and have more scales. | Bulbs and cloves are larger and more productive |
| The teeth on the bottom of the bulb are arranged in a spiral from the periphery to the center, with the outer ones being larger | In the middle there is a thick and hard rod, around which the teeth |
| Planted in early spring | Planted in autumn |
| It ripens in September, it is stored for winter and consumed before the new harvest. | Can only be stored until February |
Winter garlic is more common, but in the northern regions they prefer to grow spring garlic, since winter-planted plants can freeze.
How to choose the right planting material (teeth, bulbs)
Garlic reproduces exclusively vegetatively. Even the flowering arrows of winter varieties do not produce seeds at all, but miniature garlic bulbs - bulbs in common parlance.
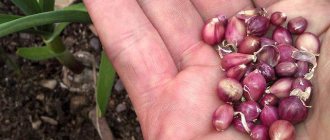
The easiest way for planting is to use clove heads of your favorite variety of garlic, both winter and spring. You should break the head of garlic into pieces carefully, the main thing is not to damage the root part of the cloves.
Only the largest
It is not advisable to plant all the cloves in a row if you are interested in the result. It is the garlic bulbs that are distinguished by a unique property that very accurately characterizes the English term undersize in one word.
In Russian, this means a progressive decline in yield as the size of planting material decreases. Even simpler: if you plant a clove 2 times smaller than the standard one, the head of garlic will grow not 2 times smaller than expected, but 3-4 times smaller.
Only from 1st row
If a head of garlic consists of several rows of cloves (features of the variety), then only cloves from the outer 1st row are suitable for planting.
Conclusion
For planting, select only the largest garlic cloves from the outer row. Even if out of 5 large cloves 1 is slightly smaller, it should be decisively discarded; only with such strict selection will the harvest consist of large heads.
Varieties of garlic with photos and descriptions
Most often, garlic is propagated by cloves, of which there are from 4 to 12 in each bulb, and sometimes more.
Do not use grocery store garlic as planting material. It may not be suitable for growing in your region, and in most cases it is treated with special substances that make it difficult to grow. It is best to buy garlic for planting from a trusted online seed store or local nursery.
Garlic varieties are divided into two groups:
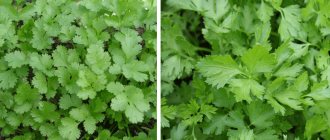
- Arrowheads - they have a flowering shoot emerging from the center of the bulb - an arrow ending in an inflorescence. It consists of bulbs (aerial bulbs) and flower buds, which subsequently dry out without forming seeds. A sign of ripening is the yellowing of the leaves and arrows. All bolting varieties of garlic are considered winter varieties.
- Non-shooting - in such plants only leaves develop during the growing season. These varieties can be either winter or spring.
The best varieties of garlic for planting before winter
For winter planting, varieties with high winter hardiness are recommended.
Shooters
Dubkovsky is a medium-ripening variety - 98–114 days pass from germination to harvest. Productivity 5.6 kg per 10 m2. The bulbs weigh 30 g, round-flat, dense. There are 10–12 cloves in an onion. The taste is spicy. Recommended for cultivation in the Krasnodar Territory, Kurgan, Rostov and Pskov regions.
Jubilee Gribovsky is the most common medium-life variety - 83–122 days pass from germination to drying of the leaves. Productivity is high - on average 12.5 kg per 10 m2. The bulbs are 20–30 g, round-flat, with large cloves. The taste is very spicy. The variety is relatively winter-hardy, resistant to drought, major pests and diseases, and adapts well to different weather conditions. For cultivation in the northern and central regions of Russia, Belarus, Kazakhstan, Ukraine.
Otradnensky is a medium-late variety - 95–135 days pass from germination to drying of the leaves, universal use. The yield is very high - 12–13.5 kg per 10 m2. The bulbs are more than 30 g, round-flat, with up to eight cloves each. The variety is very winter-hardy. Good for growing in the Primorsky Territory and Mordovia.
Parus is a medium-ripening variety - time from germination to harvest: 96–108 days. Gives a yield of 6 to 10 kg per 10 m2. The bulbs weigh 30–47 g, round-flat, dense, store well, and contain 7–10 cloves. The taste is spicy. The variety is winter-hardy. Recommended for cultivation in the Voronezh and Nizhny Novgorod regions, Ukraine, Stavropol Territory and Kazakhstan.
Siberian - medium term - from germination to harvesting 81–113 days, universal. The average yield is 5.8 kg per 10 m2. Bulbs weighing 20–30 g, rounded-flat, with medium-sized cloves (4–5 pcs.). The taste is pungent and semi-sharp. Suitable for cultivation in the Novosibirsk, Kemerovo, Omsk and Tomsk regions.
Non-shooters
Novosibirsk is a medium-early ripening variety - from germination to harvest it takes 68–82 days, for universal use. Productivity 5–6 kg per 10 m2. The bulbs weigh up to 30 g, are round, and store well. There are 9–13 cloves in the onion. The taste is semi-sharp, delicate. Recommended for the Novosibirsk and Kemerovo regions.
Saki - an early variety - 100-115 days pass from germination to yellowing of leaves, universal purpose. Productivity 4.2 kg per 10 m2 Bulbs weighing 20 g, flat and round-flat, with wide cone-shaped teeth. There are 11–13 of them in the bulb. The taste is spicy. Well suited for growing in Crimea.
Garlic varieties for planting in spring
Among spring varieties, a particularly important role belongs to numerous local forms, which are usually very well preserved. Among them:
- Danilovsky (variety of the Yaroslavl region).
- Bryansk, Ufa (varieties of Bashkortostan).
- Cheboksary (Chuvashia variety), etc.
Garlic varieties quickly degenerate, so they must be changed periodically.
Variety selection
The crop can be grouped according to different criteria (winter/spring, early/late). An important sign is the presence/absence of an arrow.
In varieties that produce arrows, one ring of 4-12 identical large cloves is formed. Popular spring and winter varieties:
- Gribovsky Yubileiny is a medium-sized winter crop that exhibits high disease resistance and is well preserved;
- Gribovsky 60 – winter, highly resistant to freezing, not damaged by diseases;
- Herman - large heads are formed, which are perfectly preserved for 7-8 months;
- Gulliver is a spring garlic that belongs to the mid-late varieties (growing season 87-97 days). Large head weighing 250-300 g, consists of 3-5 cloves.
In spring crops that do not produce arrows, smallish segments are arranged in one row, twisted in a spiral. Popular varieties:
- Victorio is a mid-season disease-resistant variety. The bulb weighing 40-45 g is formed from 13-16 teeth;
- Elenovsky is a mid-season variety, characterized by stable yield, 15-19 cloves are tied in a head weighing 18-24 g;
- Sochi 56 - the variety has a long shelf life - almost 2 years. The head weighing 45-50 g is formed by 25-30 teeth. 0.9-1 kg of garlic is dug from a square meter of bed;
- slices of the mid-season Abrek variety have a particularly pungent taste. A head weighing 25-30 g contains 13-15 cloves.
Distinctive features of winter garlic: rich pungent taste, high yield, relatively short shelf life.
The yield of spring varieties is low, but the plants tolerate spring cold well and can be stored with virtually no loss until the next season.
What soil is needed for garlic?
Garlic grows well on fertile, loose, light sandy or loamy soil, in non-flooded areas, with sufficient sunlight; Areas shaded by trees are not suitable for this crop. It does not tolerate either excessive moisture or prolonged drying out of the soil.
It is good if the garden bed is located on a sunny hill and protected from the wind by a fence, trees or bushes. In spring, water should not stagnate there.
Before planting, the soil is dug up, loosened, the roots of perennial weeds are selected and carefully leveled.
When digging, humus (1–2 buckets) and wood ash (2–4 kg) are added per 1 m2. Instead of ash, you can take superphosphate and potassium salt (15-20 g each).
Acidic soil is limed. The bed is prepared two weeks before planting, as it needs to settle a little so that the garlic cloves do not go deep into the ground.
Growing garlic in open ground
The bulbs and cloves of winter garlic are larger and more productive than those of spring garlic, but the latter, due to its many scales, is stored longer. It is better to grow both forms in open ground.
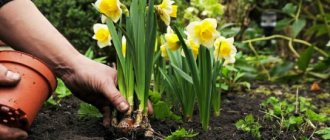
When and how to plant winter garlic correctly
Winter garlic cloves are planted before winter after harvesting vegetable crops. For planting, choose the largest and healthiest bulbs - without a single spot. Small cloves are discarded, only large ones are planted. It is very important to do this on time.
- In central Russia, planting dates are usually recommended from September 15–20 to October 5, several weeks before the onset of persistent November cold.
- Winter garlic is planted in the central regions of the Non-Chernozem Zone in the third ten days of September.
- In the Moscow region, the best planting time is from September 25 to October 5.
- In the northern regions, the dates are moved to earlier, in the southern regions - to later.
Such planting dates are due to the fact that the teeth must take root well before the onset of persistent winter cold.
Following such advice, amateur vegetable growers often make mistakes if, at the end of September - beginning of October, after cold weather, relatively warm weather suddenly sets in. And then not only the roots, but also the sprouts begin to grow actively, and the subsequent November frosts destroy them.
If planting is delayed, the cloves do not have time to take root until the end of October and do not overwinter well. In spring, such seedlings, at best, turn out sparse and frail. To avoid mistakes, it is advisable to know a long-term and reliable weather forecast.
Planting scheme for winter garlic
Teeth of the same size are planted in two lines. The landing pattern is as follows:
- the distance between rows is at least 20 cm;
- between teeth in a row – 8–10 cm;
The planting depth depends on the type of soil: on light soils it is 8-10 cm from the top of the clove to the soil surface, on heavy soils - 5-6 cm. Shallow planting of garlic can lead to the fact that when the temperature drops to minus 15 C, a significant part of the plants may die.
For each square meter you need 50 cloves, or 300 g of garlic (6-7 heads).
Although garlic is a cold-resistant crop, in November-December the snow “coat” is still too unreliable and thin, so it is better to insulate the bed by sprinkling it with peat, well-rotted manure or loose compost soil with a 2 cm layer.
Such mulching will serve well in early spring, as the soil will warm up faster. In addition, mulch will prevent the soil surface from forming a crust and will help conserve the moisture that garlic so needs. As a result, this technique alone significantly stimulates the development of young plants, increasing the yield by 10–15%.
How to grow winter garlic from bulbs (aerial bulbs)
Typically, aerial bulbs are used to obtain planting material - sets. One or two days before harvesting the garlic, the shoots are cut off, leaving 2–3 cm above the bulb, tied into sheaves and left under a canopy for 25–30 days.
If you plant bulbs before winter, next year they will produce single-toothed bulbs (sets), which will be the planting material.
Before sowing, the aerial bulbs are separated from the shoots by shaking and then calibrated. The smallest ones (less than 2 mm in diameter) are not suitable for sowing, since they produce very small single-toothed bulbs. It takes three years to grow them into bulbs that can be divided into cloves.
Bulbs are sown in the third ten days of September, like garlic cloves, on the ridges in lines, between which a distance of 10–15 cm is left. On one square meter of ridges, 8–10 g of bulbs are sown to a depth of 3–4 cm. The crops are mulched with peat or humus with a layer of 2 cm.
The next year after the emergence of seedlings, the plants are fed with nitrogen and potassium fertilizers: 10–15 g of ammonium nitrate and 5 g of potassium salt per 1 m2. The crops are watered, the row spacing is loosened shallowly, and weeds must be removed.
When the leaves turn yellow and dry out, the plants are dug up, single-toothed bulbs are selected from the soil, dried and prepared for autumn planting.
Single-clove onion sets are planted in the same way as garlic cloves. In the second year, normal shoots and bulbs are obtained, divided into cloves.
Growing garlic from bulbs (how to rejuvenate garlic) - video
Aerial bulbs can also be sown in spring. To do this, they are stored in a cold (2–5 °C) or warm (18–20 °C) room in sheaves, unthreshed. This way they are better preserved. Early spring sowing of aerial bulbs after cold storage results are almost no different from winter sowing.
After warm storage (18–20 °C) and early spring sowing, well-developed plants grow: their growing season is longer than that of plants sown in winter and cold storage. They produce large sets, but of a later ripening period.
If you did not have time to sow garlic in early spring, you can do it in June. In this case, the plants do not form a bulb and continue to grow until winter. After overwintering in the soil, the next year they grow and develop in the same way as bolting garlic plants grown from cloves, but produce a smaller bulb.
How to plant spring garlic correctly in spring
Two to three weeks before planting spring garlic in open ground in the spring, the storage temperature of the planting material is reduced from 18-20 to 2 C. Immediately before planting, the heads are divided into cloves and the largest of them are selected.
After preparing the soil, it is carefully leveled with a rake, longitudinal grooves are made, the distance between their centers is 20 cm, between the cloves - 5-6 cm.
Planting depth is 2-3 cm. The teeth should be planted in the center of the groove, bottom down. Shoots begin to appear after 13-15 days.
Brief description of cultivation
- Landing . Garlic should be planted in open ground no later than the first half of April, and the site should be prepared in the autumn. Winter planting from mid-September to the second half of October is also suitable for garlic.
- Illumination . The area should be sunny or shaded.
- Soil . Moderately moist and nutritious loam, which should be neutral, is best suited for growing such a crop.
- Watering . During the dry season, you need to water the garlic generously (take 10 to 12 liters of water per 1 square meter of bed). The garden bed stops being watered in August.
- Fertilizer . When the seedlings appear, they should be fed with urea or mullein; repeated feedings are carried out at intervals of 15 days. During one season, the bushes will need to be fed only 4 times.
- Reproduction . Vegetative - using teeth.
- Harmful insects . Caterpillars of garden, winter, cabbage and gamma cutworms, centipedes, onion moths and flies, mole crickets, stem nematodes, secretive proboscis, tobacco thrips.
- Diseases . Gray, white and neck rot, downy mildew, jaundice, fusarium, helminthosporium, smut, rust, viral mosaic, tracheomycosis.
Caring for garlic in open ground
Caring for garlic plants consists of systematic loosening to a shallow depth (4-5 cm) so as not to damage the root system, killing weeds, watering and fertilizing.
How to water garlic
During the period of active growth of garlic plants, the soil should always be moist. The lack of sufficient moisture reduces yield and reduces the number of cloves in the bulbs.
Spring garlic is more moisture-loving than winter garlic and needs watering. It is necessary to water until mid-June. But garlic also cannot tolerate waterlogging of the soil.
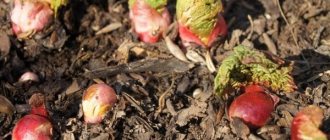
How and what to feed garlic after winter so it doesn’t turn yellow
The leaves of winter garlic begin to grow very early, when the snow has not yet melted everywhere. However, often instead of bright green young shoots, gardeners see pale yellow and frail ones. The reason lies in insufficient plant nutrition. To prevent garlic planted before winter from turning yellow, water your plantings in the spring with a solution of ammonium nitrate (dissolve a matchbox of fertilizer in a bucket of water).
Carry out the second feeding around mid-May. At this time, plants are usually fed with a mixture of mineral fertilizers: ammonium nitrate, superphosphate and potassium salt (10, 20 and 10 g per 1 m2, respectively).
How to water garlic in the spring so that it doesn’t turn yellow if you want to do without “chemicals”? In this case, it is better to use organic fertilizers for fertilizing, for example, a weekly infusion of fresh chicken manure (compared to mullein, it contains more nitrogen).
If the plantings dry out, water the soil abundantly, starting from the third ten days of May and throughout June. I periodically loosen the ground with a hoe and weed the weeds, preventing them from growing back.
The last, third time, the garlic is fed at the end of June, when the bulbs are finally formed. Summer food is an infusion of mullein (1 liter of fertilizer is diluted in a bucket of water) or an infusion of weeded weeds growing on a compost heap, in the same concentration. You can limit yourself to feeding with superphosphate (5 tablespoons per 10 liters of water). Since this fertilizer is poorly soluble in water, first boil it for 30 minutes in a mug of water, stirring frequently.
How and what to feed spring garlic
Spring garlic shoots begin to appear 13-15 days after planting. During mass germination, the soil surface must be loosened and fertilized with nitrogen fertilizer. To do this, 15 g of ammonium nitrate is dissolved in 10 liters of water and poured evenly into the grooves at the rate of 10 liters per 1 m2. When the liquid is absorbed, the grooves are covered with dry soil.
The second fertilizing with nitrogen and potassium (potassium chloride) fertilizers should be given in the phase of formation of four leaves at the rate of 20 g per 10 liters of water.
The third feeding - potassium and phosphorus (superphosphate) fertilizers - in the seventh leaf phase - at the rate of 20 g per 10 liters of water, solution consumption 10 liters per 1 m2. After each feeding, water the garlic.
Care
Mulched garlic.
Watering
Garlic does not tolerate excess moisture well, however, it requires constant moderate watering.
This is especially important during the growing season - from the beginning of spring until the appearance of the first teeth. Watering rates depend on the density of the soil. Water should penetrate the soil to a depth of about 30 cm. The time between waterings is one week.
Watering
The first watering is carried out at the end of April - beginning of May and is usually combined with the next feeding. A month before harvest, watering is stopped. The harvest of winter garlic occurs at the beginning of August, and for spring garlic - from the third ten days of August.
Feeding
In addition to fertilizing before planting, garlic needs to be fed 2-3 times during the season. It responds very well to fertilizing, especially phosphorus and potassium fertilizers.
Autumn fertilization
The winter variety is fed for the first time as soon as the snow melts. The composition of the fertilizer is as follows:
- Ammonium nitrate – 6 g
- superphosphate – 10 g
- potassium sulfate – 5 g
All standards are indicated for an area of 1 sq. m.
The second and subsequent feedings are carried out at intervals of 1 month. In June, feeding stops.
Fertilizing spring garlic is done in a similar way, but with a time shift due to planting dates . The first feeding occurs at the beginning of May, the second at the beginning of June, the third at the beginning of July.
Additional care
Garlic practically does not require any additional care, since thanks to the substances included in its composition and its size, it is able to compete perfectly with almost any weed.
Adding humus
You can also loosen the soil after each watering, but there is no urgent need for this.
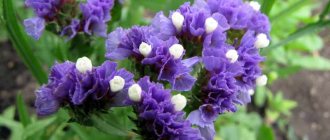
The only thing a plant needs for good yield is the timely removal of flower stalks as they appear.
However, you should not get too carried away with the process and remove flower stalks from all plants. Usually, 1-2 plants are left on each row, which are allowed to bloom and form bulbs . This is necessary to obtain part of the planting material from the flowers in order to avoid the degeneration of garlic.
Harvesting
When cultivating garlic, it is important not to miss the deadline for its harvest, since overripe bulbs begin to disintegrate into cloves, which immediately tend to begin germination.
Therefore, as soon as the garlic shows the first signs of ripening, it must be harvested.
These signs include:
- the appearance of a dense membrane at the heads
- clear visualization of teeth
- color change of lower leaves from green to yellow
Harvesting
About a week before digging up the garlic, it is recommended to rake away some soil from it and expose the top of the bulb - this will slightly speed up its ripening.
Baring bulbs before harvest
Tips for growing garlic in large heads
Around the twentieth of June, garlic shoots out flower shoots, at the end of which aerial bulbs (bulbs) develop. Several of the most powerful arrows that appear first can be left for seed. The rest are gradually removed at the formation stage, when they are good as vitamin-rich greens for salads and canning.
Timely breaking out the arrows at the very base, from the axils of the leaves, increases the yield and allows you to grow large garlic.
Do I need to tie garlic after the shoots break? Practiced by some vegetable growers, tying the garlic arrows in a knot does not give anything, since the development of the arrows does not stop, and a good half of the nutrients do not enter the bulb.
Harvesting and storing garlic harvest
A few weeks before harvest, stop watering the garlic. To determine if the garlic is ready to harvest, inspect a few bulbs, thoroughly scraping away any dirt.
When to dig up garlic planted before winter
A sign of garlic ripening is the cessation of the formation of new leaves. In non-shooting varieties, the leaves turn yellow, in shooters, the caps on the bulbs crack, dense wrappers form on the bulbs, and the head becomes ribbed.
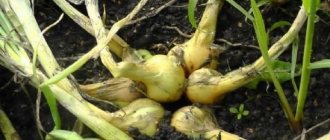
As soon as the leaves begin to turn yellow and dry out, the garlic is ripe. Now you can’t delay cleaning - if you delay, the cloves will tear the wrapper and fall apart, such heads will be unsuitable for long-term storage.
Garlic is harvested in dry weather. Ripe bulbs are dug out with a pitchfork, carefully selected from the soil and laid out in rows for several days to dry under the sun.
Then the roots and stem are trimmed with pruning shears, leaving about 1.5 cm. If the stem is shorter, the hard scales of the cloves can be damaged, and then the garlic will not be stored well.
When to Harvest Spring Garlic
Depending on the variety and weather conditions, spring garlic ripens at the end of August and September. Main signs of ripeness:
- tops lodging;
- drying of the lower leaves;
- yellowing of the upper leaves;
- death of roots (they become thin, dark).
For cleaning, you need to choose dry weather. You cannot delay harvesting, as in rainy weather garlic forms new roots and sprouts. The bulbs are dug up with a shovel or pitchfork and selected from the soil. Dry them in the air or indoors until the leaves are completely dry.
Then the bulbs are cleaned of the remnants of adhering earth, the roots and false stem are cut off 4–5 cm above the shoulders. After this, the garlic is finally dried (it should rustle when stirred) and stored.
Pests and diseases
What causes garlic, and what other enemies does it have in the open ground? The diseases and pests of garlic and onions are almost the same. Of the diseases, the most dangerous are white, neck and gray rot, helminthosporium, fusarium, smut, jaundice, downy mildew (or downy mildew), mosaic, rust and tracheomycosis.
Of the insects that most often cause trouble for garlic, the onion secretive proboscis, tobacco thrips, stem nematode, caterpillars of winter, cabbage, garden and gamma cutworms, sprout and onion flies, mole crickets, onion moths and centipedes.
- What is the difference between amaryllis and hippeastrum?
Garlic processing
We could list disease and insect control products that will help you deal with almost all of garlic's enemies, but before you treat an area with an insecticide or fungicide, remember that the head of garlic absorbs both nutrients and poisons that you will later eat. Isn’t it better to try to avoid a situation in which you have to risk either the crop harvest or your own health?
The key to a rich harvest of high-quality garlic is compliance with crop rotation and agrotechnical requirements of the crop: do not plant garlic in the same bed until 4-5 years have passed; Treat the storage area two months before planting garlic with a solution of 400 g of bleach in 10 liters of water and take the pre-sowing treatment of cloves and bulbs seriously. The health of the seed, in addition to the processing methods we have already described, can be ensured by heating the cloves at a temperature of 40-42 ºC for 10 hours.
How to store garlic in winter at home so as not to dry out
It is better to immediately process the bulk of the harvest and make preparations for the winter. The rest is stored until spring in a room where in winter the temperature is kept quite low but positive with low air humidity. The prepared heads are placed in boxes, baskets or mesh bags, and can be woven into braids.
At a temperature of 1-3 C they will remain juicy and fresh for a long time and will not germinate or dry out until spring.
Experienced vegetable growers know how to properly store garlic at home at room temperature. There are two reliable methods suitable for a city apartment:
- Well-dried heads of garlic are placed in a canvas bag, tied and placed in a plastic bag, leaving it open.
- Another method is to take a jar or pan, pour a 2-3 cm layer of salt on the bottom, then put in the heads of garlic and cover with salt again, etc. The top row must be covered with salt, but it should not be raw.