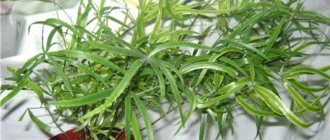
As soon as one violet appears on your windowsill, you will certainly want to transform your entire apartment by decorating it with these wonderful flowers. It's hard to resist temptation when there is such a great variety of violets and so many different colors!
A simple way out of not spending money on buying a new plant every time is to start breeding it yourself .
Propagation of violets by leaf
Propagation of violets by leaf is the simplest, most successful and, therefore, most often used method at home. In the spring, during the active growing season, a middle-aged leaf with a petiole 2 to 5 cm in length is cut from an adult violet from the second or third row of the rosette (under the peduncle). If the cutting is long, cut off the excess with an oblique cut. For some time, about half an hour, the cut cuttings should air dry.
Leaves that are too young or too old are not suitable for propagation, as are the outer ones. Leaves from the center of the rosette are also not suitable, because they have not yet acquired enough strength and nutrients. The leaf should be without defects or damage, juicy, bright green.
You can root the selected leaf or its cuttings both in water and in the substrate. Do not use all kinds of preparations, so-called rooting accelerators, to root violets. They often do harm than good, since violets have a very delicate tissue structure, and the use of chemicals can cause burns and subsequent rotting. To prevent fungal infections, treat the cut of the cutting with crushed activated carbon.
How to root a leaf in water
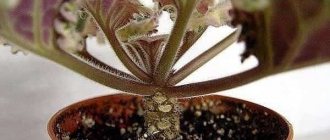
If you decide to root a violet leaf in water, do it this way. Pour settled water at room temperature to a depth of 1 cm into a glass, preferably a dark one with a narrow neck. You will have to maintain the water level in the glass at 1 cm throughout the entire rooting period (top up as it evaporates).
After the roots appear, you should plant the violet cuttings in a small pot with good drainage and light, loose soil. The seedling needs to be watered frequently so that the substrate does not dry out. You can make a small greenhouse using plastic film. After a month or so, violet babies will appear at the end of the cutting - tiny rosettes of leaves that are ready for planting in normal soil (for Saintpaulias or indoor violets).
How to root a leaf in the ground
If you decide to root the violet leaf directly in the substrate (it is better to use sphagnum moss cut into pieces), do it this way. Treat the cut, slightly air-dried cuttings with crushed activated carbon and plant at an angle of 45 degrees. to a depth of 1 - 2 cm into the moistened substrate, which fills a plastic cup. There should be a drainage hole and a layer of expanded clay or foam at the bottom of the cup. Place this cup in another one, used as a tray. There you will pour warm, settled water to moisten the substrate.
Cover the composition with the cuttings with a plastic bag with holes made in it. This is done to remove condensation from the mini-greenhouse. If you use a transparent plastic container with a lid, then, if necessary, the container will need to be ventilated and the substrate moistened. Choose a place for the greenhouse that is bright and warm. When small leaves of new rosettes appear from the substrate at the end of the cutting, you will understand that rooting has been successful and the seedling is ready to be transplanted into its own small pot with soil suitable for violets.
The rooting of the violet was successful
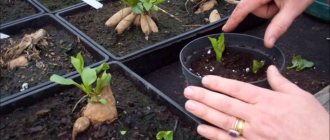
If several babies hatch at the rooting site, and this happens when you have chosen a strong cutting, replant the babies one by one. The best option for further transplanting each child is to wait until it acquires two or three leaves, is about 3–5 cm in diameter and gains strength. After this, you can separate the violet baby along with its roots from the mother leaf and plant it in the ground.
This may be interesting: Catharanthus - care and propagation at home
There are two ways to separate a baby from a cutting:
- Carefully remove the leaf cutting from the pot and shake off the soil from the roots. Using your hands, carefully separate each baby from the cutting and other babies. In this case, all children should be seated in separate small cups 4 cm in diameter.
- Do not remove the leaf cutting from the pot, but cut off the grown baby, which has already formed roots, with a clean blade (sharp stationery knife) and plant it in a separate pot with loose soil, which should contain sphagnum moss and vermiculite. Do not touch the remaining children - let them continue to develop on the mother's cuttings. When they grow up, you will also separate them from the cuttings and plant them in your own pot.
Make sure that when transplanting children, the growth point of the seedling is not buried. In about a month, or maybe more, your children will grow up so much that the size of their rosette will be three times the diameter of their pot. Now you need to transplant the young plants along with a lump of earth into their permanent pots according to all the rules for transplanting adult plants.
Rooting a violet leaf in a soil mixture
Leaves planted immediately into the ground take root well, and the process of growing violets from leaf cuttings goes much faster. This method is indispensable when, to propagate violets, they took a leaf from a still young, immature plant or, conversely, the planting material received was already withering.
The leaf is prepared in the same way as in the first case, but the stalk on miniature varieties is shortened even further, leaving only a centimeter to one and a half.
Small cups or pots with a volume of up to 100 ml and a diameter of about 5 cm are well suited for planting. The containers are filled one third with drainage material. If it is expanded clay, it would be a good idea to calcinate it in the oven to minimize the risk of the spread of fungal and mold infections.
Next, pour the soil mixture into the cup and make a hole for the cutting. To fill this depression, they do not use ordinary soil, but mixed with perlite for looseness. In this case, it will be easier for small rosettes to develop and receive the necessary air.
Sometimes you can see advice on growing violets on pure perlite. However, such a solution can result in the death of fragile plants, since perlite without other soil components does not retain moisture well and dries quickly.
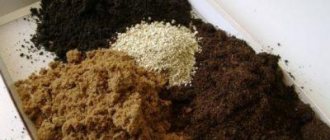
The composition of the soil for violets includes not only perlite, but also sphagnum moss, which retains water and has an antibacterial effect.
When planting, the soil mixture should be slightly moist. Planting material is buried in the ground no more than 5 mm for miniature varieties and 1–1.5 cm for standard-sized violets. By watching a video on how to propagate violets with leaves, you can learn a lot of interesting things about the intricacies of this process and subsequently avoid annoying mistakes. You can plant several leaves in one cup, the main thing is that they are of the same variety and carefully labeled.
As in the first case, when cuttings with formed roots were planted in the soil, the soil is slightly squeezed, moistened, and the glass is placed in a greenhouse. To prevent mold from forming on the soil and plants from rotting, the plantings are ventilated from time to time, protecting them from drafts and cold air.
A good result is obtained by planting leaves intended for propagation of violets in peat tablets. Due to the loose, nutritious substrate, plants quickly form roots and young rosettes.
How to grow a violet from a leaf? What conditions are important for a young plant, and how to care for the sprout so that it takes root successfully and quickly? The most important condition for the success of the growing process can be considered constant attention to the tiny violet plant, which is provided with:
- light, nutritious soil that is permeable to air and moisture;
- stable growing temperature of about 22–26 °C;
- daylight hours lasting at least 12 hours;
- regular and uniform watering;
- constant humidity and protection from wind.
Violets feel very good on racks equipped with lighting from phyto-lamps, providing plants with comfortable conditions for growth even in autumn and winter.
Propagation of violets using a leaf fragment
If you ordered some unusual variety of violet on the Internet, and the leaves arrived in the mail in a deplorable condition - frozen, rotten, broken in half, the stem rotted or broken off - do not be upset. After all, even a small but healthy part of the leaf is suitable for propagation. Every vein can give you children. Halves, quarters and even fragments of cuttings with one sq. take root well and produce offspring. cm leaf plate. Babies can appear from all the veins found in the substrate. They are, however, smaller and weaker than those children obtained in a different way. And they grow a little slower. Therefore, this method is used only when it is not possible to root a whole healthy leaf with a cutting, when you have no choice, and you are afraid of losing a rare variety that is special to you.
If you only have a rotten leaf, try to cut out the rotten area with a clean blade, touching the healthy part of the leaf. Wash the leaf in a solution of potassium permanganate to stop the rotting process. Now cut out fragments from the healthy part of the leaf blade so that the piece remains with a vein, albeit not a central one, but a lateral one, but this will be one of the conditions for successful rooting. It happens that leaf blades without cuttings, planted in this way, produce babies faster, and their number is greater.
How to cut out sheet fragments correctly
The main thing is to cut the violet leaf with a very clean and sharp blade or stationery knife. If there was rot on the leaf blade, the blade should be disinfected after each cut (for example, dipped in a glass with manganese or wiped with alcohol). All lines should, if possible, be carried out with minimal damage to the lateral veins.
This may be interesting: Types and varieties of indoor Anthurium (Male happiness)
You can divide the entire leaf into segments and plant each segment in a mini-greenhouse. Each segment will produce its own children - rosettes of leaves.
You can cut each leaf so that you first cut out the central vein, and then cut each half of the leaf into three parts. Each piece should have a side vein running from the central vein to the edge of the leaf.
You can cut two or three strips from the healthiest part of the leaf, each with two veins. There is a high probability that babies will appear from each vein of the leaf.
A fragment cut along the veins from the upper third of the leaf also takes root quickly and successfully. In this case, each vein forms a daughter rosette, and their total number is greater.
If the variety has wavy edges, simply trim the excess curls in a circle and then work with the flat surface of the leaf as needed
You can cut the sheet in half. Place the top part of the fragment along the cut into the substrate. The lower half of the leaf can be rooted in turn - you will have more children from one leaf.
If your cutting is rotten, cut it to the healthy part of the leaf so that from the central vein you get a homemade small cutting - a stalk, about 1 cm in length. You will root it in the substrate.
No matter how you cut your leaf, after this operation you need to leave all the fragments in the air alone for 15 - 20 minutes so that the sections are covered with film, and only then you can start planting them in the ground.
- prepare a weak solution of pink potassium permanganate, dip the fragments prepared for planting into it for 20 minutes;
- remove from the solution and thoroughly dip the edges of the cuts into crushed activated carbon;
- Dry for 10 - 15 minutes, and only after that place each fragment in an individual greenhouse.
As a greenhouse for future violets, you can use two 50 ml and one 100 ml cups with different bottom areas. In one, with drainage holes, with foam plastic as drainage and sphagnum moss as a substrate, the fragment will take root; use the second 50 ml glass as a tray, in which there will always be water. (There should be space between the cups for this water). You can cover these cups with a large 100 ml glass to create a mini-greenhouse. Don't forget to ventilate it occasionally to remove excess condensation. To make babies appear faster, we recommend lighting the greenhouse.
Choosing a leaf for rooting
To propagate violets with a leaf, it is better to choose the one located under the flower arrow. They are considered more suitable for germination. In addition to this rule, there are several more conditions that it is advisable to observe when selecting leaf cuttings:
- It is worth considering that any Saintpaulia leaf on a bush has a lifespan of about 1 year and then dies. For propagation, it is better not to take outdated leaves from the bottom of the bush. You can get high-quality seedlings from strong, well-developed cuttings from the middle of the plant.
- Flower growers believe that a leaf blade that is too large does not indicate the quality of the cutting. Most of the daughter rosettes appear on the cut of the leaf with the middle blade.
- The leaf stalk should have good turgor and a thick petiole.
- You can’t take limp, spotted, rotting leaves for propagation. Planting material must be completely healthy, without visible signs of disease.
How to cut correctly?
You can cut a leaf from a bush at will, trying to get the longest petiole. But before you root the violet leaf, you need to make the right cut to get as many seedlings as possible.
The cut is made with a sterile sharp instrument (razor blade, stationery knife, scalpel). This allows you to avoid crushing the succulent tissues of the cutting, and it gives roots faster. The cut is best made at an angle of 45° to the main axis of the leaf petiole (pedicle). After this, it is allowed to air for 30 minutes, and when rooted in the ground, it is dipped in ground charcoal or activated carbon.
Reproduction of violets using stepsons
Sometimes, due to the high nitrogen content in the soil, small shoots appear in the axils of the violet leaves. These are the stepsons of the violet, in other words, daughter rosettes. Stepchildren spoil the appearance of the plant and are usually removed.
If you need this stepchild to propagate your violet, do so. Wait for four to five leaves to appear on the left stepson. Now that the stepson has become like a baby, it can be cut out from the mother’s rosette of leaves and rooted in a loose, damp substrate (wet sphagnum moss will do) in any container with a lid. After successful rooting, when the young rosette begins to grow, transplant it into your small pot according to all the rules. The whole process will take about two months. As a result, you will have a new varietal violet.
You can plant other stepsons in the same way. If they are not needed, remove them immediately so as not to spoil the decorative effect of your Saintpaulia. If necessary, plant them one by one as they grow.
This may be interesting: Bougainvillea - growing at home
How to propagate a violet with a peduncle
As soon as the peduncle grows to its maximum height and its buds bloom, the flowers are carefully cut off. The peduncle itself is cut off as close as possible to the point of its growth from the rosette. There should be a fork with 2-3 green leaves left. The lower end is immersed in soil for violets and must be covered with a transparent cap on top, leaving in a warm place (20-22 ° C). Water the pot with a pipette very rarely and carefully, since waterlogging is detrimental to the peduncle and its roots. Rooting takes 2-3 months.
Violet propagation using root shoots
Sometimes, adult violets, growing, form basal rosettes. Often, these children interfere with the development of the mother’s bush. In such cases, they should be separated and transplanted into separate pots (or simply removed). It is best to carry out the procedure for separating daughter rosettes in the summer - then the mother plant will be able to restore its strength and prepare for the coming of winter.
So, you decided to propagate your violet with the help of children. To do this, proceed as follows:
- Carefully dig out the daughter rosette (baby) from the ground with some sharp, clean object. Try not to damage the mother bush.
- If the baby has few roots but a lot of leaves, remove some of the leaves to make rooting easier.
- Place the baby in a small (5x5) pot with loose substrate, similar in composition to the soil in the mother pot.
- Moisten the soil moderately.
- Cover the pot with a jar or polyethylene to create a microclimate.
- Place the mini-greenhouse in a warm place with plenty of diffused light.
- Ventilate Saintpaulia every day and moisten the soil if necessary.
After a week or two, the shelter can be removed, the baby should strengthen herself and begin an independent life.
Step-by-step instructions for leaf propagation
This is one of the available ways to breed violets. It can be done even by an inexperienced gardener. Only the chimera violet does not reproduce in this way.
Choosing the right time
Indoor violets should be propagated in the spring. Firstly, the air temperature is comfortable; violets do not tolerate heat well.
Secondly, the length of daylight hours gradually increases. And thirdly, all living things around wake up. But if you urgently need to save a plant, then this is done both in winter and in summer.
Which leaf to cut
Whatever planting material you choose, this will be the future plant. Requirements for the sheet:
- Healthy, strong, elastic;
- The color is characteristic of this species;
- No stains or damage.
IMPORTANT! If more than 5 hours have passed from the time of cutting to planting, the leaf must be placed in water for 2-3 hours. Adding a drop of manganese to water
Then dry and cut 3-4 cm from the base of the stem.
It is not recommended to cut off the leaves at the base. The second and third tier are suitable for this purpose.
Favorable conditions for rooting
The container with planting material is placed in a greenhouse, which must be ventilated to prevent excess condensation. If you planted a rotten or unhealthy leaf, then do without a greenhouse.
Microbes living on the leaf multiply faster when there is excess moisture and there is a chance of destroying the fragment. Additional lighting is not needed for the appearance of roots. Light is needed when the first leaves appear.
Rooting methods
There are two ways for a leaf to produce roots. Faster if planted in soil. And longer in time, but not worse in quality, in water.
Pour boiled water or plain water with the addition of activated carbon into a dark vessel with a narrow neck. We lower the cutting into water 10 cm and fix it with paper. Place in a dark, cool place. Add water periodically until roots appear. Transplant into the ground when the roots reach 1-2 cm. They appear in 25-36 days.
The advantage over the soil method is that you can observe the appearance of roots.
Priming
Pour drainage (expanded clay, stones, shell) into a small container and fill the top with soil. It should be loose and light. Pour perlite into the middle of the pot (promotes better rooting of cuttings) mixed with soil. We deepen the leaf by 1.5 cm. Place it in a greenhouse or cover it with a bag/film. As the soil dries out, water it. The roots appear in 14-21 days.
If you notice that the leaf has deteriorated: trim the base, cover it with ash, dry it and place it in new water or soil.
Using a sheet fragment
This method is used if there are few leaves on the plant, a rare variety of violet, a leaf intended for planting has begun to rot, etc. In any of these cases, a fragment of the sheet is used.
Preparation and planting
Removal is carried out with a sharp stationery knife, treated with alcohol or over fire.
The sections are treated with activated carbon or immersed in a solution of weak manganese for 10-15 minutes. Afterwards, dry and begin to separate into fractions.
REMEMBER! Only fragments that have a vein will give birth to offspring!
Experienced gardeners believe that 1/3 of the upper part of the leaf is suitable for propagation. But if necessary, the entire leaf is suitable for propagation.
It should be noted that with this method there will be more children than with any other.
Seating the children
You can speed up this process by creating the most favorable conditions for growth.
THIS IS INTERESTING! In some varieties, babies appear with white leaves. In this case, experts recommend placing them in a greenhouse for development and landscaping. And only then replant.
If there are many children on a leaf, we separate the big ones and leave the small ones to grow.
If the roots of the “mother plant” were not damaged during separation, when replanted it will produce a second “offspring”.
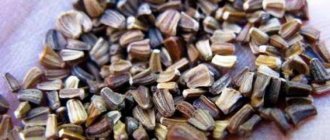
How to grow violets from seeds
The first indoor violets (Saintpaulias) were grown from seeds of wild specimens back in 1892. Currently, there are about 16 thousand varieties of this wonderful flower. It turned out that propagation of violets using a leaf or its fragment is much more likely to lead to success than propagation by seeds, since it is extremely difficult to preserve tiny seedlings obtained from seeds and provide them with suitable conditions for existence.
To germinate seeds, use containers with lids no more than 5 cm deep. The substrate must be loose and consist of peat and sand. It is poured into a container in a layer of up to 4 cm and moistened. Seeds must be planted as follows. Place them evenly on the damp surface of the substrate, at a distance of 2 cm from each other. Close the lid. Maintain the temperature in the greenhouse at about 22 degrees. in the afternoon and about 18 degrees. at night. If necessary, ventilate the container and moisten the substrate using a fine spray bottle with warm, settled water.
The seeds germinate quickly and amicably. After 20 days you can already see tiny leaves on them. If you are in a hurry to transplant them, proceed with caution, as the root system of the seedlings is thread-like and very weak. You may accidentally destroy it. Grow the transplanted specimens in mini greenhouses, under a lid, until they become stronger and grow to a size suitable for transplanting into small independent pots.
Common mistakes and main reasons for rooting failures
- Poor soil or substrate . It must be loose and not too sour. To avoid the accumulation of excess moisture, you need to use drainage.
- Incorrect watering . If you water the rooting leaves weakly or irregularly, you will not be able to achieve any results. Plants will not grow roots in soil that is too dry.
- Excessive penetration into the soil . Very often, when planting a leaf with a long stalk, beginners completely bury it in the ground, right up to the leaf blade. This cannot be done; most likely in this case the cutting will rot before it takes root. And if it does, after a long time, the plant will initially be weak.
- The leaf is in direct sunlight . In this case, it will most likely receive severe burns and the roots will grow very poorly and slowly.
- The stalk is rotting . This is due to the fact that disinfectants were not used during rooting.
You can learn about other mistakes when propagating violets from the video:
Propagation of violets using peduncles
Experienced flower growers and breeders propagate violets using this method. But for the propagation of violets - chimeras - this is almost the only possible option, since with other methods their decorative features are lost.
Select a blooming or already faded flower with large stipules from the mother bush. Don't take buds, they won't fit. Cut out the flower stalk with a clean, sharp blade or knife. Air dry for 10-15 minutes, treat the cut with crushed activated carbon. It is better to root in a greenhouse with high humidity. As a substrate, use a mixture of chopped sphagnum moss and perlite. You will see that the peduncle has taken root when a young rosette appears near the stipule. Wait a little until it develops well, only then can it be transplanted into a pot with Saintpaulia soil.
General information about the plant and methods of its propagation
Violet is a low perennial with a short stem and pubescent leaves. The leaves grow in the shape of a rosette. Place of natural growth - all regions of Africa. The species belongs to the Gesneriev family.
Varieties of violets
Violets are propagated in several ways:
- The fastest is propagation using a whole leaf or part of it.
- Seed method.
- Method of rooting a peduncle.
- Stepchildren or cuttings.
To choose a specific method, it is advisable to study each in detail.
There are several ways to propagate violets by leaf.
This is the easiest way to root violets in water. With it, you can control the condition of the cutting, which will help prevent its possible rotting. For rooting in water, it is advisable to take dark glass dishes. This will prevent the formation of green deposits on the walls of the container.
Rooting in water
The leaf is placed in the water so that it does not touch the walls of the container or the bottom. To fix the cutting in this position, use cardboard or thick paper, which is placed on top of a container of water. A hole is made in the middle and the cutting is placed there. It should be immersed in water by 1.5-2 cm.
The formation of roots should be monitored daily. In good conditions, roots appear after 3-4 weeks. If rot has formed at the cut site, then the cutting is removed from the water, the rotten area is cut off and again immersed in clean water.
Rooting a violet leaf in a peat tablet gives excellent results. After all, it contains a loose and at the same time nutritious substrate.
In a peat tablet
Rooting in a peat tablet is convenient because the resulting rosette of violets can later be transplanted into a pot without disturbing the delicate roots.
Quite quickly, violet leaves quickly take root in vermiculite. A mixture of vermiculite and peat is also suitable for rooting.
In vermiculite
The main advantages of this type of rooting:
- good breathability of the substrate;
- looseness;
- retaining the required amount of moisture.
To root in vermiculite you need to take a disposable cup and make holes in it. Place about 2-3 cm of drainage at the bottom of the glass. After that, the glass is filled with vermiculite and peat, taken in equal parts. To disinfect the mixture, it must be mixed with Fitosporin powder. It will protect the cuttings from rotting processes and fungal growth.
After planting, you should make a greenhouse from a plastic bag. In this regard, zip bags are convenient. The bag should be of such a size that the entire cup fits in it, and there should be a space of 2 cm above the sheet.
The glass with the violet leaf should be in a bright place, without direct sunlight. The germination temperature should not fall below 20 degrees.
You can root the leaf either in a pot or in a small amount of substrate poured into a transparent bag. The ideal option is ziplock bags. A small amount of Saintpaulia soil mixed with vermiculite is poured into the bag.
In a transparent bag
The cutting is placed in the substrate at an angle of 45 degrees and tightly closed. Hang the bags or place them on a flat surface. From time to time they are opened slightly for a few minutes for ventilation.
In the soil mixture
The leaf is placed in the soil at an angle of 45 degrees to a depth of no more than 2 centimeters. To prevent the sheet from touching the substrate, a support (a match or a toothpick) is placed under it. To create greenhouse conditions, it is covered with a transparent bag or glass on top.
Transplantation of cuttings rooted in cups of soil is carried out after the diameter of the newly formed leaves reaches 3-4 centimeters.
Violet can be propagated by dividing the leaf into parts. This method is used if the leaf rots. This method is especially useful if you need to preserve valuable or rare varieties. You can even divide those leaves that have already begun to rot. The main thing is that at least one vein remains on the leaf fragment.
Fragments of a sheet
For this type of propagation, the leaf is separated from the mother plant, the upper part is cut off, and a fragment of the leaf is slightly dried, about 2-3 minutes. During this time, the sheet should be covered with a film. After which the cut is treated with activated or charcoal.
Transplantation into a nutrient substrate
After numerous strong roots about two centimeters long appear on the leaf cuttings, it is time to replant it in the soil mixture. In some cases, flower growers do not remove planting material from the water until tiny rosettes appear on the cuttings. They are not buried in the substrate. But in this case there is a danger of slowing down their development and growth. What is the best way to root a violet leaf that has already given roots?
Prepare small plastic glasses and make holes in them to drain the water. Fill them a third with fine drainage, and then fill them to the top with soil. The cuttings and leaves should not be deeply buried, since the emerging rosettes will take too long to make their way to the surface. As a result, they will weaken and may not hatch at all. The soil around the cuttings is slightly compacted, moistened with a sprayer, and in this form the cups are placed in a greenhouse or simply covered with a bag to create a microclimate and retain moisture.
If you simultaneously grow violets from leaves of several varieties, the cups must be signed, indicating the name of the plant and the date of planting. The plants are taken out from under the film after the young foliage appears above the soil level. This usually takes at least half a month.
Bright flower bed on the windowsill
The extensive violet family is a perennial herbaceous plant with evergreen foliage. Plants mature quickly, reaching a height of 10-20 cm. The stem is formed from the leaves of the basal rosette. The leaves are round in shape, pointed towards the edge. They are dense, leathery, covered with soft hairs. The leaf blades of violets come in various shades of green, and in some varieties they are spotted. Buds with five petals, wide range of colors: pink, blue, purple, two-tone. Saintpaulia flowers are simple or double. The plant loves long-term but diffused lighting, warmth (20-25°C), and air humidity of 60-70%.
Methods for propagating violets
You can expand your collection of indoor flowers using several propagation methods:
- leaf;
- stepson (daughter rosette);
- seeds.
Stepchildren are shoots that appear in the axils of the leaves. They are removed to maintain a decorative appearance. The stepson, which has 4-5 leaves, is cut off and rooted in a separate pot.
Breeders prefer to grow Saintpaulias from seeds. The seeds are germinated in loose, moistened soil placed in a container. Greenhouse conditions are created for them. After 15-21 days, leaves appear on the seedlings, they are picked and transplanted into separate containers.
Separation of children from leaves
Since the babies are separated from the leaf after 2-3 true leaves appear, they can be planted in individual containers. To make it easier for the roots to unravel, dry the soil a little for several days.
The scheme for separating and seating children at home is simple:
- The leaf along with the earthen lump is removed from the container, the substrate is removed.
- The children are separated carefully so that damage to the roots is minimal; the strongest and healthiest specimens are selected.
- The container and substrate used are the same as for planting the leaf, with more drainage placed at the bottom for small children.
- Even if there are good roots, it is better for young rosettes to be provided with greenhouse conditions for 1-2 weeks.
Remember: you can grow beautiful, symmetrical violets only with a lot of diffused light. It is advisable to transplant the next rosettes after they grow to 12-15 cm in diameter.
Conditions for growing violets from leaves
How to root a violet leaf? What does a young plant need? The most important condition for the success of this process is constant attention to this tiny plant, which must be provided with:
- light nutritious soil;
- stable temperature;
- daylight hours at least 12 hours;
- uniform and regular watering;
- humidity and protection from drafts.
Violets feel very comfortable on shelves equipped with additional lighting, which provides plants with conditions for growth even in the autumn-winter period.