Why do you need bandages for horses?
The most common injury that occurs to racehorses during dressage is their limbs. Bandages are placed on the metacarpus to secure the tendons and cover the skin and act like a muscle corset.
There are different types of bandages made from woven materials. Each variety has its own purpose.
Elastic
They are considered the most dangerous if used incorrectly. They are used in competitions and dressage, when the animal endures the most significant loads. Their texture is similar to medical elastic bandages and is well suited for fixing padded pads.
Woolen or wool blend
These headbands last a long time, especially half-woolen ones with the addition of acrylic in the composition. In them, the animal’s legs breathe, they are fixed not tightly, but securely.
How to properly put a bridle on a horse?
When working with a horse for the first time, do not make sudden movements that frighten the animal when putting on a bridle or halter. Horses can sense human fear very well, so if you are unsure, it is better to move away, giving both yourself and your pet time to calm down. If a nervous individual does not want to put on the harness, it can cause injury to you by going on a rampage.
Step-by-step instruction
To avoid causing pain and inconvenience to your horse, properly accustom it to wearing tack. Take your time, come up and talk calmly, pet him. The sequence of actions is as follows:
- Make sure the harness is in good condition, unfasten the chin strap and noseband.
- Place the bridle on the animal's left side.
- With your right hand, hold the pet’s nose, throwing the reins behind the neck and holding the back of the head with your hand.
- Place the bit on the toothless edge of the jaw. If your horse is restless, offer him something tasty.
- Lifting the bridle up, put on the neck strap, throwing it behind your ears.
- Make sure that no elements are twisted during the process.
- Fasten the chin strap so that the distance between it and your head is the size of your fist.
- Two fingers should fit freely between the horse's skin and the noseband.
Precautionary measures
When putting a bridle on a horse, the pet must be monitored. If the harness gets caught on something, it can result in injury or even death. Follow simple rules:
- For safety, halters with leather inserts on top are good, which the animal can tear if necessary;
- choose replacement parts with fasteners that burst when subjected to strong pressure;
- do not wear a bridle while resting in the stall, playing, grazing, or when the animal is tied;
- be careful, do not make sudden movements unless necessary, so as not to harm the health of the animal.
Did you know? According to numerous observations, if a horse wants to leave the leash, it does not bite the rope, but tries to untangle the knot.
Rules for using a halter
When handling a simplified version of the bridle, you must follow a number of rules:
- If the horse is led out with a halter, then the reins are held closer to the head. This way she will understand that she is a follower.
- They are always located on the left, do not go forward and do not lag behind.
- Care must be taken to prevent the animal from kicking, which is possible even with docile charges.
- The horse should not be allowed to be active while wearing a halter, to avoid injury and loss of control over the animal.
It doesn’t matter who or what the ammunition was made from - by a loving owner or by employees of a large enterprise. The main thing is that it is comfortable and does not injure the animal. Then the horse will not have any fear of the straps, he will be calm and submissive.
How to put it on a horse?
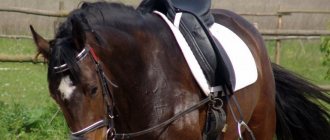
Once the issue of purchasing a bridle has been resolved, it must be correctly put on the horse. If this is done for the first time, then you should remain calm and avoid sudden movements, as they will frighten the animal. It is necessary to put on the device slowly; it is worth noting that horses perfectly sense human fear, so if their owner is not very confident in himself, it is better to postpone this event for another time.
Often nervous individuals do not want to put on the harness and begin to go on a rampage, in these cases they can cause injury to their owner. To prevent this from happening, it is recommended that bridles be put on a horse for the first time by a specialist who has experience in this matter. To quickly and easily put a bridle on an animal, you should use the following scheme.
At the first stage, the horse should be properly accustomed to wearing this device. To do this, the owner must pet the animal and talk to it calmly. In addition, you need to make sure that the bridles are in good condition by unfastening the noseband and picking strap. Then, being to the left of the horse, you need to put on the bridle, holding the nose of the pet and throwing the reins over the neck. In this case, the occipital fastener must be held by hand. After this, a bit is placed on the toothless edge of the jaw. If the animal is too restless, then it needs to be given treats. As soon as the bridle is raised up, the neck strap is put on and thrown behind the ears
During this procedure, it is important to ensure that the elements that make up the bridle do not twist. The final step is fastening the chin strap. It should be placed in such a way that there is a fist-sized distance between it and the head.
There should be a gap of two fingers between the noseband and the horse's skin. According to safety regulations, only halters with leather inserts on top are allowed. Otherwise, the animal will quickly tear them apart.
You cannot put a bridle on a horse when the animal is grazing, playing or resting in a stall. If you follow these simple rules, then the process of putting on a bridle will be simple, and you can handle it even the first time.
Experts tell you more about how to properly put a bridle on a horse in the video below.
How to make a bridle for a horse
You can make both a simple and an exclusive bridle with your own hands. It will be exclusive, since various options for its creation and decoration are possible. The only limitation can be the imagination of the creator. But first you need to learn how to sew a simple snaffle bridle. For sewing, you can use a sewing machine or you can sew by hand. The threads must be strong. It is worth watching video tutorials on this topic with comments. Since leather is usually used to create bridles, you will need several straps about 1.5 cm wide, 2-3 rings, several buckles and a snaffle. So:
- measure the distance along the line from the corner of the horse's mouth along the cheeks to the ears, behind the ears and from the ears to the opposite corner of the mouth, plus 10 cm for loops on each side. These will be the cheek and back straps together. If we want to lengthen the bridle along the length of the horse’s muzzle, we will need to sew a buckle on each side at a distance of about 7–10 cm from the ends;
- measure the distance for the forehead strap - from the intersection with the cheek strap across the forehead to the intersection with another cheek strap plus 10 cm for the loops;
- From the same points we measure the distance down through the ganache and up for the chin strap plus 10 cm for sewing in the buckle. We select the place for sewing the buckle at a distance of approximately 1/3 of the length of the chin strap;
- we make loops at the ends of the forehead strap and thread them into the cheek-occipital strap so that the forehead strap moves freely;
- we sew the chin strap to the cheek-occipital strap just in front of the frontal;
- we sew or attach the cheek-occipital strap to the snaffle rings through buckles;
- for the reins, we measure about 1.5 m and sew or connect using buckles sewn at a distance of 7–10 cm from the ends to the snaffle rings.
How to do it yourself?
It is advisable to sew a bridle from leather, or even from old belts. How to sew belts - with a sewing machine or by hand - is up to you, the main thing is that it turns out reliably. It is important that the headband is firmly attached, but does not create discomfort. You should take an old bridle as an example. If it is not possible to find it, then a photograph of the frenulum may be a more realistic and acceptable option, but it is better, in this case, to watch numerous video materials, with detailed comments and recommendations.
First you need to make cheek straps; they connect the mouthpiece with the head straps. Then, the chin strap, you can use buckles, you can use rings - about three centimeters in diameter. We must remember that the length of such a strap should be a little longer to allow the belt to overlap. Then, you need to make a head strap and a forehead protector. The edges of the straps must be processed so that the bridle lasts longer. Finally, sew the straps. Before you put it on your horse, make sure it is durable. Sometimes the belts are not sewn, but fastened, which is acceptable, the main thing is, as already mentioned, reliability.
In the modern world, several types of bridles are used.
- The snaffle bridle ensures interaction between the rider and the horse.
- A mouthpiece bridle makes it possible to control the horse's movements.
- Cowboy bridle for long walks, consists of three straps.
- A special bridle for running, which is obtained by connecting a halter and a bridle. The advantage is that by unfastening the bit, the horse can eat.
- A hackamore is a bridle that does not have a bit.
- Western headband, used without a capsule, and instead of a forehead protector, one strap is used for one ear.
What types of bridles are there?
Photo of a snaffle bridle
There are two main types of bridles:
- snaffle;
- bitless.
In this case, the headband with a snaffle is distinguished between snaffle bits (that is, they contain one separate bit) and mouthpiece ones (they come with two bits, with one of them revealing a whole rod). If we compare these two types, bit bridles are characterized by softness, since basically the bit consists of two fingers and two or one connection. Therefore, as a result of pulling the rein, the bit folds into a U shape, making it more anatomical. It should be noted that the mouthpiece is mainly used only by experienced riders who are able to transmit much more complex commands for, for example, dressage.
The mouthpiece headband is characterized by the presence of two bits
A cowboy bridle for horses is also known, which is made of fairly thin straps that allow the cowboy, in case of a break, to repair it himself if he is away from the saddler.
Horse in a cowboy bridle
Cowboy headbands are divided into single-ear and slotted. The occipital strap of the latter is made of a solid piece of leather, with corresponding slits for the ears, hence the name. This type of sewing makes it impossible to pull off the bridle. A single-ear frenulum is characterized by the presence of separate loops that fit on both ears. The reins of this type of bridle are not secured together in order to protect the horse from becoming entangled if they end up on the ground.
Bridles without a bit are also used, for example, a hackamore - a specific device that allows you to control a horse without bridling it. It turns out that such bridles are an excellent option for animals that have certain problems with the oral cavity.
The hackamore is used without a capsule, so the pressure falls on the bridge of the nose and is quite painful
The hackamore is used without a capsule for the horse, so the pressure falls on the bridge of the nose and is quite painful, which is why they are recommended for use only by experienced riders. There have been cases when the rider did not calculate the force, and as a result, the fragile bones of the bridge of the nose were broken. It should be borne in mind that the longer the hackamore's arms, the greater the pressure applied.
For horses that are calm and obedient, ordinary rope halters are used. Reins are attached to them on both sides.
Rope halter
A bridle for a horse without a bit is also known - the side pull - roughly speaking, the same thing as a halter, only the tightening force of the capsule is much stronger and the reins are attached on both sides. In the West, side pull is mainly used on young horses before putting on a bit; similarly, beginners work with such a bridle, because even despite inept handling, they will not be able to harm the horse, as this can happen with the use of iron. But I repeat once again that such a bridle is only suitable for a calm horse; it will not hold a restive animal.
Side-pool bridle
Cook's bridle is another type of bitless bridle, invented by the famous English doctor Robert Cook. She became the subject of great controversy among horse breeders.
The thing is that this horse bridle puts pressure on the nose, ganache, and also on the back of the horse’s head. Design features and abundant contact with the head can lead to very strong pressure.
The structure of the bridle
- The rein is the part that comes into contact with the rider’s hand, that is, which he holds in his hand, and it also controls the horse.
Control rein
- Cheek straps.
- Noseband. This part is optional and in some cases it is missing.
- Neck strap.
Neck strap
- Frontal strap.
- Chin strap.
The bridle is not a monolithic object, it consists of several components connected together.
The structure of a bridle for a horse is as follows: the main components are the rein, noseband and bit. The rein is necessary for the rider to turn the horse in the desired direction while moving. The simplest bridle is attached to belts. The belts are located in the following places:
- on the head;
- on the forehead;
- on the chin;
- on the cheeks.
The most popular is the snaffle bridle; it is an ideal option for beginning horse breeders and athletes. This type of bridle helps to completely control all the horse’s movements without causing any inconvenience to the animal. The most important advantage of this bridle is the presence of additional straps, thanks to which the bridle strap does not slide over the horse’s eyes and does not interfere with it.
The snaffle bridle can be either strict or not strict. The tighter the bridle, the more tightly the rider controls the movement of the animal. To loosen or strengthen the severity of the bridle, it is enough to replace one type of noseband with another. Removable nosebands can be purchased from stores that sell equestrian accessories and equipment.
Note! Professional riders always have several nosebands in stock and change them as needed.
What is a horse's bridle?
The bridle consists of many small elements, is put on the horse's head and is necessary in order to give the horse an exact vector of movement, to give commands to move and stop.
This is an essential part of the harness, thanks to which the bits are placed correctly in the horse’s mouth and do not cause pain. The horse does not wear a bridle all the time - it is put on only immediately before the horse is taken out of the stable for grazing, training, or cleaning.
Why do you need a halter?
A halter is a kind of hatching tool. It also serves to control the animal, ammunition, with the help of which it is easy to secure the individual in the pasture or in the stall. At its core, a halter is a bridle without a bit. It can be leather or rope, depending on the sensitivity of the pet.
Important! The pet will not experience pain if the equipment is comfortable and the rider does not jerk the reins sharply
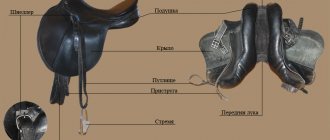
The structure of the bridle
What does a bridle consist of:
- occipital strap – needed to hold the harness on the head, passes behind the horse’s ears;
- cheek straps - one on both sides, their role in controlling the bits, are placed from the nape strap to the snaffle rings;
- chin strap – wraps around the jaw from below and is also attached to the occipital strap;
- forehead protector – serves a decorative role;
- noseband – limits the pressure of the bit and is located on the bow;
- bit, also known as snaffle - a metal part of the harness, attached to the toothless part of the horse's mouth;
- rein – a long strap, fixed to the bit on both sides.
Horse harness has been modified more than once, and today there are several types according to needs.
Is the horse in pain?
The classic bridle has a direct effect on the animal:
- the greatest pressure is exerted by the snaffle, the mouthpiece (metal parts) in the individual’s mouth, pressing on the corners of the horse’s lips;
- all bits put pressure on the tongue in one way or another;
- the harness with the collar bit presses on the palate;
- mouthpiece equipment places emphasis on the chin fossa;
- the capsule squeezes the muzzle;
- the rings on the sides rub against the cheeks;
- The occipital strap puts slight pressure on the head.
The owner’s task is to choose the most convenient harness design in accordance with the size of the horse and the structure of its head. When choosing the right bridle, the animal experiences mild discomfort, to which it gets used to over time. Did you know? Horse detachments operate in different countries today. The most famous -
«redcoats
"
and
"
Riders of Law and Order
"
.
What is a halter
A halter is a type of bridle without a bit. This type is put on the horse every day. Typically, a halter is made of dense woven material (wide rope, braid, coarse belt, even elastic) that does not rub the animal’s skin. However, there are also more decorative options. Gypsies decorate their halters especially brightly. For decoration it is customary to use:
- gold and silver chains;
- precious and semi-precious stones;
- embroidery in various styles;
- lace.
Typically, a product decorated in this way is worn on those horses that participate in various exhibitions, circus performances, exhibition shows and sporting events.
Halter
Halters are used to facilitate their work by people assigned to care for animals. For example, it can be used to move a horse to another stall.
Important! The halter is simply pulled over the animal's head and a rope rein is attached to it. However, it is impossible to give precise commands to the horse using this device. The maximum that can be done with a halter is to hold the horse in the required position (for example, if a groom is brushing his charges or a veterinarian is examining them). It is also an indispensable item when saddling.
The simplest halter, made of rope, has many advantages compared to classic versions of the halter. This variety is the most humane for horses. The animal almost does not feel a foreign object, so it behaves calmly. Rough belts do not rub the animal's skin. There are also no calluses from metal buckles because the halter has no metal parts at all.
Bridle structure for a horse:
- capsule;
- forehead protector;
- occipital, chin, cheek straps;
- reins;
- bit (elements that are in the animal’s mouth).
Horse bridles come in many different shapes, each used for a different harness.
A typical bridle consists of the following elements: noseband, browband, straps, reins and bit.
Types of bridles:
- For direct contact between horse and person - a snaffle.
- To hone movements - a mouthpiece.
- The cowboy's reins have three straps - their reins are not connected, so that if they fall to the ground they do not get tangled.
- For fast walking and running, the bridle is more like a halter - with the bit unfastened, the animal can stop to eat.
- A bridle without a bit is called a hackamore.
- Without capsule and forehead - Western headband.
For a beginner rider, a snaffle bridle is suitable. This is a classic option that will allow you to control the horse, understand its movements and behavior. This is a soft product, the materials for manufacturing are rubber, iron, plastic, the risk of injury to the animal’s oral cavity is minimal.
We invite you to read: Horse: Characteristics in the Indian horoscope
The product must be put on carefully; even with your hands you can injure the horse. The headband must be selected or made exactly to size, and the degree of tension must be adjusted. Some parts of the bridle are modified.
A mouthpiece is a part of a product with a curved middle to regulate the behavior of an animal through its mouth. It is important to choose the correct height of the bend so that it does not interfere with the animal’s tongue or put pressure on the cheeks.
Hackamores are horse bridles without a bit, used if the horse has problems with the oral cavity or while walking to make it easier to eat grass. In order for the manager to have influence on the horse, pressure is applied to the nose. Only an experienced rider can cope with such control.
In addition to cleansing the bridle from dust and dirt, it needs to be lubricated with a rich cream once a week.
A properly fitted bridle and rider control will help your horse stay healthy longer. When the head is in the correct position, the shoulder girdle is unloaded, and the muscles of the front legs are not so tense.
The interaction between the rider and the horse is carried out through the oral cavity. When the bit presses on certain parts, the animal understands what to do. The iron element is installed in the mouth without touching the teeth.
Certain actions also put pressure on the back of the head, cheeks, and bridge of the nose. The effect is on the tongue, palate, corners of the mouth, and chin pit.
The chin and noseband straps are unfastened, the headband is in the left hand, the reins are in the right. A halter is put on and an iron is placed in the mouth on the area of the jaw without teeth.
The horse may refuse to do this, then you can add a piece of sweet carrot or sugar along with the bit.
Next, the occipital bridle strap is put on and the chin strap is fastened. A fist should be placed between the last element and the head. After fastening the noseband, there should be a space of two fingers between it and the skin.
What is a halter?
When there is a need to perform therapeutic measures on an animal, perform a routine examination, or simply need to wash it, a special device called a halter is used. It acts as a reliable fixation for the horse when it is standing. Sometimes a halter is used to make it easier for a horse to move short distances. A halter is considered an imperfect bridle because it does not have such an element as a bit. Beginning horse breeders should consider the following recommendations when using a halter.
- The horse needs to be led out in such a way that he feels that he is under control. To do this, the reins must be kept close to the head.
- When using a halter, the horse breeder should stand on the left side of the animal and try not to go too far ahead, following him with one leg. At the same time, you should always be on guard, since even the calmest pet with an easy-going character can kick its owner with its hoof.
- For sensitive horses, a rope halter is recommended. You can either buy it in a store or make it yourself from ordinary twine or nylon threads. When creating a halter, the knot weaving method is usually used, in which each knot is located at a distance of up to 5 cm from each other.
It is also important to know how to properly put a halter on a pet; to do this, you should follow these steps step by step:
- The main parts of the halter are determined, which include the head strap, chin strap, cheek strap, buckle and noseband.
- Then you need to carefully approach the animal without scaring it. To hold the horse and prevent it from escaping, a chombur is wrapped around the neck.
- After this, you need to stand near the horse’s left shoulder and take the same direction as it, fixing the halter with the top buckle.
Advantages of rope halters
Today we will learn how to weave a rope halter for your four-legged friend. This halter is called a rope halter. It has a number of advantages over conventional halters. It is quite light and does not irritate even the most finicky horses who do not like wide buckles on their halters.
If the horse begins to pull hard on the harness, the knots put pressure on certain sensitive areas of the horse's muzzle, forcing the head to return to the desired position. After the horse does this, the knots will stop pressing and he will not feel it at all, which will allow you to work more softly, but more effectively. Conventional halters are heavier and put pressure on the bobbin simply because of the weight; if the horse pulls on the bobbin, the pressure is distributed evenly across the wide straps, so you need to put more effort into reducing the pressure.
The advantages of rope halters also include its relative cheapness. For the rope halter you will need rope, scissors and matches (to melt the ends of the rope).
Don't be discouraged if you don't get it right at first, the halter will gradually become easier and you'll soon be able to make a halter in just 10 minutes.
We make our own equipment for horses
In nature, horses do not require any additional equipment. Pets need equipment that will allow the owner to easily control the horse and also protect the pet from the cold.
It is also important to remember about horseshoes; without them, domestic horses, unlike their wild counterparts, have a very difficult time. Fans of making their own everything necessary for their pet not only receive exclusive equipment for the animal, tailored individually to it, but also significantly save their budget
When made with high quality, homemade products are not inferior to purchased ones, and sometimes even surpass them.
Halter
A halter for a horse is necessary for convenient removal of the animal and direction of its movement. They put it on the head. A halter also allows you to secure a horse in a stall or in a pasture.
Externally, a halter looks like a bridle that does not have a bit and has one rein. Hold the horse by the halter strap on the left side in the cheek area. All human movements must be calm and not cause sudden jerks in the equipment.
Otherwise, the horse will become frightened and may cause serious injuries.
You can make a halter from leather or rope. The second option is preferable for pets with delicate skin. They make a halter after first taking measurements of their pet's head.
To make the item, you need to take 7 soft straps lined with fleece 4-5 cm longer than necessary (will be used for seam allowances). A carabiner clasp should be placed on the left side of the back strap. The straps are connected to each other according to the scheme using strong metal rings of sufficient size.
The leather will rub the skin on the horse's muzzle, and therefore the poll strap and the fastening strap must be hemmed with fleece, folded in half. Thick flannel will also work.
A halter is made from rope using knots. You need to take a soft synthetic rope of sufficient strength. There are different schemes for linking equipment, and you can choose the one that is most understandable for yourself. The process of making a halter from leather belts is quite complex, and if possible it is better to purchase it ready-made. The rope one can only be made independently.
Bridle
Unlike a halter, a horse bridle has a bit or snaffle - a special metal ring that is inserted into the horse's mouth. A bridle is required for riding. It is made with your own hands as follows:
- A piece of soft belt equal to 3 lengths is cut from one corner of the mouth to the other through the cheeks and back of the head, making a 10 cm allowance for the seams;
- A piece of the strap is cut off from ear to ear - it will be the frontal one. The allowance is also 10 cm;
- The volume of the chin strap is determined by adding 3 cm for the comfort of the horse to the length obtained after the measurement;
- Assembling the belts according to the instructions.
The reins are sewn to the bridle last, choosing their length depending on your own convenience. It will change according to the growth of the animal and the rider.
When choosing a ring for a bridle, you need to make sure that it fits comfortably in the animal’s mouth without touching the teeth. The mucous membrane of a horse's oral cavity is delicate, and it can be injured even with your fingers when putting on a bridle.
For this reason, it is important that the bit is smooth, without cracks or nicks. Every owner knows how to make a bridle for a horse with his own hands.
blanket
Horses cannot tolerate frost without harm to their health. To be in good condition, they need, like people, outer clothing, which is a blanket. The blanket looks like a blanket. There is no need to buy a ready-made blanket, because it is very easy to sew it yourself.
To obtain measurements the following are measured:
- Length from chest through legs (sides) to tail;
- Length of the back from the withers to the beginning of the tail.
When taking measurements is impossible, you need to rely on the average table used to sew blankets in workshops. A DIY horse blanket is as comfortable as possible for the animal.
Using a standard pattern, adjust it to the size of your horse. After this, all the details are cut out from the selected fabric (cotton for summer, wool for winter). You need to add 15-20 cm to the seams. First, all the elements are swept away, and then stitched on a sewing machine.
For a winter blanket, you also need to provide a lining. A fastener is made in the abdomen and chest area. At the discretion of the owner, it can be made of Velcro, buttons, carabiners (preferred) and large metal buttons.
Blankets should be summer and winter, as well as light wool, which are put on the animal if it sweats during work in cool weather. You can’t put on a warm blanket right away, but a light, slightly insulated one is necessary. As soon as the animal has cooled down, it is wrapped in warm clothes. Knowing how to sew a horse blanket can save you a lot of money.
What is a bridle, its structure
A bridle is an element of horse harness that allows the rider to control the animal and acts as a “steering wheel.” It sets the pace, guides, and stops the horse. This is possible thanks to a part inserted into the area of the mouth without teeth - a snaffle, mouthpiece or other similar element.
Snaffle type
This type consists of the following elements:
- straps - corner, forehead, chin, cheek (adjustable);
- snaffle;
- occasion;
- capsule (may be missing).
Diagram of a simple snaffle headband
Snaffle type bridle
This bridle is considered universal. It is ideal for use by novice horse breeders and is characterized by its simple design. It is often used during training.
Mouthpiece type
In such equipment there is a mouthpiece, which is connected to a bit, as well as a mouthpiece rein. These bridles are necessary when maximum precision in executing commands is important. Unlike the previous one, the capsule here is a mandatory design element. Often such models are used in police mounted patrols.
Mouthpiece bridle
Cowboy type
Such bridles are made from leather belts - quite thin, which allows you to quickly repair the harness in case of a break. The cowboy look is adapted to all conditions of horse control. And the main motto here is convenience, since the shepherds spent most of their time in the saddle.
Cowboy bridles are:
- single-eared, with ear loops;
- slotted, on the wide corner belt of which there are holes for threading the ears.
All the elements here are just belts, without a noseband, but often with a mouthpiece and a snaffle. The cowboy bridle has one more feature: it has separate reins. If the animal fell, it immediately got up quickly, without getting tangled in the straps.
Cowboys had specially designed bridles that prevented the horse from getting tangled in the straps
Hackamore
This is the name given to a bridle that does not have a bit. Its role in this case is played by the nose strap. It presses on the face, chin and bridge of the nose, transmitting the rider's commands. The force of pressure depends on the material used to make the harness.
Hackamore
Side pool
This option is used on horses participating in racing. This is an intermediate option between a halter and a bridle of the simplest design. This model has separate cheek straps and reins. This design is convenient when the rider needs to instantly unbridle the animal. In addition, there is no unnecessary pressure in such a harness.
Side pool
Homemade bridle
You can make such an accessory yourself at home. The proposed model consists of several elements.
We suggest you read: Can ducks eat black bread?
To sew a bridle you will need:
- belts about 1.5 cm wide - made of leather, canvas or other dense, strong materials;
- metal rings ø3 cm;
- snaffle (sold in horse shops);
- silk thread.
To accurately reproduce the required model, take an old bridle, measure the length of the parts, and sew. If there is no suitable specimen, then measure the horse’s head:
- From the edge of the mouth to the ear, along the cheek and back of the head to the opposite edge of the mouth.
- Forehead width.
- Chin width.
Add 10 cm to the lengths obtained from points 1 and 2, and 3 cm to point 3 (these are seam allowances). For the reins, take a comfortable length.
Make a bridle like this:
- Cut off the length obtained from step 1 of the measurements from the belts. This piece forms the cheek straps and the nuchal loop.
- Cut the length according to the width of the forehead. The ends are tucked in, forming loops through which the frontal part will be placed on the cheeks.
- The chin detail is made in the same way.
- Collect the bit and rings.
- The edges of the cheek straps are sewn to the rings.
- They secure the reins.
Security measures
Under constant human supervision, the use of both elements is safe if they are in working order and correctly adjusted. You cannot let your horse out for a walk in the levada or while grazing in a bridle: no matter how tightly the reins are fastened, they will slip, the horse will step on them and break them. In addition, iron in the mouth interferes with grazing, and a lump of grass wound during chewing can cause blockage of the esophagus. Often at sports stables you can see a horse walking in the levada in a halter. Is it dangerous. The horse may scratch behind the ear with its hind leg and get caught in the loop of the chinstrap. In this case, a dislocation of the leg at the knee is guaranteed. Sometimes the matter ends with a fracture followed by euthanasia of the animal.
The horse loves to scratch its nose or cheek on a hard, durable object. She can easily get caught in the halter, get scared and, at best, tear the equipment. Too strong belts and fastenings will lead to the horse itself falling. Every owner knows this, but animals are still maimed in levadas. If the horse is not accustomed to running up to the gate when called, then you need to call the animal more often, grab it by the halter and give it a treat. As a last resort, you can use a lightweight walking piece of equipment. It is impossible to work in it; it breaks easily from slight tension.
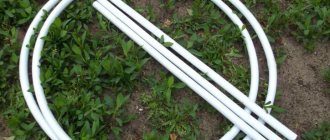
How to weave a rope halter for a horse with your own hands
In order to make a rope halter with your own hands, you should use the following materials and tools:
- yacht rope - 670 cm (this is the length for a medium-sized Cob-Large halter);
- a marker in a contrasting color to the color of the rope;
- scissors;
- lighter;
- ruler.
Did you know? Asians were the first to domesticate horses around the fifth millennium BC.
When weaving a halter, we perform the following steps:
- Cut the rope to the required length (670 cm). We singe the edges of the cut piece with a lighter so that they do not unravel.
- We measure 90 cm from the end of the rope with a ruler (point A from the size table) and mark it with a marker. We tie a knot in the intended place - hold the rope with our left hand, and then throw it with our right hand over the top of our left and pull the rest of the rope through the resulting loop. Carefully tighten the knot so that it is in the intended place.
- We measure and mark the distance to the next point 22.5 cm (point B). We tie exactly the same knot as described in the previous paragraph.
Did you know? Horse hoof
—
it is an extremely complex and sensitive organ. When the horse's weight presses on the hoof, the blood from it is forced up through the veins. Thus, the hoof plays the role of a circulation pump. - We now measure a distance of 25 cm (point B) and again tie the knot from point 2.
- Now we measure and mark with a marker 82.5 cm (point D) and knit the same knot again (point 2).
- Now we retreat 25 cm from the last knot (point D), outline and tie another type. Holding onto the marked area, we make a loop from the free end, wrap the folded loop around the marked area, and insert it into the resulting ring. Pull the end of the loop towards you. It turns out to be a small loop of about 5 cm, tied in the marked place for the nape strap. This loop will be near the ear.
- We retreat and mark 25 cm (point E). We move our marked place to the beginning of the largest gap (point B). We slightly loosen the knot tied at point B and pass the entire long unused end of the rope through it towards ourselves. Then we throw it away from us through the knot and pull it into the loop of the knot and into the new loop that results from it when throwing it over. We pull the remaining length of the rope from the resulting knot away from us and carefully tighten and align it so that it is on the marks at points B and E.
- Pull the free end of the rope 25 cm (point G) back to the knot at point B. Undo the knot a little at point B, pull the free end of the rope toward you and tie the same double knot as in the previous point. Carefully tighten the ends at the marks of points G and B. You get two identical segments tied together, which will act as a fastening belt and be placed on the horse’s nose.
- We measure 82.5 cm from the last node with a ruler and mark it (point 3). We first fold the slightly unfinished product. The loop will go to the ear, the double piece will be on the nose, the remaining rope in the form of a large loop with knots will go under the throat, and the long pieces running parallel to each other should coincide at point G. Unravel the knot at point G a little and pull it through it towards you the free end of the rope to the marking point. We tie a double knot as in step 7, only points D and Z must coincide. These are cheek straps.
- We retreat and mark a gap of 25 cm (point I). Again, we first assemble the product on our hand. We take the double segment that will be on the nose, the ear loop, the cheek strap and lead our point I to point A, the very first node. We expand it again and tie a double knot as in step 7.
- From the last knot obtained, we equalize two pieces of rope - they should be equal and 80 cm long. We cut the rest of the rope to this length and burn the ends with a lighter, placing them next to each other so that they stick together along a length of about 4 cm. This will be the back of the head strap.
- We put a double piece on the hand like on the nose of a horse. We insert the long occipital end, welded by fire, into the loop so that it seems to go through the back of the horse’s head, and tie a knot. To do this, we insert the soldered end under the loop from the side of the animal’s cheek and pull it into the loop formed. Carefully tighten the knot at the top of the loop. It will be easy to untie if necessary. We adjust the size of the halter with the long looped ends of the rope - we tie them together with a double flat knot, but not tightly, so that it can be easily adjusted on the horse. At the same time, at the ends of the knot we leave loops of the required length through which we will thread the chumbur.
Video: making a halter
Halter sizes: table
A halter made with your own hands can be adjusted at your discretion, because the sizes of horses' heads are not always the same and sometimes it is difficult to choose a bridle.
Since in order to sew a product from leather belts, you must have certain skills, it is best to make a halter from a synthetic rope (halter). Such a bridle will not rub the skin and will be a budget option
Find out what boots and stirrups are.
Below is a table with standard sizes of rope halters and the distances between nodal points, and the length of the rope used.
| Reference point for a node | Small | Medium | Large | XL | XXL |
| Head circumference in the snoring area | 50 cm | 55 cm | 60 cm | 65 cm | 70 cm |
| A | 70 cm | 80 cm | 90 cm | 100 cm | 110 cm |
| B | 17.5 cm | 20 cm | 22.5 cm | 25 cm | 27.5 cm |
| IN | 20 cm | 22.5 cm | 25 cm | 27.5 cm | 30 cm |
| G | 72.5 cm | 77.5 cm | 82.5 cm | 87.5 cm | 92.5 cm |
| D | 20 cm | 22.5 cm | 25 cm | 27.5 cm | 30 cm |
| E | 20 cm | 22.5 cm | 25 cm | 27.5 cm | 30 cm |
| AND | 20 cm | 22.5 cm | 25 cm | 27.5 cm | 30 cm |
| Z | 72,5 | 77.5 cm | 82.5 cm | 87.5 cm | 92.5 cm |
| AND | 20 cm | 22.5 cm | 25 cm | 27.5 cm | 30 cm |
| TO | 70 cm | 75 cm | 80 cm | 85 cm | 90 cm |
| Approximate rope length | 550 cm | 610 cm | 670 cm | 730 cm | 850 cm |
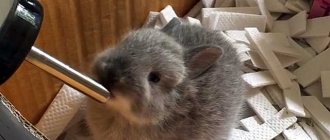
How to bandage a horse's legs using a padded pad
The technology of bandaging with a padded jacket is practically no different from a simple bandage.
- Place a padded pad on the horse's pastern so that its upper edge touches the carpal joint, and the lower edge reaches the fetlock. Fold the edges of the padded jacket overlapping counterclockwise. The edges should lie on the outside of the leg and be between the tendons.
- Place the bandage just below the top edge of the padded jacket and leave the edge of the bandage raised up.
- Make two or three turns of the bandage, turn the edge down and secure it with another turn.
- Continue bandaging your leg downwards, overlapping the wraps. Do not bandage tightly - your index finger should fit freely between the bandage and the padded pad.
- From the fetlock joint, turn upward and wrap the leg with a second layer of bandage.
- Secure the edge of the tape with Velcro or fastener.
Halter - what is it and what is it for?
A halter, in simple terms, is a bridle without a bit. It is a stable item, which is intended for leading horses out of stalls and corrals, as well as for keeping the animal on a leash. Halters are made of rawhide or special thick braid. Also today there are varieties of halters designed for show. As a rule, they are made from decorative materials using various chains and other decorations, as in the photo.
The halter is put on the head of a horse without a bridle and is used together with a chumbur. This is a rope or a halter made of braid. It must be used during breeding and cleaning of the animal. Also in the stables, special belts are attached to the halter for saddling and cleaning. They help to fix and control the horse in a level position.
Structure
So, the halter consists of the following elements:
- muzzle strap or noseband;
- chin;
- buccal;
- supine or occipital belt;
- buckle or carabiner for fastening.
You can see what each part looks like in the diagram and photo.
Important points
Always lead your horse by the reins with both hands. Hold your right hand at the base, closer to the horse’s head. This will allow you to unfasten the carabiner in any situation or hold the animal in place. With your left hand, hold the remaining part of the rein or cord. When leading the horse by the bridle, you should be to its left at shoulder level. Don't let the animal walk in front or behind you. The horse may step on your heel or get scared with all the ensuing bad consequences.
How to put on a halter correctly?
The structure of a halter is much simpler than a bridle, making it much easier to put on. Let's look at the detailed instructions.
- Take the halter and chomp, check its condition to see if there are any tears or broken fasteners. Be sure to see how it is secured. Modern halters usually have a top buckle or carabiner on the head strap, always on the left side.
- Approach the horse from the left side and greet it with a voice or a stroke so as not to frighten it. Do not make sudden movements if the animal does not know you. Then take a harness or cord and put it around the neck so that if something happens, the horse can be restrained.
- Unfasten the buckle on the shoulder strap. If the halter is not used for the first time, then there are abrasions and traces of use in this place.
- Take the halter in your left hand and throw your right hand over your head. Place it over the animal's face, pulling the head strap into place behind the ears with your right hand. Fasten the buckle or carabiner.
Traditions and rituals
Since ancient times, people have attached special significance to many household items.
And the bridle was no exception. And since the horse was a person’s most active assistant a hundred years ago, this item was endowed with various magical properties. Therefore, different peoples have many rituals in which this attribute is present. First of all, bridles are in demand in traditional wedding rituals. For example, among the Turkmens they threw it over the bride’s clothes, and the groom tried to use these ropes to remove the headdress from his future wife. This ritual is intended to remind you of the obligatory submission of the other half.
The bridle is an object for ritual actions among the Turkmen
In Rus' it was believed that this item was able to protect the wedding procession from the evil eye. When the sorcerer left the newlyweds’ courtyard, he went to the stable and blew on the bridle. It was also not customary to buy a horse without this item. It was believed that this would make it worse for her to get used to the new home. The Kazakhs put a bridle in the boy’s bed every day.
The Russians also had a wedding ceremony with ammunition.
DIY horse halter
A high-quality halter for a horse can be bought in a specialized store, but you can also make it yourself without any problems. The main thing is to strictly follow the step-by-step instructions and correctly calculate the dimensions.
Halter sizes
The dimensions of the halter must correspond to the dimensions of the horse's head. Measurements should be taken as responsibly as possible.
It is necessary to measure the following parameters of future ammunition:
- The size of the head is from the withers and along the lateral line to the end.
- Headband volume. Measured from the lateral line of the muzzle across the forehead.
- Nose cap. Measured around the muzzle in the area where the noseband is located.
If you have doubts about the final dimensions, then it is better to make the halter a little larger, it will not be critical.
Tools and materials
To make a halter for a horse you will need:
- Durable synthetic or leather straps.
- Fleece material or soft velor.
- An awl with a needle.
- 5 rings for connecting the belts together.
- Strong threads.
- Sewing machine.
- Scissors.
In some cases, other tools may come in handy, but these are the basic tools you need to use to make a quality halter.
Step-by-step manufacturing process
Making a headband without a bit consists of the following steps:
- Measure the horse's head according to all the necessary parameters and, based on them, create a diagram of the future halter. There should be a total of seven belts in the drawing, taking into account seam allowances.
- Cut out all the belts and sew their edges. If the material is initially thin, then you can make double belts.
- A buckle or carabiner must be attached to the left side of the back strap for fastening. On the other side, we make holes accordingly so that the size can be adjusted.
- On the lower section of the belt, which connects to the fastener, be sure to attach a ring to which the chomp, leash, or release will subsequently be fastened.
- Connect all the belts using rings, which should be about 3 cm in diameter.
- Thin velor fabric must be sewn onto the inside of the neck guard and neck straps to avoid chafing.
A halter for a horse should be comfortable and not cause pain. If the accessory is small, it will quickly rub the most sensitive areas, and a large halter will easily fall off at the most inopportune moment.
How to properly wear bridles and halters
So, from the beginning of the article it becomes clear that halters are necessary attributes for a stable. Of course, it must be individual for each horse.
You can make the necessary purchase in a specialized store or do it yourself. The second option is cheaper, and you can create a real individual masterpiece.
Before you start sewing, you need to take measurements of the horse. Yes, this is a very important stage. A small model can cause discomfort for the pet, and if the halter, on the contrary, is too large, then it will simply fly off the head, and at the most crucial moment.
The advantage of synthetic material is that it is more practical for everyday use. Dirt and water are not a hindrance for such models; they can be washed at any time and restored to their original form, but this is much more difficult to do with leather.
Instead of purchasing a professional horse halter, it is assembled at home. If all recommendations are followed, it will not be inferior in quality to the purchased device.
Halter sizes
The main criterion for the convenience of a product is that its size matches the dimensions of the horse’s head. In view of this, it is necessary to approach taking measurements from a horse’s head with all responsibility. All indicators must be accurate. If the device turns out to be too small, it will rub the animal’s skin, and if it is too large, there is a risk that the halter will come off the head while working with it, since it still cannot be clearly fixed. The halter for a foal should be smaller than for an adult animal.
Correct tailoring
- strong synthetic belts;
- sewing machine;
- scissors, needle;
- velor or fleece;
- strong threads;
- awl.
To begin with, they draw up a schematic example of a halter and, based on it, measure out all the straps. It turns out 7 straps with a small allowance for sewing. If the material used for belts is too thin, it is stitched twice. When using ready-made straps, you only need to stitch the sides again.
On the left side of the back strap, in the upper part, a carabiner or buckle is attached, equipped with a ring to fasten the product. Several holes are made at the other end of the belt in order to adjust the length of the buckle. The required dimensions of the neck strap are measured right there in order to work with the carabiner.
On the strap located below, where the fastening strap is attached to it, an empty ring is kept. It is needed to attach a cord, a cord or a garter to an object. All available straps are connected to each other with rings. On the capsule belt there is another mount, equipped with a buckle in order to adjust the dimensions of the guard.
Velor or fleece is sewn to the inside of the neck and snoring straps, which will reduce the risk of skin abrasion. In order to sew a halter on a foal six months or younger, you need to use the softest materials possible.