Description
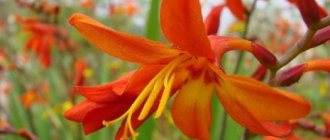
Gloxinia is a perennial. It is grown from a tuber. The stem is short, bending under the weight of numerous large flowers. At the same time, up to 20 large bells, from 7 to 12 cm in diameter, can bloom on gloxinia. The leaves are arranged in a rosette on long stalks around the stem and have a bright dark green color and a velvety surface. Flowers on long peduncles are shaped like bells or shoes and come in all sorts of colors: white and red, lilac and purple, in addition, single-color or variegated, simple and double, with a border along the edge of the petal or speckled.
Gloxinia received its name in honor of the doctor and botanist from Alsace Benjamin Peter Gloksin. Gloxinia belongs to the Gesneriev family. This flower is native to South and Central America. In the wild, it is found in the deciduous forests of Brazil, Mexico and Peru in the form of perennial herbaceous plants or low shrubs, there are more than twenty species. This flower is also called Sinningia in honor of another botanist V. Sinning, who, while engaged in its selection and breeding of hybrids at Boston University, became the second father of Gloxinia. The indoor indoor flower Sinningia-Gloxinia was grown by him. The basis for selection was two species of wild gloxinia: Gloxinia beautiful and Gloxinia royal. Depending on the size and shape of the flowers, whether they are double or regular, wavy or smooth, the result is a variety of synningia hybrids.
How to care for gloxinia, and what to do when it has bloomed
After the end of the first flowering, usually in June, its stems are cut off so that no more than four leaves remain in their lower part. After some time, new shoots will begin to appear. You need to select a few of the strongest ones and remove the rest. Within a month, gloxinia will form new buds.
This is interesting: Indoor gerbera: how to grow and care at home
After the second flowering, care comes down to preparing for the dormant period : reduce watering, stop fertilizing and cut off the stem, leaving part of it (no more than two centimeters) above the soil. When it dries completely, you need to unscrew it and stop watering the tuber remaining in the soil.
Gloxinia varieties
The flowers of many varieties of Sinningia are decorated with a contrasting border along the edge of the petals. For example, the Kaiser Wilheim variety has very large flowers with dark blue or dark purple petals with a white border around the edges, and the Kaiser Friedrich variety blooms with huge bells of a bright crimson color with a clear white border along the edge of the petals.
The variety Blanche de Meru, on the contrary, has flowers with a snow-white center and a wide, bright crimson border. The Gloxinia variety Yesenia has double flowers, burgundy or beet color. The Avanti variety has bells with a velvety surface of the most unimaginable color. For example, Red Avanti has wine-red bells and blooms up to 15 large flowers at a time on an adult plant.
Tigrin
The inner surface of the Tigrin variety or the Calico variety is dotted with speckles, similar to the colors of some exotic fish. The Tamara variety has delicate purple petals with specks inside the middle of the bell. The Mont Blanc variety has white petals. The Gloxinia variety Cleopatra is considered the most popular. Large white double flowers with wavy edges are decorated with speckles of lilac, purple or dark purple. And the Sinningia Winter Cherry variety is distinguished by large white flowers with large dark cherry polka dots.
Kaiser Wilhelm
Kaiser Friedrich
Blanche de Meru
If you like dwarf species of indoor gloxinia, plant the Brokada variety. It has wonderful double flowers of different shades that bloom from spring to autumn. Or Gloxinia royale. It is slightly higher than 10 cm in height. On thick shoots there are 4 – 6 pairs of large dark green oval leaves. Silvery veins decorate the upper part of the leaf, and the inner side is purple. Purple flowers up to 7 cm in diameter stand on long peduncles and look down.
Winter cherry
Mont Blanc
Yesenia
We can recommend gloxinia varieties such as Speckled to beginning flower growers. This is a perennial herbaceous plant up to 70 cm in height with fleshy speckled shoots. Beautiful oval leaves are pointed at the top. The surface of the leaf is bright green velvety, with a reddish tint on the underside. The flowers are purple-blue in color, arranged in several pieces on a long peduncle and have a pleasant mint aroma. This gloxinia usually blooms in the fall, in September-November.
In addition, hybrid forms of gloxinia differ in crown diameter:
- The standard one has a crown more than 25 cm in diameter
- Compact - from 12 to 25 cm in diameter
- Miniature - from 5 to 12 cm in diameter
- Microminiature - up to 5 cm in diameter
Spring planting
This is the best time, since the pot can be placed immediately in the sun, where the plant will quickly begin to grow. Planting a gloxinia tuber after winter dormancy is usually done in early March, when the spring rays begin to shine brighter through the windows. By this time, the tuber is just beginning to sprout, which means it’s time to start planting.
The tuber should be removed and cleaned of old roots and soil. And here the gardener faces a new question: how to treat gloxinia tubers before planting? They need to be kept for 30 minutes in a solution of potassium permanganate or any fungicide. After this, you can soak it in a solution of a root growth stimulator for a day, but this is not necessary.
Planting gloxinia tubers in the spring does not present any difficulties. After the preparatory procedures, the tuber is planted in a pot and sprinkled with earth. Be sure to make a drainage layer, otherwise the tuber may rot.
Plant care
Lighting and location
Gloxinia - a light-loving plant
Indoor gloxinia is a light-loving plant. She loves plenty of light, but does not tolerate direct sunlight. Therefore, the place for a flower pot should be chosen depending on the season and climatic zone of your residence. For example, in the spring, gloxinia feels great on the southern windows of the apartment, actively grows and produces buds, and on hot summer days it is better to move it to the eastern or western windows, if possible. If not, you will have to move the pot to a shelf deep from the south window or somehow shade it. If all your windows face north, your plants will most likely not get enough sunlight. Their shoots will stretch, the leaves will become faded, the plant will slow down its growth, stop producing buds and may not bloom at all. To prevent this from happening, it is necessary to create additional lighting for gloxinia, increasing daylight hours to at least 12 hours. For this purpose, special lamps are used for illumination.
This may be interesting: How to care for indoor Gerbera
Temperature
When growing gloxinia from a tuber, it is important to observe a special temperature regime. Rooting of the nodule occurs best at a temperature of 24–25 °C. When the first leaves appear, it is advisable to reduce the temperature to 22°C during the daytime and to 18°C at night. If the room temperature is much higher and there is not enough lighting, as happens in the winter months, gloxinia will begin to stretch out, the flowers and leaves on long petioles will become smaller and lose their beauty and decorativeness. During the period of active growth and flowering, the temperature should not drop below 18°C, since in cooler conditions the vegetation of the plant will slow down, and it will stop blooming, and may get sick and die. A prolonged increase in indoor air temperature during the growing season of gloxinia to 25-30°C is equally destructive. The root system will overheat, leaf turgor will weaken, and the plant will stop developing normally. During the dormant period (autumn - winter), gloxinia feels normal at a temperature of 10-14°C.
But we must remember that gloxinia does not tolerate drafts and temperature changes well at any time of the year!
Ambient humidity
For successful cultivation of indoor gloxinia, high indoor humidity is important - in the range of 70-80%. The leaves of the flower drooping down will show you about the lack of humidity. Air humidity can be raised by placing flower pots in a tray with wet expanded clay or pebbles. It should be borne in mind that velvet leaves and gloxinia flowers do not tolerate spraying with water, so if you decide to humidify the air in the room with a sprayer, try to do this with a fine spray around the plant, without getting on it. You can place wide containers of water in the room next to our sissies - as the water evaporates, it will increase the air humidity in the room, and gloxinia will delight you with a healthy and blooming appearance.
Watering
Gloxinia should be watered carefully, preferably through a tray or along the very edge of the pot, with a small amount of warm, slightly warmer than room temperature, settled water. Excess moisture often leads to rotting of the roots of the plant, and excess moisture getting on the leaves and in the center of the tuber can lead to rotting of the root collar, and then the entire bush. The next watering is needed no earlier than when the top layers of the soil have dried thoroughly. At the end of August, gloxinia should be watered even less frequently so that it gradually prepares for the dormant period, which usually begins in mid-October. Excess water from the pan under the pot must be removed so that it does not stagnate and damage the roots.
Possible errors during reproduction
Reproduction of gloxinia is a relatively easy undertaking, but in some cases certain problems may arise if certain recommendations for rooting and caring for sprouts are not followed.
With improper watering, little lighting, and low temperatures, the roots can rot. This can also happen to them due to infection with pathogenic microorganisms. Leaves may begin to wither if they do not receive enough moisture, but the same thing can happen due to its abundance.
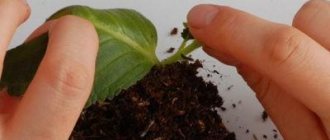
There are many ways to propagate gloxinia; which one to choose is up to each gardener to decide personally. The simplest and safest method for the plant is leaf propagation.
The soil
The soil for growing gloxinia should be loose, light, moisture and breathable, containing organic matter and mineral fertilizers in the right proportions. If you prepare the soil mixture yourself, take two parts of leaf soil, add one part of river sand and the same amount of peat. But it is better to purchase ready-made soil for flowering plants. The soil is good for Violet, Saintpaulia or Begonia. Good drainage is required at the bottom of the pot. This is expanded clay, small pebbles, polystyrene foam or clean eggshells with a layer of at least 2-3 cm. The roots of gloxinia grow in breadth, select containers for planting that are shallow but wide.
Top dressing
Gloxinia is a very demanding flower when it comes to nutrient soil. The rapid growth of its leaves and lush flowering is achieved by additional feeding. To do this, use special fertilizers for ornamental flowering plants. It is advisable to feed gloxinia with organic and mineral fertilizers once every two weeks, alternately. It is better to choose the time for fertilizing after the main watering in the morning or evening, and also during the day if the weather is cloudy, so that the sun does not burn the delicate leaves and flowers of the plant. During the period of active leaf growth, before the appearance of buds, gloxinia needs more nitrogen fertilizers (but do not overfeed the plant with nitrogen; excess nitrogen is even worse than its deficiency). After the formation of buds and during flowering, only potassium-phosphorus additives should be used for feeding. Then the flowering will be more abundant and decorative. At the beginning of autumn, you need to feed the plant for the last time this season with superphosphate or potassium monophosphate for successful wintering of the gloxinia tuber, and then stop all feeding - the plant needs to prepare for the dormant period.
Some tips
- Gloxinia loves feeding very much. It should be produced when the young foliage is fully developed. 60 minutes after watering, a solution of mineral fertilizer should be introduced into the soil. The procedure must be performed once every 10 days.
- Caring for the leaves of the plant is simple - you should wipe off the dust with a soft brush or wash them with warm water, avoiding moisture getting into the outlet.
- If you do not intend to collect seeds, faded flower stalks must be removed. Thanks to this, the flowering period will noticeably prolong.
- After full flowering, before the dormant period, watering is reduced and fertilizer is stopped altogether.
These simple tips and recommendations will help you understand how gloxinia reproduces; planting a tuber will not seem so complicated. A beautiful ornamental plant will bloom with lush bells as a sign of gratitude.
Main life cycles of gloxinia
Since gloxinia is a tuberous plant, it has a special life cycle. There are three main periods in the life of this flower during the year:
- Rest period
- Period of active growth
- Flowering period
Dormant period (gloxinia hibernation)
In indoor gloxinia, the dormant period is pronounced. Unfortunately, it is not able to bloom all year round and delight us with its magnificent flowers and even leaves. As we already wrote above, by mid-autumn, after the next flowering, gloxinia stops drinking water, the stems and leaves turn yellow and dry, and the roots die. The plant begins a dormant period. The stem is cut to a height of one to two cm above the soil. It is worth watering the stump moderately for another two to three weeks, without feeding it. Let gloxinia sleep. Only the tubers of this flower remain alive, which, if properly stored, are preserved until the next season.
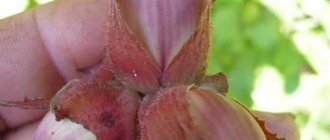
Gloxinia tubers
Ways to preserve gloxinia in winter:
- The tuber is carefully dug up, cleared of soil, treated with an antiseptic, placed in a plastic container with slightly damp sand and put away for the winter in a dark, cool place, such as a garage or basement with a temperature of 10-12°C.
- The tubers are stored in a plastic bag with a zipper along with vermiculite mixed with the substrate 1:1. The bag is zipped and placed in the refrigerator in the vegetable compartment. This way you will have peace of mind that the tubers will not dry out.
- The tubers are not dug out of the soil and are left to overwinter in a pot, which is filled to the top with dry sand and taken to a dark, cool room - a garage or basement. As a last resort, go to the bathroom, where they are stored under the bathtub, covered with a dark film. During the dormant period, gloxinia should be watered very rarely - 1 - 2 times a month, just so that the tuber does not dry out. Flooding it is even worse than drying it out - it will begin to rot and may die. Gloxinia will remain in this dormant state for one to three months. It is not advisable to allow the plant to germinate prematurely, as it will grow weak and incapable of flowering.
This may be interesting: Oxalis (Oxalis) - types and varieties
If gloxinia has not formed a tuber sufficient for storage, what should you do?
If gloxinia is still small, just grown from seeds, then its tuber is still very small, and such a plant simply will not survive the dormant period. To understand whether your flower can survive the winter, count its leaves. If there are less than six pairs, such a flower cannot be sent to rest, it may die. Let gloxinia continue its growth in winter. If you provide it with moderate watering and nutrition, humidity and long hours of daylight with the help of lighting - next year, when your flower grows at least six pairs of leaves and begins to form buds - it will enter a normal life cycle, like all gloxinias, it will bloom and will retire in the fall.
Also, a tuber may not form when growing gloxinia from a leaf or cutting, especially when the cutting is deeply buried in the soil.
The period of the active cycle in gloxinia
By the beginning of a new active cycle, with proper care of the dormant tubers of the plant, new roots and sprouts will begin to appear on them. Typically, gloxinia begins to grow in February or early March. The tubers are taken out of an old pot or from a container with sand - depending on where they were stored, they are cleaned of soil, and old roots are removed.
Every spring, gloxinia is transplanted into new, healthy soil in all respects!
Each tuber is inspected, rotten or dried areas are cut off with a clean, sharp knife or scalpel. Immerse in a dark pink solution of potassium permanganate for 30 minutes. The cut areas are sprinkled with crushed activated carbon. Sometimes gardeners treat tubers with growth stimulants. Then try not to immerse the plant deeply in the solution so that the growing point is not exposed to the drug. After all treatments, give the tubers time to dry thoroughly - within a day is enough. Sick and wrinkled - throw away. This is a guarantee that the remaining tubers will give us healthy and strong plants capable of blooming with lush, beautiful flowers for a long time and repeatedly.
The pot for gloxinia is selected depending on the size of the nodule. It can be ceramic or plastic. For a small young plant, a pot up to 10 cm in diameter is suitable; for a long-flowering plant with a large tuber, choose a pot up to 15 cm in diameter. The height is usually taken the same as the width. You should not buy a growing pot for gloxinia - the plant will fatten in it, only dense foliage and tubers will grow, and our beauty may forget about the need to form buds. In addition, too much moisture may accumulate in a large pot, which can cause the tuber to rot.
So, the tuber is planted in the ground at two-thirds of its height. We have already written above that a special soil mixture for flowering plants - “Saintpaulia”, “Begonia” - is suitable for the soil. At the stage of transplantation and subsequent rooting of gloxinia, there is a risk of losing tubers due to their rotting.
Therefore, do not forget about drainage, 2-3 cm of expanded clay or other material at the bottom of the pot - a prerequisite for healthy roots!
The soil is slightly moistened. The pot with the tuber is placed in a bright, warm place under a film until the first pair of leaves appears. Don't forget to ventilate it morning and evening. When the leaves grow up, remove the film completely. The nodules are covered with soil no more than one cm, just to cover it. It is better to water through a tray or carefully along the edge of the pot so as not to flood the middle of the flower with its growing point.
This may be interesting: Streptocarpus - growing and care at home
Sometimes, seemingly healthy, strong tubers do not show signs of life along with others. Wait a little, perhaps these tubers need a little more time to begin an active life. If you place them in the ground and start watering them, they will most likely rot, because they will have nothing to absorb food and water. Wait for the natural awakening of gloxinia.
If, however, you need to wake up the sleeping beauty, try to artificially activate the growth of the above-ground part of the plant. To do this, well-processed dormant tubers, prepared for planting, are placed in a bag with a slightly moistened peat substrate. The bag is tightly closed and placed in bright but diffused sunlight. If this is a problem, put it under a phyto lamp for 12-14 hours. The germination temperature should be high – 24-26°C. Keep the tubers in such a bag without ventilation until they begin to sprout. After a week or two, you will see drops of moisture on the inner surface of the bag - these are the tubers that have begun to breathe, and a growing point has hatched on them. This means the tuber is ready for planting. It is possible that this flower will catch up with the others in growth and will bloom beautifully no worse than them.
Gloxinia did not wake up after winter dormancy, what should I do?
Sometimes it happens that gloxinia does not wake up after wintering . The first aid for awakening it is to wrap the flower pot in a large plastic bag and moisten the soil. It is quite possible that the winter was too dry and the tuber dried out. Then, in a package from the artificially created greenhouse effect, the flower can wake up and begin to grow.
Sometimes gloxinia, which is too young, is sent to winter because it did not have time to form a sufficient tuber in the first year. Such gloxinia will never wake up.
If a gloxinia tuber was purchased last year in a store, but after last year’s flowering it did not survive hibernation, it may be due to the poor quality of the planting material. The tubers looked decent and healthy, but in reality it could turn out that the tuber was already old, or infected with an infection, or affected by pests. Or perhaps he was simply overfed with growth stimulants. Such tubers were strong enough to bloom once, and during winter dormancy, they most likely died.
Dig the tuber out of the ground and inspect it. A shriveled tuber can most likely be thrown away. If there is hope that the tuber is still alive, cut it in half. If it is all brown inside, it needs to be thrown away. If only part of the tuber is brown, you need to cut off all the rot and treat the remaining parts of the tuber with brilliant green. You can soak it briefly in Epin or Zircon to increase the vitality of the tuber.
Gloxinias usually live no longer than four to five years. If you value your gloxinia variety, think in advance about its propagation - after all, the plant may not emerge from hibernation simply because the tuber is already old and has simply died.
Bloom
Gloxinia usually begins to bloom in late spring. Sometimes, the plant awakens a little earlier, at the beginning of February, then at the end of March it can bloom. Although, for this you will need to create the most comfortable conditions for the plant - sufficient lighting with the help of lights, moderate watering, temperature within 22-24°C, high air humidity. Then it will delight you with its vigorous flowering, perhaps more than once during the season.
Typically, the period of the first rapid flowering occurs at the end of May - beginning of June. Until the end of summer, gloxinia will delight you with its amazing flowers.
Read more about gloxinia flowering and what to do afterward in this article.
The importance of choosing the right size
It is better not to plant small tubers in containers that are too wide. This will lead to the fact that gloxinia will increase its root and leaf mass, postponing flowering for a long time (you can find out more about why gloxinia does not bloom and what to do about it here).
In a pot with a diameter of less than 9 centimeters, gloxinia will feel cramped , there will be little soil and it will often dry out.
Due to the lack of sufficient space, the plant may begin to wither and shed its leaves.