Caring for an orchid to produce babies
Babies are the finally formed shoots of a culture that look like a smaller version of it. In order for sprouts to appear on the plant, you need to shorten the arrows by a couple of centimeters during flowering. The stems develop on their own; you can only speed up this process by creating special conditions. To do this, you need to provide sufficient lighting and a suitable temperature - about 30 °C.
The final formed shoots of a flower are called babies.
If you want sprouts to appear from the buds, the room temperature should not be higher than 24 °C. The plant does not like water, but it must be kept in humid conditions so that it produces buds. To do this, spray it with a spray bottle or place the pot on a tray with wet moss.
Care after transplant
After transplantation, the offspring must be provided with conditions different from those of an adult plant:
- Watering. The shoot is planted in a moist substrate, and therefore it should be watered no earlier than on the third day after transplantation. Further watering is carried out as the substrate dries.
- Temperature. It is recommended to maintain its level at least 22°C and observe the conditions of daily temperature differences.
- Humidity. Ideally, at first maintain a humidity level of 70-100%, later it can be reduced to 60-80%
- Light. Permanent diffused light for 10-12 hours is recommended.
- Fertilizer. Fertilizing begins to be applied from the second week, calculating the dosage according to the same rules as for an adult plant.
5 / 5 ( 1 voice )
Baby separation technology
In order to properly separate the sprouts and not harm the plant, you must properly prepare for this procedure. Therefore, you need to take the separation of children with special seriousness and prepare all the necessary items.
Scheme of separation of formed young shoots
Required Tools
It won't take much effort on your part to separate the sprout from the adult flower. You will need a sharp knife. Before the procedure, pre-sharpen it and treat it with an antiseptic. The knife can be replaced with small scissors. To process the cuts you will need cinnamon or crushed charcoal.
The planting container should be small with holes at the bottom and sides. It is advisable to take a transparent container to monitor the condition of the plant. You need to place drainage at its bottom, the next layer will be wet bark.
Separation procedure
You can separate the babies in several ways: from the flower, from the cut peduncle, from the root zone.
In order to separate the old flower from the trunk, it needs to be prepared. Therefore, do not water the crop for several weeks before cutting. To avoid harming the flower, carry out the procedure with extreme caution. The babies need to be cut from the side of the peduncle, but the main part should not be touched so as not to harm the flower. Treat the cuts with charcoal or cinnamon powder. The shoot is transplanted into the prepared substrate.
Experienced gardeners know how to raise children from cut flower stalks. The shoot can even be divided into cuttings, but this procedure is not recommended if you want to preserve the buds. The shoot is placed in a homemade greenhouse, and cultivation is carried out in the same way as for adult crops. Now you need to wait for the sprout to appear. Let's figure out how many leaves and roots a plant needs to have in order to transplant it into a pot. Experts say that a couple of sheets are enough, but it’s still better to wait until their number reaches four or five.
Children can be separated from the root zone, but this procedure is considered the most difficult, since there is a high probability of damage to the rhizome. If you decide to take this serious step, follow the instructions for separating the sprout from the peduncle.
Stimulation of root emergence
If the sprout has already produced several leaves and bloomed, but the roots have not appeared, you can stimulate their appearance on your own. To do this, cut off the shoot from the flower and place it in a greenhouse made with your own hands. Under no circumstances should it be placed in the ground, as it will not receive nutrition.
To create a greenhouse, take a plastic bottle and drill holes for drainage. A layer of expanded clay is placed on the bottom, and wet moss is placed on top. You can make holes at the bottom of the container through which supports for the sprout are fixed. Make sure that the rosette of the crop does not touch the moss - it should be located above the soil. The structure is covered with a bottle and the result is a small greenhouse.
If you don't have a bottle, you can use a plastic bag. The main thing is to create a greenhouse effect.
With proper care, new roots will appear in a couple of months, and their length will reach 3 cm. At this stage, you can plant the sprouts in the ground.
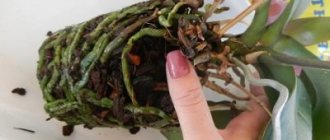
Landing in the ground
You will need a plastic cup with holes at the bottom for drainage. The volume of the container must correspond to the size of the root. Make your own substrate from moss and charcoal or purchase this mixture at the store. Each layer should not be thicker than a centimeter.
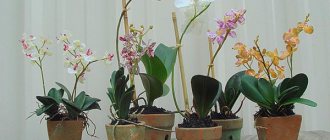
Separated children are planted in plastic containers
Features of care
You need to care for the shoots in the same way as for an adult crop. There is no need to water the sprout, since we are already planting it in moist soil. This should be done a couple of days after transplantation. In the future, the plant is watered once a week.
The air temperature must be at least 22 °C. Do not forget that shoots do not like sudden changes in temperature. Keep the air humidity between 70 and 100%. In the future, this figure can be reduced to 60%.
The plant should be illuminated for a long time and intensively. It is advisable that the light falls on it for about 12 hours a day. The flower needs to be fertilized a week after transplantation. Follow the same rules as for an adult phalaenopsis.
Methods for separating shoots
Vanilla orchid: main types and home care options
Orchid babies can form on the peduncle, trunk or at the base of the root collar. It is on this basis that they determine how to take a shoot from an orchid and whether it can be done. Separately, it is worth considering cases of the formation of shoots directly from the root itself under the surface of the substrate and above it.
The orchid has sprouted a shoot on the stem: what to do
A baby on an orchid's stem is a bad sign. In this case, reproduction should be abandoned and the shoot should be left in place. Separating young and mature plants will result in the death of both
If an orchid has sprouted a baby on its stem, what you definitely shouldn’t do is get upset. The flower will most likely continue to develop. In addition, it will take on an even more unusual and exotic look.
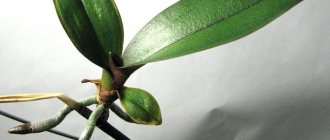
Baby on a peduncle
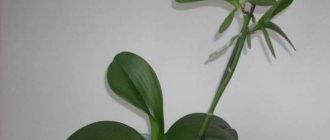
This phenomenon can most often be observed in domestic orchids. After flowering ends, a small plant begins to develop on the peduncle, which, as it grows, becomes similar to an adult, only in miniature.
Most often, shoots form on the peduncle
In this case, the separation of children is carried out as follows:
- Carefully, holding the peduncle, cut off the shoot with a small fragment of the shoot using a sharp knife.
- Set the baby aside for 30-35 minutes to dry at room temperature.
- Treat the sections with ash or activated carbon.
Experienced flower growers have noticed that it is the shoots cut from the peduncle that take root best. The main thing is to plant such a cutting correctly and care for it in the future.
Shoot from the root
Such children can be basal or located at the base of the root system. Particular care should be taken when separating the hilar process.
The procedure is carried out as follows:
- The adult plant is partially freed from the upper part of the substrate.
- By examining the root system, the location of the maternal roots and the roots of the shoot is determined.
- The roots are carefully separated and the baby is separated with a part of the root of the adult plant using a knife.
- The sections are disinfected and the adult orchid is placed in the same pot.
Attention! This procedure is quite complicated, but if you do everything very carefully and do not damage the roots, both plants will be fine.
If a sprout appears at the base of the roots, you will have to remove the root system of the adult orchid from the pot completely. But it is easier to separate such a shoot, since the roots do not get tangled.
Common problems and solutions
If you take on the task of growing new flowers from a plant, be prepared to encounter various problems. The most common are:
- absence of children;
- drying of the shoot;
- problems with the appearance of peduncles.
Does not produce a peduncle
If a young sprout does not produce a peduncle, it may be suffering from excess moisture. You should raise the temperature to 30 °C and also double the interval between waterings. This way the roots will dry out completely. After this, do not water the plant for another week. During this period, it is prohibited to fertilize and spray it.
If there is excess moisture, the young sprout does not release a peduncle
Children are not educated
Note that sprouts appear on flowers without care. Therefore, your task is to create the most favorable conditions. To do this, the flower must be in hot conditions and be limited in moisture. If such conditions do not have the desired effect, lubricate the kidneys with cytokinin paste.
The emerging shoot has dried up
Such sprouts must be removed immediately. If there are dormant buds on the peduncle, they can be lubricated with cytokinin paste, and then the proper conditions for plant growth can be created.
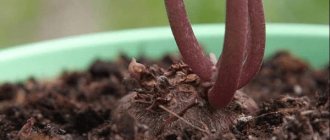
Planting and rooting process
After separating the shoot from the mother plant, you can begin planting. If the orchid has produced a shoot on the stem, the question of how to replant it disappears.
Neomarica walking iris: home care and examples of popular varieties
For planting, use a ready-made substrate and a transparent plastic pot or cup. The pot is filled so that the growth point of the leaves is located at the level of the edge of the container. The roots are covered with a small layer of sphagnum moss.
Important! To ensure that the substrate is evenly distributed in the container, it should be lightly shaken.
For successful rooting at first, it is worth considering several rules:
- It is better to place the pot in slight partial shade or on a windowsill with diffused lighting.
- Start watering only after 2-3 days, as earlier watering will harm the flower and can cause root rot.
- It is recommended to carry out daily spraying, and then carefully wipe the leaves from dust and dirt.
The first 10-14 days after planting the shoot are decisive. The slightest deviation from the temperature regime, a sharp decrease in air or soil humidity can lead to disastrous results. In the best case, the baby will take root longer than expected, and in the worst case, it will die.
Rooting baby orchids is a painstaking process
It is not enough to know how to plant an orchid from a shoot; you also need to understand the intricacies of caring for it.
Planting in an air greenhouse
Much more difficult than a regular landing. The greenhouse is created from a pencil and a plastic glass or bottle. Holes are made not only in the bottom, but also in the sides. The first are drainage, and the second are for pencils. Moistened soil from bark and moss is poured into the container, but a small amount of peat is added. A little space is left in the greenhouse.
The process is placed on a pencil. The root system should be in the air and only touch the substrate with its tips. The container is placed on a warm and well-lit windowsill. The shoot remains in the greenhouse until the roots grow to seven centimeters, and then it is transplanted into a regular pot.
If everything is done correctly, the baby will not only quickly take root and settle in, but will also quickly grow.
Detailed step-by-step instructions and photos
With root system
If the baby already has roots, then replanting a small plant will be quite simple.
The algorithm of actions is as follows:
- Take a plastic container with holes.
- Place a layer of drainage on the bottom, then a substrate mixed with moss. Moisten the mixture. But before this, it is worth spilling the soil with a pink solution of potassium permanganate or calcining it in the oven for disinfection.
- Place the baby in the cup very carefully, so that the growth point is at the level of the edges.
- Adding the substrate must be done with extreme caution, since the roots of the young plant are very delicate.
- The roots should be completely covered with the mixture.
- You should not water after transplantation, as an infection may get into an unhealed wound.
- Cover the plant with a transparent plastic bag - it will be a mini-greenhouse for better rooting.
Important! The substrate should not be very waterlogged, as there is a risk of tear rotting. At the same time, in the greenhouse it is necessary to ensure the optimal level of humidity for the young plant.
Without roots
There are situations when a baby grows and develops well on the mother plant, it can even bloom, but it does not want to produce roots. What to do in this case?
You need to proceed as follows:
- Place some drainage and moss in a plastic cup with holes.
- Make two holes in the side of the cup opposite each other for support.
- Install the support.
- Place the baby's socket on a support - it should not touch the ground.
- Place a plastic bottle with a cut bottom on top.
- The young orchid will remain in this state until roots appear.
It is worth observing the plant, since ideally the transplant should be carried out only after the roots have grown at least 5 cm . It is worth being patient, as this process is quite long and can take 4-6 months.
If it grows on a peduncle
If the orchid has sprouted on the peduncle, then the procedure is as follows:
- Use a sterile pruning shears to cut the baby from the peduncle.
- At the base of the rosette we find a scale that should be removed, since it is this that prevents the roots from developing.
- Now you can start growing roots in the air, since it is impossible to place the plant in a substrate without roots.
- We arrange a plastic cup with holes under the pot.
- Place drainage on the bottom and place moss on top.
- Make two holes at the top for support.
- Place the baby so that it hangs in the air without touching the moss.
- Cover the structure with a young orchid with a cut plastic bottle or plastic bag to create greenhouse conditions. The microclimate in the greenhouse should be close to tropical.
What if the shoot has no roots?
This happens in two cases:
- the stem baby simply does not have roots;
- The roots of the daughter plant develop poorly or do not grow at all if the mother plant is not properly cared for.
In the case of a root baby, the future flower cannot be helped to grow roots. The remaining offspring of the orchid can be stimulated to grow the root system.
There are two most popular methods of growing roots for baby orchids.
Growing in a greenhouse
You will need:
- plastic transparent cup;
- 1.5 liter plastic bottle, always transparent;
- drainage (expanded clay, coarse sand or fine gravel);
- sphagnum moss.
- Pour a little drainage into a glass, place a small layer of sphagnum on top, and moisten well.
- Position the baby so that its root base does not reach the moss by 2-3 mm. The big baby will stay on its leaves, but the small one needs to be secured with a thread.
- Cover the glass with the shoot with a bottle, creating a greenhouse.
The greenhouse must be ventilated daily and ensure that the moss does not dry out.
Using this method, you can grow roots in a couple of months.
Video about how to speed up the growth of roots on a flower stalk using a greenhouse:
Growing roots on foam plastic
- For this method, cut a hole in a piece of polystyrene foam of such a size that the baby can be placed in it.
- The daughter plant is strengthened so that the growth point of the roots is 2-3 mm in the recess.
- The resulting structure is immersed in a glass or jar of water.
As the water evaporates, the baby will sink lower, the main thing is not to let the moisture dry out.
This method is used if the room is bright enough, the constant temperature is not lower than 26 degrees and there are no drafts. And also, it is necessary to prevent direct sun from hitting the baby orchid.
For the fastest regrowth of roots, it is recommended to use growth stimulants, for example, “Kornevin”.
The appearance of the shoot and the life cycle of the flower
Miniature flowers can appear from dormant buds on the peduncle, provided that the plant is mature, healthy and well developed. The baby stays on the mother orchid for a long period until it is fully formed . It is separated if there are roots at least 5 cm long and 2-3 leaves.
ATTENTION : The duration of the process of growing roots is about 6 months, and maybe longer. Throughout this period, the new formation feeds on substances and sucks moisture from the mother plant.
This means that for the full development of both individuals it is necessary:
- ensure the room temperature is at least +25°C and high humidity;
- sufficient sunlight is required;
- Spray the leaves daily;
- Fertilize with nitrogen-based mineral fertilizers once every 10 days;
- moisten the substrate regularly after the substrate has completely dried.