This beautiful plant is found in almost every home. There are many tips on how to plant geraniums and how to care for them. But we will tell you in detail how to plant a geranium with a shoot without roots. However, despite the apparent ease of growing this beautiful plant, there are several fundamental rules. Pelargonium (Pelargonium) belongs to the geranium family. Another, more common name for this flower is geranium. Both the names "geranium" and "pelargonium" come from the Greek language. The first of them is translated as “stork”, and the second as “crane”, since the shape of the plant fruits resembles the beak of these animals.
Proper watering
The plant needs frequent and abundant watering. You can use rain or melt water, settled tap water (2-3 days). You need to make sure that water does not fall on the leaves and does not stagnate in the container, so excess liquid from the pan must be drained immediately and care must be taken to ensure good drainage in advance. The temperature should be a couple of degrees below room temperature, otherwise the geranium's buds and leaves will begin to fall off.
Attention! Hard water is not suitable for irrigation. It can be softened by adding wood ash (10 g per liter) or oxalic acid (0.2-0.3 g per liter).
How often to water?
In spring, geraniums activate all their vital processes, so they need to be watered frequently: 2-3 days after the top layer of the substrate has dried. Water more frequently during the hot summer months. In autumn - less often and in small volumes
In winter - minimally and with extreme caution, since geranium is susceptible to rotting during the wintering period
Rooting in water: rules and recommendations
Method 1 - propagation of geraniums by cuttings in water - is carried out as follows:
- prepare several cuttings;
- disposable plastic cups are optimal, preferably opaque; it is recommended to use a formaldehyde solution to disinfect them;
- pour pre-settled warm water into each glass to the middle (about 5 cm high);
- many gardeners advise adding crushed activated carbon to water for disinfection;
- lower the cuttings with the bottom part into water;
- It is recommended to change the water every 2-3 days;
- roots usually appear within 1-2 weeks;
- After the roots have sprouted, the shoot must be transplanted into a pot with soil.
The disadvantage of the rooting method in water is that in some cases the cuttings rot (usually before the roots appear), then the sprout has to be thrown away.
How to plant a geranium shoot without roots in a pot
Before replanting geraniums with cuttings without roots, you should:
- determine the time of the procedure;
- prepare planting material;
- root the seedling.
Experienced flower growers believe that collecting planting material at home can be done all year round. The optimal solution is to focus on the initial stage of the growing season. For geraniums, it is divided into two time periods: throughout the spring, and from mid-summer to early autumn.
Preparing the cuttings
Before planting geranium as a shoot without roots, select the largest apical shoots. Branches for planting should not have visible damage. How to plant geraniums in a pot without roots? Before planting geranium cuttings in a pot, the tops of the stems are cut off. The length of each must be at least 7 cm.
Cuttings of the species
It is important to use a sterile and sharp instrument. The cut is made directly above the bud and 3-4 green leaves are left on the cutting.
The lower leaves are removed. Green cuttings are left in the air for 2-3 hours so that the cut areas are covered with film. To disinfect and improve root formation, wounds are treated with Kornevin.
Ways to get roots from a shoot
For these purposes, use water or a nutrient substrate.
It is important to remember that the formation of the root system in water occurs more slowly than in the ground. Prolonged accumulation in liquid can lead to rotting of the roots
Additional Information! In different varieties, for example, Royal, roots form within 40-50 days, which means it can only be propagated in a soil mixture.
Rooting in water
For germination in water, it is advisable to use any dark container. Dishes are subject to mandatory disinfection. Activated carbon is first added to a container with warm, settled water. After this, the cutting is placed in the pot. The place is selected with maximum illumination, but without direct sunlight. Daylight hours for pelargonium last 14-16 hours.
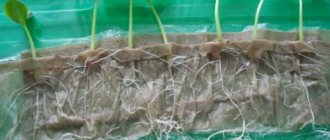
Geranium germination in water
Rooting in the ground
Geraniums are planted in the ground to a depth of no more than 1-2 cm. The soil mixture is prepared from the following components: peat, river sand, vermiculite, loose soil. All ingredients are taken in equal proportions and mixed thoroughly. Any drainage material is poured into a drained container 1 cm deep.
The cuttings are planted as carefully as possible in a pre-made recess. Cover the seedling only if there is a risk of leaf plates drying out
Note! A sharp drop in temperature (even at night) is not allowed. Watering with warm water is carried out only at the root
At the slightest overmoistening, geranium can develop root rot or blackleg. As a result, the plant will die. The appearance of new leaves means that the rooting process was successful
Watering with warm water is carried out only at the root. At the slightest waterlogging, geranium can develop root rot or blackleg. As a result, the plant will die. The appearance of new leaves means that the rooting process was successful.
Rooting in the ground
Caring for a rooted shoot
The main condition for healthy growth of geraniums is a high level of light. The best place for rooting is a south windowsill
It is important to regularly perform root moisturizing. Spraying is strictly not recommended
When moisture gets on the foliage, the plant begins to hurt. In winter, watering is reduced to 2 times a month.
The room in which the geranium grows is ventilated, avoiding drafts. To stimulate the budding process and add volume, pinching the upper shoots is carried out, which will allow you to form a beautiful crown. Abundant flowering is achieved using phosphorus, nitrogen and potassium as fertilizers.
On a note! Pinching can be done at any time of the year.
Landing
The first step is to choose the right pot. Ceramics are ideal. This material is natural and does not harm plants. The plastic looks beautiful, but the roots in such a container will be hot in summer and cold in winter. In addition, such a pot will retain moisture longer, which can cause rotting. In turn, ceramics will prevent the soil from overheating even in hot weather.
The pot should not have a large width and depth, otherwise the geranium will not bloom. For a young plant, a container with a diameter of ten to fourteen centimeters is suitable.
Geranium is unpretentious to the soil. Any fertile soil with a loose structure will do. Its acidity depends on the type of pelargonium. You can buy soil in a store, opting for a specialized one, or prepare it yourself. To do this, you need to mix peat soil, turf and leaf humus, as well as clay.
Now it’s time to learn how to properly plant a geranium shoot in a pot. You need to start by washing and disinfecting the container with boiling water or a solution of potassium permanganate. Then the pot should dry out.
Fill a quarter of the container with drainage. Fill the pot with soil up to halfway and leave it uncompacted. We plant the cuttings and add soil, leaving a little space for watering. Now we know how to properly plant geraniums with shoots and roots.
Unfortunately, this method is not suitable for all types of pelargonium. Some of them may not produce roots for up to forty days. During this time, the cutting may rot or become sick. These types include royal geranium. What to do in this case? Let's figure out how to plant a royal geranium shoot correctly.
Suitable periods
If we consider the time frame that is suitable for transplanting geraniums, then it is worth noting the end of winter or the beginning of spring. Many gardeners recommend planning this procedure from February to April. It is during this period that the flower begins to “wake up”, so this time is the best for such an operation; the plant will cope well with stress. Many gardeners replant geraniums even in summer. At this time, the plant is less susceptible to stress, changing the place of growth is not perceived so painfully
It is important that the plant does not bloom. When flowering, the procedure should be postponed until the geranium has faded.
Usually in the autumn season it is necessary to transplant geraniums that grew in open soil into a pot in order to transfer them indoors for the winter. This procedure is mandatory; the plant feels great after it if all actions are performed correctly and carefully.
When are rooted cuttings transplanted to a permanent location?
Rooting is easiest to observe in a transparent container. If a pot is chosen with opaque walls, the success of this process is indicated by the appearance of young new leaves on the shoot. Successfully rooted plants are transplanted into a flowerpot with a loose and light substrate and placed on a window facing the east or west side. In summer, geranium feels best on a balcony or loggia. In winter, it is recommended to keep the flower in a room where the air temperature does not rise above 15 degrees. During this dormant period, the plant should be watered less abundantly than at other times of the year.
How to replant in another soil?
You need to remember the fact that geraniums need lighting for 5-6 hours a day. Therefore, before planting the plant, you need to choose the right place for its location.
Before planting, you need to carefully inspect the roots. You can shake them off only if there is mold, insects or rot. If nothing of the kind is found, then the geranium should be moved along with the earthen lump.
As mentioned above, the geranium pot should be equipped with drainage holes, as the plant does not like too wet soil. Before planting, the pot should be thoroughly washed and rinsed with a weak solution of potassium permanganate to destroy bacteria.
Propagation by cuttings
Planting from cuttings is one of the easiest and fastest ways to get young geraniums. Another advantage of this method is that you can know in advance what kind of plant will grow, the color of its petals and the subtleties of cultivation. This distinguishes this method from planting a plant using seeds. This method of propagating geraniums is best done in early spring.
There are 2 ways to plant geranium cuttings - in a container with water or in soil.
If you decide to use the first method, then, first of all, you need to separate the shoot from the mother plant and place it in a jar of water. After waiting for the roots to appear, you can transplant it into a pot. One of the disadvantages of this method is that when roots and water come into contact, the risk of plant rotting increases.
With the second method, cuttings can be transplanted directly into the soil. You need to select several containers (for example, plastic glasses), make holes in the bottom, then pour a drainage layer and soil into them. The shoot should be placed in the soil, compacted and watered.
Recommendation. After planting, containers with shoots should be placed in a dark and warm place, waiting for roots to appear. They do not need additional moisture or care.
Plant stress
If geranium was purchased recently, this is not a reason for its immediate replanting. After all, she suffered temperature changes, changed her habitat, experienced a kind of “stress,” and first of all, she must be given time to adapt to the external environment. It usually takes several weeks for the plant to adapt.
If you need to replant geraniums, it is advisable to take into account some important points:
- the pot for replanting should be slightly larger than the previous one;
- the soil for replanting must be selected fresh;
- Before transferring the plant to a new container, it is necessary to moisten the soil;
- When pouring soil into a pot, there is no need to compact it.
It should also be remembered that if the geranium was blooming at the time of purchase, then to carry out the replanting process you need to wait until the flowers fall off.
Instructions for planting in a pot
Indoor geranium is a rather unpretentious plant. However, in order for pelargonium to develop well and bloom luxuriantly, when planting it, you must adhere to some rules:
- Selecting a container for planting. To plant geraniums, you need to choose a small pot (20–25 cm). This is necessary so that the plant develops not only the root system, but also directs its forces to flowering. Before planting, clean the pot and treat it with an antiseptic solution to kill all bacteria.
- Drainage system. After choosing a pot, you need to take care of the drainage system. Make several not very large holes at the bottom of the container and fill it with a layer of small stones. This will ensure excess liquid drains and prevent rotting of the root system from excess moisture.
- Soil selection. For planting indoor geraniums, universal soil, which can be purchased in specialized stores, is quite suitable.
- After planting, water the geranium with a little water and leave to ripen.
Methods for growing geraniums from cuttings
Rooting a cutting can be done in two ways, taking into account their advantages and disadvantages.
Rooting geranium cuttings in water
Rooting stem cuttings is quite easy in water. To do this, you need to prepare containers filled with 5 cm of pre-settled water. It is better if the containers are made of dark glass. The cuttings are lowered into the water with the lower cut. The roots appear within a week.
The beauty of this method is that you can observe the rooting process and plant the plant in the ground at the right time. Disadvantage - the edge of the cutting, not having time to release the roots, can rot. To prevent rotting, experienced gardeners recommend adding activated carbon to the water. The water should be changed once every two days.
The shoots with roots are planted in the ground. If you follow the rules of care, such cuttings will produce beautiful, beautiful geranium bushes.
Rooting geranium cuttings in the ground
You can root geranium cuttings directly in the ground. Containers or pots with holes to drain excess water are suitable for this purpose. Good drainage is a prerequisite for excellent results. Ready cuttings are planted in moist soil at a distance of 2-3 cm from each other. The rooting process can last two to four weeks. The shoots are watered as the soil dries. To obtain lush bushes, the top bud is pinched.
The undoubted advantage of this method is that the plants take root better. The downside is when you think that the geranium has taken root and you start replanting it ahead of time, thereby losing some of the excellent planting material.
Methods for propagating geraniums
There are several ways to propagate the plant. The most common: seeds and cuttings. To choose the best option, it is worth considering each in detail.
What does indoor geranium look like?
Vegetative (from shoots or cuttings)
In most cases, flower growers propagate pelargonium by cuttings, since the seed material cannot always convey the parental qualities of the flower. To root geranium vegetatively? Cuttings from the top of the shoots or the middle shoots remaining after pruning are suitable. For propagation, experts recommend containers for seedlings or ordinary plastic cups.
It is important to know! The planting container must have drainage holes.
Universal soil, diluted with river sand, is excellent for germination. For disinfection, change a weak solution of manganese, or pre-calcinate the soil.
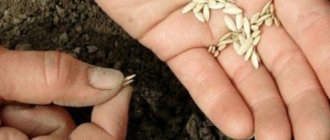
Generative (seeds)
The process of propagation by seeds is extremely labor-intensive. Before the procedure, it is important to decide how to plant geraniums using this method. First of all, pay attention to the quality of planting material. It is advisable to purchase seed material in specialized stores.
Can pelargonium be propagated by leaves?
This method is still unknown to modern botanists. But some home gardeners are trying to grow pelargonium from leaves. Perhaps the name of another flower, begonia, which is similar to pelargonium, is misleading. Begonias are residents of the subtropics; in conditions of high air humidity, they can reproduce not only from a leaf, but also from its fragment.
Pelargonium is a completely different plant; it does not reproduce or even grow in damp conditions. A pelargonium leaf by itself will never give roots, since it does not have nodes from which roots form in water or in the soil, and leaves and shoots form above the ground. An experiment with a leaf can be successful if it is cut off or broken off with a small piece of the stem, but this stem must also have at least two nodes: roots will grow from one, and the other will become a growth point for the future flower.
The geranium leaf has given roots because it was taken from a stem with a “heel” (knot), but there is no growth point, the geranium will not grow
Propagation of royal geranium
To propagate royal pelargonium, the method of placing shoots in water is not used because of their rotting. When deciding how to plant royal geranium as a shoot without roots, you should use exclusively the method of rooting in the ground, since when planted in water, the cuttings of this particular variety immediately rot.
The pelargonium sprout is planted in a pot filled with special or prepared soil, and then it is expected to take root within a month. When young leaves begin to emerge, it is time to transplant the cuttings into a large container.
How to cut and prepare a shoot
Pelargonium can be grown at home for up to 10 years, but most often its trunk is bare, leaves grow only on the tops of the branches. This is why gardeners prefer to rejuvenate plants after a few years. With shoots and cuttings you can grow from 5 to 10 new plants from one mother plant, knowing how to cut and root them.
Is it possible to do this all year round? Yes, but the percentage of rooted cuttings is much higher in spring and summer. If the mother plant is at rest, then rooting will occur very slowly, and the geranium shoot may rot. The process occurs much faster at the beginning of the growing season, that is, the best time is from March to May and from July to early September, when geraniums no longer bloom.
The apical shoot can most easily produce roots. You need to cut off a branch with 4-5 leaves using a sharp, disinfected tool. Each cutting 5–7 cm long must have several leaves or internodes. Before planting, the lower leaves must be removed, as well as the resulting buds.
The cuttings are left to lie in the open air for several hours so that a thin film forms on the cut. Then the cut with the film is treated with charcoal or any rooting agent (Kornevin, for example).
Care
Growing geraniums at home is not difficult. This plant is easy to care for. It is worth considering that pelargonium came to us from Africa, which means it loves light and warmth. Room temperature is good for keeping geraniums. Ideally, it should be within fifteen to twenty degrees. It is better to place the flower pot on the window sill where the sunlight reaches the most. If the lighting is insufficient, the plant will not bloom.
Geranium loves moisture. The plant should be watered abundantly, but still be careful not to flood the root system. In winter, the frequency of moisturizing should be reduced. The plant does not need spraying.
The soil in the pot should be periodically loosened to avoid rotting. It is recommended to choose a small container for pelargonium - this way the plant will bloom better.
Geranium prefers dry air, so if possible it is recommended to place it on the balcony. In the hot season, the plant needs to be shaded. It should be borne in mind that pelargonium is afraid of drafts.
From March to November, geranium needs feeding twice a month. Liquid fertilizers diluted in water are suitable for this. During the flowering period, the plant needs potassium and phosphorus; during the growing season, geranium needs nitrogen, and in early spring - microelements and macronutrients. This is what you need to proceed from when choosing fertilizers.
You can move the flower around the house as much as you like before flowering begins. After the buds appear, it is not recommended to move the plant; you cannot even change the position of the leaves. You can prune geraniums in spring and summer. Pelargonium does not like transplantation. It is better to do this only when the roots no longer fit in the pot.
Propagation by cuttings
How and when to take cuttings?
Houseplants are usually propagated in the spring. However, pelargonium grows well in the open air, and even on a windowsill by mid-summer and early autumn it grows a lush bush from which many cuttings can be taken. Young geraniums from summer and autumn cuttings will bloom only next year. There are many advantages to spring cuttings: there are no flowers on the mother plant yet, all the juices go into the shoots, young pelargoniums will bloom in the year of planting. There is experience with rooting in winter, but during this period the plant is weakened, the percentage of loss is high, that is, for the most part, the cuttings die without taking root.
A high-quality cutting should have at least 2–3 leaves and the same number of internodes. Typically, apical cuttings are used. If there are buds, they are ruthlessly removed along with the flower stalks. Roots always appear from nodes, that is, places where a leaf or twig is attached to the stem; there are also dormant buds there. For geraniums with a woody stem, take a cutting with a piece of bark (heel). The leaf growing from the lower node is cut off or broken off.
Video: Which cuttings take root better, rooting in autumn
Rooting in water
The method is not suitable for all types and varieties of geraniums; some rot in water. To find out whether this propagation option is good for your flower, you will have to experiment. But next time you will already know exactly how to propagate your geranium.
Stages of cuttings in water:
Remove leaves from the bottom of the cutting. Prepare the water. It must be clean and settled. You can add 1 tablet of activated carbon to a glass of water. Take a container for rooting with opaque walls. Cut a circle (lid) from cardboard with the same diameter as the neck of the container. Make a hole in the center for the cutting. Pass the handle through the hole and immerse the bottom knot in water
It is important not to let the bottom of the cutting and the places where the roots should appear hang in the air! Change the water every 2-3 days. Wait until roots appear or until the cutting rots.
Some gardeners cover the rooting cuttings on top with a plastic bag or pouch and wrap them tightly. In most cases, the cuttings rot. Pelargoniums do not like high humidity in the air and soil. The roots and above ground parts must breathe well. When planting in the soil, they should also not be covered with jars and bags.
Video: One of the methods of cuttings in water
How to plant a cutting in the soil?
- For the cutting, take a small pot or glass. Place a layer of drainage on the bottom.
- Buy special soil for geraniums and pour boiling water over it in advance and cool.
- If a cutting with roots is planted, then pour a small layer of soil over the drainage, immerse the cutting in a glass up to the first leaf and cover it with soil. A cutting without roots is immersed in a glass filled with soil, also up to the first leaf. There should be a lower node with a bud in the ground, and there should also be at least one bud above the ground, which will become a growth point.
- There is no need to cover it with jars and bags. The main task is not to flood the soil, keep it loose so that the cutting does not rot.
- It takes 1–2 months for some varieties to take root, while others begin to grow literally immediately.
Further care
You need to specially prepare the cups - make holes in them for water drainage . In addition, thanks to the holes, air penetrates to the roots, which is also very good.
Next you need to follow the following instructions:
Add a little vermiculite to slightly wet, damp soil.
- Fill each cup with soil,
- If the soil was treated with boiling water, you must, of course, wait until it cools down. Fortunately, this will not take much time. Only a few minutes.
- Place the shoots that were previously freed from the lower leaves and deepen them a few centimeters.
- Leave the glasses on a tray (to make them convenient to move) and place them in a dark place for a while,
- After 5 days, the cups need to be moved to the window. Preferably NOT on the south side.
What to do if yellow, limp leaves appear on some plants? You can place them under the jars. That is, create something like mini-greenhouses for them. Thanks to the special microclimate, the plants will recover in a couple of days .
About geraniums
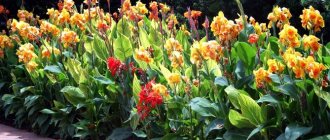
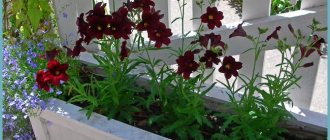
Geranium or pelargonium was very popular in the last century. She decorated mansions and simple peasant houses. Our grandmothers and mothers still grow these flowers. Until recently, geranium could be called a retro flower, but today it is regaining popularity.
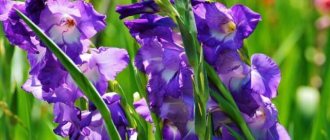
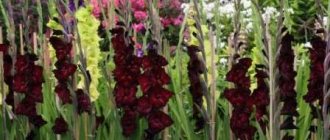
Bouquet of pelargoniums
The plant is interesting not only for its lush and bright flowering, but also for its versatility. Pelargoniums grow beautifully in rooms, on balconies and in outdoor gardens. Another plus is that the smell of geranium is not tolerated by many insect pests and mosquitoes.
Pelargonium is propagated by cuttings and seeds. However, each type and variety of this flower has its own nuances. For example, a zonal cutting produces excellent roots in a glass of water, but a royal cutting will rot in the same glass, and we will not see any roots.
How does geranium propagate at home?
Geranium mainly grows in open ground, and pelargonium is most often found among potted crops decorating window sills. The difference between them is not significant, therefore, in floriculture and gardening, both plants are mistakenly classified as geraniums.
Pelargoniums (geraniums) are propagated by:
- vegetatively - in parts from an adult specimen;
- generatively - seeds of the appropriate variety.
Each method has its own characteristics, which should be taken into account by those gardeners who want to start growing or propagating existing geranium specimens.
Caring for cuttings after rooting
A signal of successful rooting of shoots will be the growth of new leaves. In this case, you can replant the geranium into a new container along with a lump of earth. In this case, the pot should be slightly larger than the previous one - in a container that is too spacious, budding will occur much later, since the plant will direct all its forces to filling the free space with roots.
After planting geraniums in a permanent pot, it is recommended to pinch the crown - this will help the plant quickly take the shape of a bush.
Geraniums should be placed on a windowsill with sufficient lighting and no drafts. Watering should be moderate, and if the soil is very dry, it is recommended to moisten it little by little to prevent diseases of the root system.
Pelargonium reacts negatively to spraying the leaves - such care will have to be abandoned in the name of the health of the bush. During the active growing season, the flower is fed with potassium-phosphorus mineral fertilizers, which stimulate budding.
Other ways to plant geraniums
Royal geranium - home care for beginners
Other methods of reproduction are used extremely rarely. Growing from seeds is a troublesome task, and dividing the root can only be done during transplantation. In some cases, these methods are still resorted to.
Seeds
It is best to grow the seed in pre-prepared soil. The planting container is filled with nutritious soil and potassium permanganate. Sowing is carried out superficially. It is extremely important to create the right microclimate for growing. Conditions should be close to greenhouse conditions. To do this, take a container with a lid.
Dividing the root system
Additional Information! It is important to provide fresh air to the seeds. Otherwise they will begin to rot.
Transplantation is performed after the first leaves appear. It is not easy to grow a healthy plant from seeds at home. When the pelargonium has 3-4 full leaves, it is transplanted into a new container.
By dividing the rhizome
During transplantation, it is convenient to use the method of dividing the bush. The best time for propagation using this method is autumn. The flower is completely removed from the pot and divided into several parts as carefully as possible. Sanitary pruning is done not only for branches, but also for damaged or diseased root processes.
Plant care should be regular
Geranium cuttings do not take root. Methods for rooting a shoot
Roots can form in water or soil; the choice of method depends on the type of plant, time of year and the desires of the grower. If we let the cutting sit in water for too long, it may rot. For example, royal geraniums form roots in 35–40 days, which means this method is not suitable for them.
In water
The cuttings are placed with a dried cut in water (at a level of 4 cm). It is better to take an opaque container and disinfect it before use. The water should be soft, clean, settled, at room temperature (+22...+24 °C), it should be changed after 1–2 days. Some gardeners argue that you cannot change the water when rooting cuttings - they say, it’s better to just top it up. To reduce the risk of stem rotting, you can add crushed activated carbon.
The dishes with the appendage are placed in a lighted place, avoiding direct sunlight. Daylight should last at least 16 hours, and at night the temperature should not drop sharply. With this method, it is convenient to observe the growing roots, and you can easily determine the moment of planting in the ground.
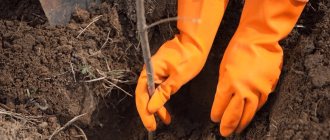
In the ground
If you know how to plant a varietal geranium with a shoot without roots directly in a pot with soil, you can quickly wait for a new plant. Planting of prepared geranium shoots should be carried out in nutritious, loose, slightly acidic soil to a depth of 1.5–2 cm. Experienced gardeners make a soil mixture of drainage soil, peat and sand, sometimes adding vermiculite. A layer of expanded clay is poured into a pot with drainage holes, then soil, and a small layer of sand is added on top, which provides some protection from waterlogging of the base of the cutting.
The soil must undergo a disinfection procedure. To do this, it is heated in the oven for 20–30 minutes or poured with a hot solution of potassium permanganate. The pot must also be disinfected before use. It is recommended to use formalin or just boiling water. Make a hole in the middle with a pencil, place the cutting, and press the soil tightly against it.
It is not recommended to cover cuttings planted in this way with a jar or plastic wrap, but this can be done if the leaves begin to dry out along the outer edge. After the leaves are restored, the jar is removed. The dishes with the shoots are placed in a bright, warm place - it can be a window sill, but without the drying effect of the central heating radiator and without direct sunlight. Water them moderately after the top layer has dried. For watering, use clean water at room temperature and a watering can with a narrow spout, directing the water to the ground so that it does not fall on the leaves and stem. Overwatering threatens the appearance of blackleg, which means the loss of the plant.
The appearance of new leaves signals that the plants have taken root. This may happen after a week or even after 3 weeks. From this moment they can be transplanted to a permanent place of growth.
Further care
Knowing how to plant geraniums without roots, gardeners often propagate varietal plants purchased at a high price. Plants rooted in water or soil are planted in pots or boxes with a mandatory drainage layer and nutritious loose soil. Caring for them includes creating comfortable conditions with the necessary amount of light, suitable air temperature, sufficient watering and regular feeding.
So, at home, young plants are most often placed on window sills. They can also be used to decorate balconies, galleries, and be planted in flower beds in the summer. The main thing is to provide the plants with at least 16 hours of daylight and protect them from direct sunlight, even when planted outside.
Geranium does not like moisture on its leaves; it must be protected from this by spraying neighboring plants, and it must be watered so that the stream of water is directed towards the walls of the pot. Young, recently rooted plants are often watered using the bottom method - placing them in a pan of water for 0.5 hours.
It is important to monitor the looseness of the soil, because the roots of pelargonium love to receive fresh air constantly. Fertilizing is carried out with special complexes of mineral fertilizers (for example, “Pelargovit”) no more often than after 2–3 weeks, simultaneously with watering
In order for plants to form lush bushes, they need to be carefully pinched with clean hands or disinfected scissors, treating the cut areas with activated carbon.
Propagation by leaves
Another method, similar to cuttings, is propagation of geraniums by leaves. It consists in cutting off only leaves instead of shoots, choosing healthy specimens with a dense base. The leaf must be cut carefully, with a very sharp knife or scissors, at an acute angle in relation to the stem.
Further actions are similar to the usual growing of shoots in water:
- Treat leaf sections with charcoal or “Kornevin”;
- place the leaf in a container of water and hold until roots appear;
- pour prepared soil into a small pot (drainage holes must be provided at the bottom) and water;
- plant the leaf in the soil, deepening it by 2-3 cm;
- care and wait 3-4 weeks before roots appear;
- then transplant the rooted leaf to a permanent place in a larger container.
Features of transplanting pelargonium after purchase
Buying geraniums does not mean immediately replanting them from transport store soil. Over the past weeks, the plant has had to quickly adapt to changing temperatures and lighting several times, so we need to take pity on it and let it adapt to new living conditions. As a rule, it takes several weeks (from two to four) to get used to. Then they proceed according to the algorithm:
- We take a pot a little larger than the previous one.
- Prepare fresh earthen mixture.
- We transfer the plant into a new container, after moistening the soil a little.
- Add soil to the edges of the pot (do not compact it).
- Water carefully.
It is recommended not to touch pelargonium purchased in winter until spring or at least mid-February. In a dormant state, the plant will not tolerate such a test. If you bought a flowering geranium, it is better to wait until the buds fall off.
Purchased geraniums must be carefully inspected before transplanting.
Before transplanting, carefully inspect the root system of the plant. Healthy roots entwine the earthen ball completely. It is necessary to shake off the substrate and wash them only if rot, diseases or insects are detected. In other cases, the whole earthen ball is moved to new soil. Young roots will receive all the necessary nutrients from it.
Some amateur flower growers violate generally accepted rules for transplanting purchased geraniums. They immediately carry out the above-described procedures with it, believing that there is no need to wait and it is better to subject the plant to all the tests right away, rather than dragging them out for a month.
How to plant geraniums without roots
You can plant a sprig of geranium without roots. The ideal time is spring or early autumn. It's usually done like this:
- A geranium branch 5–7 centimeters long with two to five leaves is cut at a right angle.
- Warm, settled or boiled water is poured into a transparent glass.
- A geranium cutting is placed in water. It needs to be changed every 2-3 days. To speed up the rooting process, dissolve succinic acid (250 ml tablet) in the liquid or add a little biostimulant - Epin, Zircon, Kornevin (2-3 ml per liter).
Keeping the future pelargonium bush in water for a long time can cause rotting of the part lowered there. To prevent this, you can put an activated carbon tablet in the container.
Geranium cuttings are dipped in water to cause roots to appear.
Most gardeners do not immerse the cuttings in water, but immediately root them in a prepared pot with an earthen mixture. After pruning, the cuttings are dried at room temperature for about two hours. Then they are planted in transparent plastic cups filled with universal soil for flowering indoor plants or peat chips. The type of geranium affects the method of rooting: zonal geranium produces roots faster in water, fragrant - in the ground, royal also prefers soil, but the process is slow.
Geranium cuttings can be immediately planted in the soil mixture; the probability of rooting is very high
The dishes with future bushes are placed in a well-lit place, but not in direct sunlight. Ivy and zonal geraniums are ready to be transplanted into a pot in 10–15 days; royal geraniums will take a month. Transparent cups are good because the appearance of roots can be quickly noticed - they reach the walls of the dish in a few days. Another criterion that the procedure was successful is the appearance of a new leaf.
Is it possible to replant flowering geraniums?
During flowering, any plants spend a lot of energy on forming buds and ripening seeds. During such a period, it is better to take pity on the geranium, increase feeding, and not subject it to additional stress. Otherwise, first the flowers will fall off, then the leaves will turn yellow. The plant may even die. It is recommended to wait for the end of flowering and replant the pelargonium after 5–10 days.
If there is an urgent need to transplant the geranium into a new pot at the time of flowering (the plant was dropped or damaged, the bush became sick), then this can still be done. You need to try to transfer the pelargonium into a new container without damaging the roots or destroying the earthen lump. The flowers will, of course, fall off, but the geranium will survive.
Features of plant care after transplantation
Geranium transplanted into a new pot does not need feeding for the first two to three months. It will take all its nutrients from fresh soil. Therefore, the pelargonium bush requires only timely watering as the soil dries out. It is important to ensure optimal temperatures and proper lighting. After the appearance of new leaves and the growth of the rooted cuttings, pinch the pelargonium so that it does not stretch upward, but bushes.
How to plant geraniums correctly: choosing a container, requirements for soil composition and other nuances
With proper care, geranium can grow and bloom for 10–12 years, maintaining its decorative appearance. How often does it need to be replanted? This depends on the rate of formation of green mass. Fast growth requires annual replanting of the plant, slower growth - once every two years. The usual schedule for updating a pelargonium pot is every 10-12 months.
Which pot to choose for geraniums
Geraniums do not tolerate large root spaces. If you plant pelargonium in a pot of significant volume, it may even die. It definitely won’t bloom until the roots “master” the entire soil. Therefore, it is better to plant the flower first in a small container, and after a year change it to a larger one. For one root, a pot with a diameter of 10–14 cm is suitable; its height should not exceed 15 cm (ideally 10–12 cm). When changing a container, its diameter is taken into account; the new pot should be 1.5–2 cm larger than the previous one.
The pot should have drainage holes. The appearance of pelargonium roots in them is a signal to transplant into a large container. A container made of unglazed ceramics is best suited. The bush feels good in it, grows and blooms. But there is one drawback: the soil dries out faster in clay dishes than in plastic ones. Therefore, more frequent watering is required.
How to plant correctly in a pot with soil?
How to plant correctly? First you need to properly prepare for this. To do this, you need to follow the following instructions:
- Sharpen the knife as sharp as possible.
- Carry out thorough disinfection with medical alcohol.
- Cut the cuttings as carefully as possible. Definitely from the top with 3-4 leaves. But under no circumstances with buds! Otherwise, roots will not grow on such shoots for very long.
- Place the resulting raw material in the shade for a while. Which one? When a new film appears at the cut site.
- Sprinkle the cut with Kornevin; if desired, you can use coal dust instead.
Methods for planting geranium seeds
Some gardeners do not like to take the simple path, choosing something more difficult. Therefore, they decide to propagate geranium using seeds. In order to implement our plans, it is necessary to carefully select planting material; it must be of high quality. If the seeds turn out to be old or rotten, then seedlings may not be expected. After this, you will need to take a tray or other wide container, fill it with soil, water it a little, scatter the seeds on top and cover the greenhouse with a transparent film. Be sure to put all this in a warm place. Having noticed the first sprouts, you can remove the film and wait for the leaf plates to appear. After this, the young pelargonium is allowed to be transplanted into a separate pot.