Caring for and growing Dieffenbachia is a rather complex process that requires certain skills and dexterity. If you approach this event with the utmost care and precision, you can soon get a healthy, strong Dieffenbachia plant that will delight its owner with an attractive appearance and unusually abundant foliage.
To grow Dieffenbachia at home, you should familiarize yourself with the basic characteristics of this plant, as well as the rules of care, watering, fertilizing and replanting. In addition, it is necessary to study in detail the diseases that can affect Dieffenbachia in order to take care of its health in advance or begin timely treatment of a diseased plant. Proper care will allow you to get a healthy specimen that can be used for reproduction or simply grown for your own pleasure.
Description of Dieffenbachia
Dieffenbachia belongs to the genus of evergreen plants from the Araceae family. Its wild relatives grow in the tropics of North and South America. The plant received its name in honor of the Austrian gardener Joseph Dieffenbach. The Dieffenbachia indoor flower is a tree-like plant that has an erect trunk and a growth point at its top, which is why many species do not bush, but over time turn into small trees. However, there are forms in which the growth points are also located along the stem, according to which they produce lateral shoots and are shaped like shrubs.
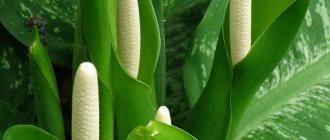
The most remarkable thing about Dieffenbachia is its leaves - juicy, dense, dark green with various light cream patterns - stripes or spots. The plant blooms very rarely, only if the growing conditions are ideal for it, and the inflorescence is a spadix that appears in the axils of the leaves. The inflorescence is covered in a creamy blanket, which is both protection and decoration. Dieffenbachia blooms for only a few days, and then the inflorescence dries out, and can remain in this state for a long time. Under the right conditions, fruits appear from the inflorescences - berries with a bright orange-red color.
It must be remembered that Dieffenbachia, which is grown at home, is a poisonous plant, the juice of which contains a certain amount of needle-sharp crystals of calcium oxalate. They cause dermatitis on the affected area of the skin or mucous membrane, as well as various allergic reactions and irritation. For this reason, it is necessary to keep it away from children or pets, and when cleaning, use protective equipment.
Although the plant is poisonous, its proper cultivation will not only not cause harm, but will also help create a favorable indoor microclimate. Dieffenbachia perfectly filters the air mass, while absorbing harmful impurities of benzene or xylene. For residents of large cities with industrial enterprises, it is mandatory to grow Dieffenbachia, because it will help clean the air and enrich it with oxygen.
How to prune Dieffenbachia?
Dieffenbachia belongs to the araceae family and is often used for growing in office and home spaces.
The plant is a gorgeous bush with large variegated leaves on a powerful stem. A feature of Dieffenbachia is its high growth rate - in a year it can reach from 1.5 to 2 meters in height. With proper care and proper maintenance conditions, the flower grows quite bushy. However, very often the plant drives a tall, but completely bare, trunk, while the leaves themselves remain only at its top. The reason for this phenomenon may be too dry air in the room, but by its nature, Dieffenbachia needs constant stimulation of growth, since it itself is reluctant to sprout new shoots.
Soil for growing
To grow Dieffenbachia at home, you can use universal soil for indoor plants, since the plant is not particularly demanding on its composition. To make a soil mixture, you need to take 4 parts turf soil, 1 part leaf soil, 1 part peat soil and 1 part sand. Additionally, charcoal can be added to this composition, which can disinfect the soil, being an excellent antiseptic and absorber of excess water. A prerequisite is the use of drainage so that excess moisture does not accumulate in the pot and does not allow the roots of the plant to rot.
Plant propagation methods
The houseplant takes root easily, so it is easy to propagate. Most often, cuttings are taken to propagate Dieffenbachia, which are prepared from the main stem. Be sure to choose an area with buds. It is immersed in warm water for one to three weeks. This time will be enough for the cutting to take root.
After this, you need to select a container, pouring a mixture of peat and sand into it. The sprout is placed in a pot, covered with a cap made of a plastic bottle. Now all that remains is to place the container in a warm place. The greenhouse is often ventilated, and the shoots are watered as the top layer of soil dries. In two months the first leaves will appear. Now the plant is ready for further development.
You can root a cutting taken from the bottom of the stem directly in the soil.
Often young leaves begin to grow from the stump obtained by cutting cuttings. In bush species of Dieffenbachia, lateral branches play the role of propagation material. They must be separated from the mother stem and planted in another pot. Plant propagation is always effective, as it takes root easily.
Comfortable conditions
As for the conditions for growing Dieffenbachia indoors, one of the main factors for proper healthy plant growth is air humidity. Since its wild relatives grow in tropical climates, indoor specimens require high humidity, and therefore they must be regularly sprayed with a spray bottle. If this is not done, the succulent leaves of the plants will soon dry out and turn yellow at the edges, and soon they will begin to fall off. In addition to spraying, you can place the pot on a tray with wet gravel, and then the evaporation will maintain a normal microclimate for the plant.
Watering
With proper care, watering Dieffenbachia should be plentiful during the period of active growth - from spring to autumn, and in winter it should be reduced. It should be remembered that excessive watering and stagnation of water in the pot can have a detrimental effect on the condition of the plant, and its leaves will turn brown at the edges and fall off.
Temperature
The temperature regime of the environment is also important for Dieffenbachia - it grows well only in warm climates, and therefore it is necessary to maintain a temperature in the room of +18 + 21 ° C. If it becomes much lower, the plant will immediately react to the change - its leaves will turn yellow and rot, and if it remains in such conditions for a long time, the Dieffenbachia will completely die. It is also necessary to protect the plant from drafts, since it is afraid of cool air.
Lighting
The illumination of the space in which Dieffenbachia is located should be stable without direct sunlight or strong darkness. The ideal location is considered to be the western or eastern side; on the south it will quickly burn out in strong sun, and on the north, in the absence of sufficient light, it will stretch out and become fragile, and its leaves will become smaller. Also, in low light conditions, light spots on the leaves of all varieties turn green over time, which reduces the attractiveness of the flowers.
Dieffenbachia stretched out
Question:
My Dieffenbachia has an elongated trunk and very long petioles, what could this be connected with? I can’t wait to cut it, only it’s winter now...
Grey:
They are elongated because she clearly does not have enough lighting! Now is not the best time of year for houseplants. It's a bit dark. Either move it closer to the window, or arrange additional lighting. Hang a regular fluorescent lamp and add light in the evening. For example, this is what I do: I illuminate many plants until 24 pm. If you move it closer to the window, then pay attention to the radiators. Dieffenbachias do not like dry air, like all other plants. So, it is necessary to humidify the air in the room to increase humidity! No need to cut now! Still, wait until spring, when all plants begin their growing season. Transplantation is also advisable in the spring. There is no need to cause additional stress to the plant.
Question:
What to do if the trunk is exposed?
Natali:
Dieffenbachia is characterized by gradual exposure of the trunk from below, but this is normal if it grows well and produces new leaves. However, if the new leaves are smaller than the old ones and the petioles are too long, then the plant clearly does not have enough light.
Shlomo:
Yellowing of the lower leaves may be normal if the plant is large and there are many healthy leaves, but it may be the result of a draft or lack of light. Dieffenbachia can be illuminated; it develops well even when sunlight is completely replaced with artificial light, and it has a positive attitude toward lengthening daylight hours.
Care and feeding
Intensive growth of Dieffenbachia is observed from May to August, and therefore at this time it requires feeding with various fertilizers. For this purpose, organic or complex mineral fertilizers that do not contain lime are suitable. It has a detrimental effect on the Dieffenbachia plant, and therefore it is necessary to choose fertilizing without it.
You also need to remember that for plants that have light spots on the leaves, fertilizers with a high nitrogen content are not suitable. This element causes the light spots and stripes on the leaves to change color, turning them green. In other words, in order for indoor Dieffenbachia to have the original color of the leaves, it is necessary to correctly select a fertilizer with no lime and a low nitrogen content, and during the dormant period, that is, from September to April, the flowers should not be fed at all.
Dieffenbachia flowering
Question:
Dieffenbachia grew just fine, then it began to bloom. I heard that flowers need to be removed?
polin:
If Dieffenbachia begins to bloom and you want to see the flowering, then it simply needs increased feeding. My bush bloomed. All the “oppression” was expressed in one sheet of smaller than usual size and that’s all. You just need mandatory weekly fertilizing with mineral and organic fertilizers during the flowering period and after it for at least a month. Then you can switch to the normal feeding mode.
If we proceed from the fact that when we need to support the foliage, we feed it where there is more nitrogen, i.e. as usual “for decorative deciduous trees”. But, since it still blooms, I did one feeding “for decorative flowering plants”, where there is more potassium and phosphorus.
2131 0 0
Dieffenbachia is a tropical plant with large leaves with characteristic speckles and light veins. This decorative evergreen crop lives in many homes, as it is beautiful and unpretentious. Let's look at the features of caring for Dieffenbachia.
Transfer
Like many other indoor flowers, Dieffenbachia needs to be replanted when the pot for it becomes too small or the soil needs to be replaced. The flower is replanted in the spring, around the end of April, before the start of the period of intensive plant growth.
The pot is selected so that it is slightly larger than the previous one, but not too large for the plant. In order to create additional roots, the stem part is placed a little deeper than before, and then new roots will form from the axils of the leaves. As for the soil, a 4:1:1:1 scheme is used - turf soil, leaf soil, peat soil and sand.
What to do with a cut trunk?
The trimmed remains are used to propagate Dieffenbachia. In this case, not only the top is rooted, but also the long trunk itself:
- Rooting the top. Place the cut top of the head in a glass of water and wrap it in a dark cloth so that it does not show through. The water is changed every 2-3 days. After the young roots appear, the top is planted in a pot with the trimmed Dieffenbachia or in a separate container as an independent plant. You can immediately root it in a mixture of soil and sand.
- Rooting the trunk. Cut the long stem into pieces so that buds remain on each. Leave to dry for 2 days at room temperature.
Keeping tropical plants is difficult. In addition to creating special conditions for them, they also need various procedures that improve their growth and vegetation. One of them is pruning. How to carry it out, in what time frame, plays an important role for the plant. Dieffenbachia grows better and rejuvenates after pruning, if it is done on time and correctly.
Dieffenbachia, plants with decorative leaves, is native to the tropical forests of the American continent. Described by Austrian botanists, the plant received its name in honor of one of the discoverers. In nature, species of ornamental shrubs reach enormous sizes. In indoor floriculture, hybrids are common that are of interest due to the coloring of the leaves and the characteristics of the flower. The plant is valued for its ease of care and is grown to purify indoor air.
- Description of a tropical plant
- Conditions for growing tree crops
- Plant propagation methods
- Pruning: terms and rules
- Post-pruning care techniques
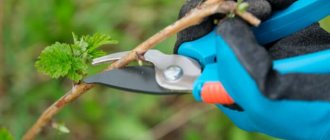
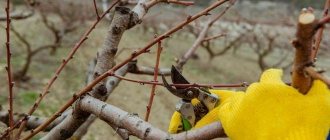
Trimming
Pruning a Dieffenbachia plant is necessary when there are drying or broken leaves, but it must be done according to special rules. Since the plant is poisonous, it produces juice that causes skin irritation. Before removing unnecessary leaves, you should take a knife or sharp blade and first wipe it with alcohol so as not to introduce infection into the plant tissue. With a clear, careful movement, cut off the damaged leaf, wet the cut with gauze or cotton wool to remove the juice, and sprinkle the cut area with crushed coal so that it quickly becomes covered with a protective layer and does not release the poisonous juice. It is imperative to use rubber gloves to protect the skin of your hands from the effects of calcium oxalate crystals contained in Dieffenbachia juice.
Conditions for growing tree crops
For tropical Dieffenbachia, the following conditions are created necessary for active growth:
- Lots of light is important, but no direct sunlight. Therefore, it is better to place a pot with a plant in the southwestern or southeastern part of the house. You can determine the lack of light by how the leaves look. If the number of light spots decreases and the plate becomes uniformly green, then the plant needs lighting.
- The indoor air temperature range for an indoor flower is from 18 to 25 degrees above zero. In summer, you can place a pot of Dieffenbachia on a glassed-in loggia or veranda. The heat in the room will cause the leaves to dry out and fly around.
- Drafts and sudden temperature changes should not be allowed, otherwise the beauty will be left without leaves.
- The soil is selected with moderate acidity.
- Given the rapid growth of the bush, the flower needs a large pot.
- Tropical air is always saturated with humidity. This is important for the plant. Therefore, he is satisfied with regular spraying. When the air temperature in the room drops, the shower is replaced by wet treatment of leaves. After moistening a soft cloth in warm water, carefully wipe the surface of the sheet with it.
The created conditions will have a positive effect on the proper development of Dieffenbachia.
Flower propagation
If the trunk has been trimmed (it is necessary when the plant has reached an impressive size), the cut part is not thrown away, since a new young flower can be grown from it.
Propagation of Dieffenbachia by apical cuttings
To do this, the apical part is placed in water or a soil mixture at the rate of 1 part peat and 1 part sand so that roots appear from the leaf axils. In this case, the Dieffenbachia cuttings to be rooted must be covered with a glass cap or plastic film, and the pot should be placed in a well-lit place, but not in direct sunlight. You need to water the sprout 1-2 times a week so that the earthen ball is wet, but not waterlogged.
To prevent the cutting from deteriorating and the roots to appear faster, it must first be treated with the root growth stimulator “Kornevin” or “Heteroauxin”, and add the product to the water for irrigation once a week. The soil temperature should not be lower than +20°C, and there should be no drafts. When the root system becomes more abundant and the roots themselves reach a length of 4 cm, the cuttings can be planted in the soil, and if they were initially rooted in the substrate, then they must be transplanted into the soil along with a lump of earth.
Propagation of Dieffenbachia by stem cuttings
Dieffenbachia can be propagated not only through the apical part, but also through pieces of the trunk, for which they are cut up to 20 cm long with several internodes from which leaves or roots will appear. Before planting, the cuttings must be dried and then planted horizontally in the ground. If the leaves do not appear for a long time, but the cuttings do not deteriorate, you need to be patient - Dieffenbachia reproduces in this way for an extremely long time. Over time, you can notice that buds swell at the leaf nodes, from which young leaves will then appear.
Seed method of propagation of Dieffenbachia
The method of propagating Dieffenbachia using seeds is considered the most labor-intensive - this plant blooms extremely rarely at home and also requires pollination. To do this, it is necessary to transfer pollen from male flowers to female flowers located on the same ear-inflorescence - female flowers at the bottom, and male flowers at the top. If pollination is successful, then in about six months it will be possible to use the ripe seed berries as planting material.
Proper pruning of Dieffenbachia with a long trunk
Dieffenbachia is a wonderful indoor plant of the Araceae family. Dieffenbachia has beautiful wide leaves with variegated colors. At home, the plant reaches up to 2 meters in height.
If you grow Dieffenbachia in a room with dry air, it quickly becomes bare and takes on a completely unattractive appearance. In order for the flower to be lush and bushy again, it is necessary to carry out regular pruning.
How to prune Dieffenbachia at home is collected in this article.
Proper pruning of Dieffenbachia
To properly prune a plant, you need to take:
- sharp knife;
- use rubber gloves;
- charcoal;
- alcohol;
- soap solution.
It is recommended to trim a plant with a long trunk so that the diameter is at least 3 cm. The cut should be made as low as possible, since nothing will grow on a bare trunk.
It is necessary to ensure that the rudiments, which are presented in the form of half rings, are preserved on the stump. Optimally there should be two or three.
From each bud it will be possible to get a new trunk, and the flower will become very picturesque in the future.
The milky sap of Dieffenbachia is poisonous, so it is recommended to use rubber gloves when pruning. Perform the pruning carefully so that the juice does not get on the skin or eyes. The slightest contact of the plant juice with the skin can cause a severe burn. Try to be extremely careful when pruning.
To reduce the secretion of juice, you need to stop watering the Dieffenbachia 5 days before the procedure. You need to cut the trunk with a sharp blade or you can use a thin hacksaw.
Before pruning, you need to wipe the blade with alcohol to prevent the plant from becoming infected. After the procedure, the instrument should be washed well with detergent to remove all remaining juice.
It is necessary to cut horizontally. To avoid Dieffenbachia infection, the cut site must be disinfected with ground activated carbon.
The remaining stump can be covered with a jar or polyethylene. Before the buds awaken, you need to reduce the frequency of watering. The jar must always be removed to ventilate the plant. When the buds wake up, you can carry out regular watering and fertilize.
The upper part of the plant that remains after pruning can be rooted and after some time planted on the stump. Thanks to this, you will get a beautiful and lush bush.
If you cut a long trunk with leaves at the end, then it is optimal to cut it into several parts. Indoor Dieffenbachia is excellently propagated by stem cuttings. Before you begin to root the cutting, it should be dried a little, about 2 days.
Rooting of the apical part can be carried out in water or wet sand. If rooting in water, then it is optimal to use an opaque container. The water should be changed occasionally.
Temperature and lighting
Dieffenbachia loves bright light and warmth. The room temperature should be 18 - 21°C. When the air temperature drops to 10 degrees, the leaves of the plant begin to turn yellow and rot. The plant does not tolerate drafts and excessively dry air.
Indoor Dieffenbachia prefers bright, diffused light, but it must be kept away from direct sunlight. If you create additional lighting, the pot with the plant can be placed away from the windows. In summer, the green pet can be taken out into the fresh air.
In the cold season, the plant needs good lighting. With insufficient light, the leaves of the plant become smaller and the flower loses its decorative effect.
Watering mode
From spring to autumn, Dieffenbachias need to be watered abundantly. In winter, watering should be moderate; it is recommended to use warm water for irrigation. You should not flood the plant, because excess moisture leads to rotting of the roots and the appearance of brown spots on the edges of the leaves. But there is no need to allow the soil to dry out, as this will cause the leaves to fall off.
To increase air humidity, place the flower on a tray with gravel and water. It is necessary to spray regularly and wipe the leaves with a damp cloth.
Top dressing
If you properly care for Dieffenbachia, it will have an excellent appearance. With the onset of the active growth period (spring and summer), Dieffenbachia needs feeding. Fertilizers should be applied once every two weeks. To do this, use complex mineral fertilizers that do not contain lime. During the autumn and winter seasons, the plant does not need to be fertilized.
It should be taken into account that the plant form with white leaves turns green if the flower receives a lot of nitrogen. Therefore, it is best not to use organic fertilizers for such flowers. When feeding Dieffenbachia with mineral fertilizers, the dose must be reduced by 2 times.
Possible diseases and pests
Since the Dieffenbachia indoor plant requires high air humidity, it may die due to the harmful effects of microorganisms for which such conditions are ideal for life and reproduction. Fungal diseases that affect large areas of flowers over a short period of time are especially dangerous for plants. Such damage is not visible on the underground part of the plant, but it is the root system that is most often affected by rot due to excessive watering.
Rotting of the root part of a plant can be determined by specific signs, which include lethargy of the plant, falling leaves and constantly wet soil even with little watering. In this situation, it is necessary to remove the Dieffenbachia and examine its root system for the presence of rot. If it is present, the damaged roots should be cut off, and the cut areas should be treated with charcoal or a solution of potassium permanganate. And it is imperative to plant the diseased plant in new soil so that harmful microorganisms are not transferred from the previously used soil.
As for the pests that attack Dieffenbachia, these include aphids, spider mites, mealybugs and scale insects. All these small organisms are capable of destroying a plant in a short time, and therefore, when the first signs of damage are identified, it is necessary to take measures to treat the plant.
The main symptoms indicating a plant disease are wilting, yellowing and curling of the leaves, as well as the presence of a white coating or cobwebs on them. To control pests, wipe and spray Dieffenbachia with a soap solution or Actellik solution at a rate of 1-2 ml. substances per 1 liter. water. In addition, a folk remedy for controlling Dieffenbachia pests is to spray with an infusion of medicinal dandelion for two weeks until the harmful microorganisms completely disappear.
Dieffenbachia transplant at home
Dieffenbachia signals its need for transplantation:
- slowdown in growth rate;
- reducing the size of the resulting leaf plates;
- rapid drying of the earthen coma after regular watering.
If you take such a plant out of the pot, you will find that the roots have completely occupied the entire volume, and the substrate is practically invisible due to their intertwining. In this case you need:
- choose a pot with a diameter 1–3 cm larger than the previous one;
- prepare fresh soil and material to replace the drainage layer.
Before transferring the plant into a new container, it is useful to inspect the root system.
When there is crowding or irregular watering, it often happens that some of the roots die or rot. When they are removed in a timely manner, there is no need to be afraid that after transplantation the Dieffenbachia will suffer not only from acclimatization, but also from infections developing in the soil.
Roots that have become darkened by rot, become wet, or, conversely, dry, are carefully removed, and the cut areas are treated with a fungicide and powdered charcoal. Now the green pet can be transferred to a fresh nutrient substrate. This must be done in such a way as to preserve as much as possible the integrity of the coma of roots and soil formed during growth. In this case, the period of adaptation to new conditions will be as short as possible, and the gardener will not encounter leaf fall or other alarming symptoms of plant ill health.
Dieffenbachia transplantation at home is carried out at the end of winter or early spring, when the plant has not yet entered the active growing season. The deadline when the culture can be fully and painlessly transplanted is the beginning of May. If circumstances force you to move the plant to a new container during the hot season, this should be done without disturbing the roots. It is better to use a new drainage for each Dieffenbachia transplant. And the soil must be sterilized before filling it into the pot.
Young specimens are replanted annually. Such plants grow quickly, but are compact, do not need pruning and can be easily transferred to a larger container.
But how to replant a Dieffenbachia with a long trunk, when the foliage remains only at the top, and a tall, unbranched shoot spoils the appearance of the plant?
Attention: the Dieffenbachia plant is poisonous!
Since Dieffenbachia produces poisonous juice, when working with the flower you should always use gloves that will protect against harmful substances that affect the skin. If, however, a situation does occur in which the juice gets on the skin and causes irritation, there is no need to try to wipe it off - the sharp crystals of calcium oxalate will pierce even more deeply into the upper layer of the skin. It is best to place the affected part of the body under running water so that it washes away the juice from the surface. After working with Dieffenbachia, you must thoroughly wash your hands with soap so that microscopic particles of the plant do not remain on them, which can cause irritation to human skin or mucous membranes.
Description of a tropical plant
The indoor flower has a thick, fleshy stem on which there are large ovoid leaves. Many plant species reach a meter in height. They differ only in the color of the leaves:
- In spotted Dieffenbachia, small yellowish spots are scattered on the dark green leaf blade. There are a lot of them in the middle, towards the edge they disappear.
- The Seguin hybrid has huge leaves with a diameter of fifteen centimeters. In addition to spotting, whitish stripes are visible along the veins.
- Dieffenbachia Camilla has a bush form with small leaves. The originality is in their colors: light middle and dark green edges.
- The lovely Dieffenbachia has beautiful symmetrical colors. The leaf plate has veins drawn in a light tone.
- In bush varieties of the plant, the oval-shaped green leaves have light stripes in the middle.
- During the growing season, the indoor plant produces inconspicuous white flowers collected in a cob.
Dieffenbachia is characterized by rapid growth. The leaves appear so quickly that after a year or two the top of the tree rests on the ceiling. In this case, there are no leaves left on the stem below. The decorative appearance of a tropical flower attracts many. By absorbing moisture from the leaves, the plant releases a lot of oxygen and helps reduce the content of chemical compounds in the house. But so many of them are distinguished by the materials used in the production of furniture.
But in addition to its beneficial properties, the plant is considered poisonous. Therefore, it is suitable for those who do not have animals at home. The tree will serve as an excellent air ionizer in offices and industrial premises.
How to care for Dieffenbachia?
Dieffenbachia, which is cared for at home by optimal maintenance conditions, timely watering and fertilizing, grows very quickly. Every week a new leaf appears on it. Within a few years, tall plant species grow up to two meters, and small ones - up to a meter. Despite its unpretentiousness, Dieffenbachia does not like drafts and low temperatures and needs proper watering and pruning.
Watering
How to water Dieffenbachia? The soil in the flowerpot where the plant is planted should not dry out and the flower should be watered regularly. Watering Dieffenbachia depends on the time of year:
- in winter it should be moderate and done as the soil dries, once every 7 days;
- In spring and summer, the soil in the pot is watered frequently - once every 2-3 days. Once a week, the culture can be given a warm shower.
Before watering, the water must be left for at least two days. It should not be cold, as this will damage the roots of the plant. If the leaves of the plant turn brown, the water has increased hardness and you need to add a little oxalic acid to it. Softer water for irrigation will be rain and snow. It is very important to maintain a balance of water in the soil so as not to cause rotting of the root system. Humidity is no less important for the bush. If the air in the room is too dry, place the flowerpot in a tray with damp sand, gravel or moss, or place a container of water next to it. Dieffenbachia leaves are wiped with a damp cloth.
Pruning and updating the plant
As the flower grows, it loses its lower leaves and its trunk becomes bare, which means it needs pruning or renewal. How to prune Dieffenbachia? Pruning the bare stem of a bush should be done with gloves, as the sap of the plant is poisonous and can cause irritation. The stem is cut to a height of 10 centimeters from its base. After some time, new young plants will appear on it.
Caring for a young flower
In the first year of life, it is better to install the bush on the windowsill of a western or eastern window. In order for it to develop correctly and not lose its decorative effect, it is necessary:
- regularly water and spray the flower;
- turn it from time to time so that its trunk is straight and develops evenly on all sides;
- feed with fertilizers containing potassium, reducing the indicated dosage by 50% (before feeding, the flowerpot must be well watered so that the fertilizer does not burn the roots).
How to renew and replant Dieffenbachia?
You need to cut the stem 1.5–2 cm above the node so that several viable buds remain down to the ground level.
The cut area is dried with a napkin and treated with activated carbon or charcoal powder. In this form, the plant can be transferred to a fresh substrate. Before transplanting Dieffenbachia, mix:
- two parts garden soil;
- part of crushed sphagnum moss;
- part of the peat;
- part of the washed sand.
You can add crushed charcoal to the soil, and if desired, replace peat with soil from under coniferous trees.
The resulting substrate should be loose and not too moisture-intensive. If the roots of Dieffenbachia, after transplantation or in the process of further growth, find themselves in a constantly moist, dense environment, this threatens them with rotting and inevitable diseases.
The bare stem and top with foliage remaining after pruning can be successfully rooted in a light sand mixture. Over time, the resulting cuttings will turn into the same beautiful Dieffenbachia as their mother plant.
A video about transplanting Dieffenbachia will help you understand the intricacies of this stage of caring for a tropical plant that has firmly settled on indoor window sills. After the plant is in new soil, it needs time to acclimatize. That's why. Until the full growth of new leaves begins, Dieffenbachia is carefully watered and protected from direct sunlight. The crop does not need fertilizing for the first time after transfer to a nutrient substrate.
Video about transplanting Dieffenbachia cuttings
Today I want to introduce you to my tropical beauty - Dieffenbachia, which is native to South America. The plant attracts with its original colors of lush foliage and unpretentiousness to growing conditions. However, there is one caveat - it does not bush or branch on its own, so there is a need for regular replanting and pruning. Let's take a closer look at how to properly perform these procedures.
Is it possible to trim the top of Dieffenbachia? How to transplant Dieffenbachia: tips for gardeners
Indoor plants have long been the most exquisite decoration of the home, as they give a feeling of comfort and peace. One of the most beautiful house flowers is Dieffenbachia. Reproduction of Dieffenbachia at home is a simple process, but it requires some skill and knowledge. In addition, the indoor flower is quite unpretentious and easy to care for, but very effective.
In this article you can find up-to-date information on how Dieffenbachia propagates at home, descriptions and recommendations for each method.
Timing of pruning
Dieffenbachia is a flower that stretches upward, but does not bush. To give it the appropriate shape, you need to trim the plant.
You can prune Dieffenbachia for the first time when it reaches the age of 2-3 years. It is carried out when it is discovered:
- stem bare below;
- the top is shaggy from an excess of leaves;
- falling and yellowing of leaves.
It is advisable to prune in winter, during the dormant period, although if urgently necessary, this can be done at any other time.
In the future, radical pruning at the root is performed every 2-4 years. This allows you to grow several plants from the trimmed part.
Choosing a new pot and soil
Before preparing Dieffenbachia for transplantation, you need to select the optimal soil and container.
The plant should be planted in a pot that is 1–3 cm larger than the previous one. The new container can be taken from the same material as the old pot. Although, if desired, plastic can be replaced with clay, and vice versa.
It is imperative to prepare fresh soil. It is not recommended to buy soil for this flower at a flower shop. The fact is that purchased land is moisture-intensive. When grown in it, the roots of the plant will rot.
You can prepare the soil with your own hands. But for this you need to know the optimal composition of the soil. Dieffenbachia grows well on a mixture of peat, sand and turf soil. These components are taken in equal proportions. You can add 4 parts of leaf soil to the soil.
Also, the composition of the soil for this flower can be as follows: humus (2 parts), peat (2 parts), leaf soil (2 parts) and sand (1 part). Before using the soil mixture, it is recommended to sterilize it. It is worth noting that if Dieffenbachia is taller than 1 m, then the soil for it should be prepared heavier.
Here it is recommended to increase the part of the leaf soil. Also, some gardeners add crushed sphagnum moss, charcoal, garden soil or soil from under coniferous trees to such a soil mixture.
Drainage (brick chips, charcoal) is placed in the selected pot, which must have holes at the bottom. Only after this the self-prepared soil is poured into the container.
Dieffenbachia pruning
An adult plant that is well rooted should be pruned. Before the procedure you need to prepare:
- a sharp knife with fine teeth and alcohol for processing it;
- cotton pads;
- Activated carbon;
- glass container.
The sequence of actions is as follows:
- use a knife to make a horizontal cut so that the remaining part contains small buds in the amount of 2-5 pieces;
- Apply alcohol to a cotton pad and treat the cut area to avoid the appearance of mold and bacteria;
- The stump is covered with a container, which is periodically removed for ventilation.
Since the culture is poisonous, all manipulations are performed strictly with gloves! After work, you need to wash your hands thoroughly!
If desired, you can grow a new flower from the cut part. To do this, it is dried during the day in the open air, then placed in water in which crushed activated carbon is dissolved.
After just 2 weeks, you can see how the cuttings have put out their first roots. After they appear, you need to root the plant by planting it in a container with soil. This is how pruning flows into the process of reproduction.
Attention: the Dieffenbachia plant is poisonous!
Since Dieffenbachia produces poisonous juice, when working with the flower you should always use gloves that will protect against harmful substances that affect the skin.
If, however, a situation does occur in which the juice gets on the skin and causes irritation, there is no need to try to wipe it off - the sharp crystals of calcium oxalate will pierce even more deeply into the upper layer of the skin. It is best to place the affected part of the body under running water so that it washes away the juice from the surface.
After working with Dieffenbachia, you must thoroughly wash your hands with soap so that microscopic particles of the plant do not remain on them, which can cause irritation to human skin or mucous membranes.
The need and timing of transplantation
There are several reasons for replanting a flower:
- the need to improve its appearance;
- the root system is cramped in the pot.
The transplant should be done on time, otherwise the flower will begin to ache, shed its leaves, and slow down its growth. The signal is also small new foliage, as well as quickly drying of the substrate after watering.
Source: https://kursi-floristiki.ru/komnatnye-cvety/diffenbahiya-razmnozhenie.html
Dieffenbachia: growing, pruning, pest control - AGRARY
Caring for and growing Dieffenbachia is a rather complex process that requires certain skills and dexterity. If you approach this event with the utmost care and precision, you can soon get a healthy, strong Dieffenbachia plant that will delight its owner with an attractive appearance and unusually abundant foliage.
To grow Dieffenbachia at home, you should familiarize yourself with the basic characteristics of this plant, as well as the rules of care, watering, fertilizing and replanting.
In addition, it is necessary to study in detail the diseases that can affect Dieffenbachia in order to take care of its health in advance or begin timely treatment of a diseased plant.
Proper care will allow you to get a healthy specimen that can be used for reproduction or simply grown for your own pleasure.
Description of Dieffenbachia
Dieffenbachia belongs to the genus of evergreen plants from the Araceae family. Its wild relatives grow in the tropics of North and South America. The plant received its name in honor of the Austrian gardener Joseph Dieffenbach.
The Dieffenbachia indoor flower is a tree-like plant that has an erect trunk and a growth point at its top, which is why many species do not bush, but over time turn into small trees.
However, there are forms in which the growth points are also located along the stem, according to which they produce lateral shoots and are shaped like shrubs.
The most remarkable thing about Dieffenbachia is its leaves - juicy, dense, dark green with various light cream patterns - stripes or spots.
The plant blooms very rarely, only if the growing conditions are ideal for it, and the inflorescence is a spadix that appears in the axils of the leaves. The inflorescence is covered in a creamy blanket, which is both protection and decoration.
Dieffenbachia blooms for only a few days, and then the inflorescence dries out, and can remain in this state for a long time. Under the right conditions, fruits appear from the inflorescences - berries with a bright orange-red color.
It must be remembered that Dieffenbachia, which is grown at home, is a poisonous plant, the juice of which contains a certain amount of needle-sharp crystals of calcium oxalate.
They cause dermatitis on the affected area of the skin or mucous membrane, as well as various allergic reactions and irritation.
For this reason, it is necessary to keep it away from children or pets, and when cleaning, use protective equipment.
Although the plant is poisonous, its proper cultivation will not only not cause harm, but will also help create a favorable indoor microclimate.
Dieffenbachia perfectly filters the air mass, while absorbing harmful impurities of benzene or xylene.
For residents of large cities with industrial enterprises, it is mandatory to grow Dieffenbachia, because it will help clean the air and enrich it with oxygen.
Soil for growing
To grow Dieffenbachia at home, you can use universal soil for indoor plants, since the plant is not particularly demanding on its composition. To make a soil mixture, you need to take 4 parts turf soil, 1 part leaf soil, 1 part peat soil and 1 part sand.
Additionally, charcoal can be added to this composition, which can disinfect the soil, being an excellent antiseptic and absorber of excess water. A prerequisite is the use of drainage so that excess moisture does not accumulate in the pot and does not allow the roots of the plant to rot.
Comfortable conditions
As for the conditions for growing Dieffenbachia indoors, one of the main factors for proper healthy plant growth is air humidity.
Since its wild relatives grow in tropical climates, indoor specimens require high humidity, and therefore they must be regularly sprayed with a spray bottle.
If this is not done, the succulent leaves of the plants will soon dry out and turn yellow at the edges, and soon they will begin to fall off. In addition to spraying, you can place the pot on a tray with wet gravel, and then the evaporation will maintain a normal microclimate for the plant.
Watering
With proper care, watering Dieffenbachia should be plentiful during the period of active growth - from spring to autumn, and in winter it should be reduced. It should be remembered that excessive watering and stagnation of water in the pot can have a detrimental effect on the condition of the plant, and its leaves will turn brown at the edges and fall off.
Temperature
The temperature regime of the environment is also important for Dieffenbachia - it grows well only in warm climates, and therefore it is necessary to maintain a temperature in the room of +18 + 21 ° C.
If it becomes much lower, the plant will immediately react to the change - its leaves will turn yellow and rot, and if it remains in such conditions for a long time, the Dieffenbachia will completely die.
It is also necessary to protect the plant from drafts, since it is afraid of cool air.
Lighting
The illumination of the space in which Dieffenbachia is located should be stable without direct sunlight or strong darkness.
The ideal location is considered to be the western or eastern side; on the south it will quickly burn out in strong sun, and on the north, in the absence of sufficient light, it will stretch out and become fragile, and its leaves will become smaller.
Also, in low light conditions, light spots on the leaves of all varieties turn green over time, which reduces the attractiveness of the flowers.
Care and feeding
Intensive growth of Dieffenbachia is observed from May to August, and therefore at this time it requires feeding with various fertilizers. For this purpose, organic or complex mineral fertilizers that do not contain lime are suitable. It has a detrimental effect on the Dieffenbachia plant, and therefore it is necessary to choose fertilizing without it.
You also need to remember that for plants that have light spots on the leaves, fertilizers with a high nitrogen content are not suitable. This element causes the light spots and stripes on the leaves to change color, turning them green.
In other words, in order for indoor Dieffenbachia to have the original color of the leaves, it is necessary to correctly select a fertilizer with no lime and a low nitrogen content, and during the dormant period, that is, from September to April, the flowers should not be fed at all.
Transfer
Like many other indoor flowers, Dieffenbachia needs to be replanted when the pot for it becomes too small or the soil needs to be replaced. The flower is replanted in the spring, around the end of April, before the start of the period of intensive plant growth.
The pot is selected so that it is slightly larger than the previous one, but not too large for the plant. In order to create additional roots, the stem part is placed a little deeper than before, and then new roots will form from the axils of the leaves. As for the soil, a 4:1:1:1 scheme is used - turf soil, leaf soil, peat soil and sand.
Trimming
Pruning a Dieffenbachia plant is necessary when there are drying or broken leaves, but it must be done according to special rules. Since the plant is poisonous, it produces juice that causes skin irritation. Before removing unnecessary leaves, you should take a knife or sharp blade and first wipe it with alcohol so as not to introduce infection into the plant tissue.
With a clear, careful movement, cut off the damaged leaf, wet the cut with gauze or cotton wool to remove the juice, and sprinkle the cut area with crushed coal so that it quickly becomes covered with a protective layer and does not release the poisonous juice.
It is imperative to use rubber gloves to protect the skin of your hands from the effects of calcium oxalate crystals contained in Dieffenbachia juice.
Flower propagation
If the trunk has been trimmed (it is necessary when the plant has reached an impressive size), the cut part is not thrown away, since a new young flower can be grown from it.
Propagation of Dieffenbachia by apical cuttings
To do this, the apical part is placed in water or a soil mixture at the rate of 1 part peat and 1 part sand so that roots appear from the leaf axils.
In this case, the Dieffenbachia cuttings to be rooted must be covered with a glass cap or plastic film, and the pot should be placed in a well-lit place, but not in direct sunlight.
You need to water the sprout 1-2 times a week so that the earthen ball is wet, but not waterlogged.
To prevent the cutting from deteriorating and the roots to appear faster, it must first be treated with the root growth stimulator “Kornevin” or “Heteroauxin”, and add the product to the water for irrigation once a week.
The soil temperature should not be lower than +20°C, and there should be no drafts. When the root system becomes more abundant and the roots themselves reach a length of 4 cm.
, cuttings can be planted in the soil, and if they were initially rooted in the substrate, then they must be transplanted into the soil along with a lump of earth.
Propagation of Dieffenbachia by stem cuttings
Dieffenbachia can be propagated not only through the apical part, but also through pieces of the trunk, for which they are cut up to 20 cm long with several internodes from which leaves or roots will appear.
Before planting, the cuttings must be dried and then planted horizontally in the ground. If the leaves do not appear for a long time, but the cuttings do not deteriorate, you need to be patient - Dieffenbachia reproduces in this way for an extremely long time.
Over time, you can notice that buds swell at the leaf nodes, from which young leaves will then appear.
Seed method of propagation of Dieffenbachia
The method of propagating Dieffenbachia using seeds is considered the most labor-intensive - this plant blooms extremely rarely at home and also requires pollination.
To do this, it is necessary to transfer pollen from male flowers to female flowers located on the same ear-inflorescence - female flowers at the bottom, and male flowers at the top.
If pollination is successful, then in about six months it will be possible to use the ripe seed berries as planting material.
Possible diseases and pests
Since the Dieffenbachia indoor plant requires high air humidity, it may die due to the harmful effects of microorganisms for which such conditions are ideal for life and reproduction.
Fungal diseases that affect large areas of flowers over a short period of time are especially dangerous for plants.
Such damage is not visible on the underground part of the plant, but it is the root system that is most often affected by rot due to excessive watering.
Rotting of the root part of a plant can be determined by specific signs, which include lethargy of the plant, falling leaves and constantly wet soil even with little watering.
In this situation, it is necessary to remove the Dieffenbachia and examine its root system for the presence of rot. If it is present, the damaged roots should be cut off, and the cut areas should be treated with charcoal or a solution of potassium permanganate.
And it is imperative to plant the diseased plant in new soil so that harmful microorganisms are not transferred from the previously used soil.
As for the pests that attack Dieffenbachia, these include aphids, spider mites, mealybugs and scale insects. All these small organisms are capable of destroying a plant in a short time, and therefore, when the first signs of damage are identified, it is necessary to take measures to treat the plant.
The main symptoms indicating a plant disease are wilting, yellowing and curling of the leaves, as well as the presence of a white coating or cobwebs on them.
To control pests, wipe and spray Dieffenbachia with a soap solution or Actellik solution at a rate of 1-2 ml. substances per 1 liter. water.
In addition, a folk remedy for controlling Dieffenbachia pests is to spray with an infusion of medicinal dandelion for two weeks until the harmful microorganisms completely disappear.
Varieties of indoor Dieffenbachia
Thanks to selection, a huge number of varieties of Dieffenbachia have been developed, which mainly differ in color and leaf shape.
The most common indoor types of Dieffenbachia
Dieffenbachia seguina (or spotted) is the most grown variety of the plant, characterized by dark green leaf coloration, complemented by a light longitudinal vein and many small cream spots. It was this species that became the main one in the selection and breeding of Dieffenbachia hybrids;
Dieffenbachia Camilla is a flower that has very strong spotting on young leaves, which turns green over time and becomes less noticeable;
Dieffenbachia linear - has rounded leaves with a small striped petiole. Their spotting is close to the central vein of the leaf, and the spots are not cream, but light green;
Dieffenbachia is lovely - an adult plant has a very impressive size and can grow up to 1.5 m and higher. The dark green leaves have transverse stripes of light or even white color;
Dieffenbachia Oersted is famous for the fact that there are practically no light spots on its leaves. The color of the foliage is quite dark, and only sometimes small patches of light color can be found on it. You can recognize the plant by its longitudinal vein, which is white in color and does not darken as the plant matures;
Dieffenbachia Bause - the leaves of the plant are small in size (up to 30 cm long) and light green in color interspersed with both lighter and darker spots.
Source: https://agrarii.com/diffenbahiya-vyraschivanie-obrezka-borba-s-vreditelyami/
Reproduction of Dieffenbachia - video
Good afternoon.
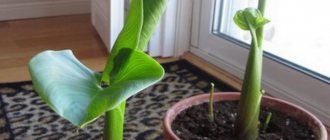
Today we will talk about what to do with Dieffenbachia if it has stretched out and bent because it was not turned to the light on one side or another, and the lower leaves have fallen off due to cold drafts or improper watering. In such cases, the best thing you can do to make Dieffenbachia look beautiful is to trim it and root the top. This is also called propagation of Dieffenbachia by apical shoot.
Now we will tell you how to properly trim the top of Dieffenbachia and how to root it.
Take a sharp knife and cut it just below the beginning of the bend. As a result, the curved part will be covered with the substrate, and this curvature will in no way affect the decorative effect of the newly transplanted plant.
It is worth remembering that the plant is poisonous, so you need to work with gloves, especially if your hands have cuts or wounds that have not completely healed. After working with the plant, you will need to wash your hands, and before that, try not to put them in your eyes or mouth.
Trimmed. We simply place the cut top of the Dieffenbachia on a piece of newspaper, tapping it, so that the cut area dries out. You can periodically blot the cut with a napkin to remove any juice that appears. A day after trimming the Dieffenbachia, the apical cutting should be placed in water, and in two to three weeks roots will appear at its base. You can throw an activated carbon tablet into the water. If the cut Dieffenbachia has a long piece of trunk left, it can also be cut and rooted - the probability of successful rooting is very high. This .
Dieffenbachia is a tropical perennial ornamental deciduous plant belonging to the Araceae family. This is an unpretentious plant; even a novice gardener will be able to care for Dieffenbachia at home. You just need to learn a few simple rules and get acquainted with the characteristics of the flower.
Brief conclusions
- Dieffenbachia is a tropical flower native to South America. Since it does not bush, but stretches out, it can only be given the appropriate shape by replanting and pruning. All manipulations must be carried out strictly with gloves, because the culture is poisonous!
- Plants are pruned when they are no younger than 2-3 years old. It is performed if characteristic symptoms are detected. If you carry out the procedure on time, you will be able to rejuvenate the bush and protect it from development problems.
- Replanting should also be carried out in a timely manner, otherwise there is a risk of developing diseases and reducing the decorative attractiveness of the flower. This manifests itself in the falling and reduction of foliage in size, slower growth, and rapid drying of the soil after it is moistened.
- After all the procedures, the flower needs proper care, which includes regular watering and high-quality fertilizing. If all recommendations are followed, the plant will quickly regain its strength and begin to grow actively, delighting the eye with lush, variegated foliage.
Dieffenbachia is one of the most common house plants, despite its care requirements. Externally, the flower attracts with its rather large leaves of variegated colors and creates a special atmosphere in the interior of your home. The variety of species of this plant makes it possible to choose the appropriate option for decorating the interior space.
If a flower stands in one position for a long time in relation to sunlight, then it may bend, and fallen lower leaves will make the plant unattractive. Experienced gardeners know how to prune Dieffenbachia and they give the following advice:
Prepare in advance a sharp knife with fine teeth (hacksaw), rubber gloves, alcohol, cotton pads, a 0.5 liter glass jar, 2-3 tablets of activated carbon.
When pruning Dieffenbachia, be extremely careful, since the juice released from the trunk and leaves is quite poisonous. Even after 1 drop gets on the skin or mucous membranes, it can cause serious health problems. Therefore, before pruning, you should wear thick gloves and periodically wipe off the released juice with a clean cloth. Wash your hands thoroughly with hand sanitizer when finished. One way to stop the active secretion of juice is to stop watering the plant 3-5 days before the procedure.
There are no strict time restrictions on the pruning procedure, that is, it can be done at any time of the year as needed. However, do not forget that radical pruning of the Dieffenbachia stem to the base of the root is carried out every 2-4 years, after which several full-fledged plants grow from the trimmed part, creating an excellent decorative effect.
The plant must be mature (trunk diameter at least 2-4 cm) and well rooted. Be sure to leave small buds on the trunk, from which new shoots will subsequently begin to grow. The optimal number of buds is 2 or 5 pieces.
The sequence of actions when pruning is quite simple: make a strictly horizontal cut with a sharp knife, apply alcohol to a cotton pad and wipe the cut part to avoid the spread of harmful types of mold and bacteria, cover the stump with a jar, which should be lifted occasionally for ventilation. Do not forget to regularly water and fertilize the pruned plant in its usual manner.
Dry the removed top of the Dieffenbachia for 24 hours in open dry air, and then place it in water for further growth. By adding crushed activated carbon to the water, you will find the first roots within 2 weeks. If the cut part is quite large, then it is worth dividing it into several small ones and rooting it in a special soil intended for the flower.
Now you know how to prune Dieffenbachia and these tips will be useful to you in the future to properly propagate the flower. The main reasons why a flower is trimmed are considered to be excessive exposure of the trunk, yellowing and falling of leaves, and loss of the decorative appearance of the plant. In general, the remaining tops of the plant take root quickly, and a gorgeous flower grows from the trimmed trunk, resembling an outwardly dense bush.
(2
rated, rating:
9.00
out of 10)
One of the most popular indoor plants is Dieffenbachia.
Despite the fact that it comes from South America, it can be successfully grown at home.
In order for the plant to be healthy and to delight with its attractive appearance for a long time, it is necessary to provide it with.
Pruning: terms and rules
Trimming the top of a tropical tree begins when the Dieffenbachia is two to three years old. The fact that it is time to carry out the procedure can be seen by the bare stem below and the top shaggy due to the many leaves.
The optimal time for pruning is the dormant period - winter, although new leaves appear at this time. Many people believe that they can always prune as soon as the need arises.
Features and rules of pruning:
- The procedure is carried out with pruning shears or a sharp knife, which is treated with alcohol before the procedure.
- We must not forget about the toxicity of the leaves and stems of Dieffenbachia. Hands should be protected with rubber gloves, and eyes with special glasses. A respiratory mask is put on the face so as not to damage the mucous membranes of the mouth and nose. The surface of the body must be covered with a robe, since the juice, if it gets on the skin, will cause a severe allergic reaction. If this happens, then it is necessary to rinse the area where the juice came into contact under running water.
- You can cut the stem as much as you want. When the trunk is completely bare, they cut it off, leaving a stump no more than ten centimeters high.
- The cut area should be blotted with a napkin, removing any juice that appears, and sprinkled with crushed activated carbon.
Cut stems are used to propagate Dieffenbachia by placing them in soil or water for rooting. The procedure for pruning a plant is simple, but requires compliance with safety rules.
Post-pruning care techniques
The flower recovers quickly after pruning. The bare stem begins to overgrow with leaves and grow upward. Dieffenbachia can be strengthened with proper care, which consists of watering and feeding:
- Without constant soil and air moisture, the plant will die. Water the tree with warm, settled water. And spray it with a spray bottle, this is especially important when the air in the room is dry. To moisturize, you can place damp moss or pebbles in the tray. This will allow the leaves to be constantly saturated with wet vapor. Swampy soil will destroy Dieffenbachia. Therefore, the need for moisture is determined by the condition of the soil in the pot.
- Feeding the plant consists of alternating mineral and organic fertilizers. Organic substances are excluded for those species in which light shades predominate in the pattern of the leaf plate. They need non-nitrogen compounds. Fertilizers are applied twice a month. If fertilizing or watering is carried out incorrectly, Dieffenbachia sheds its leaves, exposing the lower part of the trunk. During the dormant period, reduce the frequency of watering and stop fertilizing ornamental bushes.
As soon as the pot becomes too small for the plant, it is transplanted into another, larger one. The main method of replanting is transshipment along with a lump of soil on the roots. It is important to pour a layer of expanded clay into a new spacious pot, and select nutritious, loose soil. This indoor plant is easy to care for and always pleases with its variegated leaves.
More information can be found in the video:
A very beautiful ornamental shrub of the aroid family has long settled in homes and offices in our country. Dieffenbachia is native to tropical latitudes. It is so beautiful that, for example, residents of Vietnam plant it in flowerpots to decorate parks.
The juice of this beauty is very poisonous and causes skin burns and swelling of the mucous membranes when it comes into contact with them.
House Dieffenbachia can grow up to 2 meters in height. Its wide spreading leaves are the main decoration of the plant. The leaves of varying shades and saturation of green are dotted with cream or white patterns, depending on the plant variety.
A feature of Dieffenbachia is its rapid growth. The growth point is located at the crown, from where once every ten days (with proper care) a new leaf appears and opens. Its stem is more like a tree trunk, and its leaves create a spreading crown. There are bushing varieties of Dieffenbachia.
Features of growing Dieffenbachia
Indoor Dieffenbachia is a rather capricious and demanding plant to care for. As a protest against improper conditions, it begins to lose its lower leaves and partly its attractiveness. Dieffenbachia is thermophilic, and can feel good in the back of the room far from the window under artificial light. Drafts are destructive for her, however, she tolerates temperature drops to +18 degrees well. Loves abundant watering and moist indoor air.
Important! Care associated with pruning and replanting the plant should be carried out with gloves.
Optimal time for planting
Planting from apical and stem cuttings can be done at any time of the year.
How to choose the right soil (Soil composition)
For Dieffenbachia, purchased soil with the addition of peat is not recommended. Peat retains moisture, and this can cause the development of fungal diseases that affect not only the roots, but also the leaves of the plant. The soil for it should be slightly acidic with an admixture of leaf soil, sphagnum, crushed charcoal, high peat (can be replaced with coniferous soil) and sand. If the soil mixture is still purchased in the store, you must definitely clarify its composition.
When does Dieffenbachia bloom?
Flowers are not the main decoration of Dieffenbachia. It blooms once a year and for a very short time.
Flowering time, flower shape
Blooming Dieffenbachia is a rather rare phenomenon at home. The usual flowering time of the plant is late spring. In April or May, she may throw out a small flower in the shape of a cob, covered with a blanket. The color of the flower and the spathe is creamy green.
Flowering lasts about a week, then the spathe fades, although the flower itself still remains.
What to do after flowering
When flowering ends, the wilted flower must be cut off; it takes a lot of strength and nutrients from the plant. If this is not done, Dieffenbachia may slow down in growth and begin to lose leaves.
Plant propagation by cuttings with rooting in water
For propagation by cuttings, it is enough to have only one small cutting. Even a two-centimeter piece will give roots.
On the trunk of Dieffenbachia there are small cones - dormant buds, from which the trunk and leaves will then develop.
Three days before cutting, do not water the plant!
- To condition water, purchase Methylene blue from a pet store. This is a safe dye that is even added to eye drops. It will prevent the cuttings from rotting. It is enough to tint the water a little.
- In order for the roots to germinate faster, add a rooting agent to the water with the cuttings: for each container on the tip of a knife. For example, Kornevin, Heteroauxin. When roots appear, there is no need to add a root former.
- For better growth of the root system and sprouts, add ascorbic acid with glucose: dilute 1 tablet per container.
What you need to prepare for cuttings:
- sanitized sharp knife;
- ground activated charcoal or charcoal - 1 tbsp. per liter of water;
- Methylene blue;
- boiled water;
- gloves;
- glass (or plastic) jars for cuttings and tops.
Cuttings can be placed in water either upright or flat. If you are placing large cuttings and toppers, use glass jars to prevent them from tipping over from the weight of the plants.
Step-by-step process of cuttings and rooting in water
- Let's prepare the water: dilute coal in it and tint it a little with Methylene blue (until a blue color).
- We put on gloves and cut off the top of the Dieffenbachia (straightly or obliquely, it doesn’t matter).
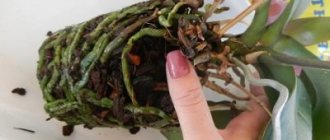
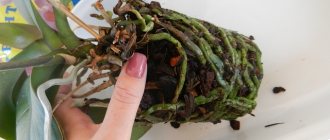
- We cut off the remaining trunk, leaving a stump with buds from the root, and cut it into parts (depending on how many shoots you need).
- We dry the top and cuttings for 3-5 hours and place them in water, which needs to be changed approximately 1-2 times a week, depending on how many cuttings you have in one container. As soon as the water becomes cloudy, you need to replace it with a new one (do not forget to add charcoal and Methylene blue).
- When roots appear, plant the cuttings and tops in the soil. You can plant up to three plants in one pot.
For better root germination, water should be at least 18 degrees Celsius.
Trimming and rooting the top of Dieffenbachia in water - video
Planting cuttings and tops with roots in the soil
Dieffenbachia requires loose soil with good drainage. This plant loves water very much. The soil should always be moist, but not swampy. Therefore, it is necessary to provide good drainage at the bottom of the pot.
What can be used as drainage:
- expanded clay;
- coarse perlite;
- pieces of brick;
- pieces of ceramics;
- pebbles.
It is better not to use pieces of polystyrene foam; it dries out the soil too much.
If the pot has drainage holes, then the drainage can be poured in a layer of 1.5 cm. If there are no drainage holes, the drainage layer should be increased to 2.5 cm.
It is useful to add pieces of charcoal and vermiculite to the soil. You can add small fractions of bark. Sprinkle the soil on top with a mixture of sand and ground charcoal (1:1), covering it with sphagnum to retain moisture in the soil.
- Soil composition N1: soil for dracaena or palm trees + 1/4 coconut fiber.
- Soil composition N2: universal soil or garden soil 2 parts + pine litter 1 part + clean sand 1 part.
- Soil composition N3: turf soil 4 parts + leaf soil 1 part + peat soil 1 part + sand 1 part.
What you need to prepare for planting:
- pots for tops and cuttings;
- ready soil;
- drainage;
- a little sand and crushed charcoal;
- sphagnum;
- warm water with potassium permanganate for irrigation, light pink in color.
Step-by-step landing instructions
- Pour drainage into the pot and cover it with soil on top.
- We make a hole for each cutting and water it with water tinted with potassium permanganate.
- We plant the cuttings in the holes, straightening the roots down, and cover them with soil.
- Sprinkle a mixture of sand and ground coal on top and cover with sphagnum.
- Place the pots in a slightly dark, warm place.
“Dark place” does not mean that the cuttings need darkness. They should not be exposed to direct sunlight and at first you need to protect them from overheating in the sun, but they need light!
Water the plants as the top layer of soil dries out. Until the cuttings develop a good root system, there is no need to heavily water the soil to avoid waterlogging.
The top is planted according to the same pattern.
Planting cuttings and tops of Dieffenbachia - video
Caring for planted cuttings
There is no need to feed the cuttings before the first shoots appear. You can only spray them a little once a month with nitrogen fertilizer for better growth.
There is a ready-made aerosol “Zelenit for decorative foliage plants” on sale.
Water young Dieffenbachia about 1-2 times a week. But it is necessary to monitor the condition of the soil: it should be moist, but not wet. If water accumulates in the pan, be sure to drain it.
When the shoots grow (about 2-3 months after rooting), start feeding the plants and place them in a brighter place.
Fertilize Dieffenbachia from spring to winter once every two weeks with fertilizer for decorative foliage plants. Reduce the fertilizer concentration by 50%.
In winter, Dieffenbachia is not fertilized.
Leaves must be wiped from dust and sprayed when the air is dry.
Plants need enough light to grow thick stems. On cloudy and winter days, illuminate the Dieffenbachia with lamps.
The formed trunk will no longer be able to become thicker, so immediately provide the Dieffenbachia with enough light!
If Dieffenbachia has monochromatic leaves, then it can be grown in partial shade. Variegated leaves require bright light. But in any case, you do not need to place Dieffenbachia in direct sunlight so that the leaves do not get burned.