Drainage for indoor plants according to the rules
If there is no “stone” drainage, it is replaced with polystyrene foam and its analogues. When growing hydroponically, drainage completely replaces the growing substrate; in fact, the entire technology is drainage. In plastic or polymer pots it is easy to make holes yourself, but when purchasing ceramic and terracotta pots you need to evaluate the drainage capabilities of the pots more carefully. 4. Before you start replanting the plant and laying the drainage, make sure that the tools and materials themselves are clean. Check the instructions for the purchased drainage: some types of special expanded clay, vermiculite and perlite need to be saturated with moisture before laying. Agroperlite is not drainage, but one of the best mineral additives for soil.
For each planned transplant, create a new drainage layer. It is advisable to use fresh drainage material. The thickness of the drainage is usually divided (conventionally) into low, medium and high. I can only say that high drainage is about a quarter of the height of the pot, medium drainage is up to 1/5, and low drainage is up to 1/6 of the height.
But it should be noted that it does not last forever: after 5 years, expanded clay will turn into something similar to soil, so sometimes it needs to be replaced. You won't be able to use a large pot for it because there is too much risk of flooding, and a small one will be unstable. It is in this situation that it is worth remembering such drainage material as crushed stone. The only downside may be that moss is not always available; you can collect it yourself, or you can buy it.
How to properly arrange drainage
In order to avoid clogging of the holes, an impeccable layer of stones should be laid on the bottom of the tank, thanks to which the liquid will flow out through the holes. A thick layer of soil and roots can also clog drainage holes.
If this happens the next time it is moistened, then you need to start transplanting the flowers into another container with fresh soil mixture.
Material selection
As for what material is best to use for drainage, in this case it all depends on your imagination. In most cases, plant growers prefer expanded clay, crushed stone, polystyrene foam, pebbles, small bricks, gravel, and others. Basically, drainage is laid at a height of 3 centimeters from the bottom of the flowerpot. For individual flowers, fill the pot by a third. Others belong to such plants.
When choosing a material for drainage, flower growers most prefer expanded clay. It is sold in every flower shop. Expanded clay quite easily absorbs moisture, and releases it after the soil dries. The remaining excess water leaves the pot without much difficulty, flowing down the spherical stones.
Expanded clay is a very lightweight material that does not burden the tank with the flower and can serve as drainage for approximately 4 years. When a transplant is performed, it is changed. Expanded clay pebbles can also be used to mulch the top layer of soil. It prevents the formation of a crust and the drying out of the soil. Expanded clay allows water to pass to the roots and prevents the formation of moss and mold.
You can do the draining yourself. Ceramic dishes or bricks are very similar in their qualities to expanded clay. They are all made from baked clay. Expanded clay is a good material for drainage, which is crushed into small pieces before use.
Gravel and crushed stone have good strength. Water flows through them perfectly, and there is no destruction. The only disadvantage of such materials is that they are heavy and the earth is supercooled. Stones do not retain heat, so flowers with similar drainage are best placed on south-facing windows.
Foam is also used for drainage. There is no mold on it and no rotting. Crushed foam does not absorb liquid, allowing it to easily pass to the drainage holes. In addition, polystyrene foam protects indoor flowers from hypothermia. It is quite soft, therefore, young roots often go deeper into it. At the next transplant they are simply eliminated. A layer of polystyrene foam measuring 3 cm is placed on the bottom of the flowerpot, then a small layer of sand and soil. After which you can plant indoor plants.
When transplanting and planting, it is imperative to use drainage for indoor flowers. This will protect the flowers from excess moisture and supply the root system with oxygen.
Under no circumstances should you use eggshells or nutshells for drainage. When moisture affects these materials, they can rot, mold, and affect the acidity of the soil, which ultimately leads to various diseases in indoor plants. If you do not react immediately, the flower may die.
Sand is not yet allowed. When watering, it becomes filled with soil particles and simply clogs the drain holes, which leads to stagnation of moisture at the roots and their rotting. It is permissible to use river pebbles, as long as you need to get rid of the sand.
Professionals do not recommend using granite and marble chips for drainage. This can be explained by the fact that the salts that are present in granite and marble act with water and very strongly acidify the soil.
Drainage includes not only excellent liquid permeability material, but also the ability to reduce flowing liquid. If water regularly stagnates in the stand, then drainage is simply not needed here. This is why it is necessary to drain the excess liquid after the next moistening. If this possibility is excluded, then the tank on the pallet must be placed on an elevation so that the lower part of the tank is in the air and not in the water.
How to make and decorate pots for indoor flowers with your own hands? Possible materials for manufacturing
How to properly use aqua soil for flowers
Types of drainage
Having understood the types of drainage, let’s consider its popular types. Each has its own advantages and disadvantages. When choosing a method of arrangement, this must be taken into account.
Wall drainage
This structure is created along the perimeter of the foundation. If the house has a basement or ground floor, it is better to make just such a drainage system. Of course, it is more correct to provide for it at the construction stage, when the foundation is just being erected and the area around it is not backfilled.
If the house has been built for a long time, it is also quite possible to create wall drainage, but large-scale excavation work will be required.
Features of wall drainage arrangement:
- Pipes are placed in the excavated areas; they should lead to inspection wells from the corners.
- The bottom edge of the equipment should be adjacent to the end tank, which leads beyond the site.
Ring (trench) drainage
This type of drainage is installed further from the foundation than wall drainage. It is necessary to retreat 2-3 meters from the building, and then carry out the work. Ring drainage is used mainly on clay soils, since it is quite simple to create and use there. If the house does not have a basement or basement, this system will be the best option.
Features of arranging ring drainage:
- A clay castle demarcates the foundation and the drainage structure.
- This type of drainage should be created deeper than the lowest point of the foundation.
- Drainage products should be placed on a layer of crushed stone or small stone, since these materials allow water to pass through well.
What can drainage be made from?
Different types of plants require different drainage patterns and sizes. The drainage component can be small, medium or large, but each of them must equally have the following properties:
- not to mold;
- do not rot;
- let water through;
- do not give any chemical reactions;
- do not damage the root of the plant.
Drainage is used not only for house plants, but also for garden ones.
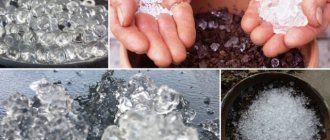
The most popular type of drainage for indoor flowers is baked clay, medium/fine fraction, called expanded clay. Expanded clay has a porous structure and performs its function perfectly. It retains excess moisture, and as the soil and roots dry out, it returns it to them.
In addition to expanded clay for drainage, the following materials are used:
- crushed stone;
- ceramic shards;
- gravel;
- polystyrene foam (or similar synthetic material);
- vermiculite;
- perlite;
- peat;
- sphagnum moss;
- charcoal;
- broken brick.
To make the right choice of drainage material, you need to have information about them:
Polystyrene foam is a good material for drainage, but the flower root gradually grows into it. It is necessary to replant such plants carefully so as not to damage the root system. Ceramic shards are laid out with the convex side facing up, but it is worth remembering that the root can be injured by sharp edges. When using broken shards, they are sprinkled with sand on top
It is very important that the shards are not large in size, otherwise sand will seep through and clog the free space through which excess moisture escapes. Broken brick can damage the root with its sharp edges, so it is used quite carefully in rare cases. White sand-lime brick has an advantage over red clay brick because it is able to absorb moisture and at the same time retain it, and then release it back as the soil dries. Crushed stone and gravel are more often used in garden plots; they have a long service life.
Sphagnum moss has disinfectant healing properties and also retains moisture well. Before using this natural material, fill it with warm water for about half an hour. This procedure will saturate the moss with moisture and get rid of insects.
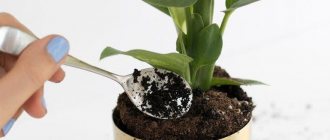
The only problem is that such moss is not easy to buy; it is often not available for sale. You can collect moss yourself in the fall in wet/wet forest areas. Moss is often used to grow orchids. Charcoal is used not only as drainage, but also as fertilizer. It has an antiseptic effect, adsorbs salts, and regulates moisture saturation. Coal is laid on the bottom of the pot in a 2-centimeter layer, choosing large fractions that will not leak through the holes. He also works according to the system - absorb, then give.
Vermiculite perfectly absorbs all available moisture, as well as fertilizers. After a while, he continues to feed the plant, giving it everything that he initially saved. This lightweight material is prepared by heating clay, which causes the minerals to compress like scales; it is absolutely harmless to the plant. Externally, vermiculite is similar to cork or wood shavings. Perlite has one drawback - its high cost, but otherwise it is an excellent drainage material that absorbs, retains and releases moisture as needed. Outwardly, it resembles white/gray granules and is of volcanic origin.
It is worth considering that drainage also has its own shelf life, for example, expanded clay needs to be changed every 5-8 years, otherwise it decomposes, becoming part of the soil.
Types of materials
In fact, any coarse-grained material that does not enter into chemical reactions under the influence of moisture and is also resistant to compaction, destruction, and decay can be used for soil drainage. The main thing is that the material meets the following requirements:
- It passed water well.
- Did not rot.
- Was resistant to mold development.
- Did not enter into chemical reactions.
- It was safe for the plant root system.
Universal drainage with expanded clay
This material is presented in the form of kiln-fired clay, the inside of which has a porous structure.
When the question arises of what to make drainage for indoor flowers from, everyone uses expanded clay. This is due to the fact that such material is considered the most suitable for the implementation of such tasks. Today, the use of expanded clay for flowers is considered the most appropriate. After all, it is very light and absorbs excess moisture well, and, if necessary, freely gives it to the root system. In addition, such material is often used in the construction industry as a soundproofing and insulating material.
The material itself has a neutral chemical composition and is odorless. Expanded clay can be used many times. After six years, it gradually disintegrates into the soil. If the plant is large, then it is best to choose medium-fraction material (with a diameter of no more than 3 cm). It must be covered with sand on top. In this case, you need to ensure that the final size of the holes in the pot is slightly smaller than the fraction of the drainage material used.
It is best if the bottom of the flower container is filled with expanded clay to a thickness of 3 centimeters. If the pot does not have holes, then this layer should be 5 centimeters.
Original vermiculite
These two types of drainage material are in great demand. The production of vermiculite is based on the fact that the clay is heated to maximum temperatures, due to which the minerals are pressed together, forming peculiar scales. The appearance of this material is most similar to parts of ordinary wood shavings. It is very light, inert and does not harm flowers at all.
But perlite is presented in the form of solid silica, which has a unique volcanic origin. It looks like ordinary snow-white or light gray granules. It is worth noting that both of these materials absorb excess moisture well with mineral and organic substances dissolved in it. They return everything back to the soil as needed. The only drawback of these materials is their high cost.
High-quality ceramic drainage
When expanded clay is not on sale, the logical question arises as to how to replace drainage for indoor plants. In this case, special attention can be paid to ceramics, which have many advantages. It is worth noting that to arrange such drainage, it is necessary to place shards with the convex side up or several large mineral pieces on all the holes in the pot. Then, if the pot is small, you need to pour a layer of coarse sand (no more than two cm). Only after this can the soil be filled in and the plant planted.
The main disadvantage of such drainage is that the root system of the flower can be damaged by the sharp edges of the shards. It is also worth considering that it is better not to use too large parts , as sand may spill through them.
Natural charcoal from wood
You can make high-quality drainage for indoor plants with your own hands from charcoal, which will act as a natural fertilizer and antiseptic. Thanks to this, it is possible to prevent rotting of the root system, as well as improve salt adsorption by regulating the soil moisture saturation.
Like other drainage materials, charcoal perfectly absorbs excess moisture and also retains beneficial microelements until the soil dries out and needs moisture. It is worth noting that to drain the soil, this material is laid out on the bottom of the flowerpot in a layer of 3 cm. The fractions must be large so that they do not spill through the drainage holes.
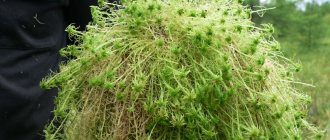
Natural sphagnum
Experienced gardeners often use this material as drainage. Its main advantage is that it holds well all excess water that could harm the plant. In addition, sphagnum moss is endowed with unique disinfecting and healing properties. The natural habitat for the growth of such material is considered to be wetlands and moist forest soils. It can often be seen in the form of soft stems that are light green in color. Needle-like soft leaves extend from them in all directions.
This material can be harvested at any time of the year, but it is best to choose late autumn, since in this case it retains all its properties well and can be transported for long periods of time. Before using sphagnum moss to drain the soil, it must be filled with warm water (+45˚C) for 60 minutes. This will help achieve the highest degree of moisture saturation, as well as destroy existing insects.
You can store moss in a well-ventilated container, in a dark and cool place. In some cases, florists even use a freezer, because in this case the material does not lose its main functions at all.
The main disadvantage of this drainage is that it is difficult to obtain, since it is not always on sale.
Proper drainage of house plants
The health and even life of the green pet ultimately depends on how correctly the gardener organizes the drainage system.
With all the abundance of flower pots, one cannot help but notice that the vast majority of them are plastic pots. Experienced gardeners even make additional drainage cuts in the side of the pot when replanting this orchid. The ability of such plants to grow in swamps in their natural habitat does not mean that they can exist in the waterlogged soil of a flower pot. Consequently, fewer holes are made in the pot. But first of all, you must become familiar with the peculiarities of growing each specific type of indoor flower.
This is the cheapest and most readily available drainage material. Moreover, unlike bricks, pebbles and shards, polystyrene foam is much lighter, which means it does not weigh down the pot.
Both the upper foliage part of the plants and the root system must be able to breathe.
This procedure is not limited only to the presence of holes; it is also necessary to use special drainage material.
You need to put the pot on its side and clean them with a stick. Some types of plants have such a developed root system that it fills the entire space of the pot. Through the drainage holes, the roots will be clearly visible and you can easily monitor their condition.
Only materials of inorganic origin are suitable for creating a drainage layer. For example, marble chips are absolutely not suitable for drainage, since with prolonged interaction with water, they significantly reduce the acidity of the soil, making it excessively alkaline.
However, not everyone knows that installing a drainage layer in a bowl is not as simple as it seems at first glance. The drainage system also includes soil that has water- and breathable properties. That is why proper drainage is one of the most important steps when planting indoor flowers. It's safe to say that all indoor plants need drainage, but the drainage system may vary.
You can purchase drainage mixture at a flower shop or at a construction site if, for example, you decide to buy crushed stone. After planting flowers, it is worth checking whether the drainage system works well.
Almost all beginning flower growers believe that drainage is the same expanded clay that is sold in stores. The main one is increasing the acidity of the nutrient solution that the roots consume. You can agree with this statement, or you can argue. In any case, your humble servant has been using expanded clay as a drainage material for many years, and has not noticed any negative effect on plants. Therefore, their calibration and cleaning falls on the shoulders of the grower. At its core, this is also a pretty good drainage material. Before creating a drainage layer from broken bricks, it also needs to be prepared.
The largest shard is placed at the bottom of the pot, in the center of which a hole is made. Then the main substrate is added and the plant is planted. Foam plastic is excellent as drainage for flowers. Poinsettia from the Euphorbia family is an amazingly beautiful plant.
Can such pain be tolerated? How much money have you already wasted on ineffective treatment?
The use of organic materials for drainage - nut or eggshells, tree bark - is strictly prohibited. For more information, you can watch a video on how to make your own indoor plant drainage. It is prohibited to use materials such as marble and granite chips, especially the first one, as drainage.
Types of drainage pipes
There are many types of drainage pipes on sale that can be used to create a high-quality drainage system. When installing drainage around the house with your own hands, you need to study the characteristics of such products.
You can choose from the following options:
- Porous. Made from expanded clay glass or plastic concrete, they do not require perforation. But this is quite expensive material. For good drainage, it is worth taking pipes of large diameter.
- Asbestos-cement. The most reliable, but quite heavy and require holes to be made in them.
- Polymer. Made from plastic, they are comfortable and lightweight, and easy to use. Nowadays, these pipes .
- Ceramic. Functional, but fragile, require perforation. Due to additional grooves, moisture is collected more effectively.
What are drainage holes and why are they needed?
The pot must have a way
to drain excess water. To do this, holes are made at the bottom of the pot, which are called drainage holes.
Their number can vary from one to one and a half dozen depending on the characteristics and needs of the flower.
If there are no holes in the pot, then you can make them yourself without any problems. And humidity control
soil begins already at this stage: the thicker the holes are, the faster the water will leave the pot, and the more oxygen the root system will receive.
The number of holes has a similar effect on the removal of moisture and enrichment of soil with oxygen.
Drain hole
Over time, it can become clogged with soil mixture, drainage or roots. Therefore, it needs to be checked periodically, especially when there is only one. If you notice that the hole is clogged, it should be cleaned. A wooden or other stick will do for this.
Other elements and basic requirements
What material is used if the necessary elements are not at hand? If you cannot find any of the above materials, do not worry, there is always a way out. Use what you have on hand. So, what can replace drainage?
- Crushed stone and gravel. Drainage made from these stones perfectly replaces the traditional one. The only drawback is that these elements significantly make the pot heavier. So if you take a small pot or one that you won’t often move from place to place, this material will work best.
- Aquarium stone. Such stones are a good alternative, but the price is quite high. But if you have this material, why not use it?
- Styrofoam. Foam plastic perfectly replaces the usual elements. It meets the necessary requirements, and besides, it can be found almost everywhere. People tend to store boxes of appliances or household appliances, so there is no better budget option for drainage. True, they don’t crumble it into a pot, but cut it into cubes and lay it in a layer of several centimeters. Of course, a significant disadvantage can be damage to the root system if the roots of the plant entwine the foam.
- Brick. You can also replace traditional materials with broken bricks. This is a natural material with the necessary properties. However, before placing it on the bottom of the pot, sharpen the edges, otherwise the roots of the plant may be damaged. White brick is better suited for use rather than red.
We also mentioned the basic requirements earlier. It is necessary to ensure that the drainage has the necessary properties and does not harm the plant. This will be enough to achieve the desired result.
Main stages of installation
The first step is to draw a site plan on paper and decide exactly how the drainage will take place. Remember that water should drain to the lowest point - there must be a water tank. To determine such an area, you can use a theodolite device. Based on the plan, the required amount of materials is calculated.
Article on the topic: Scab disease: treatment and prevention, photos, how to fight it on apple and pear trees, remedies and preparations
Step-by-step instructions for performing the work:
- In accordance with the project, it is worth marking the area on paper on the ground.
- After this, trenches are dug, the size of which must take into account the pipe and gravel that will be buried there.
- For digging, it is better to take a bayonet shovel - it will increase the speed of work.
- The width of the ditch should be approximately half a meter.
- The next step is to create a ditch slope for the system.
- In this case, differences in height, which are marked with poles, are taken into account.
- To ensure that the bottom forms the desired slope, we use sand.
- Geotextile material is laid at the base of the trench, which should have a good odor at the joints.
- Next, it is filled with gravel taking into account the slope.
- In the fine fraction we make a trench into which the pipe should fit.
- Next, we lay the drainage products, connect them in accordance with the technology, and check that the required slope remains.
- You can control the direction using a stretched thread.
- The pipe joints are connected using a special tape.
- The next stage is the installation of inspection wells.
- If drainage products do not have a filter layer, then it is worth wrapping them in geotextiles and securing them with rope.
- After this, gravel is poured on top in a layer of up to 18 cm and on top, on both sides, we cover the system with the edges of the lower geotextile.
- The final step will be to fill the drainage with coarse river sand.
Before closing the pipes, pour water into them and see how correctly it flows through the system. While the structure is not buried, everything can still be fixed.
This way we get a good and functional system. Now excessive precipitation and moisture accumulation are no longer a problem for your buildings. Drainage should be installed not only around residential buildings, but also along the perimeter of utility buildings.
Some tips for arranging drainage:
- If the system runs under a road that is frequently used by vehicles, then the pipes along the route must be metal. Next, they must be tightly connected to the rest of the structure.
- When the trench is ready, you should first compact the bottom, and only then begin to fill it with components.
- Drainage products should be filled with gravel to a depth of 18-30 cm.
- Geotextiles are used to prevent contamination of the system. For the same purposes, you can wrap the components with filter material.
- When installing the structure, the possibility of its maintenance should be taken into account. For this purpose, inspection wells are created. The best places for them are bends and joints.
- It is important that drains do not touch or block existing communications in the ground - wires, pipes.
- You need to start digging a trench from the highest point of the ground.
- You should not skimp on the amount of geotextile, since this material is designed to protect the drainage pipe from silting.
- The easiest way to attach a metal welded box as a water sump.
Answers from experts
Leka+:
In addition to expanded clay and brick chips, you can use small pebbles (aquarium grade), shells (if you suddenly have a bunch of unnecessary ones from the holidays), you can simply break old clay pots or unnecessary cups and plates. For very small plants and small pots, you can use coconut fiber or pieces of natural loofah or sisal sponges and pieces of natural sponge. And as a temporary measure (while the cuttings are rooting, while the seedlings are growing) - even pieces of polystyrene foam
A.T.:
Broken brick!
In large pots, when the root of the plants is small, then half of it, sometimes even more, is filled with cones
Galina Zelinskaya:
Crushed RED brick, expanded clay
Irina:
If the pot is large, but expanded clay or bricks are not at hand, then you can use used tea bags. which should be placed on the bottom of the pot in one layer.
Marina Chepurnaya:
expanded clay, foam plastic
Nina Tuzova (Kvashnina):
pistachio shells. advised. but I haven't tried to do that myself
Elena Protopopova:
Bricks, pebbles, old shards, etc. WASH ONLY!!!
Anna Glivatskaya:
You can use walnut shells, just pre-treat them in a manganese solution
Ms. Flora:
And also pine bark, it is useful not only for orchids, as an antiseptic, but it is good to put it on the bottom or in the soil. It both disinfects and drains.
Maximka:
Why shells? Not all plants need this lime. Shards, expanded clay and even pieces of foam.
avmir:
Broken brick, crushed stone, expanded clay, but not shells. And generally avoid limestone, chalk, and gypsum.
Tane4ka:
I don't think shells are a good idea. Sea salted ones need to be washed, washed, washed. Again, the edges are sharp and the roots may get cut. And they will alkalize. Expanded clay or small stones are better.
Clementine Lady:
I like expanded clay as drainage. Lightweight, washes well when replanting, does not injure the roots, there are large ones and small ones, for any holes in the pot. I didn’t notice any disadvantages when using it.
Irina K:
You can use coals from a fire
Irina Smirnova:
I like to use pebbles and gravel. Easily found on the street, in any size. Then just wash it thoroughly and put it in the bottom of the pot. Excellent drainage is obtained. Sometimes I use expanded clay, but not all plants like it. For example, I have adeniums. They do not tolerate expanded clay. As soon as the roots in the pot grow to the expanded clay drainage layer, the leaves immediately begin to turn yellow and drop. For a long time I struggled with the problem of yellowing leaves, until someone here on “ANSWERS” told me that I need to give up expanded clay for adeniums. I replaced the expanded clay drainage with fine crushed stone - everything was fine. Well, Adena doesn’t like expanded clay...
Photo Lady:
I always place one large flap of flat shell in the center of the drain hole. So that the roots don't get out there. In general, all my pots have many holes, so the bottom layer is pebbles, very large bark (I have mostly orchids, but there are others), large pieces of charcoal, and then the necessary soil or substrate. Pebbles are also needed to weigh down small pots. In large plants I put a pebble in each hole. at the bottom of a huge pot. The water drains, but the earth does not wake up.
tsuatsua tsautsautsa:
It is better to do drainage s polyfacture /catalog/livnevaya-kanalizatsiya/ correctly and efficiently, so that the flowers are watered constantly, then there will be no problems, this is called storm drainage.
What is drainage and what is it for?
Most houseplants require a soil composition that provides approximately 15% air, 50% solids and 35% water. Only a properly constructed drainage layer can create such optimal conditions.
This is explained by the fact that with excessive watering, the same percentages of air content that are vital for flowers are displaced. When there is no oxygen in the soil, pathogenic bacteria begin to develop, the root system rots, and the flower begins to wither.
Drainage for flowers, photos of various types of which are presented in the article, precisely ensures the removal of excess moisture and ventilation of the roots.
To lay the drainage layer, you can use various materials, such as gravel, foam plastic or any synthetics, expanded clay, moss, crushed stone, charcoal, broken brick, river sand, peat and others. Next, the most commonly used materials will be discussed in more detail.
An important quality of drainage is good water throughput, chemical inertness, resistance to rotting and mold.
Drainage for flowers has different fractions, which are selected depending on the plants.
Errors in the manufacture of drainage
Inexperienced gardeners often make mistakes when creating a drainage layer. Below are the main mistakes to avoid when laying drainage:
- Ignoring the advice not to use river sand leads to clogging of the drainage holes with sand grains.
- The use of too large fractions of available material does not promote moisture retention. The liquid flows into the trays.
- The use of natural materials as drainage leads to rotting of the root system of plants.
- The health of green spaces may deteriorate if polystyrene foam is used to perform drainage functions.
How to properly lay a drainage layer
It is important not only to choose the right materials, but also to properly lay the drainage layer
What rules exist that you absolutely need to pay attention to? Let's consider the main postulates:
- The main issue is the thickness of the drainage layer. The average height is about 2-3 centimeters. However, the specific height of the interlayer is determined by 3 factors: The shape of the container. If the pot is narrow and high, then the layer should be approximately 1/4 of the height (after all, the soil in them takes longer to dry out), if it is wide and low, then 1/8 (the soil dries out faster), if the vessel is standard and has a proportional width and height , then the layer size is 1/6 of the height.
- The material from which the vessel is made. If the plant is planted in a container that has a porous structure (for example, clay), then the drainage may be less; if the container is airtight (for example, glass, plastic, glazed ceramic), then the layer should be larger.
- Dimensions and number of drainage holes. The number of holes affects the thickness of the layer: the more there are, the smaller the layer can be, and vice versa, the fewer holes, the thicker the layer should be. However, the diameter of the holes also plays an important role: if the holes are small, then the layer should be larger and vice versa.
Materials for the drainage layer can be reused (with the exception of perlite or small stones, small expanded clay, crushed brick; it is quite difficult to separate them from the soil). After removing them from the bottom of the container, they must be washed, disinfected (for example, in a dark solution of potassium permanganate or chlorhexidine) and dried.
- When planting or replanting any plants, you must use new, clean and dry materials! Do not place dirty or undisinfected materials. If you bought drainage in a store, read the instructions.
- If you buy a houseplant and it comes with instructions, be sure to read them carefully. Drainage requirements may be specified there.
- It is optimal to make drainage in 2 layers: on the bottom there is material of large fractions (expanded clay, crushed stone, gravel, ceramic chips), and on top put smaller elements (perlite, broken brick or at least coarse sand).
- If you use only fine-grained materials, then sprinkle a small layer of soil on them before planting.
- The drainage layer must be even. After planting the plant, you need to carefully walk along the walls of the container and shake it slightly so that the material is evenly distributed.
Some tips for using drainage materials
The drainage layer must be changed every time the plant is planted and replanted.
If you want to use used material for drainage, wash it, sterilize and dry it, but remember that the service life of any material is from 4 to 6 years. The height of the drainage layer depends on the plant you plant in the pot. Usually a layer of 1 to 3 cm thick is sufficient, although some crops require a thicker layer of 4-5 cm.
Each time you replant, change the type of drainage material, and during its service life, do not forget to regularly clean the drainage holes of the pot.
If there is only one drain hole in the pot, then the drainage layer should be at least 3 cm, and if there are many holes in the bottom, then a lower layer can be laid. If there are many large holes, a drainage layer 1 cm high is sufficient. You can buy a flowerpot without drainage holes and make them yourself, based on the requirements of the crop being planted:
Related article: Wisteria flower: planting and care in open ground, photo, growing from seeds
Place drainage in the pot immediately upon replanting: pour dry material into the pot, shaking the container, and place a layer of soil on top so that the plant roots do not come into contact with the drainage particles.
Brief description and necessity
It is quite simple to explain why and why this component is so important in the field of growing flowers. The thing is that without drainage, the soil gradually becomes compacted and dries out unevenly from moisture. In addition, areas with excess moisture appear, which can turn sour and cause rotting of the root system. Experts say that the spread of dangerous diseases and pests, lack of air permeability and rotting of the soil, disruption of the normal outflow of excess moisture, as well as an anaerobic environment are not all the factors that a small layer of drainage at the bottom of the container can successfully cope with.
Experts note that such material is a universal soil drainage system that helps maintain the most favorable substrate moisture for each type of indoor plant. Simply put, this is a specific layer of coarse or coarse-grained materials at the bottom of a flower pot, which guarantees good air permeability to the soil, as well as optimal drainage of excess moisture.
Novice florists often forget that good air permeability plays an important role in the process of growing a healthy plant. After all, only in this case will the root system of the flower be able to breathe and develop normally.
https://youtube.com/watch?v=DQghHByiU1w
Blind area: meaning and installation
An additional element to protect the building from excess moisture is the blind area. It complements drainage. The blind area is the laying of waterproof material around the perimeter of the foundation, adjacent directly to the building.
The material should be positioned strictly at an outward angle to allow moisture to drain away. Thus, when water hits the blind area, it is immediately removed from the house. Contact of the foundation and walls with moisture will be minimal.
As a material suitable for the blind area, you can take asphalt, concrete, clay, stone, paving slabs. The first two are the most popular for blind areas and are used most often. This is due to the fact that they require less labor and capital investment. But such surfaces will not look very profitable. Paving slabs, stone and clay require more time and effort, but all work will be justified by a wonderful result and attractive appearance.
We talked about what drainage is, what types and types there are. They also gave advice on how to independently install various types of drainage. If you follow the technology, the process will go quickly and smoothly, and the result will definitely please you. Modern and high-quality drainage will protect your home from the negative effects of excess humidity, make it comfortable, and extend its service life.
Best answers
avmir:
When I was a snotty kid, there were only ceramic pots with one hole in the bottom. This hole was covered with a shard from broken dishes, and as soil they took soil from a garden or forest belt and mixed it with coarse river sand (cherozem from molehills was especially valued). That's all the drainage, and also a good nutritional substance.
Alisa Doronina:
Crushed polystyrene foam.
Academician:
Broken brick, if there is no expanded clay, although it costs a penny.
Lirriella:
Why replace it? Useful thing. Expanded clay works well. Or, if you grow it on a wick, you don’t need it.
riba xitraya:
sphagnum, but expanded clay is best
Polystyrene foam is essentially not drainage, but... fill in the excess volume so that there is less soil, less risk of flooding. It does not come into contact with water, and the essence of drainage is to absorb excess water and release it at the right time
SPINY LIKE A HEDGEHOG...:
Throw any stones...
Clementine Lady:
Expanded clay, ceramic fragments, polystyrene foam. You can add agroperlite to the soil, it will prevent overflow.
Irina K:
Pieces of charcoal are very good for use as drainage.
I:
crushed stone or fine gravel ideal for drainage
Elena Rudenko:
That's what drainage is for, to absorb excess moisture (if the plant is flooded). It’s better not to stuff nonsense into the pot, like polystyrene foam, which doesn’t perform its intended function. It is better to purchase high-quality drainage. I buy Flower drainage large and small from Fusco. It completely and completely fulfills its function.
Ruslan Ladushkin:
You can, in principle, use a drainage system quite cost-effectively now) acoline ordered excellent prices here. and the guys there are great. In general, it’s up to you to decide, but I really advise you won’t regret it)
Evgeniy Volkov:
acoline/