Juniper belongs to the category of the most popular crops in landscape design. This popularity is explained by the variety of species, unpretentiousness and the ability to maintain decorative qualities at any time of the year. But the conifer you like can not always be purchased at a nursery, and its cost is quite high. Therefore, the only way to get new seedlings is cuttings. It is almost impossible to do this with seeds. Propagation of juniper by cuttings has its own characteristics. Therefore, before starting the procedure, you need to study them.
Juniper is a plant unique in its characteristics
Is it possible to propagate juniper from cuttings?
The shrub is distinguished not only by its unpretentiousness, but also by its ability to grow and fully develop in one place for more than 100 years. But the disadvantage of juniper is that it cannot be propagated by seeds. And even if it is possible to grow new seedlings in this way, there is no guarantee that they will retain the species properties of the mother plant.
Therefore, it can only be propagated vegetatively. But it should be understood that all conifers, like juniper, are no exception, give a low percentage of rooting of cuttings. And 50% is considered an excellent result. Therefore, it is necessary to prepare a lot of cuttings for rooting, since most of them will die during the propagation process.
What should be the planting material, how to plant and grow the plant correctly
In general, all junipers are unpretentious, frost-resistant and in most cases do not have any special requirements for the soil.
When planting seedlings, it is necessary to make drainage at the bottom of the hole, compact the soil well and do not forget about watering until the plants take root.
All conifers respond well to sprinkling during dry periods (for example, like decorative spruce).
The plant must be planted carefully so as not to disturb the root ball. If you have to buy planting material, it is better that it has a closed root system.
You can replant at any time. But when purchasing juniper in a container, it is important to pay attention to the root system and the condition of the substrate.
If the substrate is loose and the roots do not poke out of the holes in the container, it means the plant was recently transplanted and there is no guarantee that it will take root well.
When wondering where to buy juniper, you should give preference to specialized stores or garden centers. Read our article on how to avoid being deceived at a flower fair.
Like all coniferous plants, they need feeding. Unlike deciduous trees, they do not require a lot of fertilizer because they do not shed their leaves in the winter and in the spring they do not need much effort to grow green mass.
You can feed with special balanced fertilizers for conifers , which are sold in stores. If there are no special fertilizers, you can use nitroammophoska. It is better to do this in the spring, before the start of the growing season.
Advantages of juniper propagation by cuttings
The vegetative method of juniper propagation is possible if there is at least one mother bush. The main advantage of cuttings is that the method allows you to preserve all varietal properties. And at the same time it does not require complex manipulations and additional costs.
Important! A full-fledged juniper bush from a cutting is formed in the third year after rooting.
Seedlings obtained by this method differ:
- rapid growth;
- immunity to temperature changes;
- increased immunity to diseases and pests;
- good adaptation to a new place.
When vegetatively propagating juniper, it is necessary to take into account one feature of the crop: cuttings taken from the top will eventually grow upward and expand in width from the sides.
How does juniper reproduce?
How to propagate hydrangea at home
Propagation of junipers is possible by several methods. Each of them has features and disadvantages.
How to plant juniper:
- using seeds;
- cuttings;
- layering;
- dividing the bush.
The last 2 methods are not suitable for all types of juniper. Layerings are obtained from creeping varieties, and only a young bush can be divided.
Seed propagation is a very labor-intensive process:
- cones ripen for 2 years;
- seeds require long-term stratification;
- varietal qualities are not preserved;
- seeds have low germination rates.
Juniper seeds
Because of this, the vegetative method is popular. Propagation by cuttings is the easiest and most effective way. It has a number of advantages:
- varietal properties are fully transferred to the seedling;
- a full-fledged bush is formed in 2-3 years;
- seedlings quickly adapt to growing conditions;
- cuttings demonstrate high growth rates.
Juniper has an unusual feature. The direction of growth of a new bush depends on where the cutting was cut from:
- from the top - the plant will stretch upward;
- from the side - the bush will begin to develop in width.
Many gardeners have a logical question: how to grow juniper from a twig at home so that it quickly takes root and grows actively. And more on that below.
What varieties of juniper can be propagated by cuttings
Despite the availability of this method of propagation, not all types of juniper can be taken from cuttings. In some cases, new seedlings can only be obtained by layering or grafting.
Juniper varieties that are suitable for propagation by cuttings:
- Holger. Moderately growing shrub with a spreading horizontal crown. The height of an adult plant reaches 1 m, and the width is 1.5 m. Young needles have a golden-yellow color, and over time they become bluish-gray. Does not require crown formation.
- Meyeri. Large shrub with a cup-shaped crown. Its main shoots are located obliquely. They form numerous lateral branches with hanging ends. The height of an adult plant reaches 6 m, and the width is about 3 m. The annual growth is 12 cm.
- Kuriwao Gold. A vigorous shrub with an openwork asymmetrical crown. The height and width of the conifer ranges from 1.5 to 2 m. It forms wide spreading branches that point upward. The hue of the needles is yellow-green, and that of the young growth is golden. It grows by 15 cm in a year.
- Mordigan Gold. Low-growing spreading conifer up to 1 m high and about 2 m wide. The needles are scaly, golden-yellow. Annual growth is no more than 10 cm. Prefers sunny open areas.
- Wiltonii. A creeping variety of crop that forms a carpet on the soil. The shoots of the bush are densely leafy. The needles are needle-shaped, not prickly, 3-5 mm long. It has a silvery tint.
- Dream Joy. A unique variety that combines shades of yellow, green and blue. The shrub has a flattened, cushion-shaped shape. The height of an adult plant reaches 0.5 m, and the diameter is about 1 m.
- Limeglow. Juniper with yellow tinged needles, which turn purple with the arrival of autumn. The height of an adult plant is 30 cm, and the diameter is about 1.5 m.
- Schlager. A dwarf form of the crop with creeping shoots. Forms a spreading bush. The height of an adult plant does not exceed 25 cm. It grows unevenly. The young growth has a pleasant grassy tint, which stands out noticeably against the background of old needles.
Important! To propagate juniper, it is necessary to take cuttings from a plant older than eight years.
Is it possible to propagate juniper from a twig?
All cultivated varieties of juniper propagate well from cuttings.
Juniper is a beautiful evergreen perennial, which, thanks to its decorative properties, has long become a favorite plant on the site of many gardeners. The shrub goes perfectly with flowering bushes and looks gorgeous in single plantings.
Growing juniper will not be difficult, because all the perennial needs is proper care and compliance with the basic rules of agricultural technology.
Answer to the question
The following two tabs change content below.
- About the expert:
VseZNAYKA
Gardener and summer resident rolled into one. I will try to answer all your questions. I have vast experience in this field. I especially love fruit crops.
It is POSSIBLE to propagate juniper using a twig! After all, this is a universal propagation method that is suitable for all varieties of juniper.
This juniper is grown from a branch.
Another perspective.
It's called cuttings . Growing a shrub from a twig is not particularly difficult and allows you to quickly increase the number of evergreen bushes on your site.
Recommended timing for juniper cuttings
Juniper can be propagated by branches at any time of the year. But, according to experienced gardeners, the most favorable time for this is early spring, when growth processes are activated in plant tissues. But there are also those who argue that it is better to cut juniper in the fall, when the stomata are buried, which prevents moisture loss. Therefore, all possible options should be considered.
Propagation of juniper by cuttings in spring
To propagate thuja and juniper, it is recommended to cut green cuttings at the end of March at above-zero temperatures. During this period, it is already clear which branches have retained their functionality after winter and were least affected by frost.
For propagation, it is best to select semi-lignified shoots from the upper part of the conifer, and for variegated species - from the sunny side.
Is it possible to propagate juniper in summer?
Summer vegetative propagation is also possible. In this case, for rooting, the cuttings must be cut in early June, when the active vegetation of the conifer slows down and lignification of the growth occurs.
It is recommended to prepare planting material for propagation at temperatures below +25 degrees to minimize moisture loss. Otherwise, the cuttings may dry out.
Propagation of juniper by cuttings at home in autumn
You can root juniper branches in the fall, but at home. The optimal period for propagation is September-October, when the daylight hours are at least 10 hours. The cuttings should be planted in containers, and only in the spring can they be transferred to greenhouses outside.
Juniper cuttings in winter
The end of February is best for breeding. At this time, sap flow in the plant tissues is activated, which promotes rooting. It is recommended to harvest planting material on a cloudy day at air temperatures above 0 degrees.
Reproduction by layering
But perhaps the simplest, most convenient and 100% effective method of propagating Cossack juniper is the use of layering. To do this, one of the branches is bent to the ground, a small notch is made on it with a knife (you can do without this), pinned and sprinkled with earth; this is best done in the spring during the growing season. Periodically, this area is slightly moistened. Already in the fall, the branch is carefully cut off from the mother bush and planted in a permanent place. Cossack juniper is unpretentious and tolerant of many types of soil, but grows well and quickly in well-drained soils and loose loams. Tolerates sandy soils well. If the soil is very clayey or rocky, dig a deeper hole to plant young seedlings in a permanent place. A layer of sand 15-20 cm thick and broken brick should be poured into the bottom of the hole as drainage, and a mixture of turf, peat and sand as the soil mixture. When your sprout gains strength, it will begin to grow well in any soil. These conifers cannot be planted closely; the distance between plants should exceed 2.5-3 m, since in close proximity low-growing shrubs begin to fight for living space, and pruning greatly spoils the beautiful appearance of the tips. To create a hedge - at a distance of half a meter to one. Young plants can be fed in the spring with complex mineral fertilizers; organic fertilizers, like all conifers, are contraindicated for them.
If you use only Cossack junipers in your landscape garden, the landscape will look somewhat monotonous. But in combination with perennial flowers, deciduous shrubs and trees, the compositions will sparkle with new colors. A neat green lawn, as well as a slide of natural stones, can serve as an excellent backdrop. Orange or yellow spirea will go well with juniper bushes on the banks of streams and sunny meadows. Heathers and barberries will ideally emphasize the noble beauty of Cossack juniper in rocky areas.
How to propagate juniper from cuttings at home
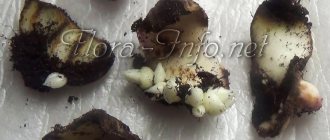
The process of propagating juniper from cuttings is quite lengthy. Rooting of shoots occurs from 2.5 to 4 months, but in some species only callus is formed during this period, and a full-fledged root system is formed after a year. Therefore, in order for juniper cuttings to have the maximum level of survival, it is necessary to follow all stages of the procedure.
Preparation of planting material
In order for a beautiful juniper bush to eventually grow from the cuttings, it is necessary to prepare high-quality planting material.
Important! It is also better not to use branches that are too thin for cuttings, since they will use up the supply of nutrients before roots form.
It is recommended to prepare cuttings for propagation in the first half of a cloudy day at a temperature not lower than 0 and not higher than 25 degrees, so that they retain moisture. For rooting, it is recommended to use green young shoots or semi-lignified ones. The main thing is that they have a “living” apical bud, which guarantees the full development of the seedling.
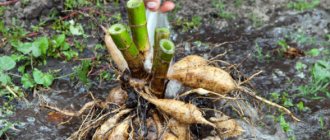
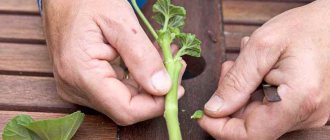
Cuttings for propagation should be 10-15 cm long. They need to be cut or torn from the branch in one motion so that a “heel” remains at the end. From the bottom of the shoots, it is necessary to remove all the needles to a height of 3-4 cm. In this case, the top should be completely left in order to preserve metabolic processes in the tissues.
After this, the lower cut of the cuttings should be wrapped in wet sphagnum moss and placed in a slightly damp cloth. They should be stored in this form until planting.
How to root juniper
There are two main ways to root conifer cuttings. But not all of them are suitable for juniper.
Before planting, the lower cut of the cuttings should be in a humid environment.
Rooting juniper in the ground
Juniper cuttings are best rooted in the soil. The substrate should be well drained with a neutral acidity level. Therefore, it is necessary to mix sand with peat in a 2:1 ratio. To disinfect the substrate, it is recommended to pour it with a bright pink solution of potassium permanganate.
Important! Wood ash cannot be added to the soil, as it makes it alkaline, which is unacceptable for juniper.
Rooting juniper cuttings in water
The method of propagating juniper by cuttings in a jar of water is not suitable for obtaining new seedlings. Since it involves a long stay of the lower part of the shoot in water. And this promotes peeling of the bark and thereby causes decay.
How to plant juniper cuttings
Vegetative propagation of juniper should be carried out in pots in autumn and winter, and in open ground in spring and summer. The landing procedure does not require complex actions, but in both cases it has slight differences.
Important! Cuttings of tree-like juniper varieties must be planted vertically, and creeping varieties - at an angle of 50 degrees.
In the pot
To plant cuttings, you need to prepare pots or boxes with a height of at least 2 cm. The first option is suitable if you need to root a small number of cuttings, and the second - for mass propagation.
All planting containers must be equipped with drainage holes, which will prevent stagnation of moisture in the soil and prevent it from souring. It is necessary to lay a layer of expanded clay 2 cm high at the bottom of the containers. And the rest of the volume should be filled with the prepared substrate.
Procedure for planting cuttings in pots:
- Water the soil and wait until all the moisture is absorbed.
- Level the surface.
- Using a pencil, make depressions in the soil at a distance of 10 cm from each other.
- Powder the lower cut of the cutting with any root-forming agent.
- Deepen it by 3-4 cm. Compact the surface at the base so that there are no voids.
- Build a small greenhouse out of film on top and make holes in it for air exchange.
After planting, the containers with cuttings must be moved to a bright place with shade from direct sunlight.
In open ground
To root juniper cuttings in open ground, you need to select a site in partial shade. In this case, the top layer of soil should be removed and a prepared mixture of peat and sand should be poured in its place.
Procedure for planting in open ground:
- Level the surface and compact it slightly.
- Water generously and wait until the moisture is absorbed.
- Make small holes at a distance of 10-12 cm.
- Deepen the cuttings 3-5 cm into them, having previously powdered the lower cut with any root former.
- Compact the soil at the base.
For successful rooting, high humidity is required - about 85-90%. Therefore, a small greenhouse should be built above the cuttings to provide favorable conditions.
How to propagate juniper from a twig
Vegetative propagation of juniper can also be carried out using small branches that extend from the main trunk. For the preparation you will need a sharp knife or pruning shears. They need to be cut with a small fragment of wood at the end - 1.5-2 cm. The length of such a shoot should not be more than 25 cm. For propagation, one-year branches from the upper part of the conifer should be used.
The process of growing juniper from a branch is similar to that from cuttings.
Further care
You can plant juniper in open ground in the fall or early spring. Planting time depends on the climate zone. It is important that before the onset of frost, the plant has time to adapt, and in the spring the burning sun does not damage the young needles. It is advisable to plant juniper in acidic, well-drained soil.
When planting juniper to prevent injury to the root system, the plant is moistened abundantly and carried with a massive earthen ball. The depth of the hole is 2.5 times greater than the coma and averages 1 m. When planting in groups, the size of an adult plant should be taken into account and a distance between seedlings of 2–4 m should be maintained. The root collar is left 5 cm above the ground. To prevent fungal diseases when planting in low areas and places with low light, seedlings are treated with Vitaros or Baktofit.
Juniper is sensitive to stagnant moisture, so a drainage layer of pebbles, expanded clay or crushed brick 15 cm thick is required. The substrate for planting is the same as for cuttings. It is advisable to add a universal fertilizer, for example, nitroammophosphate, to the soil.
After planting, the bush is irrigated abundantly and mulched with sawdust, hay or peat with a layer of 7–10 cm. The soil is periodically loosened, removing weeds. Caring for juniper in compliance with the basic principles is simple and does not take much time. The plant is a long-livers, reaching an age of 300–400 years.
Watering
Juniper is drought-resistant and watering is only necessary in the summer 3-5 times per season. One plant will require 20 liters of water. Air humidity is important for the plant and spraying the crown once a week is useful, which is carried out early in the morning or in the evening after sunset.
Trimming
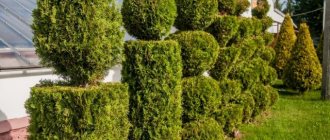
In spring and autumn, sanitary pruning is carried out, removing damaged and dried shoots. It should be borne in mind that juniper is a slow-growing plant; pruning must be done carefully. The temperature must be at least 4 °C. Juniper is often used to create hedges; the species is plastic and easy to shape. Curly pruning is carried out 1–2 years after planting, when the tree has become stronger. Junipers are popular for making topiary. For complex shapes, frames are used.
Feeding
The tree does not need regular fertilizers; it is enough to add nitroammophoska or Kemira complex fertilizer to the soil in the spring. After feeding, the juniper is watered abundantly.
Shelter for the winter
For the first 2–3 years, juniper needs shelter for the winter during frosts and protection from bright sun in the spring. Adult plants do not require shelter.
Diseases and pests
For juniper, dangerous fungal diseases cause rotting of roots, damage to needles and death of branches. The proliferation of pathogenic microorganisms occurs when there is stagnation of moisture and insufficient lighting. There are frequent cases of juniper being affected by rust. When the disease occurs, the needles become covered with brown spots, and the branches dry out. For prevention, a solution of copper sulfate is used, and for treatment, fungicides are used. Before use, the drug is tested on one plant. If no side effects have appeared within a day, and the condition of the juniper has not worsened, then the remaining plants are also treated.
Insects that pose a threat include spider mites, aphids, scale insects and moths. In case of damage, insecticides are used.
Propagating juniper at home is not difficult if you follow the basic rules. It is easier to use cuttings or propagation by layering. In the future, the plant needs minimal care.
How to grow juniper from cuttings
For successful rooting of cuttings, a temperature of at least +22 degrees is required. You should also keep the soil slightly moist at all times, since even slight drying out of the soil leads to the death of seedlings.
The cuttings should be watered with settled water at room temperature as the top layer of the substrate dries. It is also important to provide diffuse lighting.
1.5-2 months after planting, the cuttings should be adapted to external conditions. To do this, you need to remove the greenhouse or greenhouse for the first time for half an hour, and with each subsequent day increase this time period by another 40 minutes. After a week, the cover can be completely removed.
Propagating juniper at home - rules and advice from gardeners
Have you ever wondered how much the exquisite simplicity of coniferous compositions costs? Yes, a lot. But there is a way to create beauty and reduce costs - you need to learn how to propagate plants on your own. To do this you need a system and a few secrets. Let's share our experience of cutting junipers.
Propagation of juniper at home
Transplanting rooted juniper cuttings
Experienced gardeners do not recommend rushing to transplant rooted seedlings to a permanent location. Spring and summer cuttings can be planted in the ground at the end of August - beginning of September, so that they can adapt before the arrival of persistent frosts, and autumn and winter cuttings - no earlier than June, since their rooting process is significantly lengthened.
Rooted seedlings must be transferred to soil with a ball of earth, and after planting, water abundantly and temporarily shade from direct sunlight.
When can you collect cuttings for juniper seedlings?
The most suitable time for propagating seedlings is from the beginning of spring to the end of autumn, although knowledgeable gardeners note more productive growth when taken at the beginning of the season. Plan the time for planting the seedlings, and determine when you need to take the cuttings so that they have time to take root. Accordingly, they need to be prepared no later than June, so that they have time to take root and not freeze.
Thus, ideally, they need to be prepared around February, so that in the spring they can be planted in the soil (this should not be done earlier, the seedlings may not survive. Gardeners also do not advise later, the needles will fade in the sun). Then, over the course of about 70 days, the seedling will form a root system. Well, if you do not have time to plant before the seedlings are exposed to frost, it is better to hold the plant until the next season, growing it at home.
How to stimulate rooting of juniper cuttings
The market for gardeners is very rich these days. You can find anything you want, including various means for active root formation and seedling growth. Do you know that our ancestors used willow water, honey, potatoes and even yeast for these purposes. Modern products are very easy to use and very inexpensive, so everyone can afford them.
The most popular among them:
- Kornevin is a stimulant based on indolylbutyric acid. For 1 liter of water, 1 g of the drug is required;
- heteroauxin is a phytohormonal agent. The active ingredient is indolylacetic acid. Place 1 tablet per 1 liter of water;
- Epin - stimulates root formation and improves immunity. For 1 liter of water take 0.5 ml;
- zircon is a multifunctional complex preparation, a mixture of hydroxycinnamic acids. Add 1 ml per 1 liter of water.
Manufacturers do not advise exceeding the dose, as it can cause the opposite effect. In this case, more is not better. The cuttings must be immersed by a third in the solution, and the remainder is quite suitable for watering the plants.
How to plant correctly in the ground
You should not plant juniper in an area that is in direct sunlight; it is better to have partial shade. You should act carefully, as the root system is very weak. You need to replant seedlings directly with the clod of earth in which it grew.
- Prepare a hole in the ground that will allow you to freely immerse the seedling with its root system, preferably 2-3 times larger, do not forget to lay down the drainage.
- Columnar juniper should be placed vertically, and bushy juniper should be placed at a slight angle.
- After planting, the seedling is watered and mulched.
Please note that the first years of the planted seedling must be insulated for the winter and protected from the scorching sun. You should not be overzealous with watering, otherwise the roots of the plant will simply rot - juniper is drought-resistant, watering only once a month is enough.
Do not forget to fertilize with nitroammophos (50 g per 1 m2), and in the summer you need to use organic and mineral fertilizers.
Photo: https://babushkinadacha.ru/wp-content/uploads/2016/12/mozhzhevelnik-photo-bigger.jpg
Follow the advice, treat juniper propagation with full responsibility, and the result will not be long in coming. You will be able to improve the area with beautiful, healthy and powerful bushes of a wonderful crop.
Deadlines
For all operations, 2 periods are suitable: spring and autumn.
You can take cuttings from the plant in spring or autumn.
The advantages of each of them:
- sap flow begins in early spring, the plant is more active, there is a greater likelihood of developing a strong root system of the cutting during the favorable summer months;
- in the fall, processes stop, including the evaporation of moisture, i.e. the cuttings retain all the nutrients accumulated over the summer, which will be used for rooting the seedling.
The first roots of juniper appear after 30-40 days, and viable roots appear after 2-3 months. Therefore, most gardeners are inclined to use the spring procedure. Moreover, at this time the bushes are pruned, during which planting material is prepared.
For autumn cuttings (September-October), lignified shoots are used, which are planted in the ground the next year.
Cultural hybrids reproduce very well at the age of 8-10 years, when strength has already accumulated, but the aging process has not yet begun.
Transplanting a seedling into open ground
The best time to transplant grown seedlings into open ground is spring, from April to May. Seedlings with a closed root system can be planted in the fall, in September-October, but spring planting is still preferable.
Junipers are demanding on lighting, so the place for planting them should be open and not in the shade of large trees and buildings. Light partial shade or constant illumination with diffused sunlight is allowed. It is advisable that there are no strong winds on the site, especially from the north. The soil is preferably loose, well-drained. Common juniper and its Chinese variety do not tolerate dry air; they will grow well if there is a natural body of water nearby.
Different types of juniper prefer different types of soil. For example, Virginian will feel better on slightly acidic clay soils, Cossack prefers calcareous soil, and Siberian juniper should be planted only in sandy soil. Acidity levels and soil composition must be checked before planting and, if necessary, adjusted to the required values.
Important! The level of soil fertility has virtually no effect on the growth and development of juniper.
Before planting, it is necessary to prepare a sufficient amount of universal soil substrate with which the planting hole will be filled. To prepare such a mixture, a mixture of soil taken from under an adult juniper or other coniferous plant, coarse river sand and peat is best suited. All components are taken in equal proportions and thoroughly mixed together.
It is better to prepare the planting holes in advance so that the soil has time to settle and become saturated with air. Their size must be guaranteed to exceed the volume of the earthen lump on the roots of the seedling. A layer of drainage made of broken brick, expanded clay or crushed stone is poured onto the bottom of the pit. Then a layer of nutrient soil is poured on top. The pit is left in this form for several weeks.
For planting, choose a cloudy, cool day. Containers with seedlings are spilled with water in advance so as not to damage the roots when removing them. The seedling is placed vertically in a hole on an earthen hill, and then covered with a nutrient substrate. The earth around the trunk is slightly compacted to prevent the formation of voids. The root collar of the seedling is not buried; it should be at soil level. After planting, watering is carried out, and then the root zone is mulched with peat, bark or sawdust of coniferous trees.
Over time, juniper grows quite strongly, so when carrying out group plantings it is necessary to maintain certain intervals between neighboring plants. Dwarf species are planted at a distance of 0.8-1 m from each other; when planting larger varieties, it would be advisable to increase this distance to 1.5-2 m. This measure will allow the plants to avoid competition and develop normally without inhibiting each other.
Step by step instructions
In order for a juniper cutting to take root, you must:
- prepare the correct substrate;
- prepare good planting material;
- create suitable conditions for rooting.
Soil preparation
The rooting substrate should be light and breathable. Acidity – neutral or slightly acidic.
A soil mixture of equal parts is suitable for cuttings:
Disinfect the soil before use. To do this, it is calcined in the oven at a temperature of 150° for 20 minutes or spilled with a pink solution of potassium permanganate.
After the mixture has cooled, you need to add 1 part of the soil from under adult junipers. This will speed up metabolic processes and improve the absorption of nutrients, since the roots of conifers live in symbiosis with soil fungi, which ensure their vital functions.
The bark peels off in a humid environment, which can cause the cutting to rot. Therefore, it is necessary to maintain the humidity of the substrate at a certain level. To do this, perlite or vermiculite is mixed into it.
Preparing the cuttings
It is better to prepare planting material on a cloudy day, without rain. This way the cuttings will lose less moisture.
First of all, you need to choose a mother plant. It should be healthy, symmetrical, with a thick, lush crown of the correct varietal shape.
If it is necessary to propagate brightly colored specimens, then select the branch that is illuminated by the sun for the longest time.
Shoots have “memory” - they remember in which direction they grew on the mother plant.
- In columnar and pyramidal varieties, cuttings are taken from vertically located central branches 1-3 orders from above.
- A cutting from a horizontal conifer will give life to a plant that develops in breadth.
For rooting, powerful, even annual shoots from 10 to 20 cm long are best suited. Thin and crooked shoots will produce equally crooked and weak offspring.
In green young branches, as well as in old, completely lignified ones, the ability to root is noticeably reduced.
Recommendations:
It is better not to cut the selected shoot, but to tear it off with a sharp downward movement. In this case, it is separated from the stem with a “heel” - part of the branch from which the root system of the seedling will be formed.
A young tree needs good care
If the tail at the “heel” is more than 2 cm, it is shortened with a sharp tool.
If you can’t tear it off (the shoot is too powerful), then you can cut it off with a sharp knife. Just be sure to grab a couple of centimeters of the lignified uterine stem.
The torn shoot is cleared from the bottom 4-5 cm of small branches and needles, trying to ensure that there are no “stumps” left. Small wounds on the stem stimulate the appearance of roots in this place.
How to root
In the prepared substrate, with a pencil or wooden stick, you need to make small holes with a diameter of 1 cm and a depth of 3 cm, with a distance between them of at least 5-6 cm.
- For columnar and pyramidal varieties - vertical.
- For creeping or spherical ones - at an angle of 50-60°.
Carefully place the cuttings into the holes, pressing down the soil so that there are no voids left. Water with a fine-mesh watering can or spray bottle.
Conditions for rooting:
- The substrate should always be moist, but not wet. To do this, a drainage pad is placed in the container for growing seedlings. Watering is moderate, only after the top layer of soil has dried.
- At the same time, to prevent loss of moisture, the cuttings must constantly be in an atmosphere with high humidity, up to 90%. A greenhouse made from a cut plastic bottle, plastic bag, or glass is suitable for this. It must be regularly ventilated so that the shoot does not rot.
- The optimal temperature for root formation is 20-24°, with good illumination from diffuse but not direct sunlight.
Peculiarities of juniper propagation depending on the species
Not all propagation methods are suitable for a particular crop variety. A selection of applicable methods for some of the popular varieties is presented in the table.
| Cuttings | By layering | Dividing the bush | Seeds |
| Ordinary | + | + | |
| Scaly | + | + | + |
| High | + | ||
| Columnar | + | ||
| Rocky | + | ||
| Cossack | + | + | + |
| creeping | + | + | + |
| Horizontal | + | + | + |
Propagation by seeds, as can be seen from the table, is applicable only to the first variety. At the same time, its petioles take root extremely difficult. The division method is suitable exclusively for multi-stemmed varieties, and only branches of horizontal varieties can be propagated by layering. Cuttings are applicable to all types of juniper.
Hybrids bred by breeders can be propagated by seeds, but this is a very labor-intensive and often ineffective method. If you still manage to grow additional specimens through seeds, they will be distinguished by great strength and endurance. They can be used as a rootstock for grafting valuable varieties. They will lose all the features of the mother plant.
Juniper species
Cossack juniper variety "Blue Danub"
Most plant species easily tolerate the realities of Russian climatic conditions. Juniper does not require care and easily tolerates dry periods. Although this plant loves full sun, it can also grow in shaded areas.
The most common types in our country are:
- juniper virginiana, which came to us from the North American continent;
- rocky, can grow up to 10 meters high;
- horizontal juniper will cover any area with a carpet, its Cossack juniper variety allows propagation by all known methods;
- medium juniper is resistant to environmental influences, originating from a combination of Cossack and Chinese;
- common juniper has creeping and tree-like forms.