Reproduction methods
Pelargonium first appeared in European countries in the 17th century and immediately became very popular. Breeders are tirelessly developing new varieties and now their number has exceeded 400. The greatest demand among gardeners is for large-flowered, zonal, fragrant, thyroid, unique and angel geraniums.
Pelargonium reproduces:
- seeds;
- stem cuttings;
- dividing the bush.
Seed cultivation is the most labor-intensive process; in this case, the characteristics of the mother geranium variety are not always preserved. Dividing an adult bush is more often practiced when replanting a plant to a new location.
Important! It is faster and easier to propagate geraniums at home by cuttings. When taken from cuttings, young plants bear all the characteristics of the parent variety.
Zonal geranium develops best when cuttings. Young plants bloom within 3 months after planting the cuttings. In other varieties this process is much slower. They are ready to flower only 6-15 months after cuttings.
Another purpose of cuttings is to rejuvenate an adult plant. If this is not done, after a few years a beautiful, strong plant will turn into an elongated bare stem with few inflorescences at the ends of the shoots.
Whimsical varieties - breeding features
The most capricious varieties of the Geranium family are considered royal (grandiflora) and ampelous (or ivy-leaved).
Having acquired a beautiful grandiflora, a gardener often asks the question: how to propagate royal geranium at home, are there any differences from simple plant species? Basically, the finicky variety is propagated in the same way as regular geranium. But there are several features:
- The main one is that you don’t even have to try to put its sprouts in water to get roots. It is unlikely that this rooting practice will be effective; most likely, they will all rot and disappear.
- The soil mixture for them is prepared from peat and leaf humus.
- The plant will take a long pause before it begins to bloom. The period from planting to first flowering takes about a year.
Cutting time
All procedures involving mechanical damage to the plant are carried out taking into account the annual cycle and biological characteristics of the species. Otherwise, the survival rate of pelargonium deteriorates, varietal characteristics are lost, and immunity to diseases decreases.
Cuttings taken from old pelargonium take root much worse. With age, the ability for root formation decreases due to a decrease in water-retaining properties and slow metabolic reactions. Therefore, it is better not to delay the timing of cuttings.
Pelargonium cuttings are taken in autumn and spring. Although some nurseries cut geraniums for commercial purposes all year round, including in winter, it is optimal to do this in August-September or March-April.
Cuttings taken in the spring have a better chance of successful rooting. These include a consistently high temperature, the absence of drafts, and the right amount of sunlight required for auxin synthesis. The disadvantage of the spring procedure is that the planting material is cut with already formed flower buds. This reduces the decorative value of the mother bush.
Autumn pelargonium enters a dormant stage and the rate of metabolic reactions is reduced. Therefore, propagation of geraniums by cuttings in the fall at home is a little more difficult and slower if the shoots are cut from a bush older than 6 years. Planting material from young pelargonium develops quickly and blooms next year.
Important!
Cuttings and rooting are performed in the same way for all types of pelargonium. Rooting of royal pelargonium is carried out only in the soil due to its tendency to rot due to moisture accumulation. Other species root in soil or water.
How to propagate correctly?
The plant can be propagated in several ways.
Cuttings
Geranium cuttings are the easiest and fastest way to get a new plant . To understand the point of planting it using cuttings, consider step-by-step instructions on how to renew and propagate a plant:
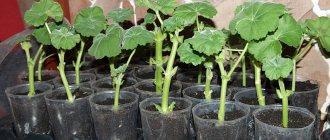
- To obtain propagation material, the upper vertical shoot of the bush is cut off. In this case, the knife must be pre-treated with alcohol. The size of the cutting should be 8-12 cm. The lower leaves are removed from it.
- The cut should be made directly under the leaf node. It is from there that the roots will appear in the future. You can leave up to three leaves on the cutting itself, the rest are removed.
- In order for the cut to dry, the cutting is kept in the air for two hours.
- After cutting, this place is treated with charcoal.
You can root the cuttings immediately in the ground or keep them in water until roots appear.
Rooting in the ground:
- First, the necessary substrate is prepared. To do this, peat, sand and perlite are mixed.
- You don’t need a large container for the soil; just take a small glass or pot with a volume of 200 ml. The container must have a hole, since the geranium is watered through the tray.
- Prepared cuttings are sprinkled with any growth stimulant (Kornevin, etc.), this is done so that roots appear faster.
- A depression of up to 3-4 cm is made in the center of the cup, where the cutting is inserted, and the earth is compacted around it.
- The pot is placed in a bright place and watered three times a day. The roots should appear in half a month.
Important. As soon as a new leaf appears on the cutting, this will indicate that the geranium has taken root.
If rooting in water, the cutting is placed in a container filled with water. It is transplanted into the ground when the first roots appear.
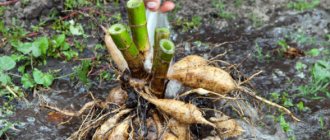
Dividing the bush
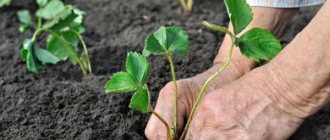
If a transplant is planned, then at the same time you can propagate the geranium by dividing the bush. This is often done in the autumn or when transplanting a flower from a small one to a larger pot. At this time, the bush is divided into small parts and transplanted into another container.
The propagation procedure by dividing the bushes is extremely unreliable, since the geranium itself is difficult to tolerate transplantation.
When replanting geraniums, there is no need to try to choose a larger pot ; it should be only a couple of centimeters wider than the plant. Otherwise, the geranium will be branched, but will stop blooming.
Seeds
Propagation by seeds is rarely used, as this process is lengthy and not always effective. But, on the other hand, a plant grows from seeds with completely new properties. The color and shape of flowers and leaves change. This is a troublesome matter, but experienced gardeners often practice propagating geraniums by seeds.
Attention! If you want something to come of your idea, first prepare the right soil. It should consist of humus and sand, with the possible addition of peat. The consistency of the soil should be loose.
It is better to sow seeds in March. It is during this period that the plant will no longer need artificial lighting using fluorescent lamps.
- Before placing geranium seeds in the ground, they are treated with disinfectants. This will protect the geranium seeds from pests and diseases.
- The seeds are sprinkled with a small amount of soil. After this, a greenhouse effect is created for them, that is, everything is covered with cans or special film.
There are also devices for growing seeds on sale, which include containers with lids.
Harvesting cuttings
For better survival, mother bushes are selected and cuttings are cut, guided by the following rules:
- Healthy and strong pelargoniums are suitable for reproduction;
- cuttings are cut from the top of the bush;
- for work, use a sharply sharpened knife with a disinfected blade;
- cut cuttings 8 cm long with 2-3 internodes with an oblique cut;
- if the stem is long, cut 2 cuttings from it, making the upper cut directly above the bud;
- the stump above the bud is kept minimal so as not to provoke rotting;
- The leaves are torn off from below, leaving 3 to 5 leaves on the stem;
- all flower stalks with buds are plucked to improve survival.
Possible breeding problems
Despite the fact that geranium is rightfully considered one of the most unpretentious plants, and its cuttings lead to a successful result in 90% of 100%, there are still those 10% of failures that are worth mentioning.
Problems when propagating geraniums can arise in cases where:
- cuttings are carried out when the room temperature is too high (above 25 degrees) or low (below 16 degrees);
- There are periodic drafts and temperature changes in the room. In such cases, the pot with the cuttings should be covered with polyethylene on top until roots appear. Regularly (once a day) remove the polyethylene to ventilate the soil and shoot for 1 hour;
- Optimal conditions for growing seeds are not met: temperature indicators should be within 22–25 degrees. Without covering the seedlings with polyethylene or a greenhouse lid, it is difficult to achieve a stable temperature;
- the cutting itself is chosen incorrectly: the cut is not made on a young shoot, but a part of the woody stem is captured. Geranium will not produce roots on an old, dried shoot;
- the geranium shoot or greenhouse is placed in a dark place. For the emergence of seedlings and the root formation process, you need to choose southern or eastern window sills. Moreover, for root formation of cuttings, places with diffused light (east) are quite acceptable, and for sowing it is better to choose window sills on the south side. Direct rays of the sun have a beneficial effect on seed germination, resulting in strong and healthy seedlings. Once a week, the container with the seedlings is unfolded so that they evenly receive sunlight from all sides and grow straight and slender.
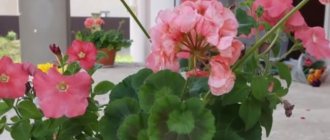
Numerous terry petals of Pelargonium rosebud fit so tightly to each other that they do not have time to open and look like rose buds. Any gardener wouldn’t mind getting a cutting of such a beauty.
Preparing planting material for rooting
Typically, pelargonium cuttings take root well without any preparation, but to increase the chances of favorable reproduction, several measures are carried out:
- After cutting, the cuttings are laid out on a flat surface in a darkened room for 2-3 hours to dry.
- Dried sections are treated with crushed activated carbon, wood ash or the drug “Kornevin”. The same applies to cuttings from the mother bush.
- Before planting, the cuttings are additionally treated with a root formation stimulator.
Home care and watering scheme
The first watering of a new plant should be done no earlier than 10 days after planting. Next, the usual watering regime for all geraniums is built: no more than once every 4-5 days. The first fertilization of a young plant from a leaf should be done no earlier than after 1 month.
Advice! They feed with special fertilizer for geraniums, and if it is not available, then with ordinary universal fertilizer. During the period when the plant blooms, choose liquid mineral fertilizers with a low nitrogen content.
Rooting in water
This method of cutting pelargonium is the simplest. To grow roots, cut cuttings are lowered into containers with clean water, deepening the lower end by 2-3 cm, so as not to reduce the useful area for breathing of the shoot. For disinfection, powder from crushed activated carbon tablets is added to the cups. This will prevent the cuttings from rotting.
Important!
The water is changed weekly. If the level of liquid in the glass drops quickly due to strong evaporation, simply add it.
In the room where rooting occurs, the temperature is maintained from +14 to +16 degrees. At a lower temperature, the shoot will not grow roots and will rot. After 7-10 days, roots appear on the lower cut. After half a month, they grow to a sufficient length and the young plant is moved into the ground. Then the seedling is cared for in the usual way.
Methods for rooting geraniums
Rooting in water
In the absence of a soil mixture, cuttings are carried out in water, which allows, if simple techniques are followed, to obtain viable planting material.
The cut shoot is prepared as for rooting in the ground.
- Pour settled water into the container.
- To monitor root development, it is convenient to use transparent dishes.
- In order to prevent the appearance of harmful microorganisms, a crushed tablet of activated carbon is poured into the water.
Place the cuttings, leaving the leaves above the surface of the water, which is changed once a week. Glass allows you to capture the moment when the root system reaches a length of about three centimeters. This will serve as a signal to plant in the prepared pot. Rooting in water is not carried out for royal geraniums, since in this variety the development of roots is slow and the cuttings may rot.
Application of peat tablets
Increasingly, rooting of cuttings is carried out in peat tablets. This modern material, also suitable for germinating seeds, is peat to which growth stimulants have been added. The substrate is compressed into small washers placed in a protective mesh.
The range is represented by peat tablets of different sizes.
- For rooting geranium cuttings, a diameter of 40 mm is recommended.
- Place peat washers in a container and pour in warm water.
- The tablet swells, turning into a cylinder.
- When the process ends, the remaining liquid in the pan is poured out.
- Using a wooden stick or pencil, make a 20 mm indentation in the center of each washer.
- Place the prepared cuttings, pressing the peat on all sides.
During the rooting process, the substrate is moistened as necessary. When the roots begin to penetrate through the holes of the mesh, it is removed, and the seedling along with a peat lump is transplanted into a pot. This method is safer, as it eliminates injury to the root system.
Rooting in the ground
For most varieties of geraniums, it is more common to plant cuttings directly into the substrate. For rooting, different types of soil mixtures are applicable:
- independently mixed soil from equal parts of garden soil with neutral acidity, humus, sand and turf;
- a soil mixture of ready-made universal soil for indoor flowers with the addition of sand and vermiculite;
- coconut substrate;
- a mixture of equal amounts of perlite and peat;
- sphagnum;
- ready-made peat tablets.
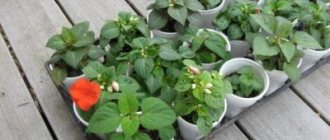
To plant cuttings, take small pots, disposable cups or other suitable containers with a volume of 100-200 ml. Be sure to make holes at the bottom and lay a drainage layer. The selected soil is placed in disinfected containers and spilled with boiling water or a pinkish solution of potassium permanganate.
In the center of the pot, make a hole 3 cm deep in the substrate and place the lower cut of the prepared cutting in it. Then sprinkle with soil and compact. Containers with planted cuttings are placed on a well-lit windowsill, shaded from direct sunlight. During rooting, maintain the temperature in the room from +18 to +25 degrees.
During rooting, the cuttings are irrigated moderately. Do not allow the soil to dry out or become waterlogged. When watering, water should not end up on the leaves. A signal of successful rooting is the growth of new leaves on the cuttings. Then you can transplant the young plant into a permanent pot.
Important!
When planting cuttings, it is convenient to place them in pots one at a time. If you need to plant several specimens in one container, maintain a distance of 3 cm between them so that the roots of the plants do not intertwine together.
How to root geraniums using cuttings
This method of propagation is much more common than the previous one, especially among experienced gardeners. Experts strive in advance to protect their pet from the effects of putrefactive bacteria and initially provide the root formation process with the proper conditions.
Growing geraniums at home using soil is not difficult. The soil mixture should be loose and nutritious. To create a suitable consistency, you can add a little sand to the substrate. To root geraniums, you will need a small plastic cup or flower pot filled with appropriate soil. If you use a plastic cup, be sure to cut holes in the bottom so that moisture after watering does not accumulate in the soil, but comes out.
It is also necessary to have a drainage layer (fine gravel or brick chips), on top of which the soil substrate is poured. One shoot should be planted in a plastic cup. If you are using a larger pot, you can plant several cuttings at the same time, placed along the edge of the container.
The shoots are buried in the ground so that the leaves do not come into contact with the soil, and the substrate around the stem is tightly compressed to prevent the accumulation of air bubbles around the cuttings. To root the cuttings, water them regularly, making sure that the substrate does not dry out. Containers with planted cuttings must be placed in a bright place. Direct sunlight on the leaves of a young plant is unacceptable.
Important! To preserve moisture in the soil for 5 days, the shoot can be covered with a plastic bag, after which the oilcloth can be removed from the flower.
You can plant geraniums not only in a pot or a plastic cup. For this, they also use a regular plastic bag, which will not allow moisture to pass through. The bag is filled with loose, nutritious soil and the substrate is moistened. After this, the soil is slightly moistened, the bag is tied with an elastic band, and holes are cut on the side parts of the resulting “ball” into which the shoots are planted.
Reproduction in a greenhouse
Flower growers engaged in mass breeding of geraniums often use mini-greenhouses to root cuttings. Such a device is a wide container with soil, covered with glass or film. The greenhouse speeds up the rooting process and allows you to work with several cuttings simultaneously and save space on the windowsill. You can build such a greenhouse yourself from scrap items or purchase a ready-made one.
The greenhouse tray is filled with nutritious soil, several cuttings are planted in it and covered with a lid. The soil in the greenhouse is regularly irrigated so that it does not dry out. You cannot fill the soil, otherwise the cuttings will rot. 2 weeks after rooting begins, the lid is removed.
The period of root formation for all pelargoniums is different. So, royal geranium takes root in a month, but ivy geranium takes only 2 weeks. Successful rooting is indicated by young leaves growing on the cuttings. After their appearance, the seedling is moved to a permanent container. This is done by transferring the plant along with a clod of earth.
Rooting geranium cuttings in vermiculite. #31 Steschka
Sent
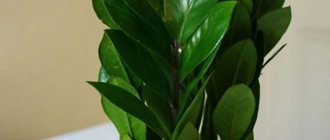
Can I put in my two cents about the rooting of geraniums and pelargoniums? As I learned from my own experience, it is better to underfill them than to overfill them. And under no circumstances in the water! My rooting technology is as follows: I rinse the cuttings first in soapy water, then after 15 minutes in clean water (I do this to avoid any pests, I usually pinch them off in a variety of places, and there is no confidence in their health - they are all “dvorterrier” varieties ", it turns out)). Then I dry it for 12 hours to 24 hours (I just leave it on paper until the next day). This next day I plant it in the ground (by the way, sometimes, as necessary, I just stick it in without any holes. I plant it straight into a pot where it is supposed to continue to grow). I water it. I pour the water out of the pan. I close it for the first 2-3 days with a cut bottle (greenhouse). I open it during the day to ventilate for a couple of hours, or I simply remove the cap from the bottle (to prevent condensation). After two or three days I remove the bottle. I water it when the soil dries to a depth of five centimeters (half a finger). All. After two weeks - good roots. I never lost it (when I started rooting it like this). Try it, maybe it will help... Lavina, (we met here too), nice baby! Good luck to him. When he grows up, post a photo, please. (And how it will bloom) The leaves are beautiful - jagged. They are somewhat reminiscent of nettles. Do you know how it will bloom?
Transfer
Pelargoniums are grown in pots no larger than 0.75 liters. Too large a container capacity provokes the plant to build up its root system and green mass. This reduces flowering rates. For the same reason, geraniums are not fed with nitrogen fertilizers. The selected pot must have holes at the bottom. It is filled 15% with expanded clay drainage.
For the growth of geraniums, a soil mixture consisting of:
- 2 parts of turf land;
- 1 part peat;
- 1 part sand.
The prepared soil is watered with a weak solution of potassium permanganate for disinfection and structuring, and then the prepared pot is filled with it two-thirds. Then the rooted cuttings are transferred to a pot. It is advisable to do this by transshipment, so as not to disturb the root system again. The remaining space is filled with soil, shaking the container occasionally to avoid the formation of voids. Then the flower is watered with lukewarm, pre-settled water.
Important!
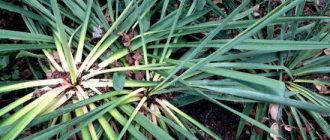
Ivy-leaved geranium looks especially advantageous in group planting. In this case, the plants are planted in a long container, keeping an interval of 15 cm between them.
Geranium and pelargonium: what is the difference?
Pelargoniums are often called geraniums because of their similar appearance. But there is still a significant difference between them. Geranium is found in many parts of the world, usually in the Northern Hemisphere, so it can grow both indoors and easily endure winters in the garden.
Pelargonium is a native of Africa and feels better on the windowsill. It is also planted in the garden for the summer, but completely dies out during winter. Therefore, in the garden, geranium is considered a perennial, and pelargonium is considered an annual. In addition, “African” is distinguished by more lush inflorescences. Despite this, the principles of care and breeding of the two plants are practically no different. This article will discuss how to properly propagate geraniums.
Caring for young plants
Young geraniums are cared for in the same way as adult plants. Pots with bushes are placed on southern windowsills with good lighting or light partial shade. During particularly hot times of the day, geraniums are shaded so that the sun's rays do not burn the leaves.
In the hot season, geraniums are often irrigated. The amount of winter watering is reduced to 1-2 times a week. It depends on the type and condition of the air in the room. Additional moisture in the form of spraying or sprinkling pelargonium is not necessary. Regularly loosen the soil in the container and remove wilted leaves and faded buds.
Important!
When the period of winter dormancy begins, pelargonium is moved to a cooler room with a temperature of +8 to +12 degrees. You can simply move the pots closer to the window glass.
To activate growth and provoke geranium to bloom, feed it with mineral complexes with a small amount of nitrogen twice a month in spring and summer. To make the bush more lush, pinch the top of the geranium and several side shoots.
Landing
Small clay or plastic pots are suitable for pelargonium. A prerequisite for them is the presence of drainage holes, since excess moisture can lead to blackleg disease of the plant. Leaves with grown roots are planted as follows:
- Drainage should be placed at the bottom of the pot. Expanded clay or brick chips are used for this.
- The prepared soil is laid out on top of the drainage, after which it must be watered with warm, clean water.
- A leaf with roots is carefully placed in a small depression in the soil. The ground underneath needs to be compacted.
- The pot with the planted plant is placed in a well-lit place, but not in the sun, where pelargonium can get burned.
With proper care, maintaining optimal conditions for seedling propagation, the geranium leaf will take root thoroughly and quickly grow. In a few weeks it will produce new shoots. In the future, the bushes of the plant must be pinched for abundant flowering.
Planted geranium leaves after rooting
Tips and tricks
To make cuttings successful, flower growers with extensive experience advise:
- a few days before cutting the cuttings, stop watering the mother bush;
- to protect against fungus, cover the planted cuttings with plastic bags or glass jars for 2 days;
- for planting cuttings, use small pots or place several in flowerpots;
- do not use clay pots with a porous structure for growing geraniums, as they provoke moisture evaporation;
- In summer, transplant geraniums into a flowerbed in the garden or simply take the pots out into the open air.
Rooting
Geranium cuttings are often rooted not in water, but directly in the soil. The fact is that its trunk tends to accumulate water, and this often leads to rotting. However, in water the shoot will take root faster, and the process itself can be observed.
When rooting geraniums in water, it is important not to lower the cuttings too deep: 1–2 cm under water will be enough. Take an opaque container, preferably dark, in which roots will appear faster. The water should settle well and be at room temperature. It is changed once a week and topped up as it evaporates. As soon as the roots reach 2.5 cm, the cutting can be planted in the ground. It makes no sense to wait longer, since there is always a risk of rotting. The cutting with roots will develop more actively in the soil where there is free access to air.
Geranium cuttings can be planted in the ground as soon as the first roots appear.
If the soil rooting method is chosen, the prepared shoot is stuck into the ground to a depth of 2–3 cm. You can sprinkle the tip with a root growth stimulator. A special composition of the substrate for rooting is not required; any universal soil for home flowers will do. The main thing is that the soil is loose and well-drained. It is better if it contains a large percentage of sand near the surface. The biggest risk when rooting geraniums is rotting. Therefore, the soil is disinfected: calcined in the oven or microwave, treated with a weak solution of potassium permanganate.
While waiting for the roots to appear, abundant watering is not necessary; it is enough to ensure that the earthen ball does not dry out completely. It’s not scary if in the first days the leaves on the cuttings begin to wither and turn yellow - geraniums without roots need to go through a period of stress. But if the wilting is prolonged, you can help the plant adapt to new conditions: cover the cutting with a plastic bag or place it in a greenhouse.
In water
The cuttings are placed with a dried cut in water (at a level of 4 cm). It is better to take an opaque container and disinfect it before use. The water should be soft, clean, settled, at room temperature (+22...+24 °C), it should be changed after 1–2 days. Some gardeners argue that you cannot change the water when rooting cuttings - they say, it’s better to just top it up. To reduce the risk of stem rotting, you can add crushed activated carbon.
The dishes with the appendage are placed in a lighted place, avoiding direct sunlight. Daylight should last at least 16 hours, and at night the temperature should not drop sharply. With this method, it is convenient to observe the growing roots, and you can easily determine the moment of planting in the ground.
In the ground in a pot
If you know how to plant a varietal geranium with a shoot without roots directly in a pot with soil, you can quickly wait for a new plant. To prevent the shoot from rotting, planting prepared geranium shoots should be carried out in nutritious, loose, slightly acidic soil to a depth of 1.5–2 cm. Experienced gardeners make a soil mixture of drainage soil, peat and sand, sometimes adding vermiculite. A layer of expanded clay is poured into a pot with drainage holes, then soil, and a small layer of sand is added on top, which provides some protection from waterlogging of the base of the cutting.
The soil must undergo a disinfection procedure. To do this, it is heated in the oven for 20–30 minutes or poured with a hot solution of potassium permanganate. The pot must also be disinfected before use. It is recommended to use formalin or just boiling water. Make a hole in the middle with a pencil, place the cutting, and press the soil tightly against it.
It is not recommended to cover cuttings planted in this way with a jar or plastic wrap, but this can be done if the leaves begin to dry out along the outer edge.
After the leaves are restored, the jar is removed. The dishes with the shoots are placed in a bright, warm place - it can be a window sill, but without the drying effect of the central heating radiator and without direct sunlight. Water them moderately after the top layer has dried. For watering, use clean water at room temperature and a watering can with a narrow spout, directing the water to the ground so that it does not fall on the leaves and stem. Overwatering threatens the appearance of blackleg, which means the loss of the plant.
When the geranium takes root, it will be noticeable in the above-ground part. In a few days, new leaves will begin to appear, existing ones will grow, and the trunk will stretch upward. 2 months after rooting, the plant can be transplanted to a permanent location. It is advisable to plant geraniums in a pot that is not too spacious - this way it will bloom more profusely and the risk of root rot will be reduced.
Zonal or ampelous pelargonium will be ready to bloom within 2–3 months after the cuttings have rooted. And the royal ones and angels bloom only the next year.