Thuja is a coniferous and evergreen plant that is very common today and is grown in many summer cottages. It tolerates transplants without any problems, and in some cases it even needs them.
Even a novice gardener can comprehend the technology for carrying out this process. All features and main significant nuances associated with the transplant procedure will be discussed in detail in this article.
Features and rules for transplanting thuja
The main general features associated with the process of transplanting these coniferous plants are discussed below:
- When transplanting to a place located outside the area where the thuja grows, the planting hole must be dug not on the day of the procedure, but 2-3 weeks before it.
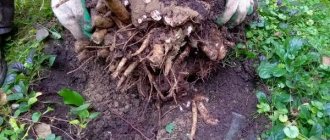
- Particular attention must be paid to your own caution when digging up thuja in an old place, since there is a risk of causing damage to the root processes using sharp tools. Such wounds take a very long time to heal and can weaken the plant at such an inopportune moment.
- Thuja easily transfers to a new place, but there is no need to abuse this. For this reason, the chosen location must be assessed against all relevant criteria and fully comply with the requirements so that it does not need to be done again in the near future.
- It is recommended to replant only mature and strong plants. If there are any lesions or signs of disease on them, you will need to wait for complete recovery. It is best not to disturb too young seedlings in the first few years after planting.
When to replant thuja: in spring or autumn
Replanting shrubs requires strict adherence to a time frame. Many gardeners note that it is better to do it in the spring, since in the fall there is still a possibility that the thuja will not have time to take root before frost and will die from the cold. However, some summer residents believe that in the fall the plant takes root better and its root system has time to grow good young roots.
Since each option has its own advantages and disadvantages, each gardener chooses the season for changing the site for thuja at his own discretion.
Attention! Autumn replanting should be done in September so that the tree has time to take root before frost sets in.
Replanting thuja in autumn
Autumn replanting has a big advantage in that at this time of year the tree is able to normalize metabolism and take root. Because with the arrival of cold weather, the bush’s root system actively regenerates and in a short period of time it manages to restore the damaged parts of the shoots and grow additional ones. True, there may not always be enough time. This means that replanting thuja in the fall should be done in those regions where winter begins closer to November and is not too cold.
If harsh climatic conditions prevail in the region where the thuja transplant is planned, the procedure is performed only in the spring
Transplanting thuja to another place in spring
Spring transplantation of thuja to a new location should be carried out before the beginning of the growing season. Because at this point the tree becomes weak and, if replanted, it will take a very long time to take root. This means that the procedure cannot be delayed and it is advisable to perform it as soon as the last snow has melted.
Comment! After the tree is dug up, you should carefully shake off excess soil from its roots and wrap them in burlap.
How to replant thuja in summer
In the summer, only an adult plant can be replanted. This will be a compromise between the autumn danger of freezing and the spring danger of getting sick. But unlike transplanting in other seasons, in summer it is impossible to predict the behavior of the plant after the manipulation.
Warning! If a young thuja was transplanted in the summer, the plant will take root very poorly.
When planting thuja in open ground in the summer, the process of its adaptation may take several years.
Purposes of thuja transplant
The main reasons why a thuja transplant may be required are given below:
- When a young plant reaches five years of age, this is the most common reason for this procedure. During the initial planting of a seedling in open ground, the chosen location is in fact always considered as an exclusively temporary refuge. This age is considered the most optimal period when most restrictions are removed from the thuja, including those relating to transfer to a new site for permanent growth.
- Digging up a plant growing in another place or natural environment and moving it to your own site is another fairly common reason. In this case, preparatory activities last longer and can last from several weeks to one month.
- A general deterioration in the condition of the thuja caused by the inconsistency of the previously chosen location with the conditions for growing this plant.
- Planting a large number of similar coniferous plants in a certain place to form a hedge.
Features of thuja
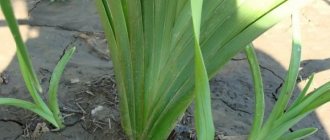
Thuja is a shrub or tree that is resistant to drought and frost and is easy to care for. Growing the plant is permissible in any soil and terrain, but you should still not plant the tree in an open, windy area.
Plant varieties are presented:
- Low-growing varieties.
- Tall varieties.
The main difference lies in the height of the plant. The remaining characteristics do not have any fundamental differences. Both types of plants are similar to each other and to other representatives of the cypress family. They have a narrow, elongated crown, scaly leaves arranged in pairs on the branches, and small oval cones at the ends of the shoots.
Site selection and soil quality
The process of determining a place for planting must be taken as seriously as possible so that the thuja feels comfortable in the new conditions. The main requirements that apply to it are listed below:
- Thuja is light-loving, so there should not be buildings, tall structures or trees next to it that will constantly keep it in the shade - in such a situation it will lose its decorative effect. At the same time, prolonged exposure to direct sunlight should also be avoided, as this can lead to fatal dehydration. It is advisable to choose a place in such a way that it is shaded during the midday hours.
- Drafts are the most undesirable factor, so they must be completely eliminated at the planting site. In addition, the thuja will need to be protected from cold northern winds; this may require the organization of some additional protective shelter.
- Thuja can grow in soil with a clay structure, sandy loam or marshy areas, but it is recommended to plant it in more nutritious areas. A good option would be turf soil, into which you can additionally add some coarse sand or peat.
- The close occurrence of groundwater, which causes rotting of the root system of most cultivated plants and trees, is not a critical factor for thuja. In most cases, on the contrary, she feels very good in such places.
Basic rules of procedure
The procedure for transplanting a thuja, however, like any other plant, requires compliance with certain rules. Before you start transplanting, you need to decide on the most suitable place. The tree loves the sun very much, but it is still impossible to plant it in an open area where the plant will be exposed to direct sunlight and will be exposed to gusts of wind all the time. The sun will cause thuja burns and dehydration. It is especially undesirable to choose an area where the sun shines on the bush at noon. Drafts and constant exposure to gusts of wind lead to plant disease and do not allow the creation of a lush crown. It is not recommended to plant on the northern side of the site.
The plant is unpretentious to soil, but it is still recommended to prepare a nutritious soil mixture in advance. For this, river sand, peat, humus, rotted coniferous flooring, and phosphorus-potassium fertilizers are used (added at will, their purpose is to promote better survival of the plant in a new place).
Next, you need to prepare the hole. It is advisable to dig it up at least 15-20 days before planting. An exception is that the plant is replanted within the same area. Then the hole can be dug directly on the day of transplantation. The depth of the hole should be about one meter.
The first layer of the hole is stones or crushed bricks. This is drainage. Then mix the prepared soil mixture thoroughly until smooth, and then pour it onto the bottom of the prepared hole on top of the drainage layer. It is advisable to ensure that the roots of the thuja do not touch fertilizers.
Step-by-step transplant instructions
After selecting and preparing a new place, you can proceed directly to the replanting process; detailed instructions are given below:
- Initially, a planting hole is prepared; its depth and diameter are determined by the expected dimensions of the root system of the tree to be transplanted. Typically these figures are in the range from 70 to 100 cm.
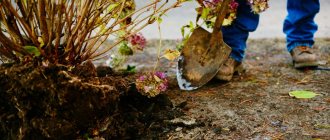
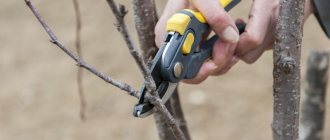
- The second stage is the most difficult and responsible, since it involves digging up the plant in its old place. To eliminate the risk of damage to the root system, you need to measure the distance from the trunk to at least 40-50 cm and pierce the perimeter around it. It is most convenient to use a shovel with a sharp working part for this.
- If an adult and already fairly large plant is being transplanted, then the area around it must be pinched in advance - at least a year before digging it up in the old place. These measures are necessary so that the thuja has time to send out new shoots within its allotted boundaries, which will allow it to be pulled out of the ground along with a lump that will retain its shape and not fall apart.
- The thuja needs to be pryed up, for this it is best to use a garden fork rather than a shovel, and pull it out along with part of the soil that makes up the tree trunk area.
- It is best to transport the dug up plant to a new planting site
- Fertilizers are added to the prepared planting hole ; you can also add a small amount of wood ash, which is recommended to be finely ground beforehand.
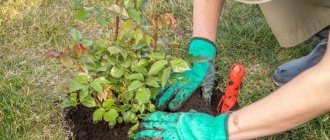
- The thuja, together with the earthen lump, is carefully placed inside the hole, while trying not to shake it or touch the edges of the hole. All root shoots must be in a natural position after placing the bush, otherwise they can be straightened by hand.
- The hole is filled to the very edges with a nutrient mixture , which consists of sand, peat and ordinary garden soil remaining after preparing the planting site.
- The surface of the earth is manually compacted and compacted, and then abundantly moistened with water. You need to stop watering only at the moment when moisture stops being absorbed into the soil. At this point, the transplantation process can be considered completely completed; then you only need to provide it with appropriate care.
Site selection and preparation
Regardless of the variety and variety, thujas prefer the same growing conditions.
The site must meet several requirements:
- It is good to be illuminated by the sun - in the shade the bush will not develop normally, the needles will lose their natural decorative effect and become less common.
- Avoid exposure to drafts and strong winds - such conditions have a negative impact on the health of the crop.
- The soil is preferably breathable - this will allow the root system to receive a sufficient amount of oxygen.
As for the composition of the soil, there are no special requirements - thuja feels good in areas with clay and sandy loam soil, and normally tolerates close proximity to groundwater.
However, it is advisable to give preference to turf substrates with the addition of sand, which are distinguished by a rich set of microelements and nutrients.
It is recommended to prepare the soil in advance by mixing several components:
- peat and river sand;
- turf soil and rotted coniferous flooring;
- wood ash and humus.
It is allowed to add phosphorus-potassium fertilizers in a reduced dosage - additional feeding will benefit the shrub and improve survival rate.
Digging of the planting hole is carried out on the day of transplantation; a drainage layer must be placed at the bottom.
It is better to mix the soil for backfilling with fine expanded clay - this will prevent stagnation of moisture and subsequent rotting of the root system.
Aftercare
All features of caring for thuja after transplanting the plant to a new location are described in detail below:
- All thujas prefer to grow in well-moistened soil; it is for this reason that they so calmly tolerate proximity to nearby groundwater. The soil should not be allowed to dry out, as this will immediately affect the appearance of the bush: its needles will quickly lose all their decorative qualities. At the same time, thuja prefers watering, which occurs naturally, but on hot and dry days the procedure is also carried out artificially. If possible, you can collect rainwater, which will then be used to water the bushes, which will have a positive effect on their condition.
- Pruning, which involves removing dried and dead shoots, is usually done after winter. However, if you find weak or diseased branches or shoots that have become too long, they can be cut back throughout the season.
- Thuja responds well to the use of bait mixtures and fertilizers, but it is necessary to strictly adhere to the schedule. The procedure must be carried out for the first time in March; for this purpose, mixtures with a high nitrogen content are used. However, with the onset of the first days of summer, they will have to be abandoned, replacing them with potassium fertilizers. Feeding mixtures based on phosphorus are used only when necessary, usually when a bush is planted in soil with insufficient nutrients and useful chemical elements.
- After watering or heavy precipitation, the soil needs to be mulched; it is best to use sawdust or purchased material based on coconut fiber for this purpose. This will help retain moisture, which will provide the root system with reliable protection in persistent hot weather.
- In March, June, August and November, it is necessary to carry out preventive treatment of thuja against various types of parasites and pests. A universal drug is karbofos; it provides reliable protection against thuja aphids, the most important pest that can cause significant damage to a cultivated bush, as well as against other types of insects.
- Seasonal pruning is not included in the complex of care procedures after planting, since it will only need to be done after 2-3 years. However, when transplanting an already mature and sufficiently grown bush, it will be possible to prune the thuja to form the correct crown the next season; it is best to carry out this process in the summer.
Care after transplant
Successfully transplanting a thuja is only half the battle. Only proper timely care after planting will lead to good rooting and development of the tree. Here are some recommendations for caring for a transplanted thuja.
- When moving the plant to a well-lit place, the thuja should be shaded on the south side for three to four weeks after planting.
- If work is carried out in the summer, the plant needs intensive watering, especially in the first months - at least once a week. In the mornings, you can spray with anti-stress compounds added to the water to speed up the adaptation of the thuja.
- Mulching the tree trunk circle will help retain moisture and protect the root system from drying out. For these purposes, bark, fallen leaves, sawdust or special coke fiber wheels are used.
- Periodically, the soil around the tree trunk needs to be loosened to improve air access to the roots and weeded.
- In the first 2-3 years after transplantation, the tree cannot be pruned: this is additional stress for the newly transplanted plant, and it may die.
- Feeding is carried out after the first year of transplantation twice a year - usually in spring and summer. For this, humus and complex fertilizers are used.
So, replanting a thuja is a troublesome process, but not difficult, especially if you already have experience in gardening. The optimal time for tree transplantation work is spring or autumn. You just need to do everything correctly, taking into account the recommendations of specialists. In any case, remember that it is better to initially think through the future location of the tree than to subject it to the stress of replanting later.
Preparing for winter
Every person who grows thuja on their own plot should know the basics of preparing it for winter, since this procedure must be carried out in the first year after planting in open ground or when transplanting to a new plot.
The features of this process are discussed below:
- The bush is tied and wrapped with any woven material or burlap, but polymers or synthetic varieties should be avoided , since they do not provide heat retention and such measures are completely ineffective.
- The insulation material is tightened at the top, but not too tightly, so as not to disturb the ventilation and natural air exchange inside the shelter being created. Otherwise, when a thaw occurs, the bush will be subject to damping off, which can lead to irreversible consequences.
- For additional insulation, you can use special types of purchased fertilizers that allow you to retain heat, but they must be used strictly in accordance with the instructions supplied with them.
- The root system of the thuja can be insulated using leaves that have fallen naturally, as well as fallen pine needles. These materials will additionally help retain moisture and subsequently begin to gradually rot, which will fertilize the soil well.
Further care of the transplanted plant
2 years after proper transplantation, you can continue to care for the thuja in the usual way. But at first, while the plant has not yet completely established itself in its new place in the open ground, it requires more attention and care.
First of all, it is important to know how to properly protect the transplanted thuja from the upcoming winter cold:
- The crown of the plant is tied with twine or other rope. Then the top is covered with burlap, which is not tightly fixed in the upper part, preventing the flow of air into the shelter from stopping. The use of synthetic covering materials in this case is unacceptable.
- The root system is insulated with the help of spruce branches or leaves that have fallen in the garden from healthy trees undamaged by parasites. Each of these materials is capable of additionally retaining moisture at the roots, and subsequently rotting, fertilizing the soil.
Under no circumstances should the soil where the thuja is grown be allowed to dry out. To avoid such risks, immediately after planting, you can mulch the soil around the plant with sawdust or coconut substrate - this will protect it from cracking.
The next spring after transplantation, it is necessary to carefully examine the thuja and prune shoots damaged during the winter season. At the same time, preventive spraying against parasites and other pests is carried out. Karbofos has proven itself very well - it protects plants from aphids and other insects that can harm the health of plantings.
Thuja responds well to spring fertilizing with nitrogen fertilizers. Overgrown shoots can be trimmed for decorative purposes throughout the season if the plant is in good condition.
Basic mistakes
Below are the main mistakes that are most often made when transplanting thuja; familiarizing yourself with them will help prevent a possible recurrence in the future:
- Lack of the required amount of moisture in the new place. This mistake is most often made during summer transplants: during this period the bush needs to be flooded without fear of any consequences.
- Excessive sunlight in the first days after transplantation. This is especially dangerous for young bushes, so they need to be additionally shaded on the south side. After 2-3 days, the thuja will no longer need such safety measures.
- Use plastic bags to protect from sunlight or when preparing the plant for the coming winter. This is one of the most common mistakes: such bags are not able to provide protection or warmth, but at the same time they disrupt natural air exchange, which negatively affects the condition of the plant.
Types of thuja
Thuja is a coniferous plant from the Cypress family, which can be a tree or shrub with flat shoots. There are five types of thuja:
- Western thuja, or life tree (Thuja occidentalis);
- Thuja Sichuan, or Chinese thuja (Thuja sutchuenensis);
- Korean thuja (Thuja koraiensis);
- Japanese thuja, or Standish thuja (Thuja standishii);
- Thuja folded, or giant Thuja (Thuja plicata).
All types of thuja are evergreen with a dense crown, and the needles tolerate cold and air pollution well. Therefore, they are ideal for improving cities in temperate latitudes. Thuja wood contains aromatic essential oils that give the plant a pleasant smell. In our cold latitudes, various varieties of western thuja grow well and withstand winters.
Adviсe
To summarize, we can give the following tips that will be useful when transplanting thuja:
- During watering, which is carried out after planting in a new place, you can add root or other types of stimulants to the water used, which will allow the bush to quickly strengthen and adapt to new conditions. Dosages must be determined strictly in accordance with the instructions supplied with the drug.
- To carry out a transplant, it is best to avoid hot sunny days ; thuja tolerates this procedure much better in cloudy and rainy weather.
- After transplantation, you can carry out not only watering, but also spraying from a spray bottle. This procedure is best carried out in the morning, and special anti-stress agents can be added to the water, which will speed up the process of adaptation to a new place.
In what cases is it necessary to transplant the thuja to another place?
The reasons for transplanting thuja can be very diverse. Large thujas are preferentially transplanted because their too high growth (which may have been incorrectly predicted during the initial planting) interferes with the development of other plants or poses a danger to humans.
Another reason for transplants is the acquisition of mature species. This is a rational solution, and it occurs quite often. Thuja is an excellent ornamental coniferous tree, but its growth rate, especially at the beginning of its life, is low. Thuja takes a very long time to grow to adulthood, which in some cases is unacceptable for its future owner.
That is why buying an already mature thuja is quite logical and justified. However, it poses a problem in transporting the tree and replanting it. Often it even has to be replanted and brought not just from the nursery, but directly from the forest.
The third reason why a thuja may be transplanted is the design aspect. There are often situations when the thuja does not fit into the site and significantly distorts its appearance. At the same time, it either looks unsuccessful, or introduces an imbalance into the overall composition, or simply interferes with the implementation of one or another of the author’s ideas. If such problems become critical, the thuja needs to be replanted.
Attention! The same reason for replanting thujas also includes work on forming hedges from them, creating park groups, preparing a base for topiary, etc.
Is it possible to transplant an adult thuja?
All botanists and gardeners agree that it is possible to replant an adult thuja. Moreover, as practice shows, most of the transplanted thujas are already adults.
Until what age can thuja be replanted?
There are no restrictions on transplanting thuja based on age. The replanting algorithm will be the same for a young thuja for 3-5 years and for a 20-30-year-old “veteran”. However, the difference in the nuances of transplanting large and small trees can be quite significant.
In order to properly transplant an adult thuja, first of all, you will need to take care of the safety of its root system, which can pose a serious problem for large trees. For example, a difference in height of 2 times means that the mass (and with it the root system with an earthen lump) of such a tree will be 8 times greater. Such issues must be taken into account when replanting mature trees, since in this case we are talking not just about labor costs, but also about the possible use of special means.
As for the time of transplanting an adult species, the question of when to transplant a large thuja, in spring or autumn, does not depend on its age.
How to replant correctly
The success of the plant transplantation process completely depends on the correctly carried out actions of the gardener. Considering that this process is often forced, choose a good place. It is important that the thuja not only survives, but is also able to develop in the future. To do this, you need a bright area, not exposed to drafts. Also prepare the soil in advance: 3-4 weeks before replanting, dig a hole 1 meter wide and deep.
Adult thuja
There is a difference between transplanting a young and an adult plant.
Important! It is not recommended to add fertilizers during the first year - the thuja may negatively perceive too much excess of nutrients.
A tree whose age exceeds 3-4 years is transplanted according to the following algorithm:
- Mix the soil from the dug hole with fertilizers: peat, ash and growth stimulator.
- Carefully remove the root system from the container and transfer it to the chosen location.
- Fill the hole with soil so that the neck of the plant stem is not completely covered with soil and is at the level of the edge of the hole.
- Compact the soil around the trunk.
- Water thoroughly and cover the soil with mulch.
young
A plant up to 2 years old is transplanted differently than an adult thuja.
Read more about propagation and cultivation of thuja.
The gardener's actions should be as follows:
- Choose a non-rainy day. It is better to replant in the evening.
- Add superphosphate to the soil, but make sure the mixture does not touch the roots.
- At the bottom of the recess, build a drainage system using broken bricks and sand.
- From the old place where the tree grew, move it to the hole. If the plant is very young, you can carry it directly in your hands, but carefully. Otherwise you will need a wheelbarrow.
- Without straightening the roots, lower them into the hole and gently cover them with soil.
- Compact and moisten the soil.
- If transplantation occurs in the fall, mulch the soil and insulate the neck.
- Water every 2-3 days for the first month of growth.
How to transplant a small thuja
There are no problems with transplanting young trees. Everything that applies to large species can also be applied to small ones. In addition, replanting small thujas is much easier, since in the vast majority of cases they are not transplanted from soil to soil, but from pot to soil. That is, this is the first transplant of the tree after its purchase.
Site selection and soil preparation
Choosing a place when planting a small thuja is similar to choosing a place for an adult, however, the requirements for midday shading in this case have a certain feature.
Unlike adult species, where midday shading is advisory, for small thujas it is mandatory. In addition, in the first few years after transplantation, a young tree needs diffused rather than direct sunlight. Therefore, it is recommended to plant thuja either in partial shade or behind a trellis, with the help of which it will be shaded or provided with diffused light.
Transplant algorithm
The algorithm for transplanting a small thuja is similar to transplanting a large tree. There are practically no differences. However, we should not forget that summer transplantation of young species is less effective in terms of their survival rate. The tree is unlikely to die, since thujas are quite tenacious, but the adaptation process may take a significant amount of time.