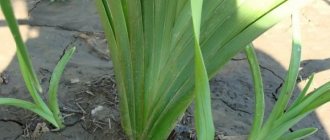
Forest juniper belongs to the coniferous family. Based on it, more than 75 decorative varieties were bred. The juniper family includes different, dissimilar plants: from compact shrubs to spreading trees reminiscent of cypress.
Despite their differences, they all look aesthetically pleasing. In addition, they do not require special care. They have one common drawback: difficulty in tolerating a new place, long time to settle down and adapt. Therefore, if there is a need to transplant juniper, for example, in the spring to another place, it must be done correctly, in accordance with the basic conditions and requirements.
The article describes how to replant juniper in a garden plot or forest. The general principles of transplantation are the same.
When to replant?
To transplant juniper from the forest to a garden plot or from one place in the garden to another, you should begin to prepare the tree or shrub for the procedure six months to a year in advance. Preparation consists of digging the plant to a decent depth. This will make it more convenient to trim the root system.
When digging, it is necessary to take into account the size of the earthen clod: it should be larger than the crown of the tree or of the same size. This manipulation is necessary so that the plant can form a compact root system. In this case, the likelihood of injury will be minimized, and the plant will take root better and faster in its new location.
The plant has certain periods during which it is allowed to be disturbed. This is due to the ability to form new roots. From one season to another, this ability weakens or strengthens. It is important to know these time intervals.
Juniper transplantation should be carried out in the most favorable and successful period - in the spring, from March to April.
Juniper transplantation should be carried out in the most favorable and successful period - in the spring, from March to April. It is strictly not recommended to carry out the procedure on hot summer days, since at this time there is a lot of moisture on the needles, it will not be able to take root well during this period. In this case, it is better to do this in the fall. A plant transplanted in the fall will take root in the spring. Cossack juniper can be safely replanted in the autumn.
When it is necessary to replant a plant in the summer, the order of procedures is as follows:
- place the dug juniper in a pre-prepared container;
- In order for the plant to adapt to new environmental conditions, remove it to a shady place, covering it with film. Bury the container in the ground;
- at the end of August you can safely plant the plant in a permanent place for growth. At first, it is necessary to create partial shade, protecting the plant from sunlight.
Caring for a transplanted plant
The transplanted juniper needs protection and care after transplantation. This consists of shading from the bright sun in spring, abundant watering and fertilization. On hot days, the seedling is watered 3 times a week. Frequent watering is necessary for good rooting of the seedling. Fertilize in the spring with nitroammophos, and in the summer you can feed the seedlings with organic fertilizers once a month. The tree also responds positively to crown irrigation. During hot months, this promotes moisture retention and vigorous growth.
Young seedlings 2-3 years old are the fastest to adapt to a new place, but older specimens are more finicky.
Juniper is unpretentious to growing conditions and is quite winter-hardy, but young seedlings still need to be insulated for the winter. To do this, wooden panels are installed around it, which are covered with agrofibre or other insulating material. After the threat of the last spring frosts has passed, the juniper is opened for hardening.
If the juniper was transplanted in the spring, then it also needs protection from the bright sun, which can burn the young branches of the plant. In spring, active growth and large evaporation of moisture begin; the roots of the transplanted plant have not yet adapted to the new planting site and do not have time to extract the required amount of moisture from the ground. Therefore, the juniper crown may suffer from a lack of moisture, which will negatively affect the appearance of the seedling, whose needles may turn yellow and even crumble, and the tree itself may die. To prevent this from happening, the seedling must be reliably shaded and thoroughly watered until it begins to grow. And it is best to plant in the fall, so as not to be upset by failure later.
With proper care of the transplanted juniper, it will delight with lush greenery and a healing aroma, decorating the garden plot of a caring owner.
Transplantation scheme
Before replanting, as well as when planting, you need to carefully consider how to plant the plants, in what order, and in relation to each other. Juniper is a long-liver - this fact must be taken into account when planting. The location and planting pattern is directly determined by the variety - juniper from the forest, wild shrub, or an ornamental variety obtained as a result of selection. They have different sizes and differ in appearance. All this must be taken into account when drawing up a planting scheme.
When the size of an adult plant reaches a meter in diameter, the distance between the bushes should be from 1.5 to 2 meters.
For example, if the size of an adult plant reaches a meter in diameter, the distance between the bushes should be from 1.5 to 2 meters.
Juniper in the garden. Origin
Juniper (lat. Juníperus) is a coniferous plant of the Cypress family (Cupressaceae). Junipers naturally grow in the northern hemisphere, in temperate and subpolar climates, as well as in the high mountains of the subtropical zone. These coniferous trees have many varieties and species, which differ from each other in height (from 15 cm to 40 cm), crown cover (spherical, cone-shaped, columnar, creeping), color of needles and bark (dark green, light green, gray-blue, golden). Thanks to their wide variety, junipers can be used in any garden. They can grow where other plants can cope - in the sun, on dry, infertile, sandy soil.
Appearance
Juniper is a fairly diverse species, within which we will find low, creeping, and widely growing bushes, trees with a columnar or cone-shaped, pointed crown. Some species develop leaves only in the form of needles (for example, common juniper, recumbent), others have needles and scales (for example, Cossack juniper, Chinese, Virginian). The needles of this plant are hard and prickly, located on the shoots, 3 in a bunch.
Some junipers are dioecious (female and male plants are present), others are monoecious (one specimen has male and female flowers). Characteristic of all species is the presence of cone-berries - they are spherical, small, dark blue, covered with wax, with a bluish or silvery coating.
Growing conditions and care
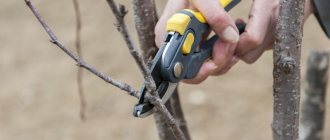
Junipers should grow in sunny areas; they should not be planted in the shade, as they may wither. They grow best in sandy soil, infertile, dry, rocky - that is, where other plants cannot cope. Prefer calcareous soils. These plants are completely frost-resistant, insensitive to drought and air pollution, making them ideal for growing in urban environments. Does not require fertilizer. They tolerate cutting very well and are not afraid of pruning, therefore we can control their growth (and these are plants that grow quite strongly and are expansive). Common diseases include shoot dieback and gray rot. Pests: juniper aphids and scale insects, mealybugs, juniper moths, flat beetle mites.
Application
Junipers are ideal for gardens in a naturalistic style, for heathland, alpine hills. They can be planted on slopes and sloping areas, supporting walls, and are also suitable as ground cover plants instead of a lawn (creeping species). They look good in combination with other coniferous plants, but can also be planted one at a time in a designated area on the lawn. Among the many species and varieties, you can find plants with needles of dark green, bluish, silver-green, golden - which will represent an interesting colorful element in the garden.
Juniper varieties
Chinese juniper (Juniperus chinensis) - this variety includes both fairly large trees and medium-sized shrubs, which can have a cone-shaped or widely spreading crown. This variety has needles (sharp, prickly, arranged 3 in a bunch) and scales (small, blunt, tightly adjacent to the shoot).
Scaly juniper (Juniperus squamata) - this variety includes both creeping forms and bushy ones with horizontal or raised shoots. Such bushes have a dense, dense growth and reach small sizes, so they are ideal for small gardens, alpine hills, heaths, supporting walls and slopes. They only have needles, which are hard and prickly, bluish above and green below.
Coastal juniper (Juniperus conferta) - this species has the form of a low, spreading bush with dense, creeping shoots. It grows to approximately 30 cm in height and can grow to a width of 1.5 m. The needles are long, spiny, bright green in color, with whitish stripes on the upper side. This species is monoecious, produces large, spherical, cone-shaped berries, dark blue in color, which are covered with a waxy, silvery coating.
Preparing the site
To replant a plant, you need to dig a hole to plant the plant. The starting point for determining the size of the hole is the earthen ball. With it, the plant is transplanted to a new place. The pit should be 2–3 times the size of the coma. The bottom of the hole needs to be loosened a little, 20 cm deep.
When planting only juniper, the space between plants must be left at least 50 cm. In some cases, it can reach 2 meters (plants of different varieties differ in size). To create a juniper alley, you will need to plant the plants in a common trench, with a distance of 40–80 cm.
Process Features
Very often, having acquired a young shoot in September, inexperienced gardeners wonder how to plant juniper in the fall so that it takes root successfully. This amazing tree can decorate any garden. And it is not difficult to plant. Difficulty can only arise if an adult juniper was purchased. Planting and care in open ground actually does not require special knowledge. There is a certain technique, after studying which, replanting in the fall will not cause trouble.
To begin with, the earthen ball should be well moistened. This will help you easily remove the juniper from the container. Transplantation in the fall consists of several stages:
- Dig a hole in a suitable place, approximately 60 cm deep. And in width it should be three times larger than an earthen coma.
- Fertilize the planting hole. The vitamin mixture is prepared in proportions 2:2:2:1 (humus, peat, turf and sand, respectively). You can also add a universal fertilizer specially designed for certain varieties of juniper.
- The young shoot is carefully placed in the hole, the roots should be placed horizontally, and then the root system should be sprinkled.
- Water the hole with juniper with two buckets of water.
- Add a layer of mulched soil to the settled soil.
As can be seen from the above, there is nothing difficult about planting decorative juniper. Transplanting in the fall will provide the root system of the shrub with a sufficient amount of moisture, which is so necessary in the first months after replanting.
Step-by-step instruction
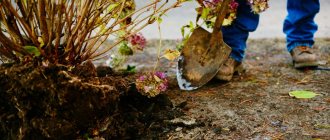
To transplant a tree or bush to a new location, it should be carefully dug up so as not to damage the root system, placed on burlap or other material, and transported to the planting site. Before planting in the ground, the roots need to be treated with a special solution for better survival. In the case of juniper, this is necessary, since the plant itself can hardly tolerate transplantation and takes a long time to adapt.
To transplant a tree or bush to a new location, it should be carefully dug up so as not to damage the root system.
It is important to maintain the same level of planting as in the previous place. Distribute the branches according to the cardinal directions. A newly planted plant requires support: place a couple or three pegs nearby and tie up the juniper.
It is easiest to transplant young plants. They can be purchased in stores, in small containers with a volume of 3 to 5 liters. They are able to settle down faster, adapt to a new place, and grow faster. Older junipers have more problems.
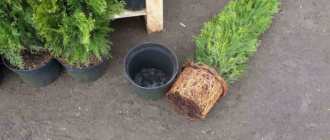
Note! When replanting a plant, you need to be careful with the earthen lump. It serves as protection for the plant's root system. Must be intact and without damage.
As already mentioned, junipers need to be planted at a certain distance (depending on the variety), not too densely - so that each plant can grow and develop normally. If you plan to create a “hedge”, an interval of 0.6 to 1 meter will be required.
It is recommended to plant seedlings with an open root system in spring or autumn. Be sure to do it before the first frost. Those plants sold in containers can be planted at any time of the year. The exception is very hot periods.
It is recommended to plant seedlings with an open root system in spring or autumn.
When planting juniper in the ground, you need to place the roots horizontally, then water and mulch with peat, pine cones, wood chips, and bark. This will create the best conditions for plant growth, and will also give an additional decorative appearance.
How to transplant a plant to another place
A tree prepared for transplantation is well watered in advance so that the soil around the roots does not crumble. Using a wide shovel, carefully pry up a lump of earth with the juniper root system from below at a good depth in order to minimally catch the roots growing down. When digging up the roots, you need to take into account that the size of the root system of a tree is approximately equal to the volume of the crown of this plant. The tree prepared for replanting is carefully lifted and placed along with the earthen ball onto burlap, making sure that the soil does not fall off from the roots. They tie the earthen ball tightly and transport the juniper to the new planting site. When replanting in autumn, the tree is less damaged, since at this time of year active growth is already behind us, and cool weather allows moisture to be retained inside the plant.
You can replant juniper at other times of the year, for example in spring, but then it needs additional protection from the bright rays of the sun and drying out, which often leads to the death of the seedling or very long adaptation. Summer replanting of juniper is not recommended. At this time, a large evaporation of moisture from the plant occurs, and the roots that have not yet adapted do not have time to replenish it, so most often the specimen transplanted in the summer soon dies.
Preparing the plant for transplantation
When replanting juniper from one place to another, it is necessary to carefully prepare the tree for this event. If it was planted in a container, it is watered well so that the earthen lump is well drawn out of the container without exposing the root system. When purchasing a young seedling, you must carefully examine it to see if it has any diseases or damage. The specimen should have a healthy appearance, a bright green crown, the needles should not fall off, and the root system should be reliably protected.
Preparing a new place: soil composition and fertilizing
The area for planting juniper should be well lit; it is best to be on a hill, since under natural conditions the tree grows in mountainous areas. It absolutely cannot tolerate stagnant moisture in the soil, so it needs reliable drainage. Different varieties of juniper have differences in their demands on the composition of the soil. Some people like acidic soil, others like alkaline soil, which creates the need to plant junipers according to varietal differences to make caring for them easier. An earthen mixture is prepared for the seedling, which includes peat, turf, humus and sand in the following proportions: 2x2x2x1. Depending on the variety of juniper, either dolomite flour or slaked lime (for an alkaline reaction), or sawdust or wood chips (for an acidic environment) are added to the earthen mixture. A year before the proposed transplant, the juniper is dug in a circle at a distance equal to the diameter of the crown so that additional roots are formed in the space limited after digging.
Junipers are very diverse in shape and height, therefore, when preparing the site, you need to take into account how much space the planted specimen will occupy in adulthood. To do this, they create a special planting scheme, which takes into account all the nuances of plant development on the site. The distance between plants when planting should be at least 0.5 meters. Depending on the variety of juniper, it can be increased to 2 meters. If you want to create a juniper alley, then the seedlings are placed in a common trench at a distance of 40-80 cm from each other.
Transplantation process
The juniper extracted from the ground is transferred to the planting hole. The planting hole is dug to a depth of 0.5 m, and its diameter should be 3 times the diameter of the root system of the seedling. A drainage layer of broken bricks about 10 cm high is poured onto the bottom. Then a layer of nutritious earthen mixture is added and the seedling is installed. It is carefully removed from the container or other material in which the root system was located, so as not to damage the lump of earth, and carefully installed in the planting hole. Exposed roots are treated with a special rooting agent, for example “Epin” or “Kornevin”. Cover with prepared soil, compact and thoroughly water with 20 liters of water. The seating height should be the same as it was in the old place. The soil surface around the juniper is mulched to retain moisture. If the variety is tree-like, three pegs are installed around it for garter. After planting, the tree is shaded from the sun's rays (if planting was carried out in spring or summer) and the crown is sprayed with fungicidal and insecticidal preparations to prevent diseases and pests, since during the adaptation period the tree's immunity weakens.
Features of transplanting adult juniper
It is not recommended to disturb an adult juniper. When replanting, there is a high probability that the plant will not take root in its new location. If a transplant has occurred, you need to conduct a careful examination: there are no injuries, diseases, or damage.
Interesting fact! Junipers grown on loamy soils take root much better than those grown in sandy soil.
The best time to transplant an adult juniper is from August to mid-September. If it’s warm in the spring and the soil temperature is normal, you can plant it in the spring. In both cases, after transplanting the plant to a new location, you will need to create partial shade on the south side. This will protect the plant from burns.
Juniper diseases
The main causes of the disease:
- Insufficient or frequent watering. Then the needles change. It turns yellow and crumbles. Watering should be done as needed.
- Excess salts in the soil. This happens if pets defecate near the plant. Then the needles change and dry out. To prevent the bush from dying, you need to treat it with Zircon or Epin, and buy trays with filler for the animals.
- Fungi. Fungal diseases appear from neighbors or spread by wind. Infection also occurs from new plants.
Widespread diseases:
- Schütte is brown - the color of the needles changes to yellow, a dirty shade. It doesn't fall off for a long time.
- Fusarium - roots rot.
- Rust - the needles take on a brown tint and crumble, and the same growths are noticeable on the branches.
- Alternaria blight - after the branches turn black, the needles also darken and then fall off.
Note! The fungus should be treated with fungicides - Fundazol and Tilt, as well as Rovral and Topsin will defeat any fungal disease. These medications are sprayed on the needles when there is no wind or precipitation, in the evening (or in the morning). After 10 days, the procedure must be repeated.
Pests and their control
Pests:
- Aphid. The dark orange insect has no wings. Aphids are visible to the naked eye. She feeds on the sap of the seedling. The damage is significant - the needles become brown, the shoots begin to bend and later die.
- Mite. It cannot be immediately seen as an aphid. But it is possible to recognize the appearance. A thin cobweb on the shoots of a plant will let you know about the “occupation” of an insect. After being captured by a tick, the needles turn brown and fall off.
- Shield. The appearance of the pest resembles growths that are located on needles and branches and are brown in color. It feeds on juniper juice. If the bush is not treated, it will die. As a preventative measure, the plant is sprayed with water in hot weather.
- Sawyer. The damage is caused by the larvae of insect pests (false caterpillars). Their “food” is the internal parts of the shoot.
Ways to fight:
- If there are not too many insects, you can try to collect them by hand (not forgetting about nests and larvae).
- Spray with insecticides and acaricides in summer in case of large infestations. Carry out prevention in spring and autumn. (Aktar and Calypso are just a few of the many recommended drugs).
- You can destroy pest pupae by digging up the soil around the plants. The procedure should be carried out in autumn and spring.
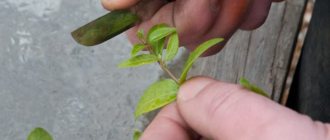
Breeding by layering
Propagation of juniper by layering is a popular vegetative method suitable for creeping varieties. They are carried out from March-April (depending on the climate) until July. Before preparing cuttings, the soil around the plant is loosened, dug up, peat, humus and sand are added and irrigated abundantly.
You can propagate by a young shoot growing at or just above the ground. The twig is cleared of needles. Then, with a sharp knife, they cut at an oblique angle, insert a match, fix it to the soil with a pin, and cover it with soil. After a few months, when the roots grow from the cut and the juniper grows an aerial part, the branch is cut off and transferred to a permanent place
It is important to replant a bush with a clod of earth
Reproduction by layering is similar to cuttings, the difference is that the cuttings are not cut off immediately. However, the traditional method is more popular among gardeners.
How to care for juniper
The survival rate and full vegetation of the crop directly depend on how correctly the forest juniper is planted, as well as on the correctness of subsequent care. Even if the plant has taken root, in order for the crown to maintain its decorative appearance, the bush must be constantly watered. The main problem is that at low humidity, the needles from the lower branches dry out and fall off. With incorrect agricultural practices, you can end up with an unsightly forest juniper with needles only on the upper branches.
Watering and fertilizing
Hybrid varieties from the nursery take root well on the site; the forest representative of the species requires constant care. Watering is a primary task in agricultural technology. Do not allow the soil to become waterlogged or dry out. For the first 6 months, water the forest seedling every evening with a small volume of water; the fibrous root system loses a lot of moisture during rooting. After this period, the frequency of watering is reduced; it is enough to moisten the soil 2 times a week.
Juniper medicinal preparations
An infusion of juniper fruits is prepared as follows: chop 10-12 berries, pour a glass of boiling water over them, leave for 4 hours. Drink 1 tbsp. l. 3-4 times a day for bronchitis, colds, edema of cardiac origin, lethargy of the gastrointestinal tract, bloating and cholelithiasis; externally for rubbing for pain in joints and muscles. Infusion of dried juniper berries: pour 400 ml of chilled boiled water and 15 g of dried berries for 2 hours, strain. Drink 1 tbsp. l. 3-4 times a day before meals as a diuretic.
Decoction of juniper berries: brew 200 ml of boiling water and 15 g of berries and simmer over low heat for 10 minutes. Then remove from heat and leave for 30 minutes, strain. Drink 50 ml 3-4 times a day for bladder diseases, cholecystitis, colitis. Decoction of juniper berries: brew 400 ml of boiling water for 100 g of berries, boil for 10 minutes, then add sugar and cook until the consistency of syrup, then remove from heat and strain. Drink 1 and. l. 3 times a day before meals for diseases of the stomach, intestines, bladder, to improve appetite. Decoction of juniper berries: pour 200 ml of boiling water 1 tbsp. l. dried ripe fruits, crushed to a homogeneous powder, boil over low heat for 5 minutes under the lid, leave for 0.5 hours, strain. Mix 40 ml of decoction with 1 tbsp. l. oatmeal or starch and apply to the skin of the face and neck for 20 minutes, then rinse the skin with warm water. This procedure has a tonic, multivitamin and antimicrobial effect on the skin. Chew juniper berries daily on an empty stomach, one berry, adding 1 more each day. Increase the intake to 15 pcs., and then reduce the rate by 1 pc. Recommended to improve the quality of blood. Juniper berry lotion: pour 1 cup of boiling water over 4 tbsp. l. juniper berries, previously crushed in a coffee grinder, leave for 1 hour, strain. Mix with 1 tbsp. l. glycerin and 100 ml of 70% ethyl alcohol. Wipe the skin 1-2 times a day for 3-4 weeks for rosacea and juvenile acne, dandruff, hair loss, herpetic fever on the lips. Juniper berry extract: grind 2 tbsp in a coffee grinder. l. berries, fill the level of the powder with vodka, leave for 14 days, squeeze and strain. Use 2-3 times a day if you have or are prone to herpes on the lips (herpetic fever). Juniper extract can be prepared by infusing the berries with wine, vodka or alcohol. Pour crushed juniper branches (200-300 g) into 10 liters of cold water for 2 hours, then boil over low heat for 20 minutes, strain into a bath (36-37 ° C). Take a bath before bed. The course of treatment is 10-12 procedures every other day. For itchy dermatoses, a tendency to allergies and herpetic manifestations.
Botanical description
Forest juniper (juníperus) is also known as forest cypress, but it is used less frequently. Botanists prefer to limit themselves to the classic Latin name. The tree belongs to the Cypress family, grows mainly in temperate climates, but due to active cultivation and cultivation in many countries of the world, it is distributed almost everywhere, except in regions with constant low temperatures.
Habitat: North America, central Europe, Asia, Eastern Siberia. There are many varieties of this shrub known, and the most common in the forests of central Russia is the common juniper (Juníperus commúnis). Forest juniper can be found in mixed, deciduous and, of course, coniferous forests.
Is it possible to plant juniper from the forest at the dacha?
The common forest juniper has several varieties; they belong to the shrubby and tall tree species. They have a decorative crown; fruits with a high concentration of essential oils are suitable for culinary use and medicinal purposes. Juniper grows in the forest on the site of clearings, in the undergrowth. Found on the slopes of mountain ranges. Feels comfortable in open areas and in partial shade.
Due to its exotic appearance, it is used for landscaping urban recreation areas and designing homestead landscapes. Hybrid species adapted to the conditions of a certain climatic zone are in great demand. You can transplant forest juniper to your dacha if conditions are created that are close to the natural environment. Initially, the choice is made; tall varieties reach up to 5 m in height, other shrubs are lower, but they have a voluminous crown. The plant is transplanted at a certain time of the year, following the recommendations for transfer.
Possible problems
After transplantation, juniper, which has not yet had time to take root properly, may be affected by aphids, scale insects and spider mites. In addition, poor drainage and water on the crown can lead to fungal diseases of the plant.
That is why it is important to carry out preventive work after moving to another place to prevent these troubles
You can often observe how juniper needles turn yellow after replanting, especially those that are closer to the trunk, in the middle of the crown. This may mean a lack of moisture, so you need to make sure that the surface of the soil under the tree does not turn into a dry crust. But the same diseases and harmful insects are also the cause of yellowing.
The fight against them must begin when the first signs of trouble appear and alternate between different means, since pathogens often develop resistance to the same drugs. Affected branches must be removed and the cuts treated with garden pitch or copper sulfate.
The replanting process is, of course, important and must be carried out according to all the rules, but for the adaptation of juniper to a new place, proper care of the plant is of great importance.
How to properly transplant juniper, see below.
Many people would like to see evergreen and beautiful trees - junipers - on their site. Despite their decorative nature, you won’t have to take much care of them. The real difficulty is the moment of landing or transplanting. In this article we will tell you when to replant juniper and describe how to carry out this procedure.