Description and main types
There are 4 popular types of bonsai:
- Japanese black. It grows slowly, but takes root well in temperate latitudes.
- Japanese white. It has white needles and a thick top.
- Mountain pine (mugus). It grows quickly, which significantly speeds up the process.
- Scots pine is unpretentious, pliable and gladly takes the required shape.
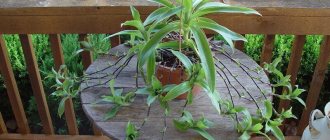
Cascading arrangement of branches on a inclined trunk
How to make a bonsai: practical recommendations
There are some recommendations for creating a bonsai.
Those who want to create a beautiful composition with their own hands can use the following green spaces as a basis:
- Sprouts of common lilac.
- Siberian larch.
- Pine.
- Siberian spruce.
- Juniper sprout.
- Kalina.
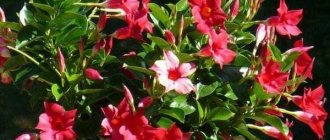
- A cob of azaleas.
- Bobovnik.
- Low almonds.
- Ussuri pear.
- Purple barberry.
- Varietal mock orange and others.
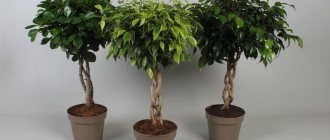
Garden ficus, low almond, and Jerusalem artichoke have also proven themselves well. You need to start by choosing a suitable container with humus. An ordinary flower pot will do. When choosing a soil, it is worth studying its formation. It is recommended that it provides drainage and retains the minimum required amount of moisture.
You can buy a pot at any flower shop. But if you want it to be exclusive, it is better to make it yourself. Read more about this in our article:.
According to these criteria, sand, clay and humus are taken in equal parts. To plant a tree, you will need pruning shears to form the crown line, a spatula, sticks, a sieve, and a watering can. Spraying is carried out with a spray bottle. If there is a specialized store in the locality, then the seedling is bought there.
After this, the bonsai is grown to the required size. Further, depending on the plant variety, crowns are formed at a certain time. If time and experience allow, you can create a bonsai from purchased seeds, each type of which requires certain conditions. Another possibility to make a flower arrangement is to use offsets, cuttings and indoor plants.
Bonsai pine-styles
DIY money tree bonsai
Form is an integral part of style. The complex shape of the trunk and the exotic growth of the branches determine the different styles of bonsai:
- Tekkan. Smooth trunk, with branches at the top. Has a basic shape.
- Moegi. The trunk has a curved shape.
- Sokan. From 1 root 2 trees.
- Syakan. A tilted trunk, as if torn from the soil by a gust of wind.
- Kengai. The arrangement of branches on a inclined trunk in a cascade format. The capacity must be high, because The top of the pine tree bends below the bottom.
- Khan-kengai. The crown is bent to the level of the pot. For the stability of the structure, the upper branches are redirected in the opposite direction.
- Bundzings. Slightly curved trunk with few branches. A prerequisite is the fact that the top of the young shoot grows on the old tree trunk.
- Sekijoju. The root is located on the stone.
- Isitsuki. Grows on stone.
- Hokidachi. The crown is like a ball with a single trunk. The shape is similar to a fan. Branches and roots spread evenly on all sides of the horizon.
- Ese Ue. Group of trees. You need to take an odd number.
- Ikadabuki. Looks like a fallen tree.
- Bankan. At the very bottom the trunk is twisted into a knot.
- Syarimiki. The trunk seemed to have been struck by lightning and burned. Part of the tree remains dead, but lives on the living half.
- Neagari. The tree stands on its roots, which is why it has a decorative appearance. Requires a minimal amount of soil.
Important! The tree is constantly watered, because bare roots dry out quickly.
Growing Bonsai
Growing bonsai in optimal conditions is painstaking but interesting work; below are useful tips and instructions.
Location
Due to the short daylight hours in autumn and winter in our country, subtropical and tropical plants may not have enough light, and no matter whether the bonsai is growing at home or in the garden, the tree must be placed in a place under the sun. The shadow will cause the needles to be unacceptably long.
Pine trees need sun in spring, summer and fall; if there is not enough sun, the branches begin to die. The bonsai tree is frost tolerant, but does not like cold winds. The tree should be placed on a windowsill where the sun will illuminate the plant for at least a couple of hours. But at the same time, it is necessary to avoid direct rays during the day and in the summer heat. It is important that the shadow of the building outside the window does not fall on the tree, and it is also important in which direction of the world it faces.
Cold protection
For all plants, temperature plays a big role. Subtropics in winter should be kept at a temperature of +7 to +15 degrees Celsius, but in summer it is better to store them outdoors, for example, on a terrace or balcony. Do not install them on a cold floor. Temperature determines the mode of light and water consumption.
Care and watering
Plants require careful attention; with good care, you will get a bonsai that is pleasing to the eye. Proper watering will ensure the health of the plant. The following describes the principles of proper care.
The humidity in the room is insufficient at home. An air humidifier will help make it bigger; it is an effective device. Sometimes bonsai are placed in a vessel filled with water; even a small basin is suitable for this purpose, so the water will enrich the air with moisture. To increase the intensity of evaporation, the container is placed above the heating system.
Spraying the plant with water periodically will be cheaper, but the result is short-lived, so the main thing is to maintain moisture in the pot. Moderate watering should be carried out, but this is done constantly. The pot should have moderate humidity. Do not allow very wet or dry soil. The best water for irrigation is melted water; if you use ordinary water, it must be settled.
These are general recommendations that vary from plant to plant. It will not be possible to apply the rules to the same extent for all possible plants.
Pruning branches
The plant is resistant to changes in structure. But health improvement is done regularly. Pine is pruned differently than other species. The procedure is carried out early, while the trunks are bent.
Trimming Features:
- Pines are unusually easy to pruning; it is done carefully once a year or less. If the pruning is radical, the plant will die. To reduce loss of sap, the tree should be pruned in the fall. If you have to get rid of a branch, this should be done in early spring.
- The crown is formed using wire. There is more than one opinion about time. Some will say that autumn and winter are preferable. Others will prefer summer. But it is unsafe to lay branches in spring or summer due to the rapid growth of needles at this time.
- Some of the buds will have to be removed, the more developed buds should be left below, and the less developed ones on the top.
- Plucking the needles helps penetrate the inner space into the outer needles. Air and light better fill and make the tree healthier. This is done from the second half of July until autumn. If a branch has a large number of needles, it remains active.
Transfer
Bonsai trees must be replanted regularly to prevent the pot from becoming filled with growing roots. Transplantation is not needed to maintain the small size of the plant, it is needed for growth and health. The procedure is carried out regularly, but with moderate frequency. A container is selected, soil and soil are purchased, and the pot is prepared for replanting.
What matters is the size of the container. The tree must be replanted once every two years; if the tree is many years old, then once every 3-5 years; replanting on a schedule does not make sense. You just need to check every early spring to see if the roots have begun to curl around the perimeter of the container. If this happens, you will have to undergo a transplant. The tree is replanted in the spring because it has not yet woken up.
Transplantation requires the availability of suitable tools; wire will help the process and make the work easier.
First, the required piece of wire is cut. Often the bonsai is secured in a container with it. The wire helps to remove the bonsai roots from the pot or insert them into the pot. You need to start from the sides and bottom. It is important not to damage the roots. Half of the coma must remain in order for the mycorrhiza to be preserved. Long roots must be trimmed, but in total the cut roots should account for no more than 30% of all roots.
Planting and growing conditions
Bonsai - DIY home care
It's a tedious task, but it's worth it. The process is approached in stages:
- First you need to get the seeds. Collect ripe pine cones and place them in a warm, dry place to open. Next, the seeds are extracted from the scales. The cones are no older than one year, otherwise the seeds may not germinate.
- At the next stage, the seeds are exposed to low temperatures (up to +4 ℃). Under these conditions, the shell softens and the embryo is born more easily.
- Seeds are sown in February or March. It is at this time that they awaken and are ready to grow.
- A layer of gravel is placed at the bottom of a small pot, and ordinary sand is covered on top. They must first be calcined to prevent the seedlings from dying.
- A groove 2 cm deep is made in the container, and prepared seeds are placed in it at intervals of 3 cm. Next, they are covered with calcined river sand, watered and covered with glass. Ventilation is necessary every day.
- After about two weeks, shoots appear. After this, the glass is removed and the containers are placed on the sunny side. The plants must not be allowed to stretch out. If there is not enough light, add backlighting.
- Root picking is done at one month of age. The plants are carefully removed from the soil and the parts of the root that are not green are cut off. This is how the radial root is formed.
- Root formation. After this, the cuttings are placed in a preparation for 15 hours to form roots. In the meantime, prepare pots with a soil mixture, which consists of garden soil and river sand in half. Ready seedlings are planted in pots and placed in a shaded place for rooting for a month and a half.
- Landing at the main seat. After rooting, the trees are planted one more time in a wide container 14 cm high. The roots are placed horizontally. The pots are returned to the sun until the buds appear. This will happen presumably in 4 months.
Picking the root to obtain a bonsai
Preparing for landing
Growing pine from seeds, compared to cuttings, is not an easy process, but it is quite doable. The seeds ripen in last year's pine cones. At the end of autumn they are collected from the tree. You need to choose cones from specimens with half-opened scales - these are last year's cones. They are brought into a warm room and laid out on a white cloth to dry. Well-dried cones crack and the seeds spill out onto the fabric. For good drying, you can put a cloth with pine cones on a warm radiator. An increase in temperature has a positive effect on the speed of ripening and opening of the cone. At the same time, the temperature should not be allowed to rise above 45 degrees, as the seeds will simply dry out and lose their ability to germinate.
It should be noted that pine seedlings do not repeat the varietal characteristics of the mother plant. The percentage of growing a varietal tree from seeds is very low. Therefore, seed propagation is usually used to quickly increase the amount of planting material.
Seed selection
Not all pine seeds are suitable for sowing. Among them there may be unripe and damaged specimens. The spilled seeds have “wings”, with the help of which they are carried by the wind through the forest. To select high-quality seed, seeds are soaked in warm water. Before soaking, the “wings” must be removed. The seeds suitable for sowing will settle to the bottom, and the rest will float on the surface. They need to be thrown away.
To grow a pine tree from a seed, you need to put in a lot of effort. Seeds must be prepared before sowing for germination to be successful.
Preparing pine seeds
To germinate pine seeds, you must first prepare them. There are two methods of preparation: stratification and direct preparation before sowing. For stratification, selected pine seeds are mixed with sand (three parts sand and one part seeds) and placed in a cold place (0-5 degrees) for 2 months. This is how the seeds are naturally hardened for better germination. Many gardeners skip this step and germinate seeds without stratification.
Selected seeds are soaked for two days in water, and another day in any solution of a growth stimulant. After this, they begin sowing.
Before sowing in the ground, you can pre-germinate the seeds. To do this, selected pine seeds are laid out between layers of damp gauze and placed in a warm place. It is important that the gauze remains moist during this period, so it is constantly moistened with a spray bottle. After about a week, the seeds germinate.
Soil preparation
To sow pine seeds, you can use a special soil mixture for coniferous plants, purchasing it at a specialized store. For self-preparation, you need to mix peat, sand, turf and dry pine needles to obtain a loose substrate. The soil must first be spilled with boiling water or a solution of potassium permanganate for disinfection. Also, for this purpose, the soil can be placed in the microwave for 20 minutes, which will kill all harmful bacteria. After this, you can start sowing.
Rules of care
DIY bonsai - growing plants at home
Pine is not a house plant, so you need to try to create conditions close to natural ones. In winter, the plant is taken out to the balcony, and in summer it is sent outside.
It is important to create conditions for the plant that are as close to real as possible.
For the full development of the plant, the following rules must be observed:
- Don't get carried away with frequent watering. In summer, the plant is watered once a week, and in winter you just need to make sure that the soil does not dry out. The plant loves showers, so it is advisable to spray the pine tree once a week.
- Feed the plant 3 times in March and September. Organic fertilizers: humus, compost. From minerals: nitrogenous and phosphorus.
- Every 3 years the tree needs to be replanted. This is done with the onset of spring, when the plant woke up and began to actively grow. It must be carefully removed from the old pot and the roots examined. If they are twisted, then they need to be straightened. It is better to cut off old coarsened roots. Take a container slightly larger than the old one and suitable in size for the tree. The plant can be temporarily transplanted outside after digging a hole and preparing the soil. New soil is taken. Care remains the same.
Note! The place of growth must be well lit, otherwise the needles may stretch out and a beautiful tree will not turn out.
Additional benefit
After cutting the candles, scraps containing a lot of vitamins remain. Since ancient times, pine teas, decoctions and infusions have been used in folk medicine to prevent colds and many diseases, and are used to rinse hair and body. Vodka tincture or decoction of pine candles helps improve tone and immunity. The healing aroma of pine needles refreshes your sleep if you place dry candles in your pillowcase.
Composition
Forming pine bonsai is an art on the verge of philosophy, combining harmony between the fruit of human labor and nature. Transforming an ordinary plant into a picturesque dwarf likeness is a fun, creative activity. A miniature pine tree will decorate your home with its unusual appearance.
Trimming and shaping
The formation of Scots pine in bonsai style occurs in a special format. The tree has 3 growth zones: the top, the middle part and the branches below. The branches grow faster in the upper part, and the slowest growth is in the lower parts. Algorithm for forming a pine bonsai with your own hands:
- Kidneys. With the onset of spring, buds begin to appear on the tree. Less developed buds are left at the top, stronger ones at the bottom.
- Candles. During the growth process, the buds turn into candles that need to be pruned. Shorter candles are left in the upper part, and longer candles in the lower part.
- Needles. To supply internal shoots with light from the sun, the tree needs to thin out its needles. This begins to be done in mid-summer and ends in the fall. The needles are plucked out at the top on the densest branches. Then the lower branches will also become evenly pubescent. To make the tree look more decorative, the needles can simply be trimmed. With further growth, they will no longer be so long.
- Crown. By wrapping it with wire, the upper branches and trunk can be given a complex shape. This procedure is carried out in the fall, when the tree's growth slows down. Otherwise, the wire will grow into the branches and scars will remain on the tree.
As they grow, the buds turn into candles that need to be pruned
It is important to know! Do not cut off all the candles at once. Mountain pine bonsai may react poorly to such intervention. It is better to stretch this process over several weeks.
Formation of pine bonsai from seedlings
There is a faster way to get bonsai. Young pine is purchased from a nursery. Prepare the soil mixture and suitable containers for planting at home. They dig up seedlings from the forest. At first, the trees, transplanted into pots, live in the garden. They are covered with mulch in the fall. In spring, the shoots are shortened to 10 cm, as a result of which the side shoots begin to actively grow, and the thickness of the trunk increases. When the tree takes root, it forms a bizarre shape.
Young pine can be purchased at a nursery
How to make a bonsai from a pine tree in a summer cottage
If the crown has become sparse, then it needs to be formed. Only the beautiful branches are left and the rest are disposed of. All actions are taken in the fall, and in the spring, when the buds begin to grow, they are pinched, leaving 1.5 cm. Simultaneously with pinching, the branches are positioned horizontally and secured with wire.
The wire may not hold coniferous branches. In these cases, stones are additionally suspended from the branches. This is the only way to securely fix powerful branches in the desired position. Pines bend well.
Additionally, large stones are suspended from branches
Wire removal
Usually one season is enough to fix the branches in the desired position. When cutting the wire into the bark, it is removed earlier, even if the branches have not yet formed. After some time, you can apply new turns in the spaces between the scars and try again.
Advice! If you need to grow a tree with a thicker trunk, you should not remove the wire for a long time.
Then just bite with wire cutters and carefully unwind.
Caring for plants in the garden
The main principle of care is to provide the seedling with a well-lit place. This tree loves light! If you plant it in the shade, the needles will be too long, which is unacceptable for the art of bonsai.
Basic principles of care:
- regular watering in small doses;
- good drainage;
- light feeding every month during the warm season;
- replant every three years with pruning of roots and replacement of soil.
How to cut your hair: diagrams
The tree can be shaped:
- ball;
- cone;
- multi-tiered tree (leave branches in each tier);
- old tree with a slope.
Crown formation
The main activities for solving this problem are cutting and pinching, as well as working with wire. You need:
- remove all large branches that do not correspond to the chosen style;
- perform pinching of shoots several times during the warm season;
- use wire to bend the barrel to give it the desired bend.
Is it possible to increase the thickness with your own hands?
Experienced gardeners know that increasing the thickness of the trunk is possible. But it's difficult. Pine does not tolerate radical pruning of the trunk. This method is used for other types of trees, especially deciduous ones. But still there is a way out. To solve this problem you need:
- be patient (the trunk will take several years);
- provide the plant with high-quality fertilizer;
- use the auxiliary trunk method;
- trim the tops;
- preserve the shoots growing along the trunk, they help thicken it.
5 / 5 ( 1 voice )
Waste-free production
When growing a bonsai pine tree, every year you have to shape the crown by cutting off growing shoots. If you don’t want to throw away the twigs and want to increase the number of plants, they are used as planting material. You just need to root the young cuttings and you can make new dwarf trees from them. In this case, production becomes waste-free.
A formed plant requires close attention and proper care. Its cultivation is a painstaking process of cutting branches, plucking needles and trimming. Not to mention maintaining humidity, applying fertilizers and maintaining temperature conditions. Fulfillment of all these conditions will lead to the desired result, and the tree will delight you for many years.
Reproduction
Bonsai pine can be propagated in two ways: grown from seeds or by cuttings. Propagation using seeds is less troublesome. The cones are collected in late autumn, and the seeds are sown in early spring.
Cuttings are not the most common propagation method, since the survival rate of cuttings is very low. The cuttings are cut in early spring from a mature tree, choosing one-year-old shoots that grow upward. In this case, it is necessary to cut with the mother fragment (heel).
How to make a money tree bonsai
There are many ways in which you can make a bonsai from the Crassula, also called the “money tree”. The key to success lies in controlling the growth and shaping the crown of the money tree. Further growth can be stopped by pinching, carried out as the plant reaches the required size.
If you plan to go the whole way on your own, you can buy seeds at the store. In this case, strictly 1 seed is planted in 1 pot. Step by step it then needs to be watered, but not too much.
The seed takes root well, so no additional care is needed, however, you need to follow some recommendations:
- The depth of the pot exceeds by 1/3 the maximum length of the root system.
- You can grow it in an aquarium, but then the shape will be curved.
- The splendor of the composition is formed by creating at least 2 sprouts from 1 bud.
- Excess buds are removed with tweezers.
- Pruning is carried out according to a pre-planned plan.
- You can decorate the composition with decorative elements made from foamiran.
- If the main holiday of the year is approaching, then white foamiran will create the New Year’s mood.