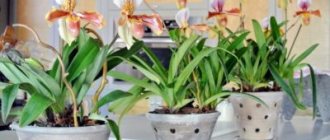
Determining the need for rejuvenation of phalaenopsis
The first step is to correctly determine when it is time to start rejuvenating the plant. Here you need to focus not on the age of the phalaenopsis - especially since it is not always possible to accurately establish it. In this case, you need to look at the condition of the orchid.
Phalaenopsis in need of rejuvenation looks like this:
- forms aerial roots not on the root collar, but high on the trunk;
- “runs away” from the pot, rising out of it and falling on its side.
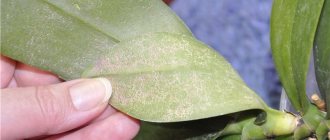
Often among the old roots of such a bush many are found that are empty or completely dried out. The orchid is stuck in the dormant phase for a long time, blooms reluctantly and sparingly. Babies may begin to form on the trunk and root collar.
Important! The procedure for rejuvenating phalaenopsis involves cutting and re-rooting the plant. It is not always painless and successful. Therefore, it must be carried out after making sure that the orchid really needs rejuvenation.
The main sign of the need for rejuvenation is the formation of a large number of roots from the leaf sinuses. This is an obvious signal that the orchid wants to re-root.
Preparing the soil for re-rooting phalaenopsis
The next point that needs to be taken care of is preparing the substrate. You can find many ready-made mixtures for planting orchids on sale. But from the point of view of their suitability for re-rooting phalaenopsis, not all of them are equally good:
| Substrate name | Manufacturer | Compound | Suitability for planting phalaenopsis |
| "Flower happiness Soil for orchids" | "Fasco" | Larch bark, high peat, charcoal, expanded clay | – |
| "Pokon Soil for orchids" | "Pokon" | Tree bark, high peat, lowland peat, lime, fertilizer | – |
| "Geolia Primer for orchids Premium" | Buysky chemical plant | Pine bark (55%), sphagnum moss (30%), charcoal. | + |
| "Orchid Garden of Wonders" | JSC "Fart" | High peat, dolomite flour, fertilizer | – |
| "Onega eco-soil for orchids" | LLC "Vermicom" | Pine bark, sphagnum moss, coconut substrate | + |
| "Veltorf Soil for orchids" | LLC "Veltorf" | A mixture of high-moor and low-lying peat, pine bark, limestone materials, fertilizer | – |
From the table above it is clear that choosing ready-made soil for orchids, with all the wealth of choice, is not an easy task. Therefore, in most cases it makes sense to prepare the substrate for re-rooting yourself. You can create it using any of the following options:
- 3 parts pine bark, 1 part fern roots, 1 part perlite;
- 5 parts pine bark, 1 part sphagnum moss;
- 3 parts pine bark, 1 part coconut fiber, 1 part expanded clay;
- 4 parts pine bark, 1 part charcoal, 1 part sphagnum moss.
You shouldn’t get too carried away with moisture-intensive materials, such as sphagnum. It is also strictly not recommended to add peat to the substrate.
The soil for re-rooting orchids should be very loose, not waterlogged, dry quickly and have good air circulation. If you have nothing but bark at your disposal, you can get by with only this component.
How to prepare the soil
It is difficult to buy a high-quality substrate suitable for planting orchids in the store. Because of this, many gardeners prefer to create the mixture themselves. The most common is soil prepared according to one of the recipes.
Option #1:
- pine bark – 3 hours;
- coconut fiber – 1 hour;
- expanded clay – 1 tsp.
Option #2:
- pine bark – 4 hours;
- charcoal – 1 hour;
- sphagnum moss – 1 tsp.
Attention! Sphagnum or its substitutes are added to the soil for planting orchids in limited quantities. Due to increased moisture capacity, the component can cause rotting of the root system.
Technique for dividing an old phalaenopsis orchid
Having prepared everything necessary for the procedure, you can proceed directly to dividing the orchid. This is done as follows:
- a cotton or gauze swab is moistened with alcohol and the instrument is wiped;
- the plant is removed from the pot;
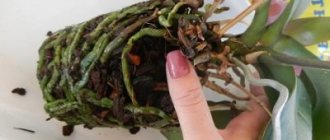
- the roots are freed from the old substrate and inspected;
- all empty and dry roots are cut off;
- the location on the trunk where the cut will be made is determined;
- The plant is quickly cut in half in one motion.
Determining where to make the cut is easy. This is done at the point above which aerial roots begin to develop from the axils of the leaves. Thus, the old phalaenopsis is divided into two parts: young (with leaves and new aerial roots) and old (on the old root system). Sometimes there may be no leaves left on the old part - only roots and part of the trunk.
After this, the sections are processed. You can cover them with ordinary pharmacy green paint, but practice shows that it is better to powder the “stems” with ground cinnamon. Plants treated with cinnamon grow more easily in the future.
You should not use any fungicides to treat the cuttings if the orchid was healthy. This can only aggravate mechanical injury with pesticide stress. Moreover, you should not smear or spray divided phalaenopsis with stimulants - cytokinin paste, Kornevin, etc. At first, both parts of the orchid should use their strength to restore and adapt. It is not yet profitable for them to devote energy to growth.
Divided phalaenopsis does not need to be planted in a pot immediately. First, you need to dry it for a day by placing it on a dry, clean cloth. During this time, the cut will tighten a little, and the risk of infection will be lower.
Sometimes old phalaenopsis divide without being removed from the substrate. But this method does not allow the lower part to be freed from dry or rotten biomass, and the percentage increases.
How to rejuvenate a phalaenopsis orchid
Renewing an orchid involves dividing the plant into 2 parts. The top develops further, and children should form on the lower part, which can be planted in separate pots. The procedure includes several mandatory manipulations, which are difficult to do without:
- excess leaves are removed;
- The root system is cleaned;
- replacement of the substrate is ensured.
Rejuvenation of phalaenopsis is a responsible process that requires a competent approach. Ignoring the rules and recommendations will not lead to the education of a child and can provoke the death of an entire culture.
When pruning, carefully treat the cuts with crushed charcoal or cinnamon. It is recommended to carry out rejuvenation after flowering has ended, otherwise the plant will drop its buds due to stress. Most often, the procedure is necessary for crops that have reached 4-6 years of age, but it can be performed earlier, if indicated.
Trimming
The main approach to rejuvenation involves pruning the crop. Without excision, it will not be possible to get a young and abundantly flowering phalaenopsis. The gardener’s task is to adhere to the basic recommendations and follow the algorithm, otherwise the procedure will end in the loss of the plant.
https://i.ytimg.com/vi/PDbzXwtqos0/maxresdefault
Leaves
The simplest method of rejuvenation is to trim the leaf blades. It must be carried out carefully so as not to damage the adult plant. Leaves are considered the main organ that ensures the life of the crop; with their help, the flower receives nutrients and water, they participate in the process of photosynthesis.
If you notice a yellowing or damaged leaf on a crop, carefully remove it. It will be easier for phalaenopsis to develop further. The culture will stop wasting energy and nutritional compounds on its life support and will be able to redistribute them to healthy elements.
Pruning is carried out using the following algorithm:
- prepare the instrument and ensure its disinfection;
- with a sharp movement, the affected, yellow and flaccid elements are cut off;
- treat them with cinnamon or charcoal;
- check the root collar to make sure there is no rot;
- leave the plant in partial shade, monitoring its condition for several days.
Attention! During the first two weeks, the crop is not watered; spraying and moistening the substrate are resumed after adaptation.
Interestingly, manipulations with leaves can affect flowering and speed up its onset. You can stimulate the formation of the arrow by cutting one of the plates in half. In order for the plant to regularly form buds, it is worth controlling the number of leaves; there should be no more than 6.
Detailed information about orchid rejuvenation is in the next video.
Plants after flowering
Many people cut off the peduncle immediately after flowering, but this is absolutely wrong. From the existing arrow, you can achieve the formation of children or repeated flowering. Non-radical pruning, carried out according to the following algorithm, helps to obtain this result:
- 3 dormant buds are counted from below;
- measure 6 cm up from them;
- make a straight cut with a sharp knife or scissors;
- seal the cut area.
Place the pot in partial shade and refuse watering for 2 weeks.
The peduncle should be cut off completely only when it dries. If the onset of the process is detected in a timely manner, the plant can be saved. To do this, cut off the dry part along the living tissues, retreating 2-3 cm. Over time, the orchid will give birth to children.
Roots
The process of plant rejuvenation is impossible without pruning the root system. All dry and rotting specimens must be removed. When organizing a transplant, attention is paid to the root system, it is inspected and cleared of rotten and dry roots. They do this to protect against pathogenic microorganisms.
Attention! In case of massive damage to the roots and rotting of the neck of the plant, resuscitation is indicated. The roots are removed completely and then wait for them to grow. If the entire plant is not infected with rot, there is a chance for rehabilitation.
https://komnatniecveti.ru/wp-content/uploads/omolozhenie-falenopsisa-verhushka
stem
Stem pruning is carried out in exceptional cases when the crop requires complete rejuvenation or extensive rotting is observed. Dividing the trunk is possible if the flower has many roots, and they, along with the leaves, are in the upper part.
The plant must be divided in the fall. It is freed from the pot and the condition is assessed, the upper part is cut off using pruners, and the cuts are processed. When dividing, 4-6 leaves with roots are left on the upper segment; air layering is not removed. Both parts are planted in the prepared substrate.
Planting the separated parts in a new substrate
A day after separation, a substrate for re-rooting is prepared. The selected components are mixed in a separate basin and lightly moistened with clean water. Parts of phalaenopsis are placed in pots, the roots are sprinkled with substrate.
At this stage it is very important not to damage the roots. Therefore, when pouring the substrate, it is not pressed or compacted. To ensure that it is well distributed around the roots, you only need to lightly tap the pot.
Planting is done in such a way that the root collar of the plants is slightly raised above the ground surface. In the future, when the phalaenopsis takes root and begins to grow, it will be possible to add more substrate if it seems necessary.
Burying the bush is a common mistake that inexperienced orchid lovers make when replanting. This leads to rapid rotting of the root collar, the development of tracheomycosis and loss of the plant.
Flowering and life time - what's the difference?
Flowering time and the life time of an orchid are not synonymous concepts. A plant can bloom a large number of times during its life.
Flowering time is the period during which the phalaenopsis shoots an arrow, fills buds, forms flowers and drops them. Lifetime is considered to be the period from the moment of planting until the death of the orchid.
How long does it bloom?
The flowering time of phalaenopsis depends on the condition of the flower and the conditions in which it is kept. The flowering period is usually quite long: from two months to six months.
How many years has he lived at home?
Phalaenopsis is considered the longest-lived among domesticated orchids. With proper care and attention, it can live from seven to ten years.
If you are thinking about breeding phalaenopsis at home, read about the rules for its propagation. Additionally, you may be interested in learning about the differences between the orchid and phalaenopsis, which are often identified or confused with each other.
Caring for re-rooted parts of an orchid
For the first 7-10 days, the planted parts of the phalaenopsis are not touched. The pots are placed under a phytolamp in a warm but well-ventilated place. The aftercare strategy includes only the most necessary procedures:
| Procedure | Execution Features |
| Spraying | This is a must, especially at low air humidity. This is done only with warm water, to which you can occasionally add 2 drops of “Epin-Extra” per 0.5 liter or 1 ampoule of pharmacy glucose per 1 liter. |
| Watering | Until complete rooting - only from a watering can. While the root system is not working at full capacity and has poorly mastered the volume of the pot, an over-moistened substrate will provoke its rotting. Therefore, diving is prohibited. Soil moisture is maintained moderate. The substrate should dry completely between waterings. |
| Ventilation | Cold drafts must be completely eliminated. However, air circulation must be good - this is necessary to prevent fungal infections and rotting of plants that have experienced stress. |
How successfully the process of rejuvenation of phalaenopsis is going will become obvious in about a month. If everything goes well, the top division will begin to grow rapidly by this time. At the bottom, you will also notice the appearance of young roots, as well as new growth from the root collar.
As soon as the separated parts of the phalaenopsis begin to show signs of active growth, careful feeding can begin. It is better to give fertilizers highly diluted, in half the doses recommended by the manufacturer.
The growth of a new trunk from the old root collar and the intensive growth of roots in a young division are signs of successful rejuvenation of phalaenopsis. At this stage, plants benefit from fertilizing with a complete complex fertilizer with nitrogen.
How to care for re-rooted plants
During the first week after re-rooting, the pots are kept in a warm, ventilated room. For additional illumination, a phytolamp is used. Then, when leaving, they are guided by the following rules:
- Watering. Until both parts are completely rooted, they are watered with a watering can, in moderation. The soil should dry completely between waterings.
- Spraying. This procedure is mandatory, especially if the air humidity is low. Warm water is used.
- Ventilation. Plants should be protected from drafts. But the room must be well ventilated to prevent the development of fungal diseases and rot.
Attention! You can evaluate how successfully you managed to rejuvenate and re-root in a month. The upper part by this time demonstrates active growth of the root system. New roots appear on the bottom, and trunk growth is observed.
Reviews from flower growers about the rejuvenation of phalaenopsis
Rejuvenating old phalaenopsis is a troublesome process, but with the right approach it gives good results. There are cases of death of one of the parts or even both, but this is mainly due to infections. If infection of the cuttings or rotting of the roots has been avoided, you can count on the orchids to bloom soon:
“I have a phalaenopsis that I have already rejuvenated twice. The first time it was possible to root only the top, but the stump never sprouted and died. The second time, both divisions took root perfectly. The tops begin to produce flower stalks the very next year after rejuvenation. I waited 2 years for the new growth from the stump to bloom” (Marina, Pskov).
With this method you will not only rejuvenate the orchid, but also get two healthy plants
Orchids are beautiful flowers that require special care. Only in this way will the plant delight you with its beautiful flowering.
If the orchid's trunk has become elongated and aerial roots have appeared on it, it's time to renew the flower. This procedure will help not only tidy up the plant, but also get two orchids. The main thing is to choose the right place for pruning.
The pruning location should be chosen so that there are at least three large formed roots above it. For pruning, it is best to use pruning shears; this will allow you to carefully cut the dry trunk.
The lower part of the orchid remaining after cutting should be dug out. A dry trunk without roots must be cut with pruning shears, and the cut should be sprinkled with coal.
For the upper cut part with small roots, use fine fraction bark for planting, and for the lower part of the flower with powerful, formed roots, it is better to use larger bark.
At the bottom of the pot with drainage holes, place pieces of large bark that do not absorb much water. This will avoid stagnation of water and rotting of the roots.
Carefully place the top cut part of the orchid on the bark, and sprinkle with finer bark up to the point where the trunk is cut.
Insert a small piece of polystyrene foam under the cut area; this will prevent moisture stagnation and rotting of the cut area.
Add more bark so that the rudiments of the roots peek out literally 2-3 mm.
Plant the lower part of the orchid cut into the pot in the same way, not forgetting to place a piece of polystyrene foam under the cut. In this case, the root collar should be left open. It is from here that new buds will appear in the future.
Do not be alarmed if at first the upper cut of the orchid loses leaf turgor. The plant will thus adapt to new conditions.
Watering orchids should be done every 3-4 days. To do this, use a small amount of water. Cover the roots that remain on the surface with cotton pads soaked in water.
Periodically, the plant should be sprayed with Epin solution. Once, to treat orchid sections, you can use “Zircon,” which increases the plant’s resistance in stressful situations.
After 3-4 days, start watering the lower cut of the orchid in the usual way, but do it half as often, since due to the lack of leaves, the moisture will evaporate more slowly. Also use Epin solution, which will promote the formation of a new kidney.
This method of rejuvenating an orchid is very simple. The best part is that it allows you to get two plants at once, the proper care of which will allow you to get beautiful orchids to decorate your home.
The step-by-step process of orchid rejuvenation can be seen in the video below:
Expert advice on solving the problem of turgor loss during phalaenopsis rejuvenation
Some time after re-rooting, many gardeners are faced with the following problem: the leaves of the apical part begin to lose turgor. Expert advice will help avoid possible plant loss:
“A re-rooted top has very few roots left. The orchid needs time to adapt and build up a sufficient volume of the root system to nourish and “water supply” the leaf apparatus. Therefore, for some time you can throw a transparent bag with holes over the phalaenopsis, creating something like a greenhouse with high humidity inside. In this case, you need to make sure that the bag does not lie on the leaves, remove it 2 times a day and ventilate the orchid. It makes sense to install an additional lighting lamp above such an improvised greenhouse.”
A. Davydovskaya, owner of the greenhouse
Current questions about orchid rejuvenation?
Question No. 1. Is it possible to use garden varnish to process sections of an orchid trunk?
It is forbidden. The gardener's task is to quickly dry the orchid sections. And paraffin is added to the garden varnish, under which they become damp and begin to rot. That is, the opposite result is obtained. Garden pitch is only suitable for tree crops.
Question No. 2. If the leaves on both parts of a divided phalaenopsis turn yellow, will they die?
Not necessary. You need to look at the roots. If they are fine and growing well, there is no reason to panic. In this case, you should simply feed the plants with nitrogen-containing fertilizer. Of course, yellowed leaves will die over time, but this will not affect development as a whole. If the roots do not grow, they darken, the baby on the lower maternal part does not grow, and the upper part turns yellow and many leaves lose turgor at once, which means the orchids are infected. It is necessary to immediately remove them from the substrate, determine the cause and place the plants under intensive care.
How to rejuvenate an old plant at home?
Rejuvenating an adult orchid at home is not a very complicated procedure. Even an inexperienced gardener can handle it. To rejuvenate a flower, it is necessary to perform the following manipulations:
- Prepare tools. A garden knife or scalpel with a sharp blade is best for pruning.
Important. The instrument must be sterile. It is recommended to treat it with an alcohol solution. - Trim the plant. Taking the tool in your hands, you need to cut off the top with aerial roots. It is better to cut off the part with five to six roots. This way the orchid will be subject to less stress. The remaining part will eventually give birth to children and the life of the orchid will extend.
- Process the cut area. To prevent the new orchid from being subject to various diseases and rotting, the cut site must be treated with garden varnish or wax.
- The next step is to place the newly formed plant in a transparent pot filled with a suitable substrate.