Deadlines
The timing of spring planting of chibuks (or in which month to plant) depends on the region:
- in the Southern Federal District (Stavropol, Krasnodar Territory) it is recommended to plant the plant in March or April;
- in the Central region - in April or May;
- in the northern corners of Russia it is approximately June.
At the same time, it is necessary to start germinating cuttings in February.
When the soil warms up to +10°C, you can plant the planting material in the ground.
The need for germination
To propagate grape bushes, they use seed germination, rooting layering or cuttings, and planting ready-made seedlings. The seed growing method is used very rarely. It takes a long time to get the finished plant. In this case, many young plants die or do not retain varietal characteristics. Ready-made seedlings are good because they allow you to immediately get a ready-made young plant. But buying seedlings always results in significant costs.
Most often, for home breeding of the varieties you like, cuttings or rooting of grapes by layering are used. In this case, the use of a particular option is determined by the weather and climatic conditions of the region where the plants are grown. If warm weather sets in early and is not limited to one summer month, rooting of cuttings is used. In all other cases, growing by cuttings or stems is recommended.
Important! Cuttings are the preferred method of growing grapes in northern regions with short summers, few sunny days and a high risk of return frosts.
Advantages of growing grapevines by cuttings:
- For cutting cuttings, a young fruit-bearing vine is used.
- Any variety is suitable for cuttings.
- To obtain high-quality planting material, chopped planting material is prepared in a certain way. Rooting is carried out so that the cuttings have given roots by the time they are transplanted to a permanent site.
- Transplanting planting material adapted to the conditions of the site is faster than rooting layering.
Before planting in a place of permanent growth, the harvested chibouks must be germinated. Only then can you get a healthy, strong bush that will take root well in a short time, produce foliage and withstand diseases.
Preparation, storage and germination of pipes
Cuttings should be harvested in the fall. Here are a few rules on how to do it right:
- choose only healthy shoots that do not have any stains, traces of fungus, diseases, or pests;
- the vine must go through the fruiting procedure at least once and have at least 4 healthy buds;
- There should be 7-8 shoots on the cuttings.
Chibuki should only be stored in a cool room (in the basement, refrigerator or on the balcony), the temperature of which is from +3°C to +6°C. At the same time, it is not recommended to allow the preparations to dry out - they will not form a root system and will die in a few weeks.
Remove cuttings from the box at the end of February or mid-March (after winter), and discard diseased or damaged ones.
Germinated cuttings
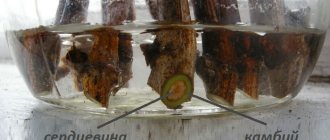
It is necessary to remove material with a yellow or brown core - it is not suitable for germination.
Wash good planting material in a weak solution of potassium permanganate, dry it, and then prepare them for germination.
Experienced winegrowers recommend keeping the cuttings in a honey solution before germinating seedlings so that the future root system is powerful and healthy.
You will learn more about how to properly germinate grape cuttings in our other article.
Important! Planting material should not be kept in the light. Excessive lighting will affect the premature bud break of grapes.
Preparing cuttings for planting
The prepared pipes are sorted and processed. Processing consists of the following steps:
- daily soaking in water;
- etching (disinfection) with copper sulfate 5%;
- drying;
- sorting, tying into bundles;
- wrapping with plastic film;
- determination in a cool storage place.
The temperature in the storage room should not exceed 5° throughout the winter. Excessive humidity in the storage area may cause rotting. Culling should be carried out in a timely manner.
Preparation stages
- The preparatory period includes several stages:
- Proper storage after pruning
- If storage rules are followed, the amount of rejected material is reduced significantly.
The following should be provided:
- cleansing of mustaches, small stepsons, foliage;
- the formation of bundles when tying with rope (non-solid wire);
- keeping in damp sand of the basement (or in an equipped trench).
Trench equipment rules
The hole should correspond to the length of the chibouks. It cannot be located near groundwater. Approximately 9-10 cm of sand is poured onto its bottom. The soil layer above the cuttings must be provided up to 40 cm. To avoid freezing, insulate with leaves, straw, sawdust and cover with polyethylene film.
In the refrigerator, the optimal temperature place for storing planting material is the door. Before storing for storage, the material is soaked for up to 2 days in cold water and placed in a polyethylene bag. Chubuki are taken out of storage in February (possibly from the end of January).
Processing and furrowing
After removal from storage, washing is carried out in a low concentration solution of potassium permanganate. The cut areas are lightly trimmed with a previously disinfected knife to light green skin.
Below, with a sharp object, longitudinal grooves are made on both sides. They and their sections are processed by Kornevin. This is a kind of stimulation of root formation (furrowing).
Soak
The material is placed in water for 1-2 days. It is practiced to refresh the sections and remove the eyes, except for the top 2. Add water as it dries.
To form the root system, the cuttings are placed in a sunny place. After 14-18 days, roots or their rudiments from 3 to 7 cm are formed. Shoots up to 5 cm are formed from the eyes. The cuttings are ready for planting.
If you have several varieties, do not forget to label (label) them.
To maintain the quality of the material, you need to take the following actions:
- if it dries out, moisten it and place it in water;
- If covered with mold, wipe with potassium permanganate.
In the absence of visible damage or disease, the viability of the chibouks is confirmed by cutting the bark and ascertaining living wood of a bright green color. The buds should be green and dense in cross section. Brown color means the death of the eyes.
If there are already leaves and roots have not yet formed, such shoots should not be rooted. They are not very viable and will quickly wither, because all the strength and energy is spent on the development of leaves.
The material selected after culling must be treated with potassium permanganate, cut off on both sides, and soaked in a growth stimulator for up to 2 days.
You can prepare a growth stimulator yourself. To do this, add honey and aloe to the water, 1 spoon per 10 liters. Apply the grooves vertically, rubbing the stimulator into them.
Earth
The selected area should be well lit and not have groundwater or other fruit trees nearby. Good soil for grapes is light and fertile soil (chernozem). To achieve good success in growing vines, you should prepare:
- Landing plan. The distance between the bushes for technical grape varieties should be 80 cm, and for table grapes - 1.5 m. The row spacing can be from 2 to 2.5 m.
- Pit. The width of the hole should be 80 cm and the depth 40-80 cm.
- A trench. If you need to plant several bushes, then it makes sense to do this too, while the width of the ridge is 1 m, depth – 80 cm, height – 0.3 m.
- A pillow in a hole or trench. It is recommended to fill the bottom of the hole with broken bricks, crushed stone or construction waste. This will preserve the fertile layer of organic matter.
Brick, crushed stone or construction waste (otherwise called stone litter) contribute to the appearance of worms and various insects in the soil.
On the one hand, worms help loosen the soil.
But on the other hand, some pests feast on plant roots. Therefore, when creating a pillow, you should take this into account.
Some gardeners prefer to fill the hole with a 10-15 cm layer of unrotted fertilizer to improve root aeration.
How to plant grape cuttings in spring
Before planting the vine, the selected location should be properly processed. After all, without carrying out this procedure, all efforts to grow cuttings will be in vain. First, you should clean up thoroughly. Remove all excess debris and burn branches and leaves that remain from the fall. By the way, the ash remaining after this can be used as fertilizer for the vineyard. Then comes the turn of digging. In a normal situation, it is done to the depth of a spade bayonet. But in cases where the land has not been cultivated for a long time, it is worth digging it even deeper. A walk-behind tractor with a good plow can help here. After digging, it is recommended to thoroughly loosen the soil.
If there is a danger of infection by various fungi, it is recommended to treat the soil with fungicides. Experienced winegrowers recommend doing a similar treatment in both autumn and spring. In this case, stronger and more effective substances are used in the fall. However, you should also not forget about preventive treatment with copper sulfate. This drug is reliable and does not harm the fertile soil layer. But using them before planting is very unwise. Such drugs can harm young and immature cuttings. To do this, one crack in the bark or near the roots will be enough.
After this comes the turn of fertilizers. Grapes really need phosphorus; they also need nitrogen and potassium. In the video you can always see how and in what proportion the fertilizers needed by the grapes are applied. After this, it is time to plant grapes. Planting is most often carried out in the second half of April or early May. At the moment when transplantation is carried out, you need to monitor the integrity of the root system. It is recommended to remove soil from the roots using water. The cuttings are planted in the ground so that the root system is completely underground. The distance between cuttings is from one and a half to three meters. Now we just need to provide them with suitable care. And experienced gardeners have their own opinion about the proper care of plantings:
“Even if the gardener managed to properly prepare and plant the vine, his work does not end there. It doesn’t matter what he planted, seedlings, cuttings or even seedlings from seeds. Caring for young grapes is always the same. He definitely needs moisture. Constantly, and in large quantities. But care must be taken to ensure that the soil does not become waterlogged. It should also be sheltered from the wind, but open to the sun. And finally, the vineyard must be fertilized. Root and foliar feeding will greatly increase the chances of successful rooting. And such plants will be more likely to survive next winter.”
Step-by-step instructions at home
Next, we will look at step-by-step instructions on how to plant rooted and rootless chibuki at home. To do everything correctly, you need to know how to prepare the soil, how to plant deeply, about watering after planting in the ground and about covering if necessary.
Without roots
- Dig a hole and pour a bucket of sand into it, then 1-2 buckets of humus on top, and another 4 buckets of earth.
- Install the grape stem so that the upper eye is 5 cm below the ground level.
- Cover with a little more layer of soil. Then water each planting with approximately 40-50 liters of water.
- Protect the planting from the sun and possible frosts.
Rooted
- Dig a hole, pour gravel, crushed stone or broken brick into it. Then pour about 10 cm layer of sand.
- Add fertile soil: 1/3 humus and 2/3 soil. It is recommended to add 3 tbsp. wood ash for prevention.
- Place the cutting in the hole so that the buds face north and the roots face south. The top bud should remain on the surface.
- Cover with soil, but do not compact. So fresh air and freely flowing water will accelerate the growth of grapes.
- After the work is done, water the plant generously.
Planting grapes with cuttings: mini-garden on the windowsill
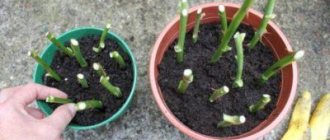
If you decide to wait for the roots to appear before rooting the grape cuttings, then the next step is to plant the plants in individual containers. The roots should be at least 0.5 and no more than 2 cm. Don’t expect longer ones, they will get tangled and break. The plan is:
- Prepare the container. The ideal option is to plant grape cuttings in spring in bottles with holes for drainage, but you can take any other containers that allow you to leave 5-6 cm of soil under the cuttings.
- The chubuk is inserted into the ground to a depth of 10 cm. The upper sprouted eye should be above the ground.
- Monitor the development of the root system and slightly moisten the soil. There is no need to water the cuttings heavily; they are prone to rotting.
- If several vines have formed on the cutting, choose the healthiest one and grow vertically upward, and remove the rest.
With due persistence, you will get bushes ready for rooting in street soil. But if problems arise, for example, all the roots have rotted, you can try again to go all the way, starting from rooting in water. To do this, refresh the cut and return the shank to the container on the battery.
If you don’t understand exactly how the whole process works, you can watch how to plant grapes with cuttings in the spring in the video.
Care
Timely and competent care of grape plantings is the key to good plant health and a rich and tasty harvest. The soil around the seedlings must be weeded and loosened to improve aeration. It is also necessary to perform other manipulations.
Important! During the flowering of the bush and the ripening of the berries, pests appear. Therefore, do not forget about timely inspection of grapes. If necessary, treat the bushes with fungicides.
Watering
When planting, pour 20 liters of water under each bush. Then each linear meter of beds will require 25-35 liters of water. During the growing season, increase the volume and number of waterings by 2 times.
Top dressing
Mineral and organic fertilizers can increase grape yields several times. It is necessary to feed young plants several times:
- The first feeding is required 2 weeks after planting the cuttings: apply 200 g of superphosphate and 100 g of ammonium sulfate under the bush to a depth of 40 cm;
- the second - before buds open: each bush requires 30 g of phosphorus and nitrogen fertilizers;
- third - during the ripening of berries: add 20 g of phosphorus and potassium fertilizers;
- It is also advisable to add 15 kg of humus to the soil 2-3 times throughout the growing season.
Trimming
Pruning will allow you to regulate the development of the bush. It happens:
Scheme of grape formation by year
- Short. Here you need to leave 2-3 eyes. The treated plant will have the appearance of a bowl. For example, professionals shape grapes according to the Crimean bowl type.
- Long. Here you should cut off the shoots with a well-sharpened pruner. Leave 6 or more buds on the vine. For example, a bush can be shaped like a large fan.
- Mixed. Cut one part of the vine short and the other long. Leave fruit shoots. This procedure is the most common, and it is called “fruit pruning.”
Shading
You can create a secluded corner for grapes with your own hands using available materials. To do this, you should install supports along the edges of the ridge, and stretch a material that is not bright and not too dark over them. Leave one half of the fabric free and support the other half with other supports. The overall design will look like an inferior tent.
For stability, you can fix the material with bricks.
When and how to plant vegetative cuttings (seedlings) of grapes in open ground
A high-quality vegetative cutting (more precisely, a seedling) of grapes must have the following characteristics:
- have at least 7-8 leaves;
- the length of green shoots should be at least 15-20 cm;
- have a developed root system (at a minimum, the 1-liter container in which the cutting was grown must be completely filled with its roots).
Under no circumstances should you immediately take a young green seedling (former cutting) outside and plant it in the ground , otherwise it will simply die. The plant must be hardened , and doing this gradually: first, take it out for 20 minutes, then for 40, and so on for 7-10 days. During this time, the seedling will adapt to new conditions.
As for timing , as was said earlier, planting can be done when the ground (to the planting depth) warms up to +10 degrees and the threat of return spring frosts has passed. This happens at different times depending on the region :
- So, in the south of Russia it can be planted starting from mid-to-late April .
- In the middle zone (Moscow region) - in the second half to the end of May.
The planting itself is standard, just like for a seedling with a closed root system, in other words, you take it and transfer it into a pre-prepared planting hole, always with a lump of earth, carefully, in no case removing the earthen lump from the roots.
Note! The site already has a detailed article about spring planting of grape seedlings .
Video: planting a vegetative seedling in open ground
Video: planting vegetative grape seedlings in the ground (according to Puzenko)
Common mistakes
Beginning winegrowers make many mistakes when growing grapes in the spring. The most common are:
- Shallow planting in the ground (buds are 30-50 cm above ground level). It is necessary to plant the plant so that the main trunk is 5-10 cm below ground level.
- Frequent watering of young seedlings. Plants need to be watered once every 3-4 weeks, but generously - 4-5 buckets per bush. Stop watering during the rainy season.
- Not performing stepsoning. It is recommended to break out the stepsons with your hands throughout the vine, otherwise the bush will die.
- Neglecting to treat bushes against pests and diseases. Some gardeners save money on buying expensive drugs, thinking that this will do. But it's not right. It is important to promptly inspect seedlings and treat them with modern fungicides.
You should also cover young bushes for the winter. Warm protection will allow the grapes to overwinter and reward people with a delicious harvest next year.
Growing grapes by planting cuttings in open ground is easy and simple. It is enough to take into account all the recommendations and advice, do not neglect fertilizing and timely treatment of bushes from pests and diseases. Only in this way will a person’s painstaking work be rewarded with a juicy and tasty grape harvest.
Rooting cuttings: the classic method
Rooting grape cuttings in the spring is a fairly simple procedure. First, you need to double-check that all chibouks have two or three buds. If there are more of them, it is better to cut the twig into two parts. Next we do the following:
- Select a container and place the cuttings in it. Take a transparent jar, such that you can pour 3-4 cm of water. The first bud is placed in the liquid; a shoot will need to grow from the second, so it should be higher than the edge of the container.
- We place the containers on the battery and wait. Be sure to change the water. You can throw a piece of coal into it so that the liquid does not turn sour.
- In a couple of weeks, when green shoots appear, it will be necessary to check the grape cuttings prepared for planting. A cluster of flowers may appear on them. This is an extra factor that draws juices and energy onto itself, so it needs to be removed. The bunch looks like a small lamb - you can’t confuse it.
- After three to four weeks, the roots of the chibouk begin to hatch. Let them grow a little and you can root.
Some summer residents prefer to plant grape cuttings in the ground, but active gardeners consider this unnecessary, because additional containers take up space, and more time is required to prepare the land. And it’s not a fact that a cutting without roots will germinate.
Another method involves the use of peat tablets, popular today, into which cuttings are stuck. Afterwards they are wrapped in cloth, film and put away. After three weeks of storage somewhere on a cabinet, you can take the cuttings apart and get most of the plants with roots.
Growing on the basis of lignified chibouks
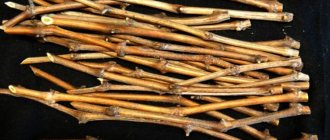
Cuttings taken from fruit shoots or on replacement knots from the middle part of an annual mature shoot take root better. Suitable parameters:
- brightly colored bark, smooth;
- where the leaves attach, the color is brown and smooth;
- shoot diameter 7-12 mm;
- the ratio of the core diameter to the cutting diameter is less than ½;
- shoot length 130-160 cm;
- the size of the internodes is characteristic of the variety.
It is these chibouks that are used for early germination at home. Cuttings removed from winter storage are wiped or washed with a solution of potassium permanganate, dried and cut so that from 1 to 3 eyes remain on each cutting.
When cutting into 1 eye, the lower cut is made obliquely in the direction from the eye, leaving 1/3 of the internode, the upper cut is 1.5-2 cm above the eye. For two- and three-eyed chibouks, all cuts are made perpendicular to the axis, that is, straight.
Caring for planted grape cuttings
During the summer season, the soil in the young vineyard is regularly loosened and weeded. In hot, dry summers, watering is necessary 1-2 times a week, 1 bucket of water for each plant. Growing shoots as they grow are tied to a trellis. If buds appear on the plants in the first year, it is better to cut them off immediately so as not to interfere with the development of roots.
It is better to cut off the buds that form in the first year so as not to weaken the young plants
In the fall, young grapes must be removed from their supports, laid on the ground and covered for the winter in accordance with the winter hardiness of a particular variety in the given climatic conditions. From the second year after planting - care as for an ordinary adult vineyard.
Winter preparation for growing grapes: how to take cuttings correctly
Cutting propagation is based on the principle of natural restoration of a plant from a small part of it. Moreover, the resulting plant completely retains all the qualities of the mother vine. Planting with chibouks in the spring is mainly used in industrial vineyards, but it is also suitable for amateur gardeners. Preparation of chubuks for spring planting is carried out in the fall, when the leaves of the grape bush begin to turn yellow and autumn pruning of the vine is performed. You shouldn’t be too hasty with cutting, but you also shouldn’t delay it until frost. For future propagation, you should choose a vine that bears fruit well in the summer. You can find out about the growing season of the grapevine here.
To obtain cuttings, you need to choose healthy mother bushes of a variety that is promising and productive in the area.
A cutting is cut from the middle part of the vine with a diameter of 0.7 to 1.0 centimeters. The number of buds on the cutting should be at least five to six, and the length should be slightly longer than required for planting. In the process of cutting planting material, the following errors may be made:
- cuttings cut too thin;
- the material is not cut from the middle;
- cuttings were cut too early.
It is the chibouks, cut from the middle part of the vine, that best withstand winter storage and have the strongest and most viable buds. If there are several varieties in your home vineyard, then several cuttings should be taken from each of them. When cutting cuttings, the lower cut should be approximately 0.5 centimeters away from the bud, and the upper cut should be made at an angle and located 1-2 centimeters from the bud. The work should be done with a very sharp knife so that the dull blade does not crush the fibers of the core.
Planting material of the same variety should be stored in a separate bunch, in a plastic bag. Every package must be signed, be it Swag or Wild. Before storing the chibouks for winter storage, they should be prepared in a certain way.
To protect against pests and diseases, chibuki should be treated with fungicides, either a 1% solution of copper sulfate or use a 0.5% solution of Quinozol. The use of iron sulfate is allowed. The cuttings should be kept in the solution for 1-2 hours. To prevent the planting material from drying out, place it in a vessel with clean water for at least 2 days. After this, the pipes should be lightly wiped with a cloth to remove any drops of liquid. This article will tell you about the use of iron sulfate for apple trees in the spring.
The material can be stored in a cellar or refrigerator at an optimal temperature of +10C. The maximum temperature at which cuttings are stored in normal condition should not exceed + 60C. Humidity can vary from 95 to 100%. During storage, the pipes should be inspected for dryness. Such specimens become unsuitable for planting and must be removed from the bunch.
The first stage of preparing cuttings for storage in winter is to soak them in water for 24 hours.
Experienced gardeners add spruce or pine sawdust to a bag of cuttings intended for winter storage. Resin from coniferous trees can protect planting material from infection by rot or mold. Before pouring sawdust into the bag, they should be doused with boiling water. During the winter they can be changed 2-3 times.
