Planting potatoes is a difficult task. It takes a lot of effort and time. To make the work of gardeners easier, Russian companies have developed wonderful equipment - a walk-behind tractor. The most famous and popular brands are “Salut” and “Neva”, these are the best walk-behind tractors for cultivating land.
They are easy to operate, last a long time and rarely break down. But there are some rules that must be followed when planting potatoes. This article will tell you tips about proper planting and nuances in using a walk-behind tractor, as well as equipment that will help plant and dig potatoes.
Is it possible to grow potatoes without hilling?
Man has always sought to optimize certain processes and work. Experiments to make agronomic work easier also included growing potatoes.
Summer residents report a larger harvest with the cropless method
Traditionally, summer residents still prefer the usual hilling, fearing the so-called “poke method”. Other gardeners with inquisitive minds, accustomed to conducting experiments on their plots, try other methods of caring for plants, for example, potatoes, and come up with new ways of planting them:
- under black non-woven material;
- in separate ridges or containers;
- in bags.
An alternative to hilling is the method of unhilling potatoes. It is carried out as follows: each stem of a grown plant is taken to the side and covered with earth, straw or grass.
For the same purposes, green manure and special agrofibre are used. At the same time, the potatoes grow in breadth, not upward. During the entire growing season, mulch is poured onto the plant, and at the end of the season the resulting nest is dug up.
The main advantage of unhilling is that weeds do not grow in the nests. The second advantage is the absence of hilling itself; there is no need to apply physical effort several times a season.
For the hillless method, you need to prepare the soil in the fall
The disadvantages of this procedure include the cost of straw and mowing grass for mulch.
But you still have to do some work before starting the unwinding process. In order to grow a good harvest, you need to fertilize the soil in the fall:
- remove weeds from the area;
- to protect potatoes from the Colorado potato beetle and other pests, you can scatter onion peels over the surface of the soil before digging;
- the area where the potatoes will be planted must be dug up without breaking large stones;
- apply fertilizer from ash and 15 grams of urea per 1 square meter;
- cover the area with a layer of hay, and manure can be spread on top.
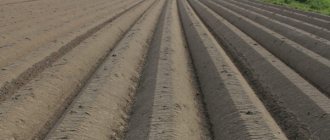
Before planting potatoes in the spring, rake off the layer laid in the fall so that the soil warms up. Then level the mulch over the entire area, forming ridges in which the tubers will be planted.
The ridges need to be watered only if there is severe drought. To do this, pour a bucket of water per square meter. If it rains, you should skip watering - the top layer that covers the potatoes retains moisture very well.
On a note! If you systematically over-water the potatoes, there is a risk of rot or late blight on the tubers.
Various fertilizers do not need to be used when growing potatoes without hilling. Due to the fact that fertilizers were applied to the soil in the fall, the mulch already contains all the necessary microelements for good plant growth.
Hilling: how many times per season and how to hill
Advantages of technology
If you properly earth up potatoes with a walk-behind tractor, you can get a high vegetable yield. After all, hilling allows you to protect the crop from temperature changes, diseases and weeds. The advantages of using the unit include:
- saving time on processing potato beds;
- a deep furrow loosens the soil well, thereby improving air exchange;
- maintaining the correct temperature in the soil, as a result of which the bushes grow better;
- high productivity and less energy consumption for work.
Manual hilling is a long and labor-intensive process. Therefore, the main advantage of using a walk-behind tractor is saving time.
Hilling potatoes and how to do the job using a walk-behind tractor
Such attachments for a walk-behind tractor, such as a hiller, help in caring for and improving the growth of root crops. Manual hilling is usually done using a hoe and consists of sprinkling the lower part of the tops with soil taken from the row spacing. However, if the process is automated, it will require much less time and effort. In addition, despite the fact that many consider this work to be a one-time job, it is recommended to hill up the potatoes twice per season - after the tops have sprouted by 10-15 cm and a month after that. After all, this procedure not only allows you to protect young tubers and saturate the root system with oxygen. This is also an additional removal of weeds that interfere with the growth of root crops.
Hilling can be done with two types of attachments, which will now be discussed.
Hilling potatoes with a walk-behind tractor with a single-row hiller
A single-row hiller is a regular reinforced wedge that goes deep into the soil, pushing it to the sides. In essence, this is an ordinary plow. The speed of hilling with such equipment is not too high, but as an advantage it is worth noting the simplicity of the design, which allows you to make such a hiller with your own hands, even without such skills. In addition, there are no adjustments here, which means that the operator himself decides what the depth of the furrow in the row spacing should be at one time or another during the work.
Hilling with a walk-behind tractor using a double-row hiller, and how it is done
When using such equipment, it becomes possible to simultaneously hill up when taking soil from two rows. This equipment is adjustable for the width of the furrows, as well as the depth.
When using a double-row hiller, you should understand that a more powerful walk-behind tractor will be required, as well as more force will have to be applied. However, this is compensated by a significant acceleration of the hilling process.
Weeding potatoes using a walk-behind tractor with flat cutters
Flat cutters are used as weeding equipment, which are easy to make even with your own hands. In the step-by-step instructions that will be presented below, the reader will be able to see how they are used. Also often used for weeding is other equipment called hedgehogs.
Step-by-step instructions for weeding and hilling potatoes with a walk-behind tractor
Today's step-by-step instructions will be discussed using the example of equipment made by hand, although based on something purchased in a store. The fact is that factory tools do not always withstand the realities of our gardens, and therefore we have to strengthen them ourselves. And the Russian-made Neva walk-behind tractor was used as draft force for hilling the potatoes.
| Illustration | Description of action |
| In order to simplify the task a little, you should load the walk-behind tractor. You can do this yourself, using any counterweights and making a simple bracket. In addition to weights, the work will require 2 flat cutters and a hiller. | |
| The design of flat cutters is extremely simple. However, if you make them yourself, you can make a mistake in the angle of inclination, which will complicate the work. Therefore, it is worth considering how they can be adjusted locally, after installation on the walk-behind tractor. | |
| The hiller is also not distinguished by its design complexity. Factory-produced disks were used here, but the bracket holding them was completely redone and strengthened. | |
| First, flat cutters are installed on the walk-behind tractor, which will allow you to cut off the roots of the weed in a small depression. The distance between them should be exactly the width of the row so as not to damage the root system of the potatoes. | |
| The example clearly shows the lugs on the wheels of the walk-behind tractor. Without them, work will completely stop. The walk-behind tractor will simply skid, burying itself in the ground. Having gone through all the row spacing with flat cutters, you can proceed to hilling. | |
| Now a hiller is installed on the walk-behind tractor, the width between the discs is adjusted, and the work is repeated. The main thing here is to carefully monitor the direction of movement of the walk-behind tractor, adjusting it as necessary. | |
| Well, this photo is given as an example. It was done a week after weeding and hilling. As you can see, there is no trace of the weed left, the rows are even. |
You can watch a more detailed master class on weeding and hilling potatoes using a walk-behind tractor in this video.
Recommendations for selection
You should not save on a walk-behind tractor, as a low price can bring headaches and problems in the form of low-quality equipment. When choosing a motor cultivator for hilling potatoes, you should take into account certain factors:
- Land cover density. If the soil includes clay and sand, then the device must be of high power. It will easily cope with lumps that exist in loamy soil.
- Area of potato bed. You should not buy low-power units for large areas, as they will quickly fail. For a 20-acre garden, a model with standard power is suitable. For large areas, it is better to choose a powerful device with a working width of more than 60 cm and more than 5 horsepower.
- Row length. It is easier to operate the unit if you make fewer turns.
Video selection
Planting potatoes using a walk-behind tractor greatly simplifies the work and greatly reduces the cost of physical labor. Additional devices - a potato planter, a mechanism for hilling - are very useful and are needed if potatoes are planted over a large area. But is the potato planter putting in tubers too often? Yes, and the depth of the furrow needs to be adjusted. How will the potatoes grow? Yes, and hilling is not of the same quality as manual hilling. There's nothing you can do - the areas are large, you can't do without the unit shown! The disc hiller is generally good. When a new furrow is created, the previous one is filled in. I think the walk-behind tractor shown is popular in rural areas.
The walk-behind tractor greatly facilitates work on personal plots; we plant potatoes in our garden under the plow, and it turns out very quickly and well.
We constantly planted potatoes by hand under a shovel, but how much easier it is to work with machinery. Now we plant it in the ridge using a disk hiller. The ridges warm up faster, seedlings appear earlier, and hilling is easier in the future. The walk-behind tractor does not stand idle at the dacha.
If you have ever planted potatoes, you know how difficult and tedious it is. And planting with a walk-behind tractor, using a mounted potato planter, turns into, one cannot say, a pleasure, but at least it is no longer hard labor. Easy and fast.
Additional hilling methods
There are also manual methods for hilling potatoes:
- raking the earth under each bush using a hoe;
- the use of a special plow designed for two people.
Hilling potatoes manually
As practice has shown, the most effective method is using a walk-behind tractor. This mechanized device will help you complete the job three times faster than using manual techniques.
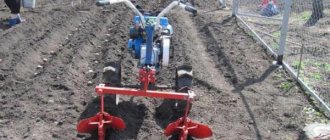
PLANTING POTATOES WITH A MOTORBLOCK USING A DOUBLE-ROW HILLER
So, we have prepared the garden, now you can start planting potatoes with a walk-behind tractor. To do this, instead of cutters, we will install lugs, having first put iron extensions on them.
On the Neva-MB2 it is necessary to remove the wings before doing this. We remove the central stop from the walk-behind tractor and hang the hitch in its place.
Everything is done very simply, just insert metal pins into the holes. We attach a two-row hiller to the hitch. Before this, we make the distance between the hillers equal to 65 cm, this will be the width between the beds.
Let's mark the garden with a special marker that we will make with our own hands.
To do this, screw short pegs to a long wooden handle with self-tapping screws so that they resemble a rake. In total you need 3 pegs, the distance between them will also be 65 cm. Take a marker and draw stripes with it. To maintain the distance, you need to let the outermost peg follow an already drawn line.
Let's adjust the cultivator to the marking and press the first speed to cut the furrows.
Using the hitch, you can change the position of the hiller, thereby increasing the depth of processing. To do this, you need to tighten the adjustment knob. Having reached the end of the garden, we turn around and go in the opposite direction.
You can put one hiller into an already made furrow, or you can, if the soil is soft, follow the marked lines. Having cut as many furrows as necessary,
Let's start planting potatoes. We throw the pre-sprouted tubers into the bed, maintaining a distance of 35-40 cm between them.
Before this, it would be good to treat them with a special composition against the Colorado potato beetle, it is called Prestige. Looking ahead, let's say that the method works, the beetle is not on the leaves for a long time. But when the drug stops working, a few larvae still appear.
Having planted the potatoes in the furrows, we will begin to fill them up. Before this, on the hiller we will increase the working width of the wings, spreading the blades as far as possible, if the design of the equipment allows this. Let’s place the equipment opposite the ridges and, at first speed, cover the potatoes with earth.
This operation requires some skill, since you have to control two ridges.
To make it easier, you can remove one hiller and place the second in the center.
Instead of lugs, we will install rubber wheels. Let's direct the cultivator in the center of the ridge and fill up the potatoes in the same way, bed by bed. If you do not have a two-row hiller, all the work of planting potatoes with a walk-behind tractor can be done in a single row. But for this, the width between the ridges must be made equal to 70 cm. This size is optimal. At the end, if there are any unevenness, we will correct the beds with a regular hoe.
Watch the video
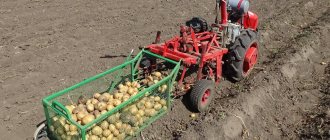
Assembling potatoes with a walk-behind tractor
The walk-behind tractor can be used not only for planting and hilling potatoes, but also for harvesting - perhaps the most labor-intensive part of the entire process of growing this crop, since it involves not only digging up a very large amount of soil, but also strictly monitoring that the tubers were not damaged either during their extraction from the soil or subsequently when the adjacent row is processed.
Did you know? In order to manually dig potatoes on a plot of one hundred square meters, it is necessary to lift an average of ten tons, and this is only the weight of the soil removed from the bed, not counting the efforts for lifting, storing and subsequent loading of the root crops themselves.
The complexity of harvesting work is influenced by many factors, in particular:
- heaviness of the soil;
- the degree of its humidity;
- cleaning calendar dates;
- weather (if the autumn is rainy, the time for harvesting is greatly limited, and the process must be accelerated);
- height of potato tops;
- total area and configuration of the site;
- presence of stones in the soil, etc.
Important! If you mow the potato tops a little earlier, without waiting for them to dry out on their own, the skin on the tubers will be stronger, so the crop can be stored longer. This agrotechnical technique is used when growing tubers on an industrial scale.
The process of harvesting potatoes using a walk-behind tractor is carried out as follows:
- First you should mow the tops. To do this, you can use a regular scythe or a mechanical lawn mower (preferably a gasoline trimmer). Experts recommend carrying out this procedure about a week before the main work. However, if the plant is affected by late blight, the tops must be cut off immediately; this is the only way to save the crop. After mowing, “stumps” no more than 6 cm high should remain in the garden bed.
- Remove regular wheels from the walk-behind tractor and install lug wheels.
- Attach the hiller to the unit and adjust the working width.
- Direct the machine in such a way that the wheels do not touch the bed while moving, otherwise the tubers may be damaged.
- Start the engine, set the first speed and start driving. As the soil is plowed, the tubers should end up on the crest of the furrow.
- In order to minimize possible losses, on the way back it is recommended to skip one bed and then dig up potatoes through one row. At the end of processing, collect the dug up tubers, and only then process the remaining rows.
When the correct settings are made, harvesting potatoes using a walk-behind tractor has the following quality indicators:
| Plowing depth error downwards | No more than 2 cm |
| Number of tubers remaining in the ground | No more than 40% (on heavy soils - up to 55%) |
| Tuber spreading width | No more than 100 cm |
| Number of damaged roots | No more than 3% (on rocky, clogged and swampy soils - up to 12%) |
The data presented allow us to conclude that harvesting potatoes using a walk-behind tractor is much inferior to the results that can be achieved using a combine harvester (modern agricultural machinery allows you to dig up to 97% of root crops with minimal losses), however, for relatively small areas, a walk-behind tractor is still very a serious help in the work of a farmer. You just need to know that after the initial digging, it is advisable to go around the field again and, if necessary, manually dig up the remaining crop in the ground.
Growing potatoes is a complex and time-consuming process. On large areas, it is almost impossible to organize it manually in such a way as to be able to count on a good harvest, but not every farmer can afford to purchase serious agricultural equipment for cultivating their own fields. A walk-behind tractor with a set of attachments is a small and relatively inexpensive device that is an excellent compromise between an ordinary shovel and a huge combine and allows you to solve many agricultural problems, including those related to planting and harvesting potatoes.
How to make a device for hilling with your own hands?
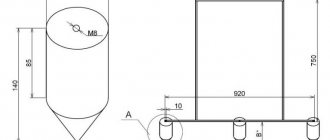
If you don’t want to spend money, then you can make a universal manual hiller that will serve the farm for many years. It can also be used for digging potatoes. The work will require a minimum of materials: a stainless steel pipe, several metal plates curved towards the middle, and a welding machine. The assembly order is as follows:
- A piece 1 m long is cut from a pipe with a diameter of 25 mm. It will play the role of a stand, to the bottom of which you will need to weld a fastener that holds the working part of the potato digger. It is best for this element to have the shape of a flange to which the knives will be attached using threaded connections through special holes. It is necessary to weld a piece of pipe perpendicularly on top, which will act as a rod;
- For better support, the ends of the rods should be bent at a right angle. A grip is welded in the middle of the rack, which the farmer's assistant will pull on. To use it with a walk-behind tractor, you will need to make a mount on the grip;
- It is necessary to weld a knife in the shape of a faceted triangle onto the metal plates. To create a knife, carbon steel with a thickness of at least 4 mm must be used;
- Finally, the plate with the knife should be secured to the bottom of the rack.
After manufacturing, it will be necessary to process the seams remaining as a result of welding. To do this, you can use a grinder. The described option involves making a simple hiller with which you can dig potatoes. No more than three hours will be spent on the work, and as a result you will receive a reliable tool that processes the soil efficiently.
Agrotechnical requirements for planting potatoes under a walk-behind tractor
Agricultural technology for planting potatoes does not depend on whether the corresponding work is done manually or in an automated way. The essence of the process, in any case, is to dig a depression in the ground of a certain size (in the form of a continuous furrow or separate holes), place root crops in it, keeping the distance between them as equal as possible, and then fill the hole again with earth. Sometimes backfilling is carried out by simply leveling the soil layer, in other cases a ridge is formed at the planting site (hilling up).
Did you know? Until the mid-18th century, potatoes were not very popular in Europe. A well-known promoter of this culture, the French agronomist Antoine-Auguste Parmentier, overcame the distrust of local residents in the new vegetable with the help of a trick: during the day he posted armed guards around the potato field, and at night he removed the guards, as a result everyone tried to steal and try something that was so carefully guarded.
In addition, simultaneously with planting tubers in the ground, you can apply the necessary fertilizing in the form of organic matter or mineral fertilizers. In this case, the nutrient mixture is placed on the bottom of the holes, sprinkled with a small layer of soil on top and planting potatoes are placed on top of it. When using agricultural machines in the process of planting potatoes, it is necessary, accordingly, that the technical device can ensure the implementation of this type of work.
Design of a disk walk-behind tractor. In particular, the walk-behind tractor is required to be able to:
- it is guaranteed not to damage the tuber when planting it in the soil, regardless of the size of the potato (root crops weighing from 30 to 90 g can be used for planting, which is comparable in size, respectively, to a walnut or a chicken egg), depending on whether the tuber is planted whole or cut into fragments, as well as the presence of sprouts on it (the so-called vernalized or sprouted potatoes);
- adjust the row spacing in accordance with the planned planting pattern, and it is desirable that the error be no more than 2 cm (the width of the butt row spacing, that is, the distance between the two outer furrows made by a potato planter, hiller, plow or other walk-behind tractor attachment, may deviate from the specified no more than 10 cm);
- dig a furrow of a certain depth and fill it with a ridge of the required height, and in both cases the error should not exceed 2 cm;
- lay the tubers at an equal distance from each other with the ability to adjust this distance in increments of at least 5 cm (for example, 20, 25, 30, 35 cm, etc.) and with an error of no more than ¼ of the specified parameter;
- avoid omissions when planting root crops, which is especially critical when it comes to planting large tubers;
- strictly maintain a straight line when laying a furrow, no matter how fast the walk-behind tractor is moving;
- ensure local application of organic and mineral fertilizers simultaneously with planting potatoes - both by direct laying in the hole, and dotted on both sides of the tuber (relevant for mineral fertilizing), while the technical capabilities of the walk-behind tractor should guarantee the ability to strictly adhere to the planting location (2–3 cm from the root crop in depth and 5–7 cm to the sides) with an error of no more than 1/10.
Learn how to grow potatoes from seeds at home.
Setting up the walk-behind tractor correctly
Disc hiller
A video of hilling potatoes using a walk-behind tractor with a disk-type hiller allows you to understand how to perform the task. The disc hiller hills only one row at a time, above which it is located. The rest of the territory will not be affected. Hilling up will take more time, since the walk-behind tractor will be driven over each row, but this will involve better soil treatment.
Setting up the disc hiller requires minimal effort. It is recommended to spread the bottom points of the discs to the width of the row spacing. After this, the angle of attack is determined, and it is recommended to focus on existing experience. In any case, the potatoes should be covered with soil. A symmetrical setting for the discs is desirable, since the hiller must be held in a certain direction.
The mandatory use of ground hooks and extensions is expected. It is advisable to use components of large diameter, which makes it possible to carry out high-quality hilling of potato bushes. If you choose a model with insufficiently large soil hooks, the walk-behind tractor will crush the potatoes.
Now hilling is carried out row by row to ensure high-quality processing of the entire required area.
To use a single-row plow-shaped hiller, you will also need ground hooks, which must run along one row. It is advisable to plant potatoes according to a special pattern, since soil hooks must pass between them. If you are interested in how to hill potatoes with a walk-behind tractor, it is advisable to focus on the shape of the hiller and the settings of the walk-behind tractor.
Important! The walk-behind tractor with the hiller is immersed in the ground to the optimal depth and adjusted according to a special scheme. The axis must be perpendicular to the ground surface
After this, the walk-behind tractor or cultivator is driven along the rows, hilling the potatoes.
In order to correctly carry out the process of processing a crop with a cultivator, the following rules must be observed:
install special soil rippers on the device; The walk-behind tractor is placed between the rows in the center; the device turns on at minimum speed; Carefully guide the walk-behind tractor along the row.
After the row has been passed, the device is carefully deployed and all the crop beds are processed in this way. Processing potatoes with a walk-behind tractor is easy when the distance between the beds is maintained
Hilling is carried out using a single-row, double-row or three-row device.
To work with the hiller, the usual wheels of the walk-behind tractor are removed and lugs are installed, and only after that the device is attached.
The distance between the lugs for a single-row hiller should be minimal, since both wheels move along the same row spacing.
On the ground! The coupling should not be rigid. It is attached to one kingpin. The play in the horizontal plane should be about 5-6°.
You cannot install the hitch on two kingpins, as in this case a rigid connection is obtained. Also, a rigid coupling between the hiller and the walk-behind tractor is obtained if the backlash is removed. In a garden plot there are always areas with denser soil. If the hiller gets into such an area, the walk-behind tractor turns around a little.
The simplest device for hilling is a single-row plow-shaped hiller. Unlike the two-row model, it is not highly productive, but at the same time it is more convenient for working on a small plot of land.
To hill up plants with such a device, you will need to install wheels with minimal outer edges on the walk-behind tractor. Since the body of the unit will move between the rows, the smaller the width of the wheels, the smaller the row spacing required for passage. The hilling process itself is no different. You just need to adjust the depth and you can start working.
The choice between different types comes down solely to individual conditions of use. In general, each device can significantly facilitate the work of any gardener.
How to work with a disc hiller?
Perhaps the disk model is best suited for working with root crops. It is mainly used for potatoes, but it is also used for other root vegetables. The device consists of two disks attached to each other at a certain angle, with the ability to adjust the width between them from 35 to 70 cm.
The angles of the disks must strictly correspond to each other, otherwise the mechanism will move to the side during operation.
The disc type is characterized by high reliability, functionality, and durability.
They are quite simple to work with. The farmer only needs to move a walk-behind tractor with a fixed and adjusted mechanism along the beds with root crops.
Planting potatoes with a walk-behind tractor and hiller
How to plant potatoes with a walk-behind tractor
- using a hiller with adjustment of the gap between the wings;
- using a mounted potato planter.
Method No. 2.
- plowing the garden;
- harrowing so that the seedlings can receive the necessary moisture and oxygen;
- soil moisture (if possible).
Next, the ridges are pre-cut. The potato planter has furrows, a device for feeding tubers into prepared holes and a disk hiller for filling potatoes. Thanks to this “versatility”, several operations can be carried out simultaneously - cutting furrows, laying tubers and filling them. At the beginning of work, lug wheels are put on the unit, and a potato planter is put on the walk-behind tractor. Parameters are adjusted for further work.
To obtain a high ridge, the discs of the device are brought closer together, and the depth of the furrow increases. And to reduce it, the reverse procedure is performed, the disks move apart, while reducing the angle of attack.
The potatoes are placed in a special compartment, and while the walk-behind tractor is moving, it is fed into the prepared furrows. The frequency can be controlled manually, or you can completely trust the technology. After planting, the furrows are closed and the soil is compacted. You can sprinkle organic fertilizer on top to moisten the soil.
Processing the garden with a walk-behind tractor
The plowing depth should be within 19-20cm; after this procedure, there is no need to harrow the soil!
The walk-behind tractor device has a special plow that makes uniform furrows to a certain depth. After this, manually or using a potato planter, the potatoes are laid out in furrows and the tubers are covered with soil using hillers.
Processing potatoes after germination
This process is ensured by a special attachment on the walk-behind tractor - one, two or three row hiller. During hilling, fertilizers should be added to the soil using an additional attachment that is installed on the potato planter.
Inter-row processing
And then - every 7 days, until the row spacing becomes inaccessible. Weeding can be done either manually or mechanically. The main thing is to remove weeds in time so that they do not complicate the growth of seedlings and do not negatively affect the development of the root crop.
Weeding with a harrow
Homemade potato digger for walk-behind tractor
For better assimilation of information, we offer a video of hilling potatoes with a Neva walk-behind tractor.
Purpose of hilling, terms and conditions
When hilling potatoes, the following goals are achieved:
- preservation of moisture in the root area, which leads to the development of tubers without loss of nutrients and taste;
- Hilling reduces the risk of diseases and pests in tubers;
- the risk of damage to the upper tubers, which can protrude on the soil surface and negatively tolerate exposure to the sun, is reduced;
- preventing the impact of negative factors on potato tubers;
- using the hilling procedure, the size of the crop increases;
- if potatoes are planted ahead of schedule, the use of this type of treatment protects the crop from frost;
- reduction in the number of weeds.
Hilling is carried out in stages, which include:
- The first stage - processing is carried out after the potato sprouts reach a size of 10 cm. Such actions will prevent possible frost damage.
- The second stage - potato processing must be carried out after buds begin to form on the crop. This will promote the formation of tubers.
- The third stage is carried out if necessary, if there is excessively hot weather that negatively affects the development of tubers.
Hilling is carried out in the evening. This period will allow you to retain moisture longer. It is also recommended to apply mineral fertilizers before the hilling procedure if the soil is poor and the plant does not have enough useful components.