Instructions
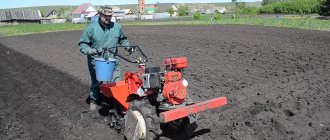
In fact, planting potatoes using a walk-behind tractor is not difficult. You must clearly follow certain instructions and you will definitely succeed.
Site preparation
Planting potatoes using a walk-behind tractor is carried out only after the soil has been processed. First, the site needs to be plowed and then booked. This will allow the soil to become saturated with oxygen and become lush. To plow the soil, special cutters or a plow are used.
To chop the breasts, you can use a walk-behind tractor or a regular rake. Of course, the second option is suitable if the garden plot is small. There are models of walk-behind tractors that loosen the soil while plowing to a depth of 20 cm. So sometimes there is no need to make a reservation. When preparing a site, it is also important to understand which vegetables can be planted after which.
The video shows the preparation of the site for planting potatoes:
Processing should be done from the edge of the area. Then plow 2 m of soil, which is located perpendicular to the furrows. If you want the entire garden to be plowed to the same depth, then use a plow to grab part of the already prepared soil.
Now you can outline the rows. In order for potatoes to grow well, it is necessary to achieve free row spacing. A distance of 60-70 cm must be maintained between the rows. Everything here is determined by the type of potato. When the holes have been prepared, the potatoes are planted directly using a walk-behind tractor. You can also use fertilizers, but this article will help you understand how to prepare fertilizer from quail droppings.
Preparing the unit
Before performing work, you need to prepare the motor cultivator itself. Instead of cutters, lugs will have to be mounted on the machine. But instead of the central stop, a hitch should be installed there. All these activities are completely easy to carry out. Now install metal pins and a double-row hiller into the existing holes. You can set the required row spacing on it.
To plant tubers, you need to use a distance of 65 cm. If you decide to use other types of hillers, then they should be installed in the same way according to the instructions.
Landing technique
Today, two main planting methods are used - potato planter and hiller. You will have to dwell a little on each of them to understand what differences exist between them and which method is still better.
Whatever unit you use, you need to understand that there should be a distance of 20-30 cm between the potato seeds in the row, and plant the planting material to a depth of 10-15 cm.
If you use a regular hiller, then attach it to the walk-behind tractor. To place potatoes comfortably in rows, it is worth moving the blades and increasing the grip of the wings. If you use the Neva walk-behind tractor, you will need to remove the wings and main support from it. But if you use the Salyut walk-behind tractor, then there is no need to carry out such activities. It is imperative to secure the lug wheels to the walk-behind tractor.
The track must be at least 60 cm wide. Place strawberries and potatoes in the already prepared grooves. Do this at an equal distance. Then take a walk-behind tractor, put rubber wheels on it, but the track width values should remain unchanged. There should be a maximum distance between the wings. Now you can fill it with fresh soil nearby.
If you have large plots of land, then planting tubers will be convenient if you use a mounted type of potato planter. The design of this unit involves the presence of a furrower, a conveyor and a disk hiller. Thanks to him, it is possible to plant and cover the planting material with soil in one pass along the row. You can create a potato planter for a walk-behind tractor with your own hands.
The video shows how potatoes are planted:
Summer residents also use the method of planting with a walk-behind tractor under the plow. For these purposes, wheels and a plow are mounted on lug wheels. Thanks to the plow, the first furrow is formed. Potato tubers should be thrown in a row, since at the end the unit with the plow turns around and makes new furrows on only one side, and also covers the already planted tubers with earth.
But is it possible to plant onions after potatoes, and how planting occurs, is described in this article.
Is it possible to plant tomatoes after potatoes, and how to do it correctly, is indicated here.
Related article: What to plant after potatoes next year - list of crops
Maybe
Preparing the soil for planting
Before starting the main work, you need to prepare the soil for planting potatoes. A cultivator or milling cutter is the main tool for cultivating soil, which can be mounted on a walk-behind tractor. It is often included with the equipment, but if it is not included in the package, then it must be purchased separately. On some models it can be installed instead of wheels, like a motor cultivator, while in others the cutter is used as a separate attachment.
The cultivator is suitable for cultivating light sandy, sandy loam soils, chernozems, as well as for spring tillage of the soil after it has been deeply plowed in the fall with a plow. It is necessary to loosen the soil in a potato plot in dry weather, to a depth of about 10-15 cm. Clay soils need to be processed 2 times to rid them of excess moisture and further enrich them with oxygen.
If the site has heavy clay soils or its area is significant, it is easier to dig up the ground with a plow, which allows you to go deeper into the soil. With its help, you can not only prepare the soil for planting tubers, plant them, but also dig up the crop in summer or autumn. When plowing a plot, you can use a regular plow, a reversible one, which can be used to plow in both directions, or a rotary one, which, like a milling cutter, consists of 2-4 curved shares.
After plowing a potato plot with a milling cutter or plow, large clods of earth remain, which then need to be broken up and well leveled, for which a harrow is designed, which is also installed on the unit (disc, finger or rotary).
What walk-behind tractors can be used
Today, various models of walk-behind tractors can be used for planting potatoes. Each of them has its own distinctive features. Often, summer residents use the Neva walk-behind tractor. This is a reliable and unpretentious unit that is perfect for working in a summer cottage. Using such a walk-behind tractor, you can carry out various work in the country.
A similar principle is observed in the Zubr and MTZ units. This is explained by the fact that the design schemes are the same and differ little. This suggests that planting potato tubers using Bison can occur in two ways. MTZ walk-behind tractors remain no less popular today.
But this information will help you understand how to get rid of wireworms in potatoes using folk remedies, and what means should be used.
In the video, the Zubr walk-behind tractor for planting potatoes:
They are distinguished by reliable and durable parts. Such equipment rarely fails, since high quality materials are used during its assembly. In addition, the unit is economical as it consumes little fuel. It remains a powerful species in its class. But this information will help you understand how a vibrating potato digger is used for the Neva walk-behind tractor.
The MTZ walk-behind tractor has the following characteristics:
- slight vibration;
- work is carried out with low noise;
- easy start;
- Ease of Management;
- environmental Safety.
MTZ is easy to use. In addition, it is so easy to operate that even an inexperienced person can perform all the work. And its maintenance can be done quickly and easily even with your own hands, thanks to which you can save money.
They can also use the Salyut walk-behind tractor for planting potatoes . This is a multifunctional unit with a cutter grip of 80-105 cm. Salute is produced with several options of gasoline 4-stroke engines from different manufacturers.
It will also be interesting to know whether it is possible to plant tomatoes after onions.
Planting potatoes is an important event in the life of every summer resident. You need to be properly prepared for it. Then it will be possible to get a high-quality harvest. To simplify your task, you can use a walk-behind tractor for these purposes. This unit allows you to do everything quickly, simply and efficiently.
How to get a good potato harvest, how to plant it correctly
Types of hillers for potatoes
Types of potato hillers for tractors
Cultivator Mantis - a means of cultivating land in the country
Which walk-behind tractor is better to use?
The walk-behind tractor is a small-sized mechanized device that makes it much easier to work both in small garden plots and in large farm areas. The scope of its application is determined by special components that are intended for cultivating the soil, planting and hilling potatoes and other vegetables. In addition, it can be used to transport various cargoes. It is especially necessary when cultivating large areas.
There are many models of walk-behind tractors. You can choose the appropriate option based on the following factors:
- size of the treated area;
- soil properties;
- power of the model and its weight;
- for what types of work the walk-behind tractor will be used;
- model fuel type;
- availability of components for the walk-behind tractor and its price.
The power of the selected walk-behind tractor directly depends on the areas being processed: the larger they are, the more powerful the unit’s engine is needed. Based on power, products can be divided into the following categories.
- Ultra-light – designed for processing areas up to 20 acres. Their power is 3 liters. With. and they weigh up to 20 kg.
- Lightweight - weigh about 40 kg and have a power of 3 to 5 liters. With.
- Medium - weight 40-60 kg with a power of 5 liters. With. These models have two directions of movement - forward and backward, which provides them with greater maneuverability.
- Heavy - weight more than 60 kg with power up to 16 hp. With. These models can withstand heavy loads and are designed to handle large, high-volume agricultural areas.
To cultivate a standard (6 acres) summer cottage, you can get by with a light-duty walk-behind tractor with a power of 3 liters. With.
Based on the type of fuel used, models are distinguished:
- running on gasoline;
- running on diesel.
Diesel walk-behind tractors are more economical than gasoline ones, but they are inferior in power.
The scope of work performed can be expanded with the help of special attachments, which are purchased separately.
- seeders;
- potato planters and potato planter-plough;
- sprayer;
- lugs;
- harrows (disc, finger), plows (regular, reversible);
- cultivation cutters;
- hillers, flat cutters.
In addition, you can complement the walk-behind tractor with a trailer for transporting cargo, and the adapter will turn the unit into a miniature tractor. It can also be used to clear snow using special rotary brushes. The most popular models are MTZ Belarus 09N, Patriot Ural, Salyut 5L-6.5. For small areas, the models “Neva”, “Champion”, “Sadko”, “Forza” are most often used.
Taking into account all these factors will help you choose exactly the model that can be used better and more efficiently in the future.
Planting potatoes with a walk-behind tractor
The use of a walk-behind tractor and attachments (grouser wheels, hillers, plow, planter) greatly facilitates gardening work on an area of over 20 acres.
It is difficult for gardeners whose plot area exceeds 20 acres to manually cultivate the land when growing potatoes. Especially if the soil is clay or chernozem, which is considered heavy soil. Significant relief can be achieved by purchasing a walk-behind tractor from the brands Salyut, Centaur, Oka, Neva or any other. Relatively inexpensive mechanisms are best suited for field work in the Russian Federation.
About walk-behind tractors and cultivators
First of all, it is necessary to clarify that a walk-behind tractor and a walk-behind cultivator are devices that differ in their set of functions, although many see absolutely no difference between them. Thanks to its high power and the ability to attach various devices to the walk-behind tractor, it is intended for almost any work on a summer cottage: from snow removal to watering beds, but the functional qualities of the cultivator are limited - it is often intended only for cultivating the soil. Most domestic and foreign manufacturers produce both walk-behind tractors and walk-behind cultivators at their factories, adding the corresponding letters MB or MK to the model names.
Read also: Do-it-yourself plasma cutting from an inverter
For Russian gardeners and gardeners, domestic or Belarusian-made devices are more suitable, since they are most adapted to climatic, economic and other conditions. It is not difficult to find spare parts for such walk-behind tractors and cultivators in the event of a breakdown and additional mechanisms to expand the functionality of the units; they tolerate sudden temperature changes and have lower prices. The most common among summer residents cultivating potatoes are the following companies of walk-behind tractors and walk-behind cultivators:
How to plant potatoes with a walk-behind tractor
In addition to the walk-behind tractor, additional attachments will be required depending on the planting method: hiller, plow or potato planter itself.
Potatoes in rural areas are used not only to feed the family until the next harvest. People grow it for sale and also to feed their domestic animals. The vegetable requirement is quite high. Large areas are planted, which require quick and timely care: weeding, hilling, harvesting.
Working procedure
How to plow potatoes with a walk-behind tractor? To get a decent potato harvest, you need to follow the rules of soil cultivation, plant care, including inter-row cultivation, and timely harvesting.
Preparing soil for potatoes
The first step to winning the fight for the root crop harvest is preparing the soil for planting potatoes with a walk-behind tractor. To start spring work in the garden, you need to determine the area for potatoes .
For this purpose, you need to find a dry place with sandy loam . Loosening the soil is recommended in dry weather. The soil layer should not be turned over during spring loosening.
Soil composition is determined simply:
- take a small amount of earth and soak it in water;
- a ball rolls out of this soil; a ball cannot be made from sandy soil;
- a strip is pulled out of the ball; if that doesn’t work, the soil is sandy loam;
- the result is a strip - the soil is loamy or clayey.
Determining the composition of the soil can be done by hand
Planting depth
The sandy, sandy loam type is most suitable for potatoes . The owner decides for himself at what depth he will plant potatoes with a walk-behind tractor.
Light sandy and sandy loam soils are sufficiently permeated by air, so the ridges can be planted in furrows rather than cut. The depth of cultivation depends on the properties of the soil and the optimal value is 12 cm .
How to check readiness
Preparing the walk-behind tractor for work is as follows:
- check the level of fuel and oil in the system; if necessary, add to the required level;
- make sure that the wheel drive levers are unlocked;
- open the fuel supply valve;
- move the ignition switch to the “On” position;
- Pull out the starter rope and pull it firmly until the engine starts.
Before starting the walk-behind tractor, it is necessary to check the oil and fuel levels
Progress
The planting process involves the entire complex of actions from preparing equipment and seeds to the end of planting time. Technological techniques develop differently depending even on weather conditions.
Under any circumstances, farmers practice pre-sowing selection, vernalization and germination of tubers . 35-50 g are selected for planting . The sprouts are planted in the soil when they become thick and green.
Treatment after germination
Grooving
The seeding material has been prepared, the equipment for cultivating the land has been brought into readiness, the timely question arises of how to cut furrows for potatoes with a walk-behind tractor. Mid-season and late potato varieties are planted in rows at a distance of up to 35 cm, and row spacing is kept at 60 cm. The cutting distance between rows of early varieties is kept within 50 cm.
Cutting beds
People use technology according to their specific conditions. Using a walk-behind tractor, furrows or beds are cut. There is an answer to the question of how to cut beds for potatoes with a walk-behind tractor.
The first bed should be made exactly along the ruler . In the next row, the wheel is lowered along the track of the previous row . Everything turns out smoothly if you put extensions on rubber wheels, attach a two-row hiller, and align the knives correctly in the center.
The role of the plow
What is a plow for planting potatoes for a walk-behind tractor - it's speed. They cut furrows, lay potatoes, go back, and the walk-behind tractor closes the furrow. The next furrow is laid at a distance of about 70 cm .
Read also: Design and principle of operation of a field-effect transistor
Homemade plow
Experienced farmers can easily make a homemade plow for planting potatoes using a walk-behind tractor. They understand the price preference for DIY products.
In addition, intelligently calculated parameters make work easier ; the plow does not break out of the furrow. The plow is controlled during operation and has its advantages.
Motor cultivator
Planting potatoes with a motor cultivator is also carried out. It is equipped with a gearbox and cultivation cutters, unlike a walk-behind tractor, which has wheels.
In terms of cost, this unit is cheaper . Cultivation of potatoes involves the use of a plow.
Planting with a disc hiller
Planting potatoes begins with plowing the area and treating the seed material from pests. Wheels with lugs are used to prevent slipping during fairly heavy work by the mechanism. The furrows are cut using an ordinary hiller, adjusting the minimum distance between its wings.
Recommended furrow parameters:
- row spacing when planting is 55-70 cm - depending on the track size of the walk-behind tractor;
- the potatoes are located in the furrow at a distance of 25-35 cm - depends on the type of soil, potato variety, and fertilizers applied;
- planting depth 12-15 cm.
Planting potatoes with a hiller is the most profitable way, because... Apart from the hiller itself, no special attachments are required.
At the second stage, instead of special wheels, ordinary ones with rubber tires are installed, and the wings of the hiller are moved apart to the maximum distance. The mechanism is installed between the furrows with the potatoes laid out exactly in the middle, observing the size of the track. Two rows are filled simultaneously on one side and the other. Soft tires, passing along the row, do not cause significant harm to the planting material.
Trailed equipment
Trailed attachments have been developed for the walk-behind tractor: hillers, plows, potato planter. Gardeners prefer to have a device with a hiller on their farm, which can be adjusted to suit their working width.
In this case, the size of the plot and the variety of potatoes are taken into account .
Planting under the plow
Passage in the opposite direction is accompanied by covering the furrows with soil. This method is used often, and there is no need to pre-mark the area for sowing .
Working with a disc hiller
Planting is also carried out with a disk hiller. This device is an attachment for a walk-behind tractor in the form of a special frame on which metal disks are suspended at an angle to the surface of the earth.
The hiller not only cuts ridges for planting, but also loosens the soil .
Disc hiller
Potato planter
Planting with a potato planter differs from the previously mentioned methods in that it does not require marking or manually laying out the tubers. This process is completely mechanized.
The use of potato planters is advisable on large areas . But the specific design of the equipment requires additional careful selection of seed material by size.
Potato planter
Using a two-row hiller
Other devices are also used, for example, a two-row hiller. It would seem that the work should be halved in time. But there are features of planting potatoes using a walk-behind tractor with a two-row hiller.
With this technology, two ridges are processed simultaneously . It is difficult to control both ridges at once, so people try to simplify the planting process.
Planting with a potato planter
A potato planter is a mounted mechanism for a walk-behind tractor, consisting of a disc hiller, a hopper for planting material, a furrow maker and a conveyor that feeds tubers into the furrow - an integral complex that carries out planting potatoes. The person plays the role of process controller.
The planting speed is approximately 12 acres per hour, so on a small garden plot the use of an expensive mechanism is unprofitable.
It is recommended to adjust the trailed potato planter to the walk-behind tractor exactly according to the manufacturer’s instructions, setting the required parameters for the potato planting depth, the distance between the rows and tubers in the row and the angle between the hiller discs.
Planting potatoes under the plow
It is recommended to first loosen the soil with a milling cutter. The wheels of the walk-behind tractor must be replaced with lugs.
Planting work is carried out in two stages:
- First, a furrow is laid into which the potatoes are placed.
- On the way back, the vegetables are covered with a moldboard when cutting the next furrow. In this case, one wheel of the unit follows the laid row, as a result of which the same distance between the rows is maintained.
Article on the topic: Potassium for potatoes: norms and features of fertilization
For this method, you can use a homemade plow for a walk-behind tractor.
At the beginning of the journey, the depth of embedding the plow into the ground is adjusted (usually the size of the shovel bayonet is used). The distance between the furrows is adjusted according to the track width between the wheels of the walk-behind tractor. The work is performed at first speed.
Landing on the ridge
How to plant potatoes in a very wet area:
- high ridges of earth (height 20-30 cm) are cut using a disk hiller;
- Potato tubers are placed on the top of the ridge and covered with loose soil taken from the rows;
- Furrow depth and ridge height change as the angle of attack of the discs decreases or increases.
Planting potatoes is a rather labor-intensive process that requires a certain amount of physical strength and time. The best way out is to use walk-behind tractors with attachments, which significantly speed up the work. Different brands of mechanisms do not make fundamental differences when seedling potatoes.
Homemade potato planter for walk-behind tractor
Homemade devices for a walk-behind tractor can cope with the tasks assigned no worse than purchased ones. To make your own attachments, you need to know how to make them and from what. A do-it-yourself potato planter on a walk-behind tractor is made from the following materials:
- sheet metal 2-2.5 mm thick or plywood (for a bunker);
- metal pipes with a cross section of 25-40 mm;
- wires with a diameter of 5-6 mm;
- chains (the one that is installed on engines is suitable);
- bearings;
- profile steel pipe with a wall thickness of 2 mm (for frame parts);
- wheels
Tools needed:
- welding machine and electrodes;
- grinder with a metal disc;
- drill and drill bits;
- pliers, hammer, screwdrivers.
Drawings of a potato planter for a walk-behind tractor
The first stage of making a potato planter yourself is design. The selected equipment parameters must be reflected in the drawing. First of all, choose the type of device, which will determine the features of the future device. There are 2 types of potato planters suitable for self-production:
- With spoon feeding of tubers. This design includes a belt with attachments for storing potatoes—spoons—attached to it.
- With a flat belt feed, in which the tubers are laid using horizontal belts.
Optimal dimensions of a single-row potato planter for a walk-behind tractor:
- height from the lower end of the ripper to the upper plane of the hopper - 59-60 cm;
- wheel section - 150-200 mm;
- bunker height - 27-30 cm;
- Hopper width - 22-28 cm.
The basis of the design is a frame made of a profile pipe, to which all elements of attachments are attached. For manufacturing, you can use channel No. 8. The frame should consist of two longitudinal spars connected by three transverse crossbars. If necessary, the frame is reinforced with metal profiles.
Bunker assembly
A suitable cone-shaped container can be used as a hopper. If this is not possible, make the bunker yourself. To do this, in accordance with the drawing, all the necessary parts are cut out of plywood or sheet steel. They are connected using metal corners. Regardless of the material of manufacture, the container is painted with moisture-resistant paint in 1-2 layers. To ensure that the sprouted tubers in the bunker are not damaged, the internal cavity is covered with thin rubber. The finished structure is attached to the frame using bolts.
Wheels
The wheels of a homemade potato planter can be made with permanent lugs. In this case, you will need: a car disk, strips of metal and spokes. The lugs are metal plates welded to the base at a slight angle. The plates are cut from sheet steel.
Instead of homemade wheels, ready-made ones that are suitable in size are installed on the potato planter. They can be taken from garden carts or other equipment. Hubs are welded to the wheels, onto which 2 bearings are mounted. The wheels are attached to the frame.
Rippers and their holders
To make the holders, you will need a profile pipe, from which a square rod measuring 50x50 cm is welded. The rods are welded to the left and right sides of the frame. Rippers are cultivator paws assembled with holder stands. They are made of sheet steel and fixed using bolted connections.
Video selection
Planting potatoes using a walk-behind tractor greatly simplifies the work and greatly reduces the cost of physical labor. Additional devices - a potato planter, a mechanism for hilling - are very useful and are needed if potatoes are planted over a large area. But is the potato planter putting in tubers too often? Yes, and the depth of the furrow needs to be adjusted. How will the potatoes grow? Yes, and hilling is not of the same quality as manual hilling. There's nothing you can do - the areas are large, you can't do without the unit shown! The disc hiller is generally good. When a new furrow is created, the previous one is filled in. I think the walk-behind tractor shown is popular in rural areas.
The walk-behind tractor greatly facilitates work on personal plots; we plant potatoes in our garden under the plow, and it turns out very quickly and well.
We constantly planted potatoes by hand under a shovel, but how much easier it is to work with machinery. Now we plant it in the ridge using a disk hiller. The ridges warm up faster, seedlings appear earlier, and hilling is easier in the future. The walk-behind tractor does not stand idle at the dacha.
If you have ever planted potatoes, you know how difficult and tedious it is. And planting with a walk-behind tractor, using a mounted potato planter, turns into, one cannot say, a pleasure, but at least it is no longer hard labor. Easy and fast.
Field plowing equipment
For these purposes, motorized devices are used in the form of a walk-behind tractor, a motorized cultivator or a mini-tractor. People invented a walk-behind tractor - the most suitable, low-cost equipment for planting potatoes.
The advantage of a motor cultivator is that with the help of a cultivation cutter the soil is prepared, beds are cut for sowing and inter-row cultivation is carried out up to the harvesting of root crops.
Mini-tractors are used in small farms for plowing, transporting goods, and cleaning areas. All small-sized equipment solves the same questions: how to help agricultural workers.
Technology for proper planting of potatoes using a walk-behind tractor
Planting potatoes is a difficult task. It takes a lot of effort and time. To make the work of gardeners easier, Russian companies have developed wonderful equipment - a walk-behind tractor. The most famous and popular brands are “Salut” and “Neva”.
They are easy to operate, last a long time and rarely break down. But there are some rules that must be followed when planting potatoes. This article will tell you about the correct fit and nuances in using a walk-behind tractor.
How to plant potatoes with a walk-behind tractor: features and planting methods
Sowing potatoes by hand is labor-intensive work. Planting potatoes with a walk-behind tractor will be an excellent solution to make the process easier. To do this, you need to properly prepare the ground and study the technique. You can plant the plant using a hiller, a plow and a potato planter. An important aspect is the quality choice of the unit. By following all the recommendations, a tedious routine will turn into easy work.
Methods of planting potatoes
There are two planting methods. They differ in the tools they use:
- Hiller with regulator
- Mounted potato planter.
Both options are equally popular among summer residents. It’s just that the first option is used for a small area, and the second for a large area. But the first option is also cheaper. Good for those who like to save money. So, let's look at each of them.
Walk-behind tractor with hiller
Its design consists of the following elements:
- Conveyor is a conveyor that supplies seed.
- Furrower - lays furrows.
- Distributor - with its help, tubers are planted in a strictly specified period of time.
- Hiller - loosens the soil and covers the crop with soil.
This tool works on the following principle. Before you start working, metal wheels and a special hopper are installed on the tool. Wheels create furrows. They should be even, then the growing process will be simplified.
Potatoes are placed in the hopper, which will fall into the holes when moving. After this, the wheels are replaced from lug wheels to rubber ones and adjusted to the track width. This will prevent damage to the root crop.
Next, the hiller covers the potatoes with soil, compacting it at the same time. Apart from manually adding tubers to the hopper, the entire planting process occurs automatically.
Mounted potato planter
Before using the potato planter, you will have to carry out the preparatory stage for planting. First you need to plow the land. Then carry out harrowing so that the crop receives the required amount of water and oxygen. After this, you need to moisten the soil (if possible).
This type of walk-behind tractor has the following design:
- furrowers;
- special bunker;
- disk device for filling potatoes with soil.
The structure of the walk-behind hiller allows you to plant potatoes in one go, since the tool simultaneously makes furrows, pours out the tubers and covers them with soil. Before use, you need to attach special wheels to grab the soil and an additional attachment - a potato planter.
What types of hillers are there?
There are several types of equipment for hilling potatoes. They differ in design and operating principles. To decide which hiller is best for a walk-behind tractor, let’s look at the most common designs.
Single row
The single-row device does not provide the possibility of adjustment. It has the form of two plates arranged in a wedge, forming a kind of stiffening rib. This device cuts one furrow in one pass. The advantage can be considered the simplicity of the design, thanks to which you can assemble the hiller with your own hands without difficulty and extra costs. This equipment option is most popular, especially in areas with light soil types.
Double row
A two-row hiller is an adjustable device that cuts two furrows on either side of a moving unit. The arrangement of adjustable components allows the equipment to be adjusted to the desired furrow width and depth level. Thanks to this, planting potatoes with a walk-behind tractor with a two-row hiller is greatly simplified.
Disk
The disc hiller on a walk-behind tractor has in its design a T-shaped leash, screw regulators and two disks directed at an angle to each other and having equal inclination angles. The discs are installed on the frame and, during operation of the unit, capture the soil, adding it to the plants. The design of the device allows you to adjust the width of the furrow and the angle of inclination, so that the ridges are obtained at a given width and height. This design, judging by the reviews of users who have experience working with a disk hiller, shows particularly high efficiency.
Propeller
A propeller-driven, or active, rotary-type hiller works on a completely different principle. Its design provides for the installation of rotors with parallel teeth instead of wheels or cutters. The use is especially effective as a hitch on a unit with two forward speeds. The propellers located on the crossbar of the device are very convenient for planting, loosening, weeding and hilling root crops. In addition, it can be used to harvest crops and cultivate soil.
Listerny
This is the simplest design that does not require adjustment of the hiller on the walk-behind tractor. Its furrow width is fixed. The device consists of two wings connected at an angle and slightly spread apart. Typically, ready-made devices of this type have a working width of 25-30 cm, which is why they are not very popular among users. More often, land owners who choose this design do it themselves, but taking into account the peculiarities of potato growing technology, which requires a distance of 50-60 cm between rows.
The working part of the device is mounted on thin stands, which reduces the load on the unit when immersed in the ground. In addition, the device is often assembled from wedges that have a concave rather than a straight shape - this prevents excessive turning out and drying out of the earth.
How to plant potatoes with a walk-behind tractor
Pre-landing preparation
Before planting, it is necessary to cultivate the land: plow it and harrow it. Thanks to this, the soil will be saturated with oxygen and it will dry out a little. This is done using a plow or a special cutter.
The beds are crushed (harrowed) in two ways: using a hand rake or a walk-behind tractor. The choice of tool depends on the area of the site and your own desire. But using the second option is preferable. After all, some tools loosen the soil very well when planting. In this case, the loosening depth reaches 20 centimeters.
After this, the rows are marked. In order for potatoes to grow better, you need to create free row spacing. The average distance between them should be 60-70 cm. The distance of the rows depends on the type of potato. After cultivating the soil, you can begin planting potatoes under the walk-behind tractor.
Article on the topic: Is it possible to give potatoes to rabbits - dietary features
Landing technique
Regardless of how the work is carried out, one rule should be followed. The planting depth should not be less than 10-15 centimeters, and the distance between tubers (seeds) should be 20-30 cm. For ease of orientation, you can pull a rope. Potatoes will germinate better if the soil is fertilized after loosening.
Working with a hiller. First it is attached to the walk-behind tractor. Using the Neva apparatus, you will have to move the blades to increase the wingspan. This is necessary for proper placement of potatoes in the holes. When working with Salyut, you do not have to go through this procedure. The lug wheels are attached to the unit.
The track width of the walk-behind tractor for planting potatoes is 60 centimeters. The tops should be planted at the same distance. After sowing, it is necessary to remove the metal wheels and install rubber ones. In this case, the width should remain the same. The wings are at maximum distance. Now you can cover the crop with soil.
There is another option for using a walk-behind tractor - using it under a plow. Metal wheels and a plow are simultaneously installed on the apparatus. When planting in this way, it is worth throwing potatoes at the stage of creating a furrow. This must be done immediately, since when the tool creates a new furrow, it covers the seeds in the already created one with soil.
Below you can watch a video on how to plant a plow walk-behind tractor.
How to dig and harvest potatoes using a walk-behind tractor
Potatoes are considered one of the most common vegetables that gardeners grow in their summer cottages. Growing a great potato crop is only half the battle.
After cultivation, it is also necessary to properly harvest the ripened root crops. Digging by hand is difficult and that is why many people prefer to dig potatoes with a walk-behind tractor.
This method is much simpler than using a bayonet shovel, since you just have to operate the cultivator to harvest the crop.
Before you start harvesting in this way, you should familiarize yourself with the features of using a walk-behind tractor.
Advantages of digging potatoes with a walk-behind tractor
Some vegetable growers refuse to dig up potatoes with a walk-behind tractor because they are afraid of ruining the potato harvest. Such fears are not in vain, since if the cultivator is used incorrectly, tubers can actually be damaged. Incorrect adjustment of the mini tractor often results in spoiled tubers cut into pieces.
However, despite this, the use of a walk-behind tractor has advantages that make the collection of root crops much easier. Common benefits include:
- Simplicity of design. The equipment has a simple design, the features of which are easy to understand. The main element of the cultivator is a potato digger, consisting of an upper fan and a metal plow.
- Easy setup that an inexperienced person can handle without any problems. Even gardeners who have never been interested in technology can handle setting up a potato harvesting machine. In order not to damage the root crops during harvesting, it is enough to adjust the depth of the plow, which is responsible for digging up the tubers.
- Reducing physical activity. The walk-behind tractor digs the potatoes itself, thanks to which physical activity is significantly reduced.
- Quick harvesting of ripe crops. Harvesting tubers using a cultivator takes less time than harvesting manually.
How to properly configure equipment?
Before you start harvesting the cultivator, it is pre-configured. When setting up equipment for collecting potato root crops, special attention is paid to adjusting the plow, which is responsible for digging up potatoes.
First, the distance the plow goes deep into the soil when digging is adjusted. It is enough to set the depth equal to the size of one shovel bayonet. If you set a smaller distance, then when digging potatoes out of the ground with a motorized cultivator, the root crops will be damaged.
The depth regulation is controlled by bolts located between the lock and the plow stand. After loosening the bolts, you can move the plow down or up yourself.
After adjusting the depth, the angle of inclination of the field board relative to the ground surface is adjusted. To adjust the angle, you will have to use a screw handle. When adjusting, the handle is twisted until the board rests completely on the ground. Then the handle is twisted in the opposite direction so that its back part rises 2–5 cm above the ground.
Beginners who have not previously harvested potatoes with a walk-behind tractor often have problems when using such a cultivator. Therefore, it is recommended to familiarize yourself in advance with the features of using such equipment in practice.
First you need to clear the area with the grown potatoes from debris, leaves and weeds. When clearing an area of weeds, you can also use a cultivator.
To do this, a special hiller and two rippers are placed on the equipment, after which you can loosen the soil between the rows.
It is necessary to loosen the soil with a walk-behind tractor between the rows carefully so as not to accidentally damage the potatoes.
Once the rows are prepared, you can begin harvesting. When digging up potatoes with a cultivator, the harvest is collected through a row. Therefore, after collecting tubers in the first row, they immediately begin digging up the third. This is done to:
- do not accidentally damage the dug-up crop with wheels, which often ends up between the rows after digging;
- The walk-behind tractor was easier to control and did not drift to the side.
Related article: Fitoverm for potatoes: processing instructions and dosage
If you follow this easy scheme, you can harvest potatoes from five acres in 35–40 minutes.
Types of potato diggers
To dig potatoes with a walk-behind tractor, various types of potato diggers are used. When harvesting, simple homemade models and factory cultivators are used, which independently dig, collect and transport the harvested crop.
Factory models are often used to dig up potato roots, as they are of higher quality. Simple models are produced that look like a regular shovel with sharp teeth and without a handle.
When digging potato tubers with a walk-behind tractor, the teeth go deeper into the soil and lift the root crops. Then all the potatoes in the soil fall onto the surface of the teeth and are carried out.
Models with teeth require precise adjustment to avoid accidentally damaging the potatoes when digging.
There are also more complex models, tests of which have shown that they are more effective in comparison with simple models equipped with teeth. Such potato diggers are equipped with special belts for transporting already dug potatoes to their further storage location.
Homemade
Sometimes people simply don’t have the money for a super potato digger for harvesting potatoes, and so some try to make such a product themselves. Such work may seem difficult for many people, but in fact the manufacturing process is not that difficult.
People who have previously worked with welding machines and metal products can easily make a homemade digger using drawings from the Internet.
To create a structure for harvesting potatoes yourself, you will need the following tools and materials:
- hammer;
- welding;
- hammer drill for working with metal sheets;
- Consumables;
- metal scissors;
- spanners.
Recommendations for selection
To efficiently dig up potatoes with a walk-behind tractor, you should choose a high-quality digger.
When choosing, the type of walk-behind tractor for which the digger is selected is taken into account. For example, potato diggers of the Agro or Zubr models are better suited for light walk-behind tractors than others.
All other varieties will not be combined with such cultivators.
For more powerful walk-behind tractors, the following models are chosen:
- KVM-3. The device goes deep to a depth of 25 cm, which allows you to remove potato tubers from the soil. The model allows you to install additional knives on it for collecting fruits in hard ground.
- KVM-1. Used for use together with cultivators. Like the KVM-3 model, it is equipped with additional slots for knives.
Conclusion
Digging up potato roots is a labor-intensive task that all gardeners face. To somehow simplify this process, it is recommended to use special walk-behind tractors for harvesting.
Scheme of planting potatoes with a motor cultivator
Before planting potatoes, the soil must be loosened and, at the same time, furrows must be created. Potatoes should be planted at a time when the soil temperature reaches 8-9 degrees. At a depth of 10 centimeters. The furrows should be made as even as possible, and the distance between them should be about 60 centimeters. This is done so that when loosening the soil it does not touch the planted tubers.
Having finished cultivating the land, the potatoes are manually placed in the holes. The distance between tubers should be 30-50 centimeters. After this, the field is again processed with a motorized cultivator to cover the potatoes with soil.
At the same time, it saves a lot of effort and energy. All work and planting with the cultivator is carried out automatically. You will only have to work with your hands when harvesting.
If the site is located near groundwater, then the future harvest should be protected from excess water. In this case, potatoes can be planted directly into the ridges. The ridges are formed with a walk-behind tractor 20 centimeters high. But this method of growing potatoes will only help where the soil is well moistened.
About other methods
In addition to the above methods, there are others:
- Planting in ridges is common in areas with close groundwater. It is not suitable for dry soils. With this method, each ridge is formed with a height of 15-20 centimeters, then seed material is placed in them;
- Planting under the plow is carried out after installing the lug wheels and plow on the walk-behind tractor. To ensure efficient operation, this method must involve two people. The first, plunging the plow to the depth of the spade bayonet, cuts a furrow, and the second throws potato tubers into it. When moving in the opposite direction, a new furrow is cut and the previous one is covered with soil.
Harvesting potatoes with a walk-behind tractor
Hilling
A month after planting, the first shoots appear. Now you need to hill up the potatoes using a walk-behind tractor. This process should begin when the height of the shoots reaches 15-20 centimeters.
Hilling itself is a replacement for loosening the soil and weeding it. At the same time, this procedure protects the crop in the spring from return frosts. It happens that before the emergence of seedlings, the temperature may drop slightly below zero. A layer of soil covers the fruits, warming them and allowing them to survive bad weather.
Usually they spud up 2 times: the first time as soon as the sprouts appear, the second time after three weeks. But you need to know what if:
- The nest begins to grow wider, across the ridge;
- Tubers peek out from under the ground and turn green in the sun
You will have to hill up a third time. There are times when you have to hill up potatoes 4 times a season. But then you get a good harvest.
Any hiller is suitable for this procedure - with one, two or three rows. If necessary, an additional attachment is installed on the walk-behind tractor and the soil is fertilized with its help.
You can see how a two-row hiller works in this video.
Hilling secrets
Many gardeners earth up potatoes in the hot summer. But it's not right. This can damage the shoots or the root crop itself. Because of this, the plant may wilt. In addition, the procedure negatively affects health.
Therefore, it is recommended to do this in the morning or evening. And not in dry weather, but after rain, when the soil dries out a little, but remains quite moist. This makes it easier to get rid of weeds and weed the beds.
And it is much easier to hill up wet soil, since wet soil does not crumble. Moist soil added to the base of the stem stimulates the development of new shoots. And this leads to an increase in yield.
Harvest
To harvest the crop, a potato digger is hung on the walk-behind tractor. There are several design options for this device:
- A universal (simple) potato digger resembles an ordinary shovel with teeth. She brings the tubers to the surface, and workers collect them by hand. But if the potatoes are planted on clay soil or simply too deep, the teeth of the device will damage them;
- a rattling (vibrating-rattling) potato digger digs up the tubers (they fall on the grate) and, due to vibration, shakes them off the ground;
- conveyor potato digger - tubers freed from the ground fall onto a conveyor belt, and from it into a bunker.
Harvesting
A walk-behind tractor is convenient not only for planting potatoes, but also for harvesting them. This is done in early autumn (September-October) in dry weather. To do this, an additional attachment is installed on the unit - a plower. Sometimes it is called a “potato digger.”
You can see how the harvest is harvested using a plower in this video
But you don't have to use it. It is enough to use a single-row hiller. He will lift the ground, and the potatoes will lie on the edge of the bed. All that remains is to go around the area and collect the ripe crop.
To avoid potato germination, after harvesting it should be placed in a dark, cool place. There it should lie for 2-3 weeks. Afterwards, the potatoes need to be sorted by size. And only after that send it to the cellar.
Hilling up potatoes
You can use a walk-behind tractor to hill up potatoes. This procedure is carried out when the potato tops have already grown a little. As a tool for it you will need a single-row, double-row or three-row hiller.
Single-row hiller
Rubber wheels are installed on the walk-behind tractor. The width between them must be set precisely, depending on the distance between the rows of potatoes. Then the hiller will not touch the plants. The movement takes place between potato beds.
Double row hiller
In this case, you need to install lug wheels on the walk-behind tractor and set the required width. Both wheels are located between the rows of potatoes if everything is set correctly.
It is not worth writing in detail about the three-row hiller, since it is widespread mainly among farm owners.
Note! It is recommended to hill up potato bushes after rain, when the top layer of soil has dried up, but inside it is still slightly wet.