- 27164
- onion planting shallots
Family onions or shallots are not as popular as onions, as they have smaller bulbs (up to 20-50 g).
But gardeners who grow shallots note the following advantages:
- Excellent taste, considered a gourmet onion;
- Early ripening: after planting, the bulbs appear in 50-80 days. Greens can be used 3-4 weeks after planting;
- Good shelf life (stored up to two years under normal conditions);
- High yield.
- Contains more useful substances than regular onions;
note
From one bulb, up to 10-15 new bulbs of different sizes are formed, which is why it is called family.
- Practically does not form arrows;
- Shallots are resistant to cold weather; the bulbs remain viable even when frozen.
I will tell you in this article how to plant heirloom onions correctly, which ones to plant and how to care for them in the spring.
The most popular are the zoned onion varieties: Off-season, Grasshopper, Siberian yellow, Sprint, Cascade, Kuban yellow, Izumrud.
variety Emerald variety Siberian yellow variety Cascade
For planting in autumn, the most suitable variety is the Off-season variety.
Shallot variety Off-season
Distinctive characteristics of the family bow
The family variety of onion is considered a widespread crop, which was first selected in the Northern regions of Russia. Breeders tried to grow an onion plant that could survive in harsh climatic conditions. Over the course of many decades, scientists have improved varieties, achieving higher yields, early ripening and long-term storage capabilities.
Characteristic features of the family bow:
- the average ripening period from planting seed to harvesting is 60-70 days;
- storage period – 11-12 months;
- increased resistance to cold;
- preservation of taste and nutrients throughout the entire shelf life;
- possibility of planting before winter and spring;
- husk color – golden, brown, purple, bronze, depending on the specific variety;
- the shade of the core is often white or pink, less often purple;
- high productivity;
- lack of shooting ability;
- disease resistance;
- unpretentiousness;
- Possibility of growing per head and feather.
Heirloom onions are used for canning, marinades, preparing first and second courses, cold appetizers, and salads.
Winter onion varieties for planting
Not all varieties of onions are suitable for planting before winter, although local released varieties, as well as those grown from seeds (nigella), as a rule, are perfectly adapted to winter sowing. However, it is still worth paying attention to the following proven varieties of winter onions:
- Stuttgarter Riesen (spicy in taste, keeps well, a bit small);
- Shakespeare (not as spicy, stores a little worse, but the onions are larger);
- Senshui (spicy, large, for long-term storage);
- Arzamas (spicy, fits well, a bit small);
- Bessonovsky (local);
- Danilovsky (sharp, well-kept, smallish);
- Radar or Raider (sharp, well kept);
- Red Baron (spicy, for long-term storage);
- Strigunovsky (spicy and stores well, but a little small);
- Sturon (spicy, keeps well);
- Ellan (sweet in taste, keeps well).
Note!
Southern (heat-loving) varieties are definitely not suitable for autumn sowing in northern regions and vice versa.
What onions can be planted before winter
In the fall, you can plant virtually any variety of onion (nigella, turnip sets, spring onions, shallots, although they are planted only in the spring), however, each of them has its own slight differences in cultivation techniques.
Black onion
(it's called that because it has coal-black seeds) sowing is very easy. The timing is not important; it is even better to sow it in frozen soil, for example, already in November or December (but, of course, it is better to make the furrows in advance, when the ground is easy to dig). Direct sowing on frozen ground followed by sprinkling of soil is also practiced (but it will have to be stored in the house, because it must be free-flowing). Mulch on top.
Video: pre-winter sowing of nigella onions and spring results
Varieties of heirloom onions
There are many varieties of heirloom onions that have their own characteristics:
- Rizhik belongs to the mid-late varieties. The heads have an oblong shape, snow-white flesh, and bright golden scales. The taste is spicy, the number of bulbs in one head is maximum 10. The weight of each is 50-70 g.
- Monastyrsky is an early onion, the Kostroma province is considered its homeland. The shape is rounded-elongated, the mass of the bulbs is up to 65-70 g, the color of the husk is pinkish, the pulp is white-pink. Number of bulbs – 8 pieces, taste – mild spicy.
- Old Believer - spicy in taste, selected in the Vologda region. The shape of the head is round-oblong, the color is copper-yellow, the number of bulbs is 10 units, 70-80 g each.
- Knyazhich is a large variety with bulbs of 80 g, of which up to 10 pieces are formed in the head. The hue of the husk is brownish-pink, the pulp is characterized by juiciness and pleasant taste.
- Veliky Ustyug has a brown-red color, the number of bulbs reaches 10 units weighing 50-80 g. The taste is quite sharp.
- Prometheus has a mild taste and increased juiciness. The pulp is snow-white, the husk is red-brown, the shape is round. The head contains 8 bulbs weighing 70-75 g.
- Albik is an early-ripening variety with round-flat bulbs and yellow scales. This is a small onion that contains several elements weighing 30-50 g. Its peculiarity is that it is mostly grown for greens.
- Grant is the most gigantic bow with 12 heads. The weight of the bulb reaches 200 g, the taste is sharp, the pulp is juicy.
- Pesandor - has a mild taste and an ultra-high content of heads in the nest - 15-20 pieces. The pulp has a purple tint.
There are other varieties that are intended for the Northern latitudes - Siberian Yellow, Grasshopper, Krepysh, Sprint and for the Southern regions - Rostov, Russian Violet, Kuban Yellow.
How to plant onions before winter
If you prefer planting onions before winter, you should not neglect the selection of a place for planting, as well as the preparation and processing of the bulbs themselves.
Selecting a location and preparing the bed
It is optimal to choose the sunniest place on the site
moisture should not stagnate
there , because everyone does not tolerate this.
The bed itself for planting onions before winter should be prepared in advance. The soil should be sufficiently loose and fertile
, and in terms of
acidity - neutral
.
To improve it, add humus or compost, superphosphate (15-20 grams per 1 square meter) and wood ash
(or you can sprinkle holes or furrows with it before planting - this is both a fertilizer and an excellent means for preventing various rots) .
Winter onions can be planted in the most ordinary beds, and in high ones (usually they grow even larger, but not much), and even in a greenhouse. In the latter case, it will rise much earlier. If you don’t have a greenhouse, then when the snow melts, you can speed up ripening by making a mini-greenhouse - installing arcs or simply covering the bed with plastic film or spunbond.
Then plant
It is very good to plant winter onions in a bed where tomatoes, cucumbers, and potatoes used to grow. You should not plant if celery, radish and carrots grew in this place, that is, root vegetables.
Preparing and processing bulbs before planting
First you need to calibrate the planting material. Select and discard all diseased (rotten), too dry and damaged bulbs. Then first arrange the remaining bulbs into piles (and then plant them separately):
- wild oatmeal (up to 1 centimeter in diameter) - on the head (turnip);
- sevok (diameter from 1 to 2 centimeters) - on the head and partly on the feather (greens);
- large (more than 2-3 centimeters in diameter) - only for greens (very early).
Important!
The larger the bulb size, the better the greens will be. In factions that are too small, the feather will take a very long time to develop and will be quite small.
Important!
Many gardeners advise disinfecting planting material before planting, for example, by soaking it for 5-10 minutes (but in the spring 20-30 minutes) in potassium permanganate or a solution of copper sulfate, followed by drying for 12-24 hours. But it’s worth considering that dry bulbs can withstand sudden cold spells better than swollen bulbs, and the latter can begin to germinate too quickly.
Advice!
However, if you do not want the seed to start bolting, you can warm it up in one of the following ways:
- Dip the bulbs in a warm solution of potassium permanganate (50-60 degrees), and then pour boiling water over the grooves right before planting.
- Place the bulbs in a canvas bag and hang near the radiator for 2-3 days (but do not touch).
Video: planting onions before winter - optimal timing, how to prepare a bed, at what distance and depth to plant, how to mulch or cover for the winter
Direct landing
Step-by-step instructions for planting winter onions before winter:
Note!
The need for mulching and shelter for the winter depends on the climate of our region. If you have snowy winters without much frost, then you don’t have to cover them with anything.
Video: planting onion sets before winter
Preparing family onions for planting
Bulb crops, like other vegetables, must be prepared before planting, which increases yield, speeds up the process of pipping of heads and the growth of seedlings.
Preparatory activities include three steps - processing planting material, choosing a location based on crop rotation, and preparing the beds.
Preparation of seed material
Before planting the bulbs, carry out the following manipulations:
- Peel the upper layers of the husk, under which pathogenic microorganisms can be localized. It is they who further contribute to the development of diseases, especially fungal ones.
- Treat the bulbs with a disinfectant. To do this, you can use a solution of manganese or copper sulfate. Soak in liquid for 2-3 hours. In the store you can buy special disinfectants (Maxim and the like).
- Rinse the bulbs with clean water.
- Soak the planting material in humic fertilizer, organic matter and minerals or growth stimulants. Soak in the solution for 10 hours.
- Place the bulbs in a common container, place it in an unheated place. The roots will grow in a few days.
- Before planting, cut off the tops of the heads to promote seedling growth.
How to prepare family onions for planting, as well as methods of protection against onion flies, see the following video:
Preparation of beds
First of all, choose a place – sunny, without strong winds. This must be done in the fall, since the beds are prepared immediately after the previous harvest. Since the soil needs to be loose, the garden is dug up to the height of a spade bayonet. At the same time, fertilizers are applied (norm per 1 sq. m):
- 15 g of potassium salt and 25 g of superphosphate.
- Humus or compost – 5 kg.
Crop rotation rules
Crop rotation is an important agricultural technique that optimizes soil exploitation by replenishing missing resources naturally.
Each crop has a special effect on the composition and structure of the soil, so different vegetables need to be alternated with each other when planting. Otherwise (when cultivating only one crop in a garden bed), the land is subject to depletion of one or another nutrient or their complex. In addition, pest larvae can accumulate, which devour, for example, only nightshade crops.
It is strictly forbidden to grow onions in one area every year. You can return to previous beds only after 3 years.
The best predecessors for onion family crops:
- tomatoes;
- celery;
- white cabbage, kohlrabi;
- squash, zucchini;
- potato;
- spinach, lettuce;
- pumpkin;
- eggplants.
Worst predecessors:
- garlic and onion;
- radishes and radishes;
- beans and peas;
- cucumber and dill;
- sunflower and corn;
- parsnips and parsley.
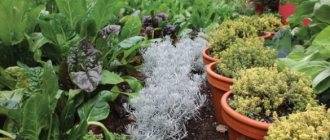
It is customary to plant vegetable crops in the neighborhood based on their beneficial effects on each other. Family onions go well with cucumbers, beets, tomatoes, carrots, strawberries, spinach and lettuce.
It is not advisable to plant onions next to kohlrabi and broccoli, turnips and dill, radishes, peas, beans, parsley, cabbage, and lettuce.
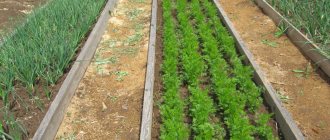
Onions can be planted in close proximity to desired crops or planted in a specific pattern. For example, make 2-4 rows with onions, 1 row with carrots, again 2-4 rows with onions, 1 row with tomatoes, etc.
Preparatory work before planting
It is necessary to begin preparing for this long before planting shallots in the garden. They choose a place for planting, make beds, cultivate the bud, and prepare planting material.
Preparation of planting material
For planting in the fall, sets or seeds are traditionally used. When planting seeds, you need to check the expiration date. Seeds, if stored correctly in mid-autumn, will sprout, take root, and successfully overwinter.
Sevok must be selected more carefully:
Using small onions with a diameter of 1-2 cm is the most profitable solution. In the future, it will be able to produce 10 full-fledged large bulbs.
Large bulbs, larger than 5-7 cm in diameter, shoot. They form a nest with many small bulbs. This indicates low commercial quality.
Planting material must be free of damage and infection. There should not even be signs of disease or pest infestation on its surface. You can disinfect the material by heating it at a temperature of 40 degrees. For greater yields and to prevent bolting, it is better to use hybrids and varieties “Serezhka”, “Sprint”, “Krepysh”, “Garant”.
Preparing the beds
Heirloom onions should be grown in areas with maximum sun exposure. Moisture accumulation is not allowed, so it is necessary to make high beds.
You cannot plant onions in the place where garlic or onions used to grow. It is imperative to observe crop rotation to get a strong and healthy harvest. Planting early cabbage, beets, peas, cucumbers, and legumes is the best way to prepare the soil for the subsequent planting of heirloom onions.
The soil needs to be plowed a month before planting. Then fertilizers are applied, for this they use 70 g of double superphosphate and 5-6 kg of humus per 1 square meter. meter of soil. Wood ash can be used to saturate the soil with potassium and phosphorus.
Fertilizers must be evenly distributed over the entire area of the bed; the root system must independently take up minerals during development. If there are not enough fertilizers, you can lay them using the nesting method, this is also effective. High humidity levels are very important. During drought, the soil should be irrigated before and after sowing. This will help the crop strengthen its root system.
Planting heirloom onions
Family onions are planted according to a certain pattern depending on the type of variety, but the distance between the bulbs, unlike the slightly rudimentary varieties, is much greater.
This is due to the fact that one head contains several bulbs that grow to the sides. If this rule is not followed, the heads grow small.
Landing dates
The biological feature of heirloom onions is that the root system develops better at cool temperatures. For example, the optimal temperature for the roots is from +2 to +20 degrees, for the green part – +15-25. Onions at the stage of formation of the root system and heads are not afraid of frost, down to -6-7, but excessively hot weather does not harm.
These indicators allow you to plant the crop at any time of the year - early autumn, spring or before winter. You can sow onions at any time, but you should pay attention to the agricultural technology requirements for a specific variety.
Scheme
The planting depth of family onions varies from 2 to 3 cm, the distance between rows should not be less than 30 cm, more than 40 cm. The distance between seedlings depends on the size of the bulbs in their grown form:
- small varieties require 10 cm;
- medium-large – 15 cm;
- large – up to 30 cm.
The process of planting family onions in open ground
Planting family onions in open ground:
- loosen the beds by adding saltpeter (7 g of substance per 1 sq. m);
- level the surface of the earth;
- make grooves or holes according to the chosen pattern;
- pour plenty of water;
- sprinkle with wood ash;
- install bulbs;
- sprinkle with soil and compact.
It is not recommended to moisten the beds after planting, but to maintain an optimal level of humidity, it is advisable to mulch.
How to grow family onions using seedlings?
When planting onions in open ground, they have to be thinned out; not all heads can sprout; young shoots have to be protected from heavy rains. With the seedling method, these problems do not arise.
How to sow onions for seedlings:
- process the seed material in a standard way;
- plant the bulbs in wooden boxes, watering them generously;
- cover with plastic wrap until the first shoots form.
During the growing season, periodically moisten the soil and maintain the temperature from +14 to +25 degrees. You can feed chicken manure diluted with water in a ratio of 10:1 once.
They can be planted in the ground after weather conditions have stabilized. The planting time depends on the climate - the seedlings are ready for transplanting in 30-50 days, depending on the variety.
Transplant process:
- water the seedlings in the box generously;
- dig the bulbs with a tool, pull out the heads;
- trim the roots slightly - 4 cm should remain;
- pour the slurry solution into the prepared hole;
- plant seedlings;
- dig in with earth;
- pour plenty of water;
- lay down mulch.
After planting, loosen the soil 3 days later.
Features of planting before winter
Almost all varieties of multi-bud onions are suitable for planting before winter, as they can withstand frost. But for this there is one condition - a stronger root system, so you need to take into account the timing of planting. Consequently, family onions are planted 1.5-2 months before frost, in late September - early October.
Preparatory activities and the planting process are identical to the rules for planting in spring. Before the onset of frost, onions must be mulched. The mulch height should be at least 6-8 cm.
Soil preparation
It is recommended to grow heirloom onions in sunny areas of the land, without excess moisture. It is necessary to plow the soil and add fertilizer to it a month before autumn planting. For every 1 m2 of soil you need to add 5-6 kg of humus and 60-80 g of double superphosphate. Wood ash can be used as a source of phosphorus and potassium. Fertilizers should be applied to the entire area of the site so that the root system can independently supply itself with minerals during development. If there is a lack of fertilizers, nutrients can be supplied using the nesting method, which is less effective in this case.
In autumn, it is important to maintain a high level of soil moisture. If necessary, the soil should be irrigated before and after sowing onions until frost occurs. A sufficient amount of moisture will allow the family to grow a powerful root system and successfully overwinter.
How to care for heirloom onions?
To grow a decent harvest, heirloom onions need to be properly cared for.
Watering
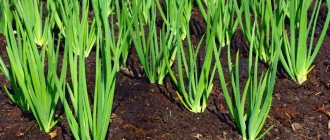
When growing onion crops, gardeners want to get not only heads, but also green mass. Due to the presence of several bulbs in the head, the family variety produces an abundant feather. And to achieve this, watering is necessary. Moistening begins after the formation and growth of seedlings by 8 cm.
Watering rules:
- It is enough to water once every 6-7 days. For 1 sq. m requires 16-20 liters of water.
- Rainwater is used to moisten the soil. If this is not possible, you can use tap water, but be sure to leave it for 3-4 days.
- The water should be warm (cold water makes the plant sick and dies), so leave the liquid collected in the container in the open rays of the sun.
It happens that with sufficient watering, the green mass turns yellow, so inexperienced gardeners increase the amount and frequency of moisture. This should not be done, since the reason lies in the lack of minerals. To get rid of the problem, add a solution of ammonium nitrate or sprinkle wood ash on the plants.
Mulching
Thanks to mulching, you can save time, water and effort, and prevent the growth of weeds. The filled material retains the required level of moisture for a long period, so the frequency of watering is reduced. Mulch forms a dense, porous layer that makes it difficult for weeds to break through.
The procedure is carried out immediately after rain or moisture. For this, exclusively natural materials are used - grass, tops of other crops, hay, straw, sawdust, pine leaves.
Feeding
Family onions do not require fertilization, since fertilizing is carried out before planting. But, if you notice wilting or yellowing of the feathers, or the growth of the bulbs is stunted, use the following:
- For 10 liters of water, take 15 g of potassium salt and 10 g of ammonium nitrate.
- Dilute chicken manure in a ratio of 1:15/20.
Loosening
It is necessary to loosen the soil between the rows the next day after watering. For the entire season, 4 procedures are sufficient under normal weather conditions.
If the summer is very dry, and cracking crusts form on the surface of the earth, you will have to loosen the soil more often. Along with loosening, weeding is also carried out.
Pest and disease control
Heirloom onions are considered disease resistant, but under unfavorable conditions fungal diseases most often occur. Sometimes plants are also affected by pests.
How to deal with the most common diseases and insects:
- When affected by fusarium, which is characterized by the formation of rot on the bulb, watering is completely stopped. Plants are treated with a solution of copper sulfate (1%) or copper oxychloride.
- For prevention, a solution of copper sulfate – 5 g, water – 10 l, crushed laundry soap – 50 g is used.
- To protect against pests, the beds are sprinkled with tobacco dust and ground black pepper.
- It is useful to water the row spacing with saline solution - 200 g per 10 liters.
- Of particular danger is the onion fly, which affects the heirloom variety. To destroy it, the following drugs are used: Iskra, Inta-Vir, Fly Eater, Zemlin.
- It is advisable to plant marigolds and carrots near the beds.
- You can boil mint and pine needles and water the beds.
Forming an onion nest
The nest of family onions is formed in order to obtain larger heads. This must be done starting at the end of June. The optimal number of onion elements for their growth is 4-5 pieces.
How the procedure is carried out:
- inspect the head by slightly moving the soil away from it;
- carefully separate the excess onions without pulling the head out of the hole and without damaging the root system;
- dig in the bulbs.
Autumn planting of onions
There are two ways to plant onions before winter. Methods for planting onions depend on the choice of planting material.
Planting sets
You need to prepare the seedlings, then planting will take place without problems. For this, a light solution of potassium permanganate is used, and then a growth stimulator. These drugs will disinfect the surface of the bulbs and speed up the germination process by two weeks. The use of humic agents helps increase the resistance of onions to pests and diseases.
Onions are grown in open ground, the sets are planted in rows. The distance between the rows is 25 cm. Plant the onion to a depth of 3-4 cm. Since the onion needs space to form a nest, the sets should not be placed close to each other in the same row. The optimal distance is 25-30 cm.
To prevent the plant from freezing, onions require mulching. It is best to use humus and straw. In cold northern regions, it is recommended to use additional frost protection. Caps of snow are thrown over the beds. With the arrival of warmer weather, the mulch is removed from the beds so that the soil warms up faster. To keep more snow in your garden, you need to install special shields.
You may be interested in: Planting onion sets in spring, features and further care
Planting seeds
Is it possible to plant heirloom onions with seeds before winter? It is possible, but the onion seeds must first be soaked in water to which growth stimulants have been added. Seeds are sown in rows at a distance of approximately 20 cm from each other. The depth of placement in the ground is 1.5 cm. We carefully plant the planting material in the prepared grooves.
Then the soil is compacted and mulched. If you plant the seeds at the end of August, you can already see onion greens in September. At this time, the seeds form a set. It will take root naturally, overwinter and produce a good harvest next year.
Sometimes novice gardeners fail to grow this type of onion on their plot the first time. The most common reasons for this are: excessive deepening of planting material, dense planting. Shallot heads that are too close interfere with each other. They cannot get enough nutrients, moisture and sunlight. The harvest will be of poor quality, the bulbs will be small. Family onions, grown correctly, will allow you to get up to 10 kg of vegetables per square meter of soil.
Harvesting
The harvest time of family onions depends on the variety, but you can determine it yourself by external signs - the feathers dry out and fall off. Bulbs should be harvested under favorable weather conditions. This must be in the morning, since after harvesting the bulbs are laid out on beds in direct sunlight to dry.
In rainy weather, the onions are transferred to a warm, ventilated room, placed on woven material so that they can breathe from all sides. In this case, you need to turn the heads 2-3 times a day.
How to properly collect family onions?
In order for onions to be preserved for a long time, you must adhere to the basic rules of collection:
- it is forbidden to remove the heads by pulling them by the tops;
- first you need to dig up the vegetables;
- then gently pull, holding the base (neck) with your hand;
- lightly shake off dirt without hitting each other or other objects;
- spread out to dry;
- trim the green mass, leaving the neck 3-4 cm;
- dry again until completely dry indoors for several days or weeks depending on the humidity level;
- cut the roots by 1-2 cm;
- discard damaged bulbs.
Storage rules
After you have collected and prepared the heirloom bulbs, they are sent for long-term storage. The room can be an apartment (kitchen, pantry, drawers, balcony) or a cellar. Requirements based on storage location:
- In room conditions, the permissible temperature range is from +18 to +22°C, air humidity is 60-70%. You can store it in different ways:
- in a cardboard box;
- in old nylon stockings;
- in bags made of natural fabric;
- in wicker baskets;
- in paper bags;
- in polypropylene nets;
- in the form of braids that are woven from bulbs with uncut tops.
- In the basement, the temperature is 0-4 degrees Celsius, humidity is a maximum of 85%. You can store the heads in boxes made of wood or plastic, which are filled with sand and sawdust. A prerequisite is to drill holes to eliminate excess moisture and air penetration.
Drying heirloom onions
If the heirloom onions are not completely dried, in the future they will be subject to putrefactive diseases, so it will become impossible to preserve them for a year.
The first time the crop is dried in the beds, and secondary drying requires the following conditions to be met:
- Drying time – minimum 10 days, maximum 20 days.
- Place - attic, ventilated room, street (under a canopy).
- The method is to spread it on a woven material and hang it in a bunch.
Features of harvesting and storage
The onion itself makes it clear that it is time to pick it up from the garden - the feather dries and lies on the ground. On a dry, clear day, it is pulled out or dug out of the ground and left to dry in the garden bed. In the evening they put it in a barn or attic and dry it there. For good shelf life, turnips need dryness and warmth. You can store it in braids or in bulk, in boxes.
Despite its modest size, shallots compensate for this deficiency with good yield, unpretentiousness and excellent taste. All gourmets should definitely have one on their site.
Useful tips
Novice gardeners quite often make mistakes that prevent them from getting a good harvest of family onions. To prevent this, use the advice of experienced people:
- Don't be afraid to plant multi-bud varieties in early spring - they are not afraid of frost.
- When choosing seed material, keep in mind that small bulbs will grow more feathers, medium bulbs will produce heads, and large bulbs will produce neither one nor the other. The fact is that there will be little greenery, and the bulbs will grow small.
- If the rules for harvesting and storing the crop are not followed, the planting material for the next year will be of poor quality.
- If feathers suddenly turn yellow, it means they are lacking nitrogen or potassium. To solve the problem, apply appropriate fertilizing.
- But before you apply fertilizer, carefully inspect the plants. Perhaps the leaves turn yellow due to pests - onion flies and their larvae.
- Oddly enough, but yellowing of greenery can occur when the soil is over-moistened.
- If growth occurs only in the feather, it means that the onion was planted too late, when the air and soil temperatures were not conducive to the growth of the root system.
- The heads do not ripen if there is an excess of nitrogen fertilizers.
- To grow the heads immediately after planting, try not to water the soil at all for about 6-7 days.
Selection of planting material
To plant heirloom onions before winter, you can use seeds or sets. Seeds must meet their expiration date. If stored correctly, small grains will sprout first in mid-autumn, take root well and successfully overwinter. You have to choose the seeds more carefully:
- Large bulbs with a diameter of 5-7 cm often bolt and form a nest of many small bulbs, which are of low commercial quality.
- A bulb with a diameter of 1-2 cm is the most suitable planting material, which will produce 10 large, full-fledged bulbs next year.
Planting material must be healthy. There should be no signs of pests and diseases on its surface.
Not all varieties of heirloom onions are suitable for winter planting. Some of them shoot when spring arrives. To prevent this from happening, you need to grow varieties and hybrids “Sprint”, “Seryozhka”, “Garant”, “Debut”, “Krepysh”.
Reviews
★★★★★
Galina Vasilyevna, 57 years old, summer resident, Kaliningrad region. I haven't always loved heirloom onion varieties.
I attribute this to the fact that they have small heads (compared to regular onions). You don’t want to spend a lot of time peeling the vegetable afterwards. And once a neighbor treated me to the Monastyrsky variety, and I liked the taste of it, and I also noted that such onions can be chopped very finely without any effort. ★★★★★
Igor, 31 years old, Krasnoyarsk. Multi-bud onions (family) are easy to grow even in our region - they grow during frosts, the harvest is rich, and the taste is excellent.
And it doesn’t require any special care. But for planting I always choose early ripening options. ★★★★★
Natalya Gulyaeva, 36 years old, farmer. I’ve been growing family onions for five years now, I use different varieties for this and the result is always equally positive - high yield, unpretentiousness, excellent bulbs, so I recommend it.
Hide
Add your review
The yield and taste characteristics of heirloom onions depend on the quality of their care. By showing care and diligence, you will collect tasty, juicy and healthy vegetables. And if you collect and store it correctly, it will last you until next spring.
0
0
Copy link
Proper care of shallots
Caring for a plant grown in open ground is not at all difficult and consists of the following:
- Watering.
- Loosening.
- Weeding the beds.
- Feeding.
At the beginning of growth, family onions should be watered periodically, because if the plant does not have enough moisture, it will quickly complete the growing season and the bulbs will not be able to fill up sufficiently. Approximately a month before harvesting, watering is stopped.
. A layer of mulch will help retain moisture. During the entire season, watering is carried out at least 3 times.
The soil in the garden bed should not dry out.
In rainy weather
The plant should be watered less frequently, and
in dry weather,
watering should become more frequent. In cloudy weather and without precipitation, the plant should be watered approximately once a week.
Family onions tolerate feeding well. What fertilizer to feed the plant:
- Bird droppings.
The latter is diluted with water at a ratio of 1:15. - Complex mineral fertilizers:
40 g dissolved in 10 liters of water. - Mullein infusion.
It is diluted in water in a ratio of 1:10.
It is necessary to stop fertilizing and stop fertilizing about a month before harvesting so that the crop grows bulbs and does not continue to produce greens.
Compared to turnips, heirloom onions have a refined taste and quick preparation. After using it, there is practically no smell from the mouth.
For these reasons, the plant has become a real find for gourmets. And growing this crop is an absolutely simple task and can be done by novice gardeners.
Traditionally, planting onions just before winter is more in demand in most regions of our country. If we look at the root of the problem, then a lot depends on the correct choice of suitable winter varieties, onion varieties, as well as determining the optimal planting time. In addition, the choice of the planting site itself and, of course, skillful preparation of the beds play an important role. If you still have a wormhole of doubt, check out our recommendations and tips to help you better understand this problem.
Caring for onions after planting before winter
With the onset of spring, when the snow melts and the soil begins to thaw, the entire shelter should be removed, because the ground underneath, on the contrary, will only take longer to warm up.
Caring for winter onions in spring and summer is quite simple - they need to be fed
(nitrogen in early spring, for example, ammonium nitrate, a little later - with phosphorus-potassium fertilizers, for example, the same ash, superphosphate, potassium monophosphate),
remove weeds
and sometimes
thin out
.
Advice!
If you plant winter onions more often, then in the spring, during thinning, you will be able to pull out the bulbs for greenery, as well as get rid of the weak ones and those that have begun to bolt. The remaining bulbs will continue to grow per head, and the optimal distance between them should be about 8-10 centimeters.
Video: thinning winter onions
Harvesting and storage
As a rule, in mid-summer - in July (already in the first half of the month) winter onions can be removed from the garden.
Video: when to harvest winter onions and how to prepare them for storage
By the way!
If you don’t know
what to plant after harvesting onions in the summer (July-August)
, then this will help you
To properly achieve a full harvest of winter onions, use our tips and advice, because it is very important to correctly determine such fundamental things as planting dates, appropriate varieties and other subtleties in growing, caring for and harvesting onions.
Video: growing winter onions - from planting to harvesting for storage
Family bow, who doesn’t know it. But if you look at it, almost no one does. Everyone knows Kuschevka, but the name “family” is somehow rarely used. But both the first and second are different names for the same type of onion.
Why family?
Maybe because in one nest a friendly “family” of full-fledged bulbs grows from one small bulb. On average, this is from 3 to 10 pieces, under very favorable conditions and all 20. It may also be because in the spring the family onions produce the very first greens in quantities sufficient for the whole family. True, in order to get this greenery in early spring, planting material must be planted in the fall. And here many gardeners have a natural question about when to plant family onions before winter and how to do it correctly. But everything is quite simple if you follow the order of work.
Soil preparation
In principle, you can plant family onions for the winter without preparing the soil. But not everything is so simple, since you can only do nothing with the soil in a cultivated garden. The earth has already been dug up, has sufficient looseness, maybe even fertilizers have been applied. Another thing is virgin soil. She can't do it without digging. Maybe they wouldn’t dig virgin soil, but you can’t put an onion in the turf. Therefore, if anyone is not sure whether it is possible to plant family onions before winter in an unprepared area, then it is better not to suffer, but to dig up the soil. It won’t hurt to have a vegetable garden, and it will give you peace of mind.
After bringing the soil into proper condition, it should be: - at least a little loose; - moderately moist; — neutral in acidity (preferably).
The area itself should be well lit and warmed up. Next comes the addition of organic matter and minerals, followed by planting itself. Also, if the garden is being dug up, this must be done in advance. After loosening, the soil needs to settle and compact.
How to fertilize the soil
To say that family onions cannot do without fertilizers would be untrue. Even on sandy soil without fertilizing, it grows quite well and produces a sufficient amount of greenery. But you always want to have more harvest, just how to achieve it. The amount of onions increases due to the applied fertilizers. There are 3 options for fertilizing beds. The first is that minerals are added. Secondly, organic matter is introduced. The third one combines the first with the second.
By minerals
If you decide to plant family onions just before winter, it is recommended to add for each square meter: - 25 grams; — potassium salt 15 grams; - ammonium nitrate 5 grams.
Organic
It’s easier with organics; it’s always at hand. Before planting onions, the ground is fertilized with humus, preferably 3 years old. Or rotted compost. About 5 kilograms of one or the other are added per 1 m². Plus a little ash, so that the ground becomes slightly grayish. Particular attention should be paid to fertilizer in the form of humus. This should be humus, not fresh manure. Manure forms loose, unsuitable for food bulbs and massive “tops”.
Mixing fertilizers
Some zealous gardeners advise combining minerals with organic matter. Probably, after such a procedure the harvest will be large. But again, you can plant family onions for the winter even in the soil without any fertilizer at all. And if you need a large harvest, you can get by with humus or compost. But this is an option. In the garden, only the owner decides what to add.
When and how to plant family onions before winter
First, the timing. Sometimes gardeners are interested in when to plant family onions before winter so as not to make a mistake. If we talk about days, then in the middle zone the best time is the tenth day of October. It's approximately. But if anyone knows the climate of their area well, then a month before the first frost. The planting process itself consists of two stages. The first is the choice of planting material. The second is the choice of planting scheme and the planting itself.
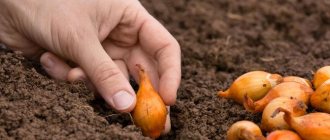
At the first stage, you should decide what you would like to get next season - greens or commercial bulbs. If there are greens, take onions up to 1.5 centimeters in size. If the bulbs are full-fledged, then the size of the seeds should be about 3 centimeters. In the first case, the bulbs are deepened by 2-3, in the second by 5-6 centimeters. Some gardeners practice planting large onions cut into 2 halves.
How juicy the greens will be in the spring and how full-fledged the “new” bulbs will be also depends on the chosen planting scheme. For greens, plantings in a row are spaced at 10 centimeters intervals, for commercial bulbs at 15 centimeters intervals. The distance between rows can be from 20 to 30 centimeters.
That's all for basic work. Now the question of whether it is possible to plant family onions before winter is probably not so pressing. For those who want to have fresh greens immediately after winter, planting onions in the fall is not only possible, but also necessary. By the way, if before winter individual plantings are arranged according to the scheme for greenery, and in the spring part of the young shoots are collected for food, the remainder will yield a good harvest of healthy, full-fledged bulbs.
People usually read along with this article:
The most common vitamin supplement that probably everyone has tried to grow on a windowsill at least once is onions! Did it sprouted during storage? In a jar, water there, and on the window! However, if you want a delicious onion, and even a decoration for the windowsill, then this method will not work.
Thanks to its interesting mildly pungent taste and special juiciness, Carmen onions are very good to use fresh for making salads. In addition to its distinctive taste, it also adds a special fragrant aroma to food.
Red Baron onion set: description of the variety, differences and the possibility of growing from seeds. Not everyone can appreciate the bright onion taste that distinguishes most varieties of this crop. Some people find mild or semi-spicy versions more enjoyable. One of these is Red Baron - a variety that is completely easy to plant and care for, but nevertheless shows excellent results when harvesting.
Not all summer residents know how to properly plant onions before winter and why this is necessary. In this seemingly simple matter, there are several subtleties that should be observed in order to get a bountiful and early harvest.
Not all onion varieties are suitable for winter planting, however, choosing the right variety does not guarantee you results. Only a combination of competent agricultural technology, high-quality planting material and compliance with onion planting dates will allow you to enjoy fresh herbs next spring.
For autumn planting of onions, a bed on which tomatoes, cucumbers, peas, beans, any grains, beets, mustard, rapeseed, and salads was previously grown is suitable. It is not recommended to plant onions after beans, potatoes, alfalfa, or red clover, as this can lead to damage by nematodes. But you can plant onions after onions only once - in the third year you will not get a good harvest.
The soil for winter planting of onions must be prepared in advance. The best harvest will be on loose, fertile soils. Therefore, when digging, add 5-6 kg of humus, 10 g of potassium salt and 20 g of superphosphate per 1 sq.m. Before planting, sprinkle the soil with wood ash at the rate of 10 g per square meter.
Then water the bed, level and compact its surface. Cut grooves at a distance of 20 m from each other and place dry seedlings in them, leaving 5-7 cm gaps between the bulbs. Carefully fill the bulbs, but do not water them - in the fall there is enough moisture in the soil. With the onset of frost, mulch the plantings with dry leaves, spruce branches, pine litter and cover the mulch with branches to prevent it from being blown away by the wind. If winters in your region are snowy, you can do without additional shelters.
It is also important to know at what depth to plant onions before winter. Bulbs that are too deep in the spring will take longer to germinate, waiting until the soil warms up, and those located near the surface may freeze or get wet. Therefore, the optimal depth of seedlings when planting is 5 cm.
Regardless of whether you purchased planting material or grew it yourself, you will have to sort and sort the onions before autumn planting. First of all, remove all diseased, rotten, dried out and onions with mechanical damage.
Then arrange the remaining onions according to size:
- up to 1 cm in diameter (wild oat);
- from 1 to 3 cm in diameter (sets);
- more than 3 cm in diameter (sample).
The first and second options are excellent for planting on a bulb, and the third gives early and abundant greenery.
If you are not sure about the health of the seed, it is advisable to disinfect it before planting.
To disinfect the bulbs, immerse them in a solution of copper sulfate (30 g per bucket of water) for half an hour, and then dry them in a warm room for 24 hours.
Landing
In the fall, you can always buy small sets at the market (at least in our area) - the so-called
. The size of such onions is no larger than the nail on the little finger (diameter less than 1 cm).
They sell it inexpensively because it is still very difficult to preserve until spring: small onions dry out first. A jar (0.5 liters is the standard measure of sowing adopted by our traders) holds a huge amount of planting material: you’re already tired of planting, but it still doesn’t run out. Therefore, even if not every onion produces a good harvest, the results from planting one measure of seedlings are still enough for a new harvest for both my daughter and I, and my friends. And this despite the fact that I immediately plant the smallest fraction for greenery.
So, the economic effect is obvious. What other advantages?
The shooter does not form small sets, and this is its enormous advantage. This is really true - tested in practice. Over the entire growing season, I literally break out several flower stalks from my onion beds - during normal planting, it also happened that almost every second onion sprang.
Please note that this is an important nuance: do not try to plant large sets before winter! Shooting in this case is practically guaranteed. I plant a few large sets on a feather: the small ones at first produce weak, small greens, but the large ones immediately produce a full-fledged feather. But it gets a little warmer - and flower stalks appear, that’s it - the onion can be pulled out.
Large sets can be planted to get early greens. Photo by the author
The second plus is the early harvest. My onions ripen already in July. By the way, the benefit here is double: firstly, when the onion fly threatens spring plantings, the onion planted before winter is already strong enough, and the pest hardly damages it; secondly, harvesting occurs at a relatively quiet time, and in the vacant beds you can sow greens or early ripening vegetables - they will ripen quietly before the fall.
By the way, there is less hassle with weeding. Onions are a cold-resistant crop; seedlings of winter onion plantings appear literally from under the snow; a rare weed can compete with them in this. Well, when the weeds begin to grow, my onion is already noticeable and strong - there is no need to fear that you will pull it out along with the grass. And there is less harm to him from weeds (which, however, does not free him from traditional care responsibilities, which is a pity).
If you are thinking about how to get income from your garden, an early onion harvest is also a plus: all vegetables that are ripe before mass harvesting are valued higher and are sold at a higher price. Think about it. And such onions are stored perfectly: they are initially healthy and strong, they can be dried perfectly - first in the sun, and then in a heated attic or hayloft; then all that remains is to braid it and hang it for storage.
Drying onion harvest. Photo by the author
Traditionally, the benefits of autumn planting include saving time. Here I can say that I personally don’t have enough time both in spring and in autumn. But still, the period of autumn work can most often be stretched out, while in the spring time seems to be compressed, and a huge number of things need to be squeezed into this short period of time. So for the ever-busy gardener, planting onions before winter is a good option for a reasonable distribution of energy and time.
Shallots are a vitamin-rich and tasty addition to the diet at any time of the year. If you want to surprise your family and guests, prepare Iranian sauce from shallots and natural yogurt. It perfectly complements meat dishes - for example, shish kebab.
It’s not difficult to grow shallots yourself, and they ripen earlier than turnips. In this article you will find detailed information on how to plant shallots before winter and get an early harvest.
Winter landing
Shallots, or heirloom onions, are a nesting variety of onions. From one bulb 6-12 daughter bulbs grow.
Its heads are smaller (20-50 g), so they ripen faster. Heirloom onions are grown for greens or to produce turnips.
Is it possible to plant shallots before winter? Yes, you can. Planting in the fall allows you to harvest the crop 2-3 weeks earlier and reduce the amount of spring gardening work. And the development of plants during the period of snow melting allows rational use of moisture in the soil.
In addition, when planted in winter, the heads grow 15-20% larger than the same varieties planted in the spring.
Sowing dates
The optimal timing for sowing family onions in the fall is determined based on the timing of soil freezing. From the moment of planting until the soil freezes, 2-3 weeks should pass. During this time, the heads have time to take root, but do not grow.
When planting onions in winter, do not forget about the rules of crop rotation - crop rotation.
Reference. The main rule of crop rotation is that one crop should not be grown in the same bed for more than two years in a row.
Planting onions in the same place will lead to the dominance of onion flies, shredding of the bulbs and loss of yield. The crop is returned to its original place no earlier than after 4-5 years. The longer the break, the better.
Then why plant onions in the fall? For pre-winter sowing, choose beds on which pumpkin crops (cucumbers, pumpkin, zucchini), tomatoes, legumes, and grain crops were previously grown. It’s a good idea to sow after beets, mustard, and rapeseed.
We invite you to familiarize yourself with Marinated eggplants stuffed with carrots and garlic
Do not plant onions after any other varieties, garlic, parsley, or parsnips. Other undesirable precursors are potatoes, alfalfa, and red clover. Otherwise, there is a risk of onion being damaged by nematodes.
For sowing in the fall, cold-resistant varieties are chosen, since the bulbs must have time to take root and not freeze out in the winter.
Popular cold-resistant varieties include:
- Sir 7. A variety bred for cultivation in the northern regions. It has good keeping quality and average yield. Forms up to eight bulbs in a nest.
- Sophocles This variety is distinguished by large bulbs up to 50 g (7-9 pieces in a nest). The taste is spicy. The color of the bulbs is red, with a purple core. Undemanding to soil composition and high-yielding.
- Yellow Kuban. Suitable for southern regions. The variety is distinguished by its semi-sharp taste, fast ripening time and high yield. Its keeping quality is high.
- Siberian amber. Not afraid of cold weather, resistant to diseases. The bulbs are medium in size, weighing 25-30 g (5-8 pieces in a nest). The taste is semi-sharp.
- Family. Resistant to cold weather and diseases, ripens quickly. The average weight of the heads is 25 g. Up to five onions are formed in each nest. It has a mild taste.
Preparation for the autumn sowing of shallots involves choosing the material for planting, processing it and preparing the beds.
When sowing before winter, it is important to choose the right planting material.
Attention! The size of the bulb you plant affects the formation of the flower stalk. The larger it is, the higher the likelihood that the plant will shoot arrows.
Small heads, on the contrary, successfully overwinter and form lush greenery without shoots in the spring. A bulb weighing 10-15 g and 2 cm in diameter is the most preferred planting material.
Shallots are propagated mainly vegetatively (by bulbs). When sowing seeds, the yield is lower and the ripening period is longer.
But when grown with bulbs, after 3-5 years, shallots lose varietal qualities, accumulate diseases and reduce productivity. In this case, they sow seeds or purchase new planting material from manufacturers.
When sown with seeds, a bulb of five small heads grows in the first year. They are planted the following year. In the second year, a large nest with a large number of bulbs is formed. After this, shallots are propagated vegetatively for 3-5 years.
Tillage
Sowing beds are made in a lighted area. The earth is dug up, cleared of weeds, fertilized and moistened. It is better to dig in advance so that the soil has time to settle.
Fertilizers include organic substances and mineral supplements: humus or compost (5-6 kg per 1 sq. m), double superphosphate (60-80 g per 1 sq. m), wood ash.
Before sowing, the soil is moistened. Then the plants will form a powerful root system and successfully overwinter.
Before planting, shallot heads are sorted and sorted. Specimens with signs of disease, rot, or mechanical damage are removed.
Selected bulbs are disinfected to prevent the development of diseases. To do this, they are soaked in a solution of potassium permanganate or copper sulfate for 20-25 minutes.
Soaking in a solution of wood ash (250 g per 5 liters of water) for 5-10 minutes will protect the planting material from rot and saturate it with useful substances.
So, the seed has been selected and prepared, the beds have been dug, fertilized and moistened. You can start sowing.
They operate in this order:
- The soil on the surface of the bed is leveled and grooves are cut.
- Onions are placed at the bottom of the grooves. The depth of planting the heads is approximately 4 cm. If the bulbs are larger than 3 cm in diameter, then 5-6 cm.
- The head is placed bottom down. When planting shallots, the orientation of the bulb is important - if you plant it the other way around, the onion will not survive the winter.
- After planting, the grooves are covered with moist soil and compacted.
- The surface of the bed is mulched and covered with covering material.
In Siberia and the Urals, for better wintering, the beds are covered with spruce branches. Without additional shelter, crops can withstand frosts down to -25°C; in more severe winters, insulation is indispensable.
Landing schemes
When sowing shallots, it is important to follow planting patterns. Thickened sowing will lead to the formation of small bulbs, since there is not enough space or nutrients for a large nest.
The grooves are cut at a distance of 35-45 cm from each other. Leave 8-10 cm between the heads in the row.
Novice gardeners make the following mistakes when sowing family onions in the fall:
- use for sowing bulbs with signs of disease, damaged heads - such material will not give a high-quality harvest even with proper care;
- Shallots are planted from their own seed for more than 3-4 years - over time, the onion degenerates and it is necessary to grow new seed from seeds;
- thicken crops - shallot nests need much more space for growth and development than onions;
- choose large heads for planting (more than 2 cm in diameter) - such specimens shoot more often and overwinter worse than small ones.
Planting care
Caring for winter shallots is practically no different from caring for spring plantings.
In spring, the beds need to be opened after the snow melts, because greenery appears quickly. The soil is periodically loosened and weeds removed. Considering that during the growth period plants actively use spring moisture, the need for watering practically disappears.