- 59162
- onion planting nigella
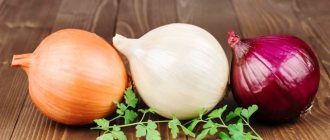
Nigella is the seed of onion. They are called so because of their black color.
As you know, onions take a very long time to germinate from seeds, and one season may not be enough to produce a harvest. Therefore, nigella is often sown in the fall before winter. At the same time, the crops germinate earlier and are characterized by increased endurance.
note
In addition, when sowing nigella onions in the fall, you can get a set and plant it again to get larger bulbs
In this article I will try to analyze the main points of sowing nigella onions before winter.
Usually, before winter, seeds of the following varieties are sown: Danilovsky 301, Myachkovsky 300, Strigunovsky.
variety Myachkovsky 300 variety Danilovsky 301 variety Strigunovsky
The Exhibition variety is very popular. The onion eventually turns out to be quite large.
Is it possible to plant black onions before winter?
Planting chives before winter is not only possible, but also necessary. Compared to spring planting, this is the most preferable option.
There are many advantages to autumn sowing:
- crops germinate earlier;
- the endurance of bulbs and sets is higher when planted before winter;
- a large selection of varieties (the choice of varieties of seedlings for sowing cannot boast of much variety);
- with this method of planting, the seedlings are hardened and adapted to the weather conditions of the growing area;
- in spring, the time that is usually spent on sowing onions can be devoted to planting and caring for other crops;
- less hassle with watering - groundwater will do most of the work, providing the plantings with a sufficient amount of moisture.
Attention! There is a widespread misconception that black onion is a separate variety of onion. This is wrong. Black onions are the black seeds of onions of different varieties.
Harvesting and storage rules
The signal for the start of harvesting is the lodging of the leaves, as well as the drying out of the neck of the bulb. Onions must be harvested before frost sets in. First, dry them in the beds or by placing the plants under a canopy. This process takes about 7 days, after which the dry leaves should be removed and the bulbs should be stored in a dry place.
For long-term storage, specimens with the following characteristics are selected:
- the hardness of the entire bulb;
- dry top and thin neck;
- dry roots and lack of sprouts;
- no damage or signs of rotting.
The heads should be completely cleared of soil. The optimal storage location is a dry basement or cellar, where the temperature is maintained at about 0°C. At home, you need a box with ventilation holes or a hanging net. You can also use the traditional technique of braiding your bow. Humidity in the room should not exceed 65%.
Did you know? Yellow onions last longer than white or red ones due to the fact that their scales are denser and contain more essential oils.
Onions need to be sorted out from time to time and heads that have sprouted or begun to rot must be removed. Storing onion sets requires special conditions that should ensure the viability of planting material in the spring. Use storage at subzero temperatures, warm storage or combined options.
When to sow chives before winter
The exact time to plant chives varies greatly depending on the region. They mainly focus on local climatic conditions - seeds are planted immediately before the onset of persistent cold weather, when the ground freezes properly. So the onions will sprout only in the spring.
In temperate latitudes, sowing occurs in the last days of October-November. In the northern regions, planting dates are shifted to late November - early December. You can also plant onions directly under the snow; this does not harm the seeds at all.
Germination of seeds
Typically, nigella seeds germinate in 7-10 days and the soil temperature actively influences this process. The smaller it is, the longer the seeds “sit out” in the soil. Warm soil can trigger germination in just a week.
To speed up the process, pre-germination is practiced. The seeds are placed in a soft piece of cloth, which is dipped in a container with warm water + a few drops of Epin. After a day, they are taken out and dipped in a solution of potassium permanganate (to eliminate fungal diseases). And then they put it in a plastic bag and tie it. If you place the bag in a warm, well-lit place, then after 4-5 days the seeds will hatch.
Important! Try to plant nigella on time and correctly, because... if future stems become too long, they will grow into the tissue and become deformed.
Planting nigella onions in autumn before winter
A variety of varieties are used for planting chives before winter; however, winter-hardy varieties have proven themselves better in Russia. These include:
- Robin is a mid-season variety with medium-sized bulbs (up to 100 g);
- Muzona is a mid-early variety with increased frost resistance (fruit weight from 100 to 120 g);
- Lugansky is a medium-late variety with large fruits (up to 145 g);
- Siberian annual is an early ripening variety with high yield (about 4 kg of onions can be harvested from 1 m2).
Also in the Northern regions, the hybrid form of the Tamara f1 onion has proven itself well.
Preparing the landing site
Plant onions in an area with good lighting, preferably on a small hill, to avoid accumulation and stagnation of excess moisture. As for the type of soil, it is better to give preference to soil on which legumes, carrots, tomatoes or cabbage previously grew.
Site preparation begins before the onset of persistent cold weather, usually in the first ten days of October. The preparation process is as follows:
- The soil is carefully dug up and cleared of weeds, tubers of last year’s crops and other debris.
- The cleaned area is leveled with a rake. The height of the beds should be 15-20 cm.
- Heavy soil must be lightened before sowing seeds. To do this, add ½ bucket of humus to the soil, which can be replaced with ⅓ bucket of coarse river sand. This is the dosage of fertilizers per 1 m2.
- After the area has been dug up and fertilized, shallow grooves are laid on it - about 2 cm deep, no more. The seeds are not deeply buried.
Advice! If desired, you can sprinkle the furrows with a small amount of table salt to reduce the risk of onion fly infestation of the plantings.
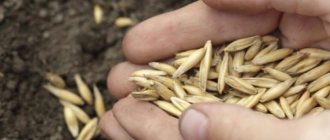
Seed preparation
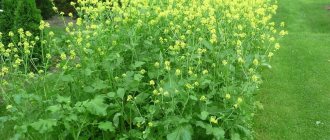
You can buy seeds for planting or collect them from onion umbrellas yourself. For manual collection of planting material, plants planted before winter or early spring are used. By summer they produce spherical flower stalks containing small black seeds.
In each inflorescence, the seeds ripen at different times, which somewhat complicates their collection. To avoid losing some of the material, it is recommended to loosely tie the flower stalks with a layer of gauze or a piece of thin fabric. However, you don’t have to tie the umbrellas, but simply pick them and put them in a warm, dry room for 1-2 weeks until the seeds are ripe.
The next stage of preparing nigella onion seeds is sorting the collected material. The fact is that the seeds in each umbrella vary greatly in size. The smaller ones ripen 10-15 days late, and this is not entirely convenient.
Seeds of onion are sorted using a sieve, but you can also use cellular fabric. In addition, it is necessary to select unripe seeds from the total mass. This is done with water - the planting material is poured into any container with water and left for 1 hour. The floating part of the seeds is once again immersed in water, again for 1 hour. This time, only garbage and dummies will appear on the surface.
Another option for testing germination is germination. The procedure looks like this:
- Several seeds are placed on a saucer, on a damp cloth or cotton pad and covered with another layer of cloth. You can additionally wrap the saucer with film.
- The covered material is left for a week in a warm place.
- If after this period more than 30% of the seeds germinate, the germination of the material is at the proper level.
After determining the germination of nigella seeds, they begin to disinfect them. If the material was purchased in a store, you should carefully examine the packaging - if there is a disinfection sign on it, then there is no need for re-processing.
Self-collected seeds must be disinfected. To do this, you can use any industrial fungicide or a weak solution of manganese, in which the material is soaked for 24 hours.
Another effective way to disinfect seeds is to place them in hot water for 30 minutes (the temperature should not be below 50°C). Then they are kept for another 30 minutes in a weak solution of aloe juice.
Regardless of the processing method, after disinfection, nigella onion seeds must be properly dried. Do not place material on the battery, otherwise overheating may occur.
Rules for planting chives before winter
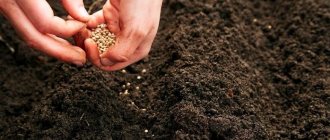
The procedure for planting chives before winter is as follows:
- Furrows are made on the site at a distance of 20 cm from each other. Depth – 2-2.5 cm.
- Seeds are placed in the resulting grooves in a checkerboard pattern. It is better to plant black onions thicker, since not every seed germinates. The optimal planting density is 80-100 seeds per 1 m.
- The sown furrows are sprinkled with a thin layer of soil, no more than 2 cm, and watered moderately.
Advice! To make it easier to control the density of planting of nigella onions, mixing the seeds with chalk powder will help. White seeds on dark soil will be much more noticeable, and chalk will cause no harm.
You can learn more about the features of planting chives for the winter from the video below:
Sowing rules
The best precursors for growing nigella onions are various types of cabbage, cucumbers, legumes such as peas and beans, and potatoes. In the case of high-quality application of fertilizers for predecessor crops, before sowing nigella onions, you can get by with improving the quality characteristics of the soil through humus or compost.
The technology for sowing nigella in late autumn is as follows:
- It is recommended to arrange beds for onions at some elevation, which will allow excess moisture to drain;
- the area for planting nigella and growing high-quality onions should be located in a sunny and well-warmed place;
- It is best to allocate ridges for planting after harvesting tomatoes or potatoes, as well as cabbage, carrots or any legumes;
- in the process of pre-sowing soil preparation, you can add half a bucket of humus and a third of a bucket of coarse sand per square meter;
- When digging, be sure to carefully remove all weeds, and then level the surface of the ridges with a garden rake.
Planting chives is not difficult. On the ridges you will need to make furrows, the depth of which should be about 2.5-3.0 cm. The distance between the furrows should be approximately 18-20 cm. More dense and dense sowing of seeds than in spring is allowed. As a rule, when sowing nigella before winter, it is recommended to adhere to the standard calculation of one hundred seeds for each linear meter of planting area. Good results are obtained by sowing onions and carrots together, which are able to protect each other from the attacks of many pests.
Crops need to be mulched with peat, sawdust or spruce branches, which will protect the seedlings from late, return frosts in the spring and retain the moisture necessary for the development of garden crops. In winter, it is necessary to monitor the condition of the ridges and ensure that the crops are evenly covered with a layer of snow.
Care after landing
Weeds greatly inhibit the growth of onions, so it is necessary to weed the beds. Otherwise, the bulbs will be very small, and the harvest itself will be only 50% of the original amount. In addition, the formation of a thin crust on the soil surface indicates that it is time to loosen the soil.
In winter, it is important to ensure that the beds are evenly covered with a layer of snow.
Watering and fertilizing
Watering onions in spring is moderate - plantings are watered twice a week in dry weather. About 1 bucket of water is needed per 1 m2. During the season, watering is carried out 5-8 times, depending on what the weather is like. In conditions of heavy rainfall, the beds are practically not watered. 3 weeks before harvest, watering is stopped completely.
Fertilize onion plantings 2-3 times per season at intervals of 2-3 weeks:
- The first feeding is represented by nitrogen fertilizers. It is applied to the soil 14-16 days after the first shoots appear.
- The second time the soil is fertilized with complex mineral fertilizers.
- The third feeding is carried out with fertilizers rich in phosphorus and potassium. Mullein infusion or chicken droppings are best for this.
Mulching
Mulch the plantings with sawdust, spruce branches, dry branches or leaves, peat or hay. Regardless of the type of material, the mulch layer is 2-3 cm. This way the seeds will be reliably protected from low temperatures.
As soon as snow begins to fall, it is collected and the area is covered as additional insulation. In the spring, the open beds are inspected and the exposed seedlings are sprinkled with mulch.
Thinning
Thinning the onions cannot be neglected, otherwise the bulbs will become very small. This is done in 2 stages.
First, the plantings are thinned out so that at least 2-3 cm remains between two adjacent seedlings. Then, after 2-3 weeks, when the onion has formed 3-4 leaves, it is thinned out again, but to 6 cm between seedlings. Double thinning is necessary to produce medium to large bulbs and greens. If the purpose of planting is to collect seedlings, then the procedure is not necessary.
Important! After the onion plantings are thinned out, organic fertilizers must be added to the soil. A manure solution diluted in a ratio of 1:5 is suitable for this purpose.
Disease and pest control
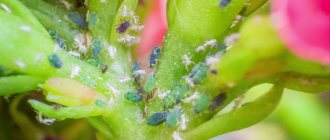
The most annoying onion pests include:
- Onion fly - its identifying mark will be white larvae in the onions. The insect looks like an ordinary fly and appears in mid-May. To protect the plantings, they are covered with nets, the seedlings are sprayed with herbal infusions and sprinkled with mineral flour between the rows. Proximity with carrots is also recommended.
- Onion or tobacco thrips - damages green feathers, as well as bulbs during storage. They are saved from the pest by following the principles of crop rotation and treating with insecticides.
- Onion mite - determined by the deformation of leaves with a white coating, the appearance of mold and wrinkling of the entire plant. For prevention, you need to control the quality of planting material and treat the beds with nettle infusion. Tick control is carried out using various types of insecticides.
The most common diseases include fungal ones:
- Gray rot - usually enters the plant during harvest and can lead to the death of the bulbs during storage. It is necessary to thoroughly dry the collected plants to avoid problems.
- Rust - may appear by the end of summer. Forming yellowish spots on the leaves, the disease progresses in wet weather and subsides in dry weather.
- Downy mildew - can affect the entire planting. Elongated gray spots increase until the plant completely dies. Treating soil and plants with special preparations will help fight the disease.