Potatoes are a popular vegetable crop that almost every gardener grows. There are a huge number of methods for growing tubers. Traditional methods are attracting less and less attention from land owners, as they require a lot of effort in order to ultimately get a good harvest. After all, it’s easy to guess how much effort it takes to dig up a site, apply fertilizers to the soil, systematically water and weed, which the bushes need. In recent years, the method of planting tubers under straw has become increasingly popular, reducing the hassle. Below you can familiarize yourself with the features of planting root crops and the main advantages of the method.
Advantages and disadvantages of the method
In small summer cottages, the method of growing potatoes under straw is especially appropriate. With it, there is no need to dig up beds for tubers, lay additional fertilizers, or spray against many harmful organisms. This method of potato growing has undeniable advantages:
- protection against pests without the use of chemicals - no need to purchase insecticidal preparations reduces the cost of products;
- minimizing the risk of mechanical damage - the crop is often harvested by hand, without injuring the tubers with tools;
- no need for protection from heat and frost - straw or hay acts as mulch, which prevents freezing and excessive evaporation of moisture;
- saving labor costs - when growing potatoes under straw, there is no need to till the soil, use a shovel when harvesting, expending effort on this;
- natural restoration of fertility - over time, straw turns into compost, enriching the soil and loosening.
There are also disadvantages to cultivating under straw or hay. Main disadvantages:
- the appearance of numerous colonies of rodents - for the latter, the remains of wheat are an excellent food supply;
- unusual taste - some note the appearance in the potato taste of notes that are atypical for tubers if grown in the traditional way;
- costs for covering material - about 20-30 m2 of straw is used per one hundred square meters, which has to be purchased from agricultural enterprises or farmers;
- greening of tubers - noted when potatoes grow under a thin layer of straw or hay, when sunlight hits the fruits;
- proliferation of slugs - as a result, the crop may be damaged.
For your information!
Despite all the advantages of the method, it has its own nuances. Before using it, a trial planting of a small amount of potatoes under hay should be carried out throughout the entire area.
Effect of mulch
Above we talked about how straw introduced into it affects the soil, but mulch is laid on top. In fact, the expression “growing potatoes under straw” came from her, that is, mulching the plants, covering them with threshing waste.
When the soil around plants is covered with straw, the following happens::
- moisture loss caused by the capture of water molecules from the surface of the earth by passing air flow is reduced;
- the daily temperature difference decreases;
- the growth of weeds that cannot break through the mulch layer is suppressed;
- the process of crust formation on the surface of the earth stops, thereby eliminating the need for loosening;
- the need for hilling disappears, because the straw lying on the ground effectively serves as an additional layer of soil, that is, it stores and then gradually releases water, and also reduces the daily temperature difference and protects the tubers from light, which increases the yield of each bush.
How to plant potatoes under straw
Planting of tubers begins only after preparatory measures have been carried out. This applies not only to the germination of seed potatoes, but also to their processing. With this method, you don’t have to dig up the soil. But the site should be prepared from the previous season by sowing green manure.
Tuber preparation
A month to a month and a half before potatoes are planted under covering material, they are removed from storage and sorted, removing diseased tubers. For field work, specimens the size of a chicken egg are selected. Planting material is disinfected by immersion in a manganese solution for 15 minutes. Then it is dried and placed in boxes. The latter are transferred to a dry, bright place. The temperature is maintained in the range of 5-15 °C. During the germination period, strong shoots should develop from the eyes.
Soil and mulch
In the area where they plan to grow potatoes under straw next season, green manure crops are sown this season as the most optimal predecessors - alfalfa, rye, oats, mustard. In autumn, the soil can be fed by distributing fertilizers over the surface using the following nutritional compositions:
- compost;
- well-rotted manure;
- grated citrus peels are an effective way to repel rodents in the future;
- ground shell;
- ash is a disinfectant that perfectly fights wireworms.
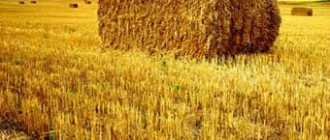
To grow potatoes in straw, the latter is purchased from agricultural enterprises cultivating cereal crops. When the area is small, you can use hay from self-mown grass left after mowing the lawn. If the straw has not become too rotten since last season, you can add it to the mulch.
Technology
When the ground warms up to 10 °C, planting begins. Step-by-step instruction:
- Furrows are made in the soil into which water is poured. The soil should be well moistened.
- The distance between the grooves is about 70 cm.
- If desired, add a nutrient mixture of compost and humus to the recesses. This is not a mandatory action, but is desirable in case of severe soil depletion.
- In grooves with a distance of 30 cm between each other, the tubers are distributed with the sprouts facing up.
- The potatoes are laid with straw or hay in a layer of 40-50 cm, but not thicker, so that the sprouts can quickly and easily appear on the surface.
For your information!
If all manipulations are carried out correctly, growing potato tubers under straw or hay is an effective way to get a large harvest. The bushes develop in optimal conditions: absence of weeds, rapid evaporation of moisture.
Landing rules
The basis for a rich harvest is laid in advance: in the fall, the area is prepared for planting, and the seeds are germinated in early spring.
Preparing the bed
To improve the composition of the soil, add:
- compost or humus, preferably 2-3 years old;
- dry ground citrus peel: its smell repels rodents;
- finely ground egg shells: disinfects the soil;
- ash: effective against wireworms.
Fertilizers are scattered on the ground and lightly loosened with a rake.
Green manure plants are planted in future potato beds: alfalfa, rye, oats, phacelia, mustard. As a result, in the spring you get soil saturated with useful substances, without weeds.
Tuber preparation
Seeds are prepared in March. The tubers are sorted out and damaged and infected specimens are removed. Small potatoes the size of a chicken egg are suitable for planting. They are dipped in a weak solution of potassium permanganate for 10 minutes, dried and placed in boxes.
Containers with planting material are left for 3 weeks in a cool, dry place (at +5...+15°C). This time is enough for sprouts to appear.
Care
Potatoes planted in straw are easy to care for. After the shoots reach a height of 15-20 cm, mounds are created around the bushes - hilling is carried out. This will help protect the tubers from being exposed to direct sunlight and turning green as a result. Humidity must be constant so that when growing potatoes in straw, the tubers form evenly.
Prolonged drought can lead to cracking of tubers. To prevent such consequences, the bushes are watered in small portions at the root. The procedure is carried out only in the evening hours. In case of excessive rainfall, the straw is “stirred” and turned over. This event prevents stagnation of moisture and the development of rot. As the bushes grow, the mulch layer is periodically renewed.
Care after landing
When the stems grow and become more than 15 centimeters, they begin straw hilling - a mound is poured from grass and straw around the tops. This quick procedure completely replaces traditional hilling and is much more effective.
Straw is added once every 10-14 days. When the height of the tops is 40 centimeters, an additional layer is generously poured - 10 cm thick. The bushes do not need additional root feeding; they sufficiently absorb nutrition from the decomposition of the lower layers of mulch. Watering is needed once a week in hot and dry weather. If you don't water at all, the tubers will begin to crack. Water is poured directly under the root.
Watering is necessary at three stages:
- the appearance of sprouts;
- formation of buds;
- after flowering.
Treatment against pests and pathogens is carried out on the eve of flowering.
Alternative methods for cultivating potatoes under straw
In addition to the classic technique, there are a number of variations. All of them involve the use of straw. In its absence, well-dried hay will do an excellent job as mulch. However, to form a layer 50 cm thick, this type of covering material will require more.
Under straw using soil
Small holes up to 10 cm deep are prepared in the selected area. The layout of the planting holes is standard - 30 x 70 cm. Potatoes are thrown into the holes with the sprouts up, burying them with earth. The soil should not rise above the planting material. On top there is a layer of straw 30 cm thick. In order for the shoots to be friendly, this figure should not be increased.
With straw in a bucket
Another unusual way is to plant potatoes in a deep container. Basic steps:
- Take a deep bucket.
- Drainage is placed at the bottom, which is soil in a layer of 7 cm.
- Add humus.
- Send 1-2 tubers.
- Cover the planting material with a 10 cm layer of straw.
- As the bush grows, mulch is added until the container is completely filled.
Using cardboard and straw
Boxes from household appliances are used for reception. In the selected area, the resulting sheets of cardboard are laid out overlapping, fixing the edges of the “beds” with bricks. Cross-shaped cuts are made on the material, into which the tubers are placed so that at least one of the sprouts of the planting material touches the soil. After covering with hay, the potatoes are under a 10 cm layer of covering material.
For your information!
The appearance of seedlings is a signal that mulch should be added. The optimal thickness is 30-40 cm.
Potatoes: growing in straw and hay
Let's look at step-by-step cultivation of potatoes in straw.
Step 1: Preparing the soil
Potato is a light-loving plant. For growing, it is better to choose a well-lit, open area. Otherwise, the tops will stretch, the leaves will turn yellow, and the tubers will become small.
Soil preparation traditionally begins in the fall. During this period, the earth is dug up on the bayonet of a shovel without loosening or leveling. At the same time, weed roots and beetle larvae are removed from the soil.
Important! When digging in acidic soils, add 1 cup of lime per square meter of site. Lime can be replaced with dolomite flour.
In the spring, when the soil warms up to 10°C, mineral and organic fertilizers are added to the dug up soil.
Table. Organic fertilizers for different types of soil
| Soil type | Fertilizers per 1 sq. m |
| Clay or loam | Humus/peat – 1 bucket. |
| Sandy or sandy loam | Humus / peat - 1 bucket, the same amount of clay soil. |
| Peat | Clay, compost and river sand 1 bucket each. |
Table. Mineral fertilizers per 1 sq. m
| Option 1 | Option 2 |
| 1 tbsp. l. powdered superphosphate, 1 glass of wood ash, 1 teaspoon. l. potassium sulfate. | 1 glass of wood ash and 2 tablespoons of nitrophoska. |
Important! Only humus can be added to the soil. Fresh, unrotted manure cannot be used.
After applying fertilizers, the area for sowing is leveled with a rake. The grooves for planting tubers are dug with a hoe or a Fokin flat cutter.
You can apply fertilizers not “randomly”, but directly to the place where the tubers will lie. For fertilizer use:
- peat or humus - one glass each;
- ash – 1 tbsp. spoon;
- superphosphate – 1 teaspoon. spoon.
Fertilizers are mixed with soil to a depth of 10 cm.
Step 2. Preparing tubers for planting
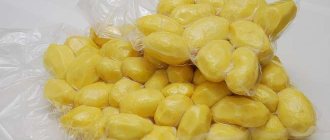
Preparation begins with the rejection of seed material. A richer harvest is obtained from tubers weighing more than 100 g. Tubers weighing from 40 to 60 g are suitable for planting. It is better not to use small tubers.
Germination of tubers is carried out in well-lit rooms at room temperature and sufficient ventilation of the space.
- Selected tubers are strung on wire and hung in front of the window until sprouts appear. Do not expose seed potatoes to direct sunlight.
- Potatoes are packaged in small transparent plastic bags with perforations. You can tie bags with thread or twine. During the germination process, the bags are turned over several times. Sprouted potatoes are transported in the same bags, placed in any rigid container of suitable volume.
What to do if you didn’t have time to germinate the tubers?
In this case, the potatoes are dried for 8-10 days. The tubers are scattered in a layer up to 10 cm thick in a bright, heated, ventilated room. The tubers will not sprout, but the eyes will become active, which will have a positive effect on the speed of germination and yield.
Step 3. Planting conditions
In order not to constantly measure the degree of soil warming, while waiting for a favorable period for planting potatoes in hay, you can focus on the air temperature. During frosts with temperatures dropping to -3°C, the sprouts die. The optimal average daily air temperature to start planting is +15°C. Typically, gardeners plant tubers from May 5 to May 10.
On a note! Some gardeners begin planting potatoes at the same time as the bird cherry blossoms.
For work, it is best to choose a fine sunny day and plant in moderately moist soil. If the soil is waterlogged, there is a high risk of rot and crop diseases.
Step 4. Planting technology
How to plant potatoes under straw? Tubers are placed in the prepared grooves, one piece at a time, sprouts down. The distance between tubers is 20-40 cm. The distance between grooves is up to 70 cm. The tubers are lightly sprinkled with earth. A layer of straw 15 cm thick is laid on top.
To prevent the straw from flying away when the wind gusts, you can sprinkle a little earth on top.
Step 5. Potatoes in straw: cultivation and care
In dry weather, watering is required. For convenience, you can use drip tapes or evenly irrigate the crops manually from a hose. The stream should be directed at the root, without wetting the flowers and leaves of the plants.
When the stems reach a height of 25-30 cm, you can “hill” them with straw. If the tubers are exposed to direct sunlight, they may turn green.
Step 6. Harvest
Harvesting occurs when the tops begin to dry out. On average, it takes 12 weeks to grow potatoes in hay. You can mow the tops 1-2 weeks before harvesting the potatoes, but this is not necessary. The tubers do not need to be dug up; they are located under the hay. Some tubers may be covered with soil.
It is recommended to store the crop in perforated bags to prevent the potatoes from becoming damp and rotting during storage.
What to do with the hay - leave it to fertilize the soil or fold it and put it away until next spring - each agronomist decides independently.
Diseases and pests of crops
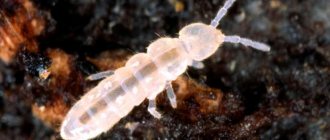
The greatest danger to potatoes cultivated under covering material are slugs and mouse-like rodents. For the former, straw becomes an excellent bedding under which they live, feeding on young shoots. Lime, ground eggshells are used against gastropods, and they are also collected by hand. To protect the plantings from rodents, herbs are planted next to the bushes. You can also use sound effects by installing metal rods around the perimeter of the beds and hanging 5-liter plastic flasks on them.
In addition, as with standard cultivation, potatoes are attacked by the Colorado potato beetle. To protect the crop, the tubers are treated with an insecticidal disinfectant. The effect will not be enough for the entire growing season. You will have to carry out additional spraying after the mass population of shoots begins. If moisture stagnation is avoided, diseases do not appear.
Harvest and storage
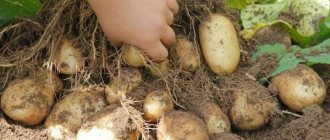
Harvesting potatoes on straw is pure pleasure. There is no need to dig it, just slightly tug the bush and selected clean tubers will completely appear on the surface.
Storage details:
- The first two weeks after harvesting, potatoes are stored at 14-18 degrees;
- Then they keep it at 12-14 degrees for 10-12 days. Tubers are selected for food for the winter and for seeds;
- Store for a long time at 2-4 degrees, humidity 80-90%. Use dark, ventilated rooms;
- Placed in wooden boxes, nets, shelves, containers for vegetables;
- The straw is dried and stored for the winter.
Although highly effective, the method of growing under straw mulch is inexpensive and simple. No need for hilling, weeding, minimum watering. As straw rots, it releases heat and nutrients. Potatoes are comfortable in it - moisture is retained, there are few weeds, the soil is soft, loose, fertile. Consistently high yields do not depend on weather conditions, productivity per hundred square meters is 320-330 kg. and more.
Currently reading:
- All the benefits of mulching the soil for high yields
- Choosing cucumbers for open ground according to your preferences
- Basic technologies for growing and caring for peas
- Timely application of dolomite flour for the harvest
Share the news on social networks
About the author: Lyudmila Vasilievna Nosikova
Agronomist of the state agricultural enterprise "Garovskoe" of the Khabarovsk region of the Khabarovsk Territory.
Harvesting
If the timing of planting and preparing seed potatoes is observed, young tubers are dug 60-70 days after emergence. Technical ripeness depends on the planted variety. The last factor also affects productivity. Depending on the variety grown and the quality of the planting material, about a bucket of large tubers is collected from the bush.
Potatoes are harvested on a sunny day. The mulch layer is removed with a rake. The tubers are collected by hand, since they are located almost on the surface. Drying with this growing method may not be necessary if the covering material was dry. The harvest is distributed into boxes or bags. Fresh straw is not thrown away, but used for the next year.
Growing methods step by step
There are two ways to plant potatoes under straw:
- the first implies that straw is used only for mulching, and soil restoration occurs through the application of various fertilizers;
- the second involves not only laying straw on top, but also using this material to restore the soil and increase crop yields.
We recommend using the second method, which, unlike the first, completely eliminates the risk of increasing nitrates in the fruits, and such tubers are very dangerous to health, so they should not be eaten.
In addition, the second method greatly facilitates the entire growing process, because:
- no need to weed or pull out weeds;
- the frequency of watering is reduced;
- the need for hilling disappears;
- productivity increases;
- plant immunity improves.
This difference is due to the fact that no fertilizers or even repeated digging of the site can replace the process of natural soil regeneration, but if you speed up this process by adding straw and combine it with digging, the soil fertility will increase several times. Therefore, proper cultivation of potatoes under straw begins not with planting new seed, but with harvesting the old crop.
Such cultivation can be divided into several stages :
- autumn soil preparation;
- spring soil preparation;
- planting seed material;
- application of mineral fertilizers;
- first mulching;
- second mulching;
- intermediate mulching;
- harvesting.
Autumn soil preparation
If you plan to plant potatoes in the same place where they grew, then immediately after harvesting, sow the area with green manure , that is:
- cereals;
- legumes;
- mustard;
- oily radish.
You can plant just one plant, but it is better to use them all, mixing them throughout the area. As soon as the green mass gains strength, trample it and dig up the area, then mulch it with partially rotted straw.
We described these processes in detail in articles:
- Mulching with straw.
- Is it possible to cover plants with straw for the winter?
If you have ready-made humus, then pour it before mulching, cover it with partially rotted material on top and water it generously. The use of biodestructors gives good results, because they accelerate the conversion of cellulose into humic acids and increase the efficiency of the soil regeneration process.
If you plan to plant potatoes in an area previously occupied by other crops, cover it with humus and mulch with straw. If the site has been fallow for a year, then it does not require any preparation , because the land has rested and is in optimal condition.
Spring training
In warm regions, spring soil preparation comes down to digging trenches and placing humus from manure and straw, or any other material, in them. In cold regions, soil heating is required , which will allow seed to be planted 2–3 weeks earlier.
To do this, either dig trenches approximately 80 cm deep for every 2 rows of potatoes, or dig a pit of the same depth, and beds and row spacing are formed after adding heating material and insulating soil.
Having prepared a hole or trench, fill it with straw and trample it thoroughly to make a pillow 40 cm thick. Ideally, under the weight of a person, it should sag no more than 1–2 cm. If possible, it is advisable to increase the thickness of the pillow to one meter, this will increase the heating efficiency, but it cannot be made thinner than 40 cm, otherwise it will not warm the soil above it.
Then water the heating material generously with warm water with biodestructors dissolved in it , for example:
- The drug Baikal EM-1.
- The drug Biocomplex-BTU.
- Urea.
- Yeast.
Immediately after watering and adding biodestructors, cover the heating material with a layer of earth 30–40 cm thick and after 2–3 days plant the seed material.
Planting seed material
Gardeners still cannot agree on what is better to plant - whole potatoes or pieces, so you will have to choose a solution yourself.
Before planting, make furrows 10 cm deep, into which pour a 5 cm thick layer of humus; if this is not done, the yield will be worse. Place the furrows from north to south , so the plants will get more solar heat and light.
Some gardeners first form high beds that rise 5–10 cm above the row spacing, and then form furrows in them.
To grow under straw, deep furrows are not required, the main thing is that the potato is at least slightly covered with soil, and new tubers will form at the junction of soil and straw, so the optimal distance between the top of the tuber and the straw is 1–3 cm.
Application of mineral fertilizers
Among gardeners who grow potatoes, there is ongoing debate about when to apply mineral fertilizers, that is, ash. Some recommend sprinkling it at the bottom of the furrow, while others advise sprinkling it on top of the soil or mulch.
We recommend focusing on autumn preparation - if you mulched the area in winter with partially rotted straw, then it is advisable to apply the ash both into the furrow, where it will reduce the slightly increased acidity of the soil, and sprinkle it on top of the mulch. If you did not mulch the area in the winter, then there is not much difference where exactly you add the ash, the effect will still be the same.
First mulching
Immediately after planting the seed material, cover the beds and row spacing with straw, with the layer thickness on the beds being 20 cm and on row spacing 10–15 cm .
Use only fresh (not rotted or discolored) straw that has been stored in ventilated, dry places for no more than a year.
The best material is with an average straw length of 20 cm; it is quite flexible and pliable, and due to its relatively long length it will not be blown away by the wind. Do not compact the mulch, but rather loosen it a little with your fingers; this will not spoil the thermal insulation properties of the material, but will make it easier for potato seedlings to germinate.
In most cases, the entrances will successfully break through the mulch, but sometimes they lack the strength to do so. In such cases, the surface of the mulch rises slightly above the emerging greenery .
When you see a characteristic raised area through which a sprout has not emerged for a couple of days, carefully dig it out, providing access to the sun, then carefully spread the mulch so that it tightly covers the soil and the young stem.
Second mulching
When the stem rises 15–20 cm above the mulch, instead of hilling, cover the entire area with another layer of mulch 10 cm thick. Use the same material as for the first mulching, that is, last year’s normally preserved straw with a light yellow to golden color.
Do not press it to the ground to compact it, but lay it in 5cm thick bunches, pressing them together.
Such beds can be watered either from a watering can or by drip irrigation. Depending on the weather and the properties of the soil, watering is required 2-8 times a month, although if there was a snowy winter, and then after the snow melted there were heavy rains, then you can do without watering until the heat starts.
Intermediate mulching
In addition to the first and second mulching, intermediate ones are also necessary, during which the optimal thickness of the protective layer is restored.
The need for this arises because:
- exposure to wind, which blows away some of the straws;
- the natural process of pressing the lower straws, caused by the softness of the straw due to high humidity, as well as natural decay.
This mulching is carried out once every 3-4 weeks.
Harvesting
Before harvesting, all mulch is removed from the site and placed in a compost heap or pit; until complete rotting, the material is unsuitable for use on the site. Then most of the tubers are collected from the surface of the soil, and the remains are dug up , after which the area is leveled and green manure is planted.
Which is better: hay or straw?
You can grow potatoes under hay and straw. Both covering materials have good protective functions. However, straw has an important advantage in terms of facilitating maintenance and minimizing labor costs. It is heavy and dense, so it retains moisture well, preventing evaporation. But potatoes under hay need to be watered often. Loose mulch dries quickly.
This is counterbalanced by the fact that you can easily prepare hay yourself. You can sow forbs on the site. Then, in addition to hay, the summer resident will improve the composition and structure of the soil for future plantings. If you don’t have the time and desire, you can mow the grass next to your house, in the pasture, dry it well and use it for cultivating garden crops.
For your information!
When choosing a covering material, take into account the acidity of the soil. If it is elevated, hay should not be used.
How is this possible?
There is a non-traditional way of growing potatoes under straw, where the soil plays a secondary role. Caring for potatoes planted in open ground in this way is easier. But even this method of agricultural technology has its advantages and disadvantages.
Pros:
- There is no need to dig deep into the soil and shake out all the weeds.
- You can start growing potatoes even in a deserted area where nothing has been planted for a long time.
- Straw is an excellent mulch layer. Weeds cannot break through the thick layer of thatch. This means you won't have to weed.
- There is no need to hill up. You will only need to add hay/straw.
- Potatoes grown in hay are rarely attacked by the Colorado potato beetle.
- The method is good for arid regions. Watering is only required if drought and high temperatures persist for a long time.
- There is no need to dig for crops. You need to move the layer aside and lightly pull the bush.
- The land is not depleted by such agricultural technology. Potatoes get all their nutrients from decomposed hay. The soil, on the contrary, will be enriched with nutrients.
- From one bucket of planted potatoes you can easily harvest 10 buckets.
Minuses:
Straw is a magnet for mice and other rodents. If they multiply under it, then most of the harvest can be lost. To repel rodents, elderberry, black root, wormwood, mint, tansy, chamomile, and wild rosemary are grown in the potato plot. You can also spread dried and crushed orange and lemon peels when planting potatoes. Their aroma will repel rodents.
- Potatoes grown under straw have a slightly different taste that takes some getting used to. Not everyone likes him.
- Straw is a breeding ground for slugs. They feel at ease here. It is not advisable to plant cabbage near a potato plot.
- To grow crops, large volumes of straw and hay are needed. If you can’t prepare them yourself, you’ll have to buy them. And this is a financially expensive undertaking.
Reviews
Sergey, 45 years old:
“I was recommended to grow potatoes under straw by a neighbor at my summer cottage. I don’t go there often, so I don’t have the opportunity to constantly weed and loosen the beds. I often come to the dacha just to relax. Thanks to this technique, it was possible to combine potato cultivation and relaxation. I only spend time on planting, care is not a hassle. But the harvest obtained with one’s own hands is very pleasing with its stability and quality.”
Maria, 50 years old:
“I plant potatoes every year. To get a good harvest, I spend a lot of time and effort, as it involves weeding, fertilizing, and hilling. Not to mention plowing and harrowing. After watching the video and reading the reviews, I decided to try growing some bushes using covering material. The result was pleasing: maintenance is minimal, the soil is not depleted, and the harvest is rich.”
Growing potatoes under straw is an excellent method that allows you to get a good harvest with minimal effort. The main thing is to plant correctly, observing all the requirements for planting material, site, and mulch.
Reviews from gardeners
Opinions about the method vary. Experienced gardeners get a good harvest. Those who experimented for the first time had more modest results.
Valentina, Odintsovo: “Last year I conducted an experiment. It was a pity to throw away the remains of the sprouted potatoes. She laid it out between the rows on the mown grass. I covered it with straw, then added freshly cut lawn grass. But I made the rows too close - it was inconvenient to add mulch. I liked this semi-lazy method, and I’m continuing the experiment this season. It’s convenient to harvest: lift the hay, take out what you like, close it, and let it grow further. At the end, I moved the entire straw blanket and collected clean tubers.”
Sergey, Izhevsk: “I’ll share my experience of how I grew potatoes under hay: I planted 7 varieties of 5–10 tubers each. I didn’t spend a lot of time on this: I laid out the tubers on the ground and covered them with dry grass. Of course, it's easier than digging with a shovel. As the potatoes grew, I forgot to add material. I think that’s why I got a lot of green tubers when harvesting. There were mice - I brought 2 cats, but after a few days the mice disappeared. I left 1 cat in the house. Because of the hay, the tops came out later than usual. There were few beetles, but there were still some. Different varieties produced different yields. I concluded that for this method it is better to select tubers. It wouldn’t hurt to cover the area with something opaque, at least in the first half of growth.”
Alexander, Krasnodar: “When they ask me how I planted potatoes and got so much harvest, I answer: “Under straw.” It preserves ideal microflora in the beds. The tubers under it are warm and humid, they turn out tasty and large. I plant no more than 2 buckets, and collect no less than 12.”
Advantages of the method
Using straw as a cover for potatoes has many important advantages that all novice gardeners should know about:
- Straw is an environmentally friendly and safe natural material.
- There is no need to preliminary dig up the soil and clear the tubers from the soil.
- The shelter provides the vegetable crop with reliable protection from adverse weather conditions (in the form of hail or frost), as well as from weeds and insect pests.
- The bottom layer of straw mulch is actively processed by earthworms, which saturate the soil with humus and increase its fertility.
- High yield is ensured - you can get a bucket of potatoes from a bush.
- Straw retains moisture well, so in rainy weather there is no need for frequent watering.
Care and harvesting
Potato seedlings usually do not emerge soon, since they need time to overcome the layer of straw, but then, having grown stronger, they begin to outstrip their counterparts planted in the ground in growth.
Supervision of potatoes grown under hay consists of restoring a layer of mulch around the sprouts, and their preliminary spreading to the sides with straw relaying replaces conventional hilling.
During very hot periods, it is possible to water the area, but in damp summers you may have to stir up the straw to ventilate it.
Getting a good harvest is unthinkable without eliminating rodents and slugs. The fight against the former involves installing ultrasonic repellers along the boundaries of the site.
The means of fighting slugs are no different from those used when caring for potatoes planted in the ground: various products are poured along the outskirts of the site, such as pepper, salt, cilantro, dry parsley, as well as ash, eggshells, and fluff lime.
In addition, containers with beer are also placed as traps, which are then regularly cleaned and substances specifically designed for combat are used: Ferramol, Thunderstorm, Meta, Slug Eater, etc.
In the fall, after about three months, harvesting begins, since by this time the potato tops will turn yellow and dry, so it is enough to rake the mulch with a pitchfork or rake and select the potatoes.
The removed mulch will be useful next spring and should not be thrown away, since in the next season, observing crop rotation, carrots, pumpkins, zucchini, beets, and cabbage will grow well in this area.
Reviews and dry statistics show that one bucket of potatoes planted under straw can yield up to 10 buckets of tubers, and the second year is characterized by a higher yield and, most likely, because part of the mulch is already turning into humus and the soil structure improves , and summer residents gain some experience.
Classic way
Work on the future harvest begins in the fall. So. Let's move on to the main steps:
Setting the stage
Work begins in the fall. The scheme works both in the case of a well-groomed plot and in the case of cultivating “virgin land”. We stick the bayonet of the shovel shallowly and turn the grass upside down. The green part of the grass is in contact with the ground. In winter, it will rot and serve as soil fertilizer.
It is recommended to plant the area with green manure plants. They displace weeds from the site and enrich the soil with phosphorus, nitrogen and other microelements.
The following are suitable potato precursors:
- mustard;
- oats;
- rye;
- alfalfa;
- phacelia.
Preparation of material
For growing potatoes, it is preferable to use not fresh straw, but last year’s, compacted straw . Freshly cut grass will not work. It gives little nutrients to potatoes. Straw that has not rotted during the season can be reused. You just need to dry it well.
Planting potatoes
In the spring, before planting potatoes, the soil is moistened.
- Next, it is laid out in rows, keeping a distance of 25-30 cm between the holes.
- The gap between rows should be 70 cm.
- You can scatter your choice around the potatoes: crushed eggshells (disinfecting effect), wood ash (from wireworms, a source of potassium), crushed orange and lemon peels (repels rodents).
- Then you need to cover the potatoes with a 25-30 cm layer of straw/hay.
- The layer between the holes should be thinner.
Note! Weeds will not break through such a layer of straw, moisture evaporation will be excluded, and fruit formation will begin in ideal conditions for potatoes.
From the video you will learn how to plant potatoes under straw:
Preparing tubers for planting
In autumn, when harvesting, tubers weighing from 30 to 100 g (within a chicken egg) are selected for seeds. Before storing potatoes, they must be left in the light for a couple of weeks so that they turn green and corned beef forms in them, which makes the potatoes unsuitable for food, but corned beef has protection against rodents, bacteria and pathogenic fungi.
On the eve of planting potatoes for hay, it is necessary to start preparing seed again, namely: approximately a month before planting, the selected tubers should be sprayed with Phytosporin, which prevents diseases, and in addition, a pink solution of potassium permanganate and copper sulfate can be used.
A good result is obtained by treating the seed tubers with activated water, and then spreading the potatoes in a thin layer in a room with sufficient lighting and a temperature of about 20 degrees.
At least seven days before planting, remove the seed tubers to a dark, cooler storage and preferably cover them with sawdust or burlap soaked in water. During this time, the tubers harden, their sprouts become white, on which fibrous roots appear, which contributes to the emergence of faster shoots.
Immediately before planting, the tubers need to be treated with solutions against pests, for example, Turbo or Prestige.
By germinating seed potatoes before planting, the harvest is achieved 2-3 weeks earlier than when unsprouted tubers are used, and to speed up the appearance of potato sprouts, it is appropriate to spray with solutions of mineral fertilizers. Protection against diseases and slugs is achieved by rolling the seed material in ash.