How is it carried out?
Previously, instead of a special device - an ovoscope, a candle was used. Now to examine the contents of the egg you will need a device and a special grid. It is placed on the grill, and then shined through by placing the device under it. The method is simple, but with its help you can control the process of incubation development of poultry.
If there is no money for a special device, you can track incubation development in a different way. To do this, you will need an ordinary cardboard box and a light source - an incandescent lamp with a power of more than one hundred watts.
Not all breeders use a reflector , but installing it under a lamp also helps. A hole of small diameter is made in the box. Place an egg inside and examine it with slight turns in different directions.
What is ovoscopy?
Before laying eggs for incubation, they are examined with an ovoscope. The inspection process is called ovoscopy. In addition to the ovoscope, the light source can be a window, a flashlight, or a lamp.
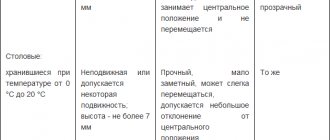
Important! At the moment of laying, a chicken egg has its greatest weight. It dries out every day, so only recently laid ones are taken for incubation.
Ovoscope is a small box with electric or other type of lighting. By placing an egg against a light source, you can determine whether it is suitable for incubation. The light source illuminates it, and you can see not only the contents, but also defects in the shell or air chamber, if any.
Process and photos by day
There is no need to ovoscope chicken eggs every day during incubation. There are reasons for this. Which?
- If the eggs do not hatch in an incubator, but the chicken hatches them, every inspection is stressful for her.
- Damage to the egg.
- When removing an egg from the incubator/taking it away from the chicken for a while, the temperature drops, which means problems with development may arise (you can find out more about the storage temperature of hatching eggs here).
Ideally, all manipulations are carried out in a warm room, and try not to delay the procedure for more than five minutes.
For the first time
The first candling of chicken eggs is carried out on the sixth day of incubation. Ovoscopy should not be skipped at this stage, since only with its help will it be possible to determine the degree of fertilization, the state of the circulatory system and the location of the fetus.
Unfertilized eggs have a light tone, the yolk is a solid dark spot , and there are no rudiments of the circulatory system. If the fruit has frozen in development, it is large in size, has a pronounced oval shape and an uneven edge.
If there is a blood circle, the fetus has died. If it develops normally, there are no abnormalities, and the circulatory system is clearly visible.
Day 11
After checking on the 6th day, ovoscopy is carried out only on the 11th day. The goal is to assess the condition of the allantois . When properly developed, it fits tightly around the contents and closes where the end is pointed.
If problems are identified with the development of the allantois circulatory system, you can help the embryo by improving its nutrition.
Day 18
Immediately before biting, on the 18th day, ovoscoping is done for the last time. The procedure is needed to determine the readiness of the fetus to hatch. In the absence of a lumen in the pointed end, there are no pathologies.
If defects are detected, the testicles are transferred, moving, for example, to the middle tier of the incubator.
Features of the procedure
Before being placed in the incubator, the eggs are inspected in order to reject unsuitable specimens. During the incubation process, inspection is carried out 2-3 times to identify eggs with frozen embryos and other developmental anomalies in order to promptly remove such specimens from the incubator.
Inspection instructions:
- Hold the egg over the light source. To do this, place the blunt end directly over the source.
- Tilt it slightly to the side. Turn.
- Look for signs that the specimen is suitable for incubation: the yolk is centered, the air chamber of the correct shape is at the blunt end, there are no defects in the shell, no blood vessels, no foreign matter.
- At the embryonic stage, the outline of the embryo and blood vessels should be visible.
- If the embryo has stopped developing, the contents become cloudy and the blood vessels are not visible.
- An unfertilized egg contains no signs of embryonic development. It will look exactly the same as when it was placed in the incubator.
- If you are unsure about any of the eggs, just check them after a few days.
Video: Ovoscoping duck and goose eggs
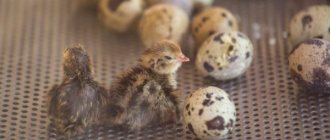
During normal development of the embryo
The examination should show that in the first week the embryo formed and began to develop, in the second week that it increased in size, in the third week the formed chick is visible at the end of the egg, and in the 4th week it simply develops, filling the cavity.
Important! You will absorb about half the protein from an egg if you eat it raw. In other words, it's better to fry them than to drink them.
For pathology
If the embryo has stopped developing, you will see in the light:
- presence of blood clots;
- a cloudy darkened mass instead of an embryo;
- absence of blood vessels;
- an embryo that is too dark and appears stuck to one side of the shell.
The examination is carried out within 2-3 weeks in order to notice the frozen embryo in time.
Procedure for normal embryo development
Some poultry farmers do not agree that ovoscoping should be carried out only 3 times. They prefer to do the procedure every three to five days. In the early stages, they weed out unfertilized eggs by looking closely at the threads of blood vessels.
Poultry specialists are able to determine the heartbeat by the pinkish tint of the glow . At a later stage, the allantois lines the entire inner surface of the shell, closing in one place - at the sharp end.
A normal embryo already has a large shape and the threads of blood vessels are clearly visible. By the time it hatches, it is even larger, takes up all the internal space and moves.
For pathology
This invaluable diagnostic method allows you to remove eggs from chickens in which the embryos are not developing properly. If too many eggs are discarded, it is worth paying attention to the conditions in the incubator in the future.
Quite often, the embryo is pressed to the shell at 7 days . Its outline resembles a comma. It is not normal. Another problem is manifested by paleness of the egg and poorly defined vascular cells.
It is advisable to consult with specialists or study literature on this topic before throwing away eggs.
What defects may appear during incubation?
- Uneven shell structure. It looks spotted or marbled. This defect occurs due to the fact that there is little or too much calcium in the body of the fetus.
- Lightish lines indicate internal damage.
- The presence of air space on the sides, in the middle and at the pointed end.
- Blood clots inside.
- Dark stains are mold.
- Quilts or grains of sand inside an egg.
- There is no yolk inside and the entire liquid is reddish-orange in color. It simply broke the yolk and mixed it with the white.
- Two yolks.
- “Free movement” of the yolk or it has dried to the shell.
DIY ovoscope
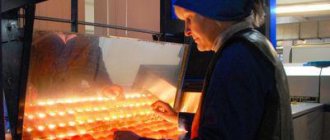
On large poultry farms and poultry factories, industrial ovoscopes are used to control hatching eggs, which make it possible to examine a batch of up to 300 or more pieces.
Be sure to read:
How to make a cone for slaughtering poultry with your own hands, how much does such equipment cost?
In homestead farming, simple devices are used that are designed to test a maximum of 16 eggs. If it is not possible to purchase a device, it is easy to make it yourself.
From a tin can
To make an ovoscope you will need the following materials:
- a cartridge with a cord with a plug attached to it;
- light bulb, preferably energy-saving;
- tin can with a height of 20 to 30 cm.
A clean coffee or beer container will do.
Further progress of work;
- 1/3 is retreated from below, a hole is made in the side with a knife, the diameter of which corresponds to the circumference of the cartridge. An opening can be made in the bottom, and holes can be pierced on the sides for ventilation.
- The cartridge together with the light source is inserted into the opening and secured.
- A hole is cut at the top of the future ovoscope, shaped like an egg, but smaller in size so that it does not fall through.
Ovoscope from a tin can
Ovoscope from a tin can
Ovoscope from a tin can
The device is ready, you can plug it into the network and examine the incubation material.
From a flashlight
The idea is based on simplified models of Chinese-made ovoscopes, where an elastic attachment is placed on a regular flashlight. The egg is placed in the hole, the flashlight is turned on, and the device works.
To implement your plan, you will need:
- simple LED flashlight;
- rubber nozzle: this will require a regular cuff connecting the sewer pipes;
- handle holder, can be used as desired.
By attaching a rubber band to the head of the flashlight, you will get a device for candling eggs. For ease of viewing, you can use a holder that is attached with a screw or wire at an angle of 90° to the flashlight body.
Video on the topic
You can also learn about ovoscopy of chicken eggs in this video:
People reading the article may find other materials about chicken eggs useful:
- Rules for selection and verification.
- Incubation mode.
- Shelf life of raw eggs at room temperature.
- How to store it correctly?
- Artificial chicken breeding technology.
- What is the incubation period?