Poultry farming » Quail
0
1608
Article rating
Kira Stoletova
Nowadays, for human convenience, when breeding quails, incubators are used, in which the most correct and suitable conditions are created for the maturation of eggs. As for quails, it is extremely important to preserve as many young animals as possible, since their further resale is a fairly profitable business. For babies you also need to choose a cage; it should be very low. However, in order to obtain unusually tender quail meat, you need to create the necessary conditions for the chicks, that is, this will require incubation of quail eggs.
Incubation of quail eggs
The fact is that the female quail does not hatch eggs for a long time, so in natural conditions some of the young animals do not survive. If you use an incubator, that is, hatch quails in an incubator, then in just 16-18 days, the offspring will hatch, and the losses will be close to zero, that is, they are low. What is hatching of quails in an incubator at home, what eggs need to be selected in order to hatch healthy offspring, how they are laid, what modes of incubation of quail eggs there are, we will talk about these and other pressing questions regarding the process of incubating quails and their breeding below .
Benefits of Incubation
Farmers have no problems with the choice of fertilized eggs: cockerels mate very actively, so in fact, at least 90% of the eggs can produce offspring. However, it will not be possible to plant quails on the eggs themselves.
They solve the problem of hatching chicks in 2 ways. Eggs can be placed on a mother hen or even a hen, although problems may arise with the latter: quails hatch faster than chicks.
A more radical and effective method is incubation. Selected specimens are placed in a special apparatus where constant temperature and humidity are maintained.
The incubation period is 17–23 days. Then the bite begins.
How to choose an incubator?
Standard incubator
Quail eggs are very small - 9-11 g, so a large apparatus is not needed. Quite often, small farms make do with tabletop options designed for 40–60 pieces.
If it is intended to breed a larger number of individuals - up to 100 pieces - use universal incubators, such as "Hens" or "Cinderella".
The big advantage of incubating quail eggs is that the latter do not require any special conditions.
The eggs are not turned, so the machine does not need an automatic turning function. No active ventilation required - a few open vents are more than enough.
Humidity can be maintained in the most common way by placing a couple of containers of water over the heaters. Models in which the heaters are located below the tray are preferable to ensure uniform heating.
Water containers should be placed above the heaters. This makes it much easier to maintain the required humidity level.
These features distinguish the incubator, the operation of which is discussed using the example of hatching chickens.
Accordingly, for hatching chicks, you can safely choose the simplest, cheapest models.
The important factors for making a decision are the following:
- maximum load - that is, the number of eggs that can be placed in the incubator;
- The presence of a thermometer is mandatory;
- the presence of ventilation holes is mandatory;
- the possibility of incubating eggs of different birds , if it is planned to breed not only quails, but also chickens and geese;
- quality of thermal insulation - in order to maintain a stable microclimate, the incubator actually needs not high-tech control systems, but good thermal insulation.
Requirements for containers and premises
Violation of the rules for storing an incubation batch can lead to undesirable consequences. Quail and chicken eggs can be kept in plastic trays. Cardboard containers are not suitable for storing such batches, as mold may develop inside.
Specimens for incubation are placed with the blunt end up. In what room is the “bird future” preserved? Is it possible to keep a batch of eggs in the cellar?
- If you are faced with the task of leaving chicken or geese eggs for 2-3 days, the temperature in the room should be 16-18 °C.
- If there is a need to keep the batch for 5-7 days, the conditions will be different. At a temperature of 8-12 °C they feel good for a week. The quality of hatching specimens may then decline.
- In a warehouse with eggs, air humidity should reach 80-85%. Failure to comply with this condition leads to drying out of the incubation specimens. To ensure that the product is stored safely, place plastic containers with water nearby. You need to turn it over every day.
How to choose eggs?
Material for laying can be purchased ready-made - this is what they do if they start breeding from scratch. If they have their own flock of birds, farmers, as a rule, select specimens on their own. However, to get healthy offspring, you also need to pay attention to the parents.
To obtain incubation material, only young - 2-8 months old, and healthy individuals are selected. They are placed in a separate cage - no more than 60 individuals per 1 square. m to prevent overcrowding.
It is necessary to monitor the cleanliness of the cage, provide the birds with fresh water, clean air, and complete food rich in protein.
The cockerels are changed periodically. When the quail reaches 4–5 months, new young cockerels at the age of 2–3 months are added to the females. For every 15 quails there are no more than 5 cockerels - the ratio of females to males is 3–4:1.
Females older than 8 months are discarded. Their egg production drops slightly, but their eggs are no longer suitable for fertilization.
Inbreeding should not be allowed. As practice shows, in this case, the hatchability of chicks drops to 50%, and the offspring are weak.
Weight
The first eggs, even from the best birds, are always small. They are not suitable for bookmarks. You need to wait until the quails start laying larger eggs.
The weight of the selected specimens must correspond to breed standards. Thus, the eggs of meat quail breeds should weigh 12–16 g, and egg quail eggs – 9–11 g.
Specimens that are too small are not suitable, since the embryo in them is not provided with sufficient nutrients. Too large ones often contain 2 yolks, which makes the emergence of an embryo impossible.
Form
Equally important is the shape of the egg, as well as the location of the yolk.
Specimens are selected based on the following characteristics:
- Only eggs of a regular, slightly elongated shape are suitable. Sharp and elongated ones will not allow the embryo to develop normally; spherical ones contain too little protein;
- reject specimens that have an air chamber at the sharp end or on the side;
- the shell must be smooth, evenly colored, without cracks, sagging or roughness;
- too bright pigmentation is also a disadvantage;
- if the yolk is placed too close to the shell, and not in the center, such a specimen is also rejected.
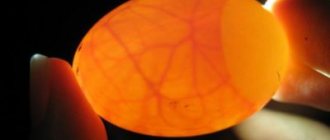
Ovoscopy
The candling procedure is carried out several times during incubation. The ovoscope allows you to see what is happening inside each specimen and reject unsuitable eggs.
The first ovoscopic examination of eggs is carried out before they are placed in the incubator. It is impossible to determine the fertilization of the testicle with its help, but the ovoscope allows you to clarify the condition of the yolk and its position.
During candling, specimens with the following characteristics are removed:
- mixed yolk and white indicate the impossibility of an embryo;
- the presence of blood spots in the white or yolk also indicates the unsuitability of the incubation material;
- the presence of 2 yolks or the absence of even one is a reason for culling;
- the formation of air chambers at the sharp end is noticeable only through an ovoscope. Such specimens are rejected;
- If the yolk is not centered or moves to the side or pointy end when turning, the egg is not used.
Laying eggs
Before placing the material in the incubator, it is brought into the room and left for 2 hours at room temperature, this will prevent the formation of condensation drops on the shell.
Vertical bookmark
The timeliness of turning does not determine the quality of hatching in quails, so many poultry farmers practice laying incubation material in a vertical position with the sharp end down.
Regular movement of eggs from cooler areas of the incubator to well-warmed ones should be accompanied by turning them manually.
2-3 days before hatching, the eggs are laid on their side.
Experienced poultry farmers, in order to save time and space, also practice vertical laying on two floors. This is possible in industrial incubators with good air exchange and uniform heating. Rotation in this case is carried out by tilting the gratings (shelves), performed by the unit in automatic mode.
Horizontal bookmark
Laying the embryos on their side is more common, but in this case it is better to turn off the drive for auto-turning. To prevent damage to the shell, practitioners recommend lining eggs with napkins, cardboard or foam rubber, but all these methods are labor-intensive and worsen the gas exchange of the embryo, preventing it from fully developing.
Preparing for Incubation
The device for laying also needs to be prepared:
- The incubator is washed with warm water. Potassium permanganate can be added to water to create a light pink solution. Then the device is dried.
- It is necessary to disinfect the incubator in any available way.
- After disinfection, the device is dried again.
- Water containers are filled with clean liquid.
- Immediately before laying, the incubator is preheated for 2–3 hours.
Determination of quail eggs unsuitable for incubation during ovoscopy.
Humidity in the incubator
In modern models, water containers are simply filled with liquid. If they are not there, then you can simply install a container of a suitable volume.
Additionally, during incubation, the walls and lid of the device are sprayed with a spray bottle. Measure humidity using a hydrometer. Initially, the humidity should be 50–60%.
Disinfection
Disinfection is carried out using a variety of methods:
- formaldehyde - the device is treated with vapors of the substance for 40 minutes;
- You can also disinfect it with a chloramine solution - 10 tablets per 1 water.
- The walls and lid are sprayed with liquid and the device is left closed for 40 minutes. Then rinse with warm water;
- ready-made preparations are also used - “Monclavit”, “Virosan”, “Brovadez”;
- For the same purpose, you can use a quartz lamp - treat it with radiation for 30–40 minutes.
Eggs are also disinfected before laying. To do this, they are placed in a weak, light pink solution of potassium permanganate and kept for 15 minutes. Then air dry.
What to do before placing it in the incubator
In order for a healthy and viable chick to hatch, the egg must be no older than 10 days and stored at a temperature of 10-15°C. Preparing quail eggs for incubation is the most important stage of quail hatching. The percentage of young animals depends on preparation. It is important not to keep eggs at room temperature for incubation. This way they can quickly deteriorate.
Collection of quail eggs and their disinfection are necessary to increase the chances of survival of the chicks. Before putting them in the incubator, be sure to wash the shells well, and it is better to use disinfectants for this. Placement of quail eggs into the incubator is carried out only after disinfection. You can use different methods for this:
- Disinfection with chemicals to destroy residual droppings and bacteria. To do this, you can use “Brovadez-plus” or “Ecocide”.
- Use ultraviolet lamp radiation. The quartzing method involves irradiating the shell before incubation at a distance of 40 cm from the surface for 5-8 minutes.
- Wash the shells with potassium permanganate. You need to make a weak solution of potassium permanganate and carefully wash the shell, trying not to damage its integrity.
Quail eggs can be placed in the incubator only when it itself is disinfected. You can also treat it with a weak solution of potassium permanganate, which will destroy all pathogenic bacteria and pathogenic microorganisms. Next, it is recommended to set the humidity level and temperature to high to warm up the device for several hours before laying the eggs.
How to pawn?
Eggs can be laid in 2 ways: vertical and horizontal.
If the incubator has automatic turning and the farmer is going to use this function, then the specimens can only be placed vertically.
Each method has its pros and cons.
Vertical
The eggs are placed in the tray with the sharp end down at an angle of 45 degrees. This is a more natural position for the fetus and makes it easier to turn over. In addition, with this method of placement it is possible to place a large number of copies in the same area.
Horizontal
In nature, eggs in a hen's nest are always placed horizontally. In an incubator, this method allows you to place the incubation material not only in a special tray, but also on a simple mesh.
If the eggs are turned over, it is easier to do it manually with this laying method. When placing horizontally, it is necessary to mark the copies on both sides with different marks so as not to get confused when they are turned over.
When laying horizontally, it is easier to spray the material, since more moisture gets onto the shell.
Storage duration
Long-term storage of the incubation batch reduces the chances of the chicks hatching safely. It is highly undesirable to store incubation material for longer than 8 days.
At high temperatures, eggs spoil quickly. Temperatures close to zero are also detrimental to duck and chicken offspring. If the room temperature is 10 °C, they will last 8-10 days without problems. They will then be taken to an incubator.
The experience of poultry farmers shows that eggs can be stored for 2 weeks, then they can be transferred to incubator trays.
Of the ten, 3 will turn out to be “nothing”, and 7 will be promising. Most will hatch into chicks. But the catch is that the young animals may not be viable.
Temperature conditions in the incubator
Different stages of embryo development require different temperatures and humidity. This must be monitored, otherwise the development of the embryo will stop and the embryos will die.
Only large and expensive models of incubators are equipped with the function of programming temperature and humidity conditions.
In all other cases, the values are indicated manually, and in simple devices the degree of heating of the heating elements is independently regulated based on the readings of the thermometer.
To successfully hatch quails, you must follow the following regime (table):
Incubation stages
There are 3 stages of incubation. Each stage requires its own temperature, humidity and ventilation conditions, as it is associated with certain processes occurring during the development of the embryo.
Quail egg incubation table
Stage 1
Lasts only 3 days. The temperature in the incubator is immediately set to 38 C. When laying, the temperature drops, since the eggs are heated only to room temperature.
As soon as the thermometer readings become stable, adjust the temperature so that it reaches 38.5 C. At least on the first day, it should not fall below, since the embryo needs to be activated.
Over the next 2 days, the temperature is maintained at 37.5–38.5 C.
Be sure to monitor the humidity - 50–65%.
Stage 2
Lasts from 4 to 14 days. The temperature is maintained at 37.7 C. The indicators need to be monitored, since on the 4th day the egg, if the embryo has appeared, heats up and maintains the temperature on its own, so the heating of the incubator will most likely have to be reduced.
From this time on, it is necessary to ventilate the masonry - open the ventilation holes or even the lid. For 6–7 days, when transilluminated with an ovoscope, the capillary mesh is visible; it occupies about a quarter of the egg.
If it is not there, the embryo is dead. The humidity in the incubator decreases, but spraying should not be abandoned. If the masonry is turned over, then this should be done 3 to 6 times a day.
Stage 3
15–17 days, hatching period. The masonry must be ventilated to provide a sufficient amount of oxygen. The temperature is kept within the same limits, but the humidity is increased to 75–80%.
This prevents the inner shell of the shell from drying out. If it dries out, the chick will not be able to get out of the egg. You can no longer turn the masonry over. As a rule, the bite begins on the 17th day.
You cannot immediately pull out the hatched chicks - they need to dry well. Over the course of 2 days, the chicks are taken from the incubator approximately once every 4–5 hours.
Chicks begin to eat and drink water from the very first hour of their lives. So the transplanted chicks need to be taught to peck and drink water immediately.
How long does it take to hatch?
The incubation period for quails lasts 17 days.
In fact, this indicator depends on the breed of bird:
- for egg breeds, 17 days is indeed the normal period;
- Chicks of egg-meat breeds are hatched on the 20th day;
- Meat breed quails are born on the 23rd day.
The timing varies, as it somewhat depends on the temperature. In addition, the chicks do not appear all at once on 1 day.
As a rule, hatching lasts about 1.5 days. But experienced farmers recommend that if there are still eggs left, wait another 6-8 hours.
Possible mistakes
When hatching chicks, it is not always possible to immediately produce a healthy large brood.
There may be several reasons for this:
- Lack of nutrition - if the parent individuals received an insufficient amount of feed or the latter contained an insufficient amount of protein, then the egg does not have enough nutrients and moisture for the full development of the embryo. Accordingly, the embryos die or the chicks appear weakened.
- Low fertility - insufficient activity of males or too old females leads to the appearance of a large number of unfertilized eggs. But it is impossible to determine this indicator during ovoscopy;
- Violation of the temperature regime - the embryos cannot be overcooled or overheated, in both cases they will die, so the temperature must be monitored;
- Violation of the humidity regime - lack of moisture is detrimental to the embryo. If there is a lack of moisture in the first stages, the embryos simply die. If there is insufficient humidity at the last stage, the chick simply cannot get out of the egg due to the drying out of the shell;
- Poor ventilation - at a certain stage, the embryo begins to absorb oxygen from the air, and not from the air chamber. If there is not enough oxygen in the air, he will die from suffocation.
Common Mistakes
When starting incubation, it is necessary to anticipate the occurrence of difficulties that can significantly reduce the hatch rate.
- Poor nutrition of the parent flock, deficiency of vitamins and minerals in the diet leads to biologically inferior eggs. In this case, the chicks are unable to break through the shell and subshell membrane and emerge, or are hatched weak and easily fall ill.
- Violation of the recommended incubation regime actually kills embryos or provokes the occurrence of deformities and loss of organ functionality.
- A lack of fresh air is detrimental to birds; to improve gas exchange in the second half of incubation, the eggs are ventilated once a day by briefly turning off the incubator and removing the lid.
This is interesting! In nature, hens also leave their eggs for a short time, flying away to warm up and eat. The period of their absence usually does not exceed 10 minutes.
Useful tips
A few additional recommendations for incubating quail eggs will help beginners get consistently positive results:
- You should not often open the incubator lid “just to see how things are going.” Even within a few seconds, the humidity inside decreases.
- Additional calcium evaporation when moistened makes the shell harder. Therefore, it is better to use soft or boiled water for hydration.
- Newly hatched chicks should be removed no more than once every 3-4 hours. Babies need to dry off to ensure their feathers dry properly. It is useful to then spray warm water from a spray bottle onto the walls of the incubator to restore the humidity inside.
- At home, Japanese, Estonian and other egg-bearing breeds are the least demanding in terms of incubation conditions. Broiler Texas quails are more capricious and require strict adherence to all parameters from the table at the beginning of the article.
- It is very convenient to create reminders on your phone or computer that will not allow you to miss key moments: 10 and 15 days.