General concept
Shapes, descriptions, container material
Tribes living in the jungles of South America call orchids “daughters of the air . This expression contains the true meaning of the lifestyle of most species of tropical orchids.
Therefore, we should immediately make a reservation that growing exclusively inside flasks is not suitable for orchids , moreover, it is contrary to their nature.
However, in flower shops you can find epiphytic orchids, the same vandas that are sold in a glass flask. And cultivated orchid seeds are germinated in sterile, sealed containers - bottles, jars and laboratory glassware.
Thus, we can say that most often flasks are of a simple shape in the form of an elongated glass glass or a complex, “traditional” shape with a flat bottom and a narrow neck.
Neither one nor the other is suitable for normal cultivation. Since the plant will suffer from constant stuffiness, being in danger of rotting. You need to find a wide flask in the shape of a cognac glass.
What types of orchids can grow in glass?
Traditional, so to speak, cultivation in a flask for aesthetic and practical reasons implies the absence of a substrate or its replacement with a hydrogel.
Therefore, epiphytic/lithophytic orchid species that have a highly developed root system can grow in flasks . Taking into account also the fact that the flask has an elongated upward shape, monopodial species that grow upward are preferred :
- Wanda;
- phalaenopsis (and their hybrids);
- vanilla;
- ascocenda;
- Angrecum;
- brassavola, etc.
Vandas in glass vases.
What is the best way to arrange a flower?
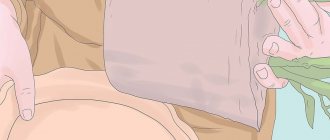
The plant is placed halfway in the flask. only orchid roots are placed inside a suitable-sized “glass” . The plant itself is located on the surface, in the open air. The base of the rosette should be flush with the edges of the vase and not be recessed inside. You can secure the plant in this position with wire or any other available methods and available materials.
Growing seedlings and adult plants
An orchid flask is not quite a “flask” in the traditional sense of the word. The container is a tall cylindrical or complex vase , similar to a glass or goblet. They are made of glass and very rarely of plastic.
To germinate seedlings, as usual, various glassware is used, ranging from bottles and jars to laboratory glassware of various shapes and volumes. The only conditions for which are: transparent glass and the possibility of hermetically sealed.
Such flasks are a temporary shelter for orchids , since germination does not depend on the volume of the container, and, at the same time, requires sterile conditions. Such containers are not suitable for growing adult plants , at least in one respect – size. Considering the complex shape, fragility of thin glass and the presence of narrow necks, you can safely cross them off the list of candidates for “housing” an orchid.
Orchid seedlings in a flask.
As has already been noted several times above, for an orchid it is necessary to find a flask of a suitable size, similar in shape to a cognac glass. And even though the blooming vanda behind the glass of a tall, glass-like flask looks very elegant, such content suits it only conditionally.
Requirements and fit
Often, even experienced gardeners are interested in whether it is possible to plant an orchid in a glass pot, but the answer will be positive if:
- an orchid without soil will be an initially healthy plant;
- drainage will be properly formed;
- the substrate will be carefully selected;
- ensure strict control over watering.
Important!
Glass vases for orchids are not considered the best way, since if the container is narrow and cylindrical, then the foliage, gradually growing, will begin to bend and break on the edges.
A flask that is too high can cause a slow outflow of moisture and insufficient air, which will soon lead to fungus and rotting. Therefore, a vase for an orchid should have a leg, a wide bottom and not too narrow a top, and such a height that the roots are inside the vessel, but the leaves are outside.
An orchid must also be planted in compliance with the rules presented by experts in the field of botany:
- A glass pot for orchids must be disinfected with boiling water or sterilized by steam.
- Cover the bottom of the container with a layer of expanded clay chips, also pre-treated with disinfectant compounds.
- Glass pots should contain sphagnum moss.
- The rest of the space will be filled with phalaenopsis in a glass vase and a substrate that you can prepare yourself or purchase in stores. However, first, the contents of the pot with soil, but without the flower, need to be filled with warm water and left for half an hour to saturate it with moisture.
- Next, drain the water.
- Plant the plant in a layer of bark, and cover its surface with moss, previously soaked in water. Use it to lay out the area near the root collar.
How to care for an orchid in a flask?
Keeping an orchid in a vase has its advantages and disadvantages. A humid microclimate is formed and maintained behind the glass of the flask , which in turn is very useful for the root system of the epiphyte, since in nature they grow precisely in such conditions.
A significant drawback is the rapid cooling of the glass, which can cool the roots. And cold and moisture, as you know, are very harmful to orchid roots and can provoke the appearance of mold and rot.
In addition to the low thermal conductivity of glass, there is its fragility and high rate of contamination - with limescale, colonies of algae and fungi.
Advice! The disadvantages of glass are offset by another material – plastic. Even a plastic bottle with the top cut off may work.
You need to know about all these features of materials and shapes before placing the plant in such a container. If this does not stop the grower and a similar experiment is planned, it is also necessary to know about proper care in specific conditions.
Watering
The watering procedure is no different from what a gardener would do with a plant in a pot and flowerpot. It is necessary to carefully pour water into the flask so that all the roots are immersed. After 30-45 minutes, the water must also be carefully drained. Use rain, melt or filtered water with a minimum amount of dissolved mineral salts.
Watering is done in the usual way.
Attention! Be careful when draining water. The flask can become very slippery and you can drop it and accidentally injure yourself or others with shards of broken glass.
After draining the water, you need to make sure that it does not remain in the vase. Watering is carried out as needed , depending on the condition and requirements of the plant. On average, this is 2-3 times a week in warm weather and 1 time in cloudy weather. On especially hot days, the frequency of watering can be daily. Watering is carried out in the morning so that the plant has time to dry out by night.
Ventilation
For epiphytes, the presence of fresh air is extremely important. It is necessary to ventilate the plant periodically . The size of the container should be sufficient so that the orchid roots fit freely inside, can be ventilated, and air can easily get inside.
Disinfection of the flask
Over time, the glass of the container becomes covered from the inside with a layer of algae, fungi or a coating of salts. For this reason, the flask must be constantly washed and kept clean.
Disinfection can be carried out with a weak solution of potassium permanganate. During the procedure, remove the plant from the container.
Sometimes the orchid's roots get stuck to the sides of the vase, so be careful when removing it.
Feeding
Epiphytic orchids in nature feed on humic substances that collect in the cavities of tree bark or between stones. In cultivation, these plants, like no other, need proper feeding.
During the period of active growing season and growth of green mass, feed the orchid with liquid fertilizers at ¼ of the concentration indicated on the package. Before the procedure, it is necessary to moisten the roots of the plant with clean water - this measure is necessary in order to exclude the possibility of burning the delicate root system with the fertilizer solution. Such fertilizing can be alternated with foliar fertilizing “by leaf”.
Important! Feeding during the dormant period is sharply reduced or not carried out at all, depending on the type of particular orchid.
Disease Prevention
The best prevention is to keep the plant in proper conditions and maintain its hygiene. Care must be taken to ensure that the orchid receives a sufficient amount of light, especially in winter, when the length of daylight hours is sharply reduced. Hypothermia of the root system, dirt and debris inside the flask are also unacceptable. Remove dead roots and leaves of the plant in a timely manner.
Fungicide treatment
It is carried out for preventive purposes with systemic fungicides according to the instructions.
Due to improper watering, orchids may rot roots or leaves.
If the plant is nevertheless affected by bacteria or fungi, treatments are carried out in medicinal dosages.
In pots made from natural materials
Raising exotic pets in containers made from natural and other materials is not excluded. Particularly popular are baskets made from:
- Trees;
- Bamboo;
- And even made of steel;
- Steel mesh;
- Or plastic.
Bamboo is the most successful material in terms of structure. The smooth surface, unlike other wooden materials, does not allow roots to grow into the pores.
Baskets made of steel mesh or plastic do not differ in decorative appearance and aesthetics. But they are the ones that are practical when growing orchid crops.
Pros and cons, landing features
Advantages:
- Aesthetics and beautiful appearance;
- Environmental friendliness;
- Convenience when creating drainage.
Among the disadvantages, it is worth noting the rather rapid fragility of natural material.
Convenience in the formation of substrate components allows for proper organization of drainage and other components. If there are large holes, they should be sealed with sphagnum moss to prevent small fractions of soil from spilling out.
These baskets look beautiful when hung. The transplantation process itself is not much different from standard methods.
Orchids in a flask
A flask or bottle (from Latin flasco - “vessel for wine”) is a small container that is used for storing liquids and other substances. In the context of growing orchids, flasks are glass or plastic bottles containing seedlings and juveniles. This container is temporary and is only suitable for germinating seeds and growing seedlings.
Orchids in flasks.
The cost of a bottle of seedlings varies depending on the type of plants inside and their quantity. It can range from several dollars and above, reaching tens and hundreds of dollars.
Advice! You can purchase a “flask” with orchids via the Internet on specialized websites, in stores or directly from breeders.
Advantages and disadvantages
The big advantage of such a purchase is:
- relatively low cost of each individual plant;
- a large number of them;
- the ability to grow a plant that is fully adapted to specific conditions.
Also, sometimes this is the only opportunity to purchase a specimen of a particularly rare species. Purchasing a batch of bottles with orchids is a good way to start a business with the resale of orchids.
Among the disadvantages are the downsides of the advantages. In fact, when placing an order via the Internet, the gardener plays the lottery and most often gets a “pig in a poke”, because the seedling blooms only after 4-5 years of life.
That is, it is impossible to be 100% sure of the honesty of each individual supplier, since he may simply send the wrong thing by mistake. And the florist knows about this only by flowers.
The exception is orchids, which have some specific distinctive features and characteristics, but these are few.
Advantages and disadvantages
One of the main positive aspects of using this type of container is primarily its decorative function, which serves as a real decoration for this beautiful plant. In addition, glass transmits light perfectly , which is also important.
Besides:
- the wide range presented in stores allows you to choose a container to suit every taste and plant size;
- due to its heaviness compared to plastic pots, glass is quite stable;
- the absence of pallets allows you to quickly and easily rearrange the plant;
- in addition to light, the flower will receive a lot of air.
The main disadvantage of glass vases, pots, etc. is the inability to make additional holes at the bottom for drainage purposes. Accordingly, excessive amounts of moisture may appear. If the container is too narrow and tall, the plant will receive enough light but not enough air , which will negatively affect its growth.
Technology of growing from imported seedlings
Acclimatization of sprouts is carried out gradually. Seedlings are germinated under sterile conditions and do not have acquired immunity to various pathogens. Therefore, it is necessary to slowly accustom them to the harsh conditions of an open atmosphere. The best place for growing seedlings will be a mini-greenhouse, florarium or orchidarium , where gentle conditions are maintained.
Seedlings are removed immediately before the procedure of planting young plants. Long tweezers or a hook made of hard wire are suitable for this. If the plants are kept in a nutrient mixture, you can add water inside - the mixture will dissolve and the orchids can be poured into a basin along with the water. Plastic containers greatly simplify the procedure - they are simply carefully cut with a knife or scissors.
Attention! In the case where it was not possible to get the sprouts using the methods described above, and the flask is glass, it is carefully split with a dull blow of a suitable tool.
Transplanting seedlings to grow roots is carried out according to the same principle as planting an adult orchid for the purpose of resuscitation. That is, a thin layer of expanded clay is poured into a mini-greenhouse, and a cushion of damp sphagnum moss is placed on top, on which orchid sprouts are placed in funnels.
Growing seedlings in a greenhouse.
The greenhouse is placed under a source of bright diffused light, the temperature inside is maintained at 24-26 ° C, and the relative air humidity is >70%. Watering is carried out as needed. It is necessary to remember about daily ventilation. Feeding begins after the roots appear, carried out once every 1-2 weeks (1/8 of the indicated dose on the package).
When the roots are more than 5 cm long, the young orchid can be planted in a substrate or on a block, like an adult plant. The size of the pot is selected depending on the size of the young plant, and the composition of the substrate is selected based on the species characteristics of the orchid.
Diseases and pests of the Vanda orchid
Spots on Vanda orchid photo
The Vanda orchid is susceptible to various diseases, the causes and signs of damage, control methods are described below.
Fungal infections
Fungal infection on Vanda orchid photo
Treating plants with Physan according to the instructions helps against fungal infections (as in the photo above).
Spotting - spots similar to warts form on the underside of leaf blades. This happens from waterlogging of the soil or high air humidity.
Fusarium - round black spots appear at the base of the leaves. The reason is that the environment is too warm and humid.
How to treat spots on a Vanda orchid
Black spots on Vanda orchid photo
Treat the leaves and roots with a fungicide, provide shade, do not spray the orchid on the leaves, reduce air humidity, avoid too high and too low temperatures (it is advisable to maintain 24°C).
Bacterial rot
Overmoistening of the substrate (especially in combination with low air temperatures) causes rotting of the root system and stem. The roots of the plant soften and turn black, the stem turns yellow, without intervention the plant will die. Carry out an emergency transplant: cut off the affected areas, treat the entire plant and cut areas with a fungicide (phytosporin, Bordeaux mixture), replace the substrate with a new one, also disinfect the container, keep the orchid in the shade until it shows signs of growth. Treatment with an antibiotic helps against bacterial rot (1 gram of tetracycline is dissolved per liter of water).
As a last resort, you have to cut off the rhizome completely. It takes some effort to grow the root system again. Be sure to treat the cut area with crushed charcoal. The ideal option for resuscitation is to place it in a basket made of natural raw materials with large weaving. Maintain a high level of air humidity and water by spraying. Under such conditions, young roots will appear after 7-10 days.
Viral lesions
Infection by various viruses is especially dangerous. Viruses do not spread as quickly as bacterial or fungal rots, but they are almost impossible to cure. If you decide, it is better to get rid of the diseased plant so as not to infect all the orchids. The virus can be kept dormant: cut off all affected parts, treat the orchid with a fungicide. Avoid elevated temperatures and excessive humidity. Remember that viruses are most aggressive during the warm season.
How to treat an orchid against thrips and mites video:
Among the pests that can cause trouble:
- Thrips
Light dots and streaks appear on the surface of the leaf blades, over time they become covered with a whitish coating, then turn brown and die. Thrips and flowers are affected: they become covered with spots and become deformed.
- Shields
Yellowish dots appear on the leaves and stem, which over time take on the appearance of warty growths. Scale insects suck the juices from the plant, causing the orchid to dry out.
- Mealybug
Small insects collect on the reverse side of the leaf and can be recognized by the presence of a coating similar to cotton wool. The growth rate of the orchid slows down, the leaf blades die off.
- Spider mite
How to deal with mealybugs video:
The pest attacks the plant when the indoor air is dry. Thin whitish cobwebs can be found on the plant. The pest settles on the reverse side of leaf blades. The leaf blades turn yellow and dry out.
If any pests are detected, they must be removed mechanically. To do this, moisten a cotton pad with soapy water and wipe the leaf blades on both sides, then treat with an insecticidal preparation.
Cut orchid in glass
When used in compositions and bouquets, cut shortened peduncles of orchids or individual flowers are sometimes equipped with special test tubes with water on rods.
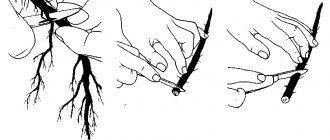
Having brought home such a bouquet, before placing it in a vase, you need to remove the peduncle from the test tube and freshen the cut with a sharp knife. This is done diagonally in order to renew the capillary system of the peduncle to absorb water.
Water should be used boiled or settled, at room temperature . In order to extend the life of the peduncle and flowers, you can add a little alcohol or vodka to the water.
Advice! You cannot use potassium alum and preservatives intended for other cut flowers.
It is better to place the bouquet in a shaded place away from heating devices . Direct sunlight and high temperatures accelerate the withering of flowers and the peduncle itself. Decorative effect also depends on ethylene, so it is necessary to exclude the proximity of the bouquet to food products, especially fruits.
As you can see, there are many nuances and you definitely need to know how to preserve cut orchids in vitro.
General form
The glass container looks quite aesthetically pleasing, allows light to pass through, and a plant placed in such a container looks very nice and original.
Glass vases, pots and flasks for flowers come in a variety of shapes and shades: tall and elongated, with a widening downwards, rounded, glass-shaped and cup-shaped, from completely transparent to lightly darkened colors: light blue, light green or light yellow . This variety allows you to choose the most suitable type of container for a particular plant.
As for the flower itself, it comes in all sorts of colors: from bright white, milky and cream to rich purple, red, pink and blue.
Photo
We present to your attention a photo of orchids in glass containers.
Possible problems and difficulties
If the reader nevertheless managed to purchase a plant in a flask with a narrow neck and did not bother to take it out and place it somewhere in time, some obvious difficulties await him.
Difficulty in removing from the flask without damaging the leaves
Using laboratory glassware or bottles involves removing the sprouts before they outgrow the size of the neck. Then there is no problem and the sprouts are carefully removed with tweezers, shaken out or washed with water. In other cases, it will be possible to extract the plants only by breaking off part of the organs or breaking glass.
Removing an orchid from a flask is quite a labor-intensive task.
Development of infections and fungal infections
Sterility inside the sealed container prevents contamination. After unsealing, air naturally enters inside, which may contain spores of various microorganisms or fungi.
Airing and ventilation in such conditions is extremely difficult, and the stuffiness provokes the rapid growth of mold and the appearance of infections.
Shuffle content
The nutrient mixture inside usually keeps the orchids in a stable position. However, with accidental movements, especially during transportation, there is a high probability of mixing everything that is inside, as well as damage to young plants.
Care must be taken to ensure that the contents of the flask are not mixed.
The growth of the crown of the head rests against the wall of the vessel
If the grower's negligence ultimately reaches such proportions, there is nothing left to do but carefully break the container and plant the plant in accordance with the requirements and species characteristics.
Step-by-step instructions for transplanting from a flask to a pot
Before planned transplantation, it is recommended to adapt the seedlings to the external environment. The process is possible if the development of plants in the flask proceeds normally. The nutritional gel is evenly at the bottom, and healthy and green shoots quietly grow from it.
Begin gradually accustoming the seedlings to the new living conditions. At the beginning, open the lid slightly for a couple of minutes, letting air into the flask, gradually increasing the airing time from five minutes to several hours. Observe your pets’ reaction to changing circumstances, and if mold appears, remove it.
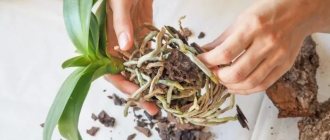
- First of all, we open the jar, separate the babies, straighten the roots and wash them off the gel. If mold is detected, the washed seedlings need to be kept for an additional 10-15 minutes in a fluconazole solution (150 g per liter of water). This is an antifungal drug that is sold in pharmacies.
- After washing, drying follows. Pets laid out on a napkin take several hours to dry. You need to blot the growth points and sinuses with a napkin so that not a drop of moisture remains.
- Transfer. Place all the seedlings in small containers prepared in advance, one at a time. Each one to his own house. Place polystyrene foam on the bottom of the cups, then wet moss and another small piece of foam plastic. We plant a sprout on it, straighten the roots and cover it with another layer of moss.
Video on how to transplant an orchid from a flask into a pot:
The influence of the microclimate of the flask on the plant
A container with a narrow neck is used for germinating orchid seeds. It is not intended for growing orchids on an ongoing basis. It is obvious that the stale air and microclimate of the bathhouse inside are absolutely unsuitable for a plant whose genes are designed to exist in opposite conditions.
Ultimately, the gardener is faced with a dilemma: break the container and plant the orchid normally, or never see it bloom and watch how fungi and bacteria rot it.