Currant is a berry that can easily be propagated by vegetative means, perfectly adapted to the different climatic conditions of Russia, and, at first glance, there is no need to graft it at all. However, it is not always possible to buy a ready-made currant seedling of a valuable variety, but there is a cutting from it; there may not be enough time to renew a damaged or old berry garden; you decide to improve the beneficial qualities of your existing varieties or add new ones. Then grafting currants is a good way out. It will expand your options for using this crop.
Benefits of vaccination
Grafting currants has a number of advantages:
- “rejuvenation” of the bush;
- acceleration of fruiting (the scion begins to produce berries after 2-3 years);
- propagation of a variety when there is a shortage of cuttings or lack of space (varietal cuttings are in abundance, but there is no place for them);
- increasing its resistance to the environment and diseases (the juices of the rootstock greatly affect the frost resistance, durability, and vegetation of the grafted plant);
- improvement of fruit characteristics (make the berries more one-dimensional, sweeter, larger);
- increasing productivity (relevant in industry, where golden currants are used as a rootstock);
- growing an ornamental currant tree, or trunk, while maintaining fertility.
Step-by-step vaccination instructions
Most often, the procedure for grafting currants with other fruit crops is carried out with an eye (grafting material) or a cutting using any pinching method.
It is recommended to follow the following sequence and rules during operation:
- You need to make a straight cut on the rootstock (5 cm in diameter) with further stripping.
- A 10cm split is made in the middle of the branch using a combination knife or axe.
- The handle should have two cuts, which roughly form the shape of a blade.
- After the tool has been pulled out, you need to carefully place a support in this place.
- Place the cutting in the split, with the cambial layers touching.
- The support is removed. If the rootstock is too wide, you can insert 2-3 cuttings.
- Tie the rootstock with a special binding material along the entire length of the cleft from top to bottom.
- The grafting site and the upper cut should be well treated with a healing garden remedy and varnish.
- Additionally, to create greenhouse conditions, wrap it in polyethylene, which is removed after 2–3 weeks.
Video: winter grafting on golden currants
What can you vaccinate on?
The rootstock for currants can be black, red, golden currants, as well as other fruit trees and bushes (gooseberries, cherries, rowan). It can be broken, old or young, but it must be healthy, adapted to the climate of the region and a plant compatible with currants. The good condition of the tissues of the scion and rootstock is important, since successful fusion depends on the density of contact between the cambium of both. Read about the best varieties of currants for the middle zone here.
Cambium (lat. cambium - exchange, change) is part of the bark, a layer of conducting plant cells between wood and bast, due to which branches and trunks grow in breadth.
Golden currant
It serves as an excellent rootstock for currants more often than other crops. This is a tall shrub with a different leaf shape and berry flavor than the common black or red currant. Gardeners use its considerable growth and durability to form a currant trunk - a small exotic-looking tree. Golden currant increases frost and drought resistance and immunity to diseases in the grafted variety. To form a “tree,” the rootstock is prepared as follows: one branch is left - the future trunk (the remaining shoots and branches of the second order are removed), it is cut at a height of 60-80 cm. It is better to graft it behind the bark or by copulation. The graft takes root better in humid conditions.
Black currant
Excellent acceptance of colored and black currants. Red currant berries become larger and sweeter, the scion grows strong and lush due to a deeper root system, and successfully tolerates cold, even if they were initially unstable to it. Black varieties, such as Exotica, Dachnitsa and others, are grafted in order to renew a heavily pruned bush or propagate a rare variety (grow on the roots of a less valuable one). Find out when red currants ripen in this article.
You can also tie red or white currants; colored species impart high yield and resistance to disease to the scion.
Cherry
The survival rate of currants on cherries is average. Experienced foreign gardeners successfully use cherries as a rootstock, but only an experimenter who is not afraid of the high probability of scion rejection can decide on this option. But large berries grow on successfully established currant branches. True, their taste is strange, it’s not for everyone.
Rowan
Not the most successful rootstock, but in the absence of anything else, you can graft currants onto rowan trees. The survival rate is average, the probability of rejection is high. The grafted branches do not adhere well to the rootstock; the grafts on the fruit tree fall out or break off after three years. But on a rowan tree you can form a currant trunk. The taste of currant berries does not change on such a rootstock.
Gooseberry
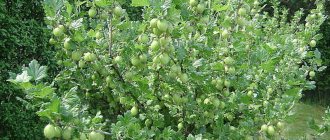
Gooseberries and currants belong to the same Gooseberry family, therefore they are physiologically suitable for each other: both crops can be a scion and a rootstock for each other. But it is better to graft gooseberries onto currants, and not vice versa. Find out about the hybrid of currants and gooseberries Yoshta at this link.
Why is currant grafting necessary?
Currant bushes reproduce vegetatively and grow throughout Russia. So why do you need grafting on currant cherries if you can plant bushes anyway? Thanks to vaccinations, the following goals can be achieved:
- quickly propagate a rare variety of currant without buying seedlings;
- preserve the life of a bush of a certain variety if it is threatened with death;
- grow different varieties of currants on one cherry tree, which is important when the garden area is small;
- obtain a hybrid adapted to a specific area;
- improve the characteristics of currants, increase frost resistance and disease resistance.
Landscape designers and simple gardeners use currant bushes to decorate their plots. Against this background, the cherry trees with currants growing on them look unusual in the garden.
Deadlines
The correct timing of vaccination is one of the main conditions for the successful engraftment of the scion. They were determined experimentally and are determined by the periods of greatest activity of the vascular cambial layer of the rootstock and the least activity of the scion. Outside of these periods, the condition of the bark and wood (too fibrous in winter) of the bushes prevents fusion, so grafting is not advisable at this time.
in spring
This is the most natural time for currant grafting. The grafting is done with the beginning of sap flow, but before the leaf buds bloom. So, in the south it may be the end of March, and in the northern regions - the second half of April and the beginning of May. You can focus on daytime temperatures of +10 and nighttime temperatures of 0 degrees. In practice, the beginning of the flow of sap is determined by the bark: if it comes off easily on a cut branch, sap flow has begun, if it is “glued” tightly, it has not. Scion cuttings are harvested in the fall or cut in the spring, before the procedure.
The most effective methods: improved copulation, behind the bark, into the split.
Cuttings with dormant, not swollen buds take root better.
In summer
The time of active sap flow and vigorous growing season (second half of July - early August) is also suitable for grafting currants (buds or fresh cuttings). The underwater bush must first be thoroughly watered: this accelerates the flow of sap in it (due to which the bark moves away from the wood more easily) and facilitates the fusion of tissues. Summer vaccinations are best done where winters are mild and warm. In areas with a different climate, the time of the procedure is calculated so that the scion takes root, but does not have time to start growing, otherwise this will make it vulnerable to freezing. For example, a kidney is implanted no later than two months before persistent cold weather.
in winter
The most comfortable time for humans, but the least physiological for plants, is the time of grafting. Winter vaccinations are done in December - April, so that at least two weeks remain before planting in the ground. These two weeks are needed for the rootstock and scion to grow together in warmth. Afterwards, the seedlings are either taken back to a cold place (cellar) or planted in the garden. The material for grafting is prepared in the fall before frost: the rootstock is dug up, the scion is cut from annual shoots. Both are stored in the cold (0 +2 degrees) in peat or wet sand, before the operation they are warmed in a humid environment (rootstock 4 days, scion 1 day). The best methods for winter grafting are splitting and improved copulation.
Standard forms of currants
Advantages of standard forms of currants
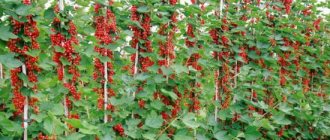
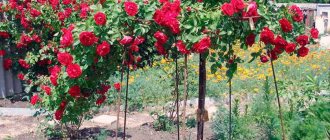
- Decorative. Such trees, hung with bunches of currants, look very beautiful on the site. They are used not only for harvesting, but also for decoration, planted along paths or even on the lawn.
- Convenient harvesting. Since standard forms are taller, it is much easier to pick berries from them. There is no need to bend towards the ground.
- Increased yield. Such plants have larger berries. This is explained by two reasons: the properties of the golden currant rootstock and good illumination of all branches.
- Improving the taste of berries.
- Such currants are sweeter and tastier. This is due to the same factors.
How to create a standard form of currant?
To create a standard tree, a one-year-old golden currant rootstock is used, onto which a one-year-old scion cutting is grafted. The best methods of grafting are splitting (preferably using a grafting pruner) and improved copulation. The grafting should be done at a height of 0.8-1 m from the ground. Thanks to the tall growth of the golden currant, acting as a rootstock, a rather powerful trunk is formed, which is beautifully framed by the hanging branches of the grafted bush.
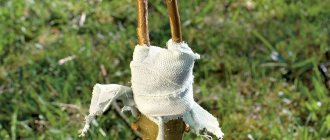
It is better not to take the wild form of golden currant as a rootstock, since it produces a lot of root shoots. But today you can buy specially bred clones of this crop that do not produce it. If you cannot find such a rootstock, use a regular one. You’ll just have to remove the growth on time in the future. The grafted plant must be tied to a peg so that the man-made tree does not fall. This is a mandatory requirement for standard forms obtained from shrubs.
Not all gardeners are involved in grafting currants. Therefore, you can become one of the “chosen ones” by successfully mastering such an exciting and useful business. This will allow you not only to renew existing bushes or obtain valuable seedlings, but also to decorate your site with standard forms. By the way, gooseberries can also be shaped into a tree. You can read about this here...
Join our Facebook group
Preparation and storage of cuttings
Scion cuttings (for winter and spring grafting) are harvested in the fall, when the leaves have already fallen, but frost has not yet set in. At this time they are already “falling asleep.” They are cut into 30-40 cm pieces from lignified shoots with a diameter of 4-5 mm, and “sealed” with hot paraffin on both sides. Store in bunches in sawdust or sand in a cellar at a temperature of 0 +2 degrees and a humidity of 65-70%. The material can be wrapped in damp flannel and placed in the refrigerator. For summer grafting, freshly cut cuttings are used.
Short cuttings (1-3 buds) give good growth the next year, long ones begin to bear fruit earlier.
Rootstock, already rooted, cuttings 7 mm thick are shortened to 25-30 cm, dug up in the fall before frost, stored in a cold cellar (0 +2 degrees) in boxes with peat or sand.
The scion and rootstock can be stored in the snow in bags or buried in the ground, but there is a possibility that they will be damaged by mice. They are protected from freezing by a layer of peat. Regardless of where they are stored, cuttings should be checked every three weeks.
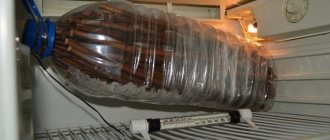
To avoid getting the bark wet, you can put the cuttings not in bags, but in plastic bottles.
Preparation of cuttings
Preparing cuttings is a responsible process. It is recommended to select annual cuttings with sufficiently developed buds. Cuttings must be of proven varieties in order to get a good harvest of quality fruits.
Blank
The length of the scion should be about 10–20 cm with 2-3 buds placed on it. Blackcurrant cuttings are usually harvested from March, but this depends on the area, since in the northern regions the sap flow will be later (late April). In any case, you need to make the cut before the buds open, because such cuttings (with opening buds) rarely take root.
Unlike black currants, cuttings of the red and white varieties must be harvested in the fall (late October - early November). This is due to the fact that winter and spring cuttings take root much worse.
Storage
Storage is a very important stage, since it is necessary to provide the harvested cutting with all the required conditions so that it is not subject to frostbite or, conversely, rotting or drying out. Cuttings labeled according to variety must be packed in thick film.
Storage is carried out both indoors (in a cellar, refrigerator, cool places) at a temperature of 0°...+2°C and a humidity of 70%, and on the site (in a dry dark place where there is no stagnation of water and snow lies for a long time in the spring) in a dug-out a groove 10 cm deep. Autumn harvested cuttings that will be sent to the groove are placed with the lower cuts at an angle, and then sprinkled with soil.
Required Tools
In order to carry out the procedure correctly, you will need:
- garden pruning shears - similar to curved scissors (used for cutting cuttings);
- copulating knife, or grafting knife - one-sided, long, straight (the main tool for cutting);
- budding knife - the blade is convex, pointed, sharpened on both sides, there is a “bone” for separating the bark (convenient for cutting buds);
- grafting pruner (replaces knives, makes cuts that fit each other perfectly);
The sharpness of the sharpening is checked by using thin paper: if it cuts, the knives are sharp, if it breaks, they are dull.
- strapping - elastic, durable material (fum tape, cling film), fixes and isolates the grafting site; you can buy self-destructive strapping material;
- var or garden putty - protects the cut areas from drying out, freezing, and attack of currant fungi, viruses and bacteria.
It is better not to use electrical tape for fixation, as it sticks to the delicate bark and damages it.
Tools necessary for work.
Dates
A very important point is the choice of timing for grafting the crop, as this can affect the fertility of the bush.
This procedure can be carried out in spring, summer and winter.
- Winter grafting of currants usually occurs in the second half of February, and the process is carried out in a warm room. In the fall, it is necessary to prepare the cuttings and leave them to be stored in the cellar. When the grafting is completed, the cuttings should be placed in sand with peat or wet sawdust and stored in this state for up to 14 days at a temperature of about 20°C.
- Spring grafting of currants during the period of increased sap flow until the buds open is the best time. The exact period also depends on the location. For the southern regions, it is better to carry out the procedure at the end of March, for the northern regions it is the end of April - the beginning of May.
During summer active sap flow, it is permissible to graft currants. The second half of July - the first half of August is the optimal period for grafting currants for the central zone of the European part of Russia. As for the northern regions, the timing of vaccination will be a little later. Before budding or grafting cuttings, you need to water the rootstock bush to enhance the movement of sap.
Methods
There are many ways to plant currants, each with its own advantages and disadvantages. The choice of a specific one depends on the time of the operation (season of the year), its goals (rejuvenation, reproduction, trunk formation), the ratio of the diameters of the scion and rootstock, and the experience of the gardener.
Gardeners around the world know more than 150 methods of grafting fruit and berry crops, but only about a dozen of them are widely used.
Budding
To get several branches of the same variety, just one cutting is enough: all the buds, as many as there are, are cut off from it with a budding knife. This is a summer type of vaccination (July - early August). Budding shows very good survival rate. The rootstock is slightly damaged. The rootstock is watered for 2-3 days, cleaned of leaves and dirt. The scion (ripened cuttings 35-40 cm) is cut off several hours before the operation, the leaves are cut off, leaving petioles 1 cm long, and placed in water. On the rootstock they do:
- A T-shaped cut measuring 2-3 and 1-1.5 cm separates the bark from the wood;
- or completely cut off a piece of bark.
An oculant bud with bark 1-1.5 cm up and down is cut out from the scion, inserted into the cut or applied to bare wood, bandaged tightly, leaving a free petiole. The petiole will fall off from the established shield in 12-15 days.
Copulation
From the Latin “copulo” - “I connect”. The easiest way is to graft the desired cutting onto a rootstock of exactly the same thickness. In this case, the corresponding vascular tissues of plants coincide perfectly. Oblique cuts made with a knife on the scion and rootstock must be smooth, clean, and perfectly aligned with each other so that the contact is as tight as possible. The success of plant fusion depends on this. The right time for copulation is spring. The rootstock should be at the stage of bud swelling, the scion should remain dormant. This is possible if cuttings are taken in the fall and stored in the cold or at the end of winter.
Simple
Large contact area due to smooth oblique cuts at an angle of 20-25 degrees. In this case, the length of the cut is 3-5 times the diameter of the branches. You need to cut towards yourself, in one motion. The scion is cut 1 cm below the bud. The receiving and grafted branches are simply applied to each other, pressed and tied tightly with a winding (a strip of polyethylene 5-10 mm wide). The technology is simple, but requires experience and dexterity, since during the fixation process it is difficult to keep the sliding and rotating handle in the desired position. Such a graft is rarely rejected, but the grafted branch does not hold firmly.
Improved
The grafted cutting does not slip from the desired place, since the rootstock and scion are interlocked with “tongues” into a strong lock. To do this, on even (as in simple copulation) oblique cuts, longitudinal tongue incisions 1-1.2 cm deep are made at a distance of ~1/3 from the upper edge, then they are connected to each other and tied tightly. Improved copulation is a good solution in case of slight mismatch in branch diameters: it is easier to achieve at least partial alignment of the cambium. Improved copulation has a high survival rate, but requires more time to carry out.
Into the cleft
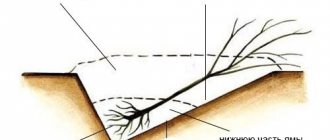
The most ancient method of grafting. Advantages: high probability of engraftment, difference in diameters of rootstock and scion is acceptable. The method is used to twist old bushes. It also has significant disadvantages: extensive damage to the tissue of the rootstock: wounds take a long time to heal, and the risk of rotting is increased. The procedure consists of splitting the stem of the rootstock to a depth of 3-5 cm, cutting the cuttings with two oblique cuts, and installing them in the cracks. The bark of the scion and rootstock should touch. Usually the cuttings are tightly clamped in the hemp; in this case, there is no need to tie them.
For the bark
It has the advantages of the “split” method, but requires very precise alignment of the cambial layers. The survival rate of the scion depends on this. The best time is a month after the leaves bloom and cloudy weather. The cutting is cut with an oblique cut 5-6 cm long, inserted into a pocket cut between the wood and the bark, made 3 cm below the end of the underwater stump. 3-4 cm of the cut should be left unburdened. Cover this area, as well as the end of the rootstock, with varnish.
Butt
The method is suitable when the thickness of the host shoot (trunk, branch) is much greater than the grafted one, and copulation is excluded. There is a simple grafting into the butt (anywhere on the rootstock), with a saddle (grafting near the end of the stump), with a tongue, with a saddle and a tongue. The survival rate of the scion is good; it increases if the contact area and adhesion strength are increased due to the tongue, which must be formed in the same way as in the improved copulation technique. The bark on the rootstock at the application site is removed. If the exposed area is larger than the cut area, it is enough to combine the cambium on one side. Assess the condition of the scion after 7-10 days: if the buds are swollen, the graft has taken root.
Into the side cut
The method is low-traumatic for the rootstock, on which cuts are simply made to the bark, and is suitable for branches of different diameters. Grafting into a side incision is done in the spring if the oculants have been rejected. Disadvantage: weak point of the graft, can break in strong winds. A longitudinal cut-tongue is made on the rootstock, one side of which is 1.5-2 times longer than the other. The lower end of the cutting, 15-20 cm long, is sharpened with a double-sided wedge, inserted into the cut, aligning the bark, wrapped with tape, and coated with putty.
Ablactation
Similar to natural self-grafting. Close shoots simply grow together, while the scion and rootstock remain attached to their roots. It is better to carry it out in early August or early March. The method is suitable for forming continuous currant hedges. Productivity, weather resistance and immunity to disease do not change in any way. At the junction of both branches - it is better if they are at the level of the bud - remove a 4-5 cm strip of bark. The bare areas are applied to each other, bark to bark, and tied tightly.
Never remove the bark in a ring: the branch will die.
Methods
Grafting a fruit plant such as currants can be done using various methods. The choice of method depends on the gardener’s level of preparedness. Knowledge about the agrotechnical features of each method will enable the gardener to choose the option that is perfect for his plant.
Copulation
Copulation can be simple or improved.
Important! All growths that have arisen below the grafting site must be removed.
Each type of copulation has its own technique:
- Simple. Take a cutting 30 cm long with 4 buds. It is necessary to make oblique cuts on the base of the scion and on the rootstock (angle 45°). The fixed cuttings on the rootstock must be secured with special garden tying material.
- Improved. It has a larger number of oblique cuts on the rootstock and scion, which promotes better engraftment. The “tongues” made by the gardener on the cuts form a conditional lock, thanks to which the scion is firmly held in the rootstock.
Budding
This method is performed by transferring an axillary bud to the rootstock. The method is considered simple, but requires attention. For the budding process you will need a budding knife and strapping material. It is necessary to cut the bud on the cutting, capturing the bark with a diameter of 1.5–2 cm. A T-shaped cut should be made on the rootstock. You need to place the kidney in the hole (after opening the valves) so that it can be seen with the naked eye. After this, the grafting site is wrapped with special garden material.
Into the cleft
The method in question is considered one of the oldest, which explains some of its shortcomings. Spring is the best time for this grafting method. In the presence of deformed branches and old trees, the method will be very useful, but its significant disadvantage can be considered the long healing process of damaged areas, which can cause tissue rotting.
The peculiarity of the pin is the formation of a split on the cut of the scion to accommodate the cuttings. The gardener must make two oblique cuts (on both sides) in advance. The attachment of the scion to the rootstock should be carried out in such a way that the bark on the cutting and the stump coincide. It is necessary to lubricate the end of the currant cutting and the sides of the rootstock with a special healing agent. You can skip the tying step if the cutting is firmly attached to the rootstock.
For the bark
This type of clothespin can be considered the simplest, which is perfect for beginner gardeners. The method is used only for mature trees. The grafting process must be performed 3-4 weeks after bud break, which will subsequently give good results.
- During work, the hemp is cut off on the rootstock, and the ends are also cleaned.
- It is necessary to make a cut (oblique) at the bottom of the cutting, and remove the bark from the bottom end of the stump using a copulating or combination knife.
- The scion must be placed behind the bark of the rootstock. Raise it a little and turn it away.
- The scion is inserted behind the bark of the rootstock.
- It is recommended to leave 4 cm at the top of the oblique cut.
- Using binding fabric treated with a healing lubricant, the scion is connected to the rootstock.
Any pinching method should be carried out in cloudy or even cloudy weather in order to achieve better fusion.
How to tie correctly - technology
There are basic rules for the procedure:
- Before the procedure, clean the areas of future cuts with a damp cloth.
- Wash your hands and tools for grafting trees, disinfect them, and only then make cuts on the rootstock and scion according to the chosen method.
- Place the cuttings or buds in the places prepared for them, combining the cambial layers of the rootstock and scion; in these places they will grow together, forming a single vascular system.
- Wrap the grafting site with an elastic material with overlapping turns, additionally securing the rootstock.
- Protect open sections from drying out with varnish, garden putty or plasticine, otherwise one or two upper buds on the scion will not germinate, and pathogenic microorganisms will penetrate through the unprotected stump of the rootstock.
- Build a greenhouse out of a plastic bag at the vaccination site for two weeks.
It is best to carry out grafting using any of the methods in dry, cloudy weather. Rain or heat will reduce the survival rate. The exception is winter vaccination: it does not depend on the weather. All stages must be completed quickly, without giving the material the opportunity to weather and dry out. Read about the best varieties of currants for the middle zone here.
Care after vaccination
After surgery, you need to care for both the grafting site and the entire plant. Splice area:
- protect against leakage of juice and infection by covering open cuts with varnish;
- cover with a bag or cap, creating a humid microclimate inside;
- in cold weather it is insulated, and when positive temperatures are established, the insulation is removed;
- if the winding does not stretch, check whether it has cut into the bark, loosen if necessary.
Grafted plant:
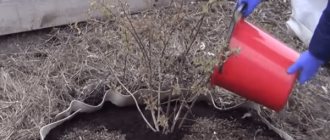
- loosen or mulch, water more often than usual;
- feed after two weeks with nitrogen fertilizer, then feed with a full set of macroelements;
- cut off the growing shoots and pincer the branches below the grafting site.
Caring for currants.
Caring for grafted cherries
After grafting currants onto cherries, the plant needs proper care. Water the tree generously immediately after grafting, then it is enough to water the plant once a week. The ground around the trunk is covered with mulch, this prevents the soil from drying out.
It is recommended to feed cherry trees no earlier than two weeks after grafting. Lateral shoots and shoots up to the grafting site are removed, due to this the cutting receives the maximum amount of nutrients.
If not special garden material was used for fixation, but cling film or electrical tape, then the branch is regularly inspected for rot.
Experienced gardeners advise not to remove the tying materials for a year after the tree has been grafted.
Mistakes of inexperienced gardeners
Grafting plants is a simple procedure, but the graft will not take root if the gardener makes one of these mistakes:
- will violate the rules of grafting and post-grafting care of the plant (cleanliness of tools and hands, speed of operation, protection from unfavorable environment and pathogens);
- will carry out the procedure at the wrong time (too early - before the start of sap flow or too late);
- chooses the wrong rootstock (it must be compatible) or prepares the scion (uses diseased, dry, frostbitten, damaged material).
Newbie mistakes
The procedure for grafting currants onto another fruit plant requires attention and experience, so beginners can often make a number of mistakes in the following points:
- choice of timing;
- selection of rootstock;
- grafting technology;
- care.
If you graft currants at the wrong time, this can lead to drying out of the cuttings or its rejection, so it is important to choose the date correctly, according to the area and sap flow of the plant. Before the grafting process, you need to find out in advance about the compatibility of the grafted plants, study the characteristics and taste of the crops. In pursuit of exotics, you can get low yields with weak characteristics.
Incorrect grafting of a plant can be associated with delaying the process, using blunt instruments, or ignoring the procedure for covering the cuts with healing agents. All this will contribute to poor splicing or rotting of the cuttings. If mistakes were made during care, then an inexperienced gardener can get at least a low yield, or, at a maximum, the death of the crop.
Find out how to properly tie currants.
Thus, grafting currants is a rather responsible process that requires the attention of the gardener, knowledge of the specifics of the plant, the characteristics of the plant and the care of the crop. If you adhere to all the rules of agricultural technology, the result is a healthy currant bush with a rich harvest.
How to prepare the base, cuttings, tools
The scion for grafting is grown independently from a seed, seed or seedling, purchased from other gardeners, or formed from an adult healthy tree. The junction of the cutting and the base is selected and prepared depending on the grafting method.
Culture cuttings are prepared:
- in late autumn before frost sets in, followed by storage in a cool, dry place;
- in early spring or summer immediately before vaccination.
For cuttings, young shoots are selected, cut at an angle, divided into blanks 25-30 cm high. 3-4 buds are left on a separate cutting. For long-term storage, the branches are wrapped in damp gauze and placed in a cold place (basement, cellar, refrigerator).
To carry out the procedure, it is enough to have the following tools:
- garden knife (secateurs are suitable for cutting cuttings);
- strapping material (adhesive tape, grafting tape);
- garden pitch or oil paint;
- plastic bag.
Knives (secateurs, hatchets) must be well sharpened so as not to injure the plant with blunt ends. It is recommended to pre-treat them with an antibacterial agent. Using the package, a “greenhouse” effect is created for the grafted rootstock, but attention to weather conditions is required so as not to overheat the plant.
Cuttings
The method of propagating currants by cuttings allows you to obtain a very significant number of seedlings. Therefore, it is used in commercial nurseries for growing planting material on an industrial scale. There are modifications to this type of propagation method: green cuttings and rooting of lignified cuttings.
Green cuttings
Propagation by green cuttings is relatively good only in large nurseries. There they can be grown under conditions of artificial fog, without which the rooting rate of cuttings is very low. Therefore, in small gardens and nurseries, only rooting of lignified cuttings is justified.
Spring
Another method of cuttings is spring cuttings in water. It consists in the fact that it is proposed to place currant cuttings in glasses of water for 7-10 days, while periodically changing the water. In May, after the return frosts have passed, the rooted currant cuttings can be planted in the ground, having previously been soaked in a solution of heteroauxin or root or other means that stimulate root growth.
When to take cuttings
It is recommended to harvest blackcurrant cuttings for propagation from the end of September to the warm period of October. But in red currants, propagation by cuttings is recommended to be carried out from the 3rd decade of August to mid-September.
Recommendations for taking cuttings
Before preparing cuttings for propagation, it is recommended to mark well-growing and fruit-bearing bushes during the summer; preferably at the age of 3-5 years of the variety you like, free from pests and diseases. Immediately before cutting, the pruning shears should be sharpened and disinfected. Sharpening is important to ensure that the cuts are even and smooth, and disinfection is important to prevent infection in the wound.
For cutting, it is recommended to select shoots that have reached a thickness of 1-1.5 cm at the base. It is recommended to cut them close to the ground. The recommended diameter of the cuttings is 5-7 mm, and the length is from 15 to 20 cm. Therefore, the middle part of the shoot is more suitable for cuttings. The upper cut should be oblique, approximately at an angle of 60 degrees, 5 mm above the bud. It is proposed to make the lower cut at a right angle 6-10 mm below the bud.
Rooting
Method No. 1
You can root cuttings in different ways. With the first method, they must be placed in a solution of heteroauxin, root or other stimulating drug or fertilizer so that the lower parts of the cuttings are in the solution to a height of 3 to 5 cm. First, with the first method, the cuttings must be kept in the solution for 16-21 hours. It is important that the ambient temperature is 18-20 degrees. After soaking, the cuttings can be planted both in open ground and in various containers (pots, boxes).
Method No. 2
The second case is designed for rooting in indoor or similar conditions. The second method of cutting involves storing cuttings cut in the fall until spring in the snow. In areas where the snow melts relatively early, after the snow has completely melted, the bunches can be wrapped in burlap and kept in the refrigerator until the weather is warm enough for rooting. After the air has warmed up to a temperature of +12, or better yet +18 degrees, the cuttings can be planted in the ground, in the so-called schoolhouse.