How to properly secure (tie) blackberries to a trellis or other structure
After building the support, you need to learn how to tie up plants correctly. Regardless of whether a support, stand or trellis is used to support the branches, care must be taken to ensure that the material with which they will be attached to the frame is natural and does not damage plant tissue. To do this, you can use old nylon tights, cutting them into strips, or regular cotton fabric.
Video: blackberry garter on a trellis
Each two-year-old shoot is tied to one side of the support, and one-year-old shoots are tied to the other. They begin to attach the branches to a trellis (another structure) when they reach a height of 50 cm. To do this, wrap a strip of fabric around the branch in a ring, and then put the two free ends behind the wire and tie it. Thus, a figure-eight fastening is obtained, which avoids friction of the branch on the twine or wire. Instead of fabric, you can use special plastic fasteners in the form of the number “8”. Such a device is attached to the wire with one ring, and to the branch with the second.
How to make a trellis with your own hands for cucumbers?
If clemantis and roses are plants that gardeners grow for spiritual pleasure and beauty, then growing cucumbers has quite a practical value. This is not only a tasty and healthy product, but also an opportunity to make money by selling it. Therefore, the question of how to make a wooden trellis with your own hands often arises not only among summer residents, but also among rural residents.
You can also create a trellis for support and proper growth from all the materials you have at hand. It is very advisable to purchase PVC mesh for this purpose. And then everything is very simple:
- We drive two metal or wooden posts deep into the ground.
- We stretch the mesh between them.
- If the posts are wooden, we treat them with protective agents against moisture and pests; if they are metal, we paint them.
When constructing such a structure, keep in mind that it must support not only the stems and leaves of cucumbers, but also ripe fruits, some of which have quite an impressive weight. If the year is fruitful and there are a lot of cucumbers, but you come to the dacha only on weekends and do not have the opportunity to collect them every day, the fruits pull the net down. This causes it to sag and may tear or become deformed. Therefore, try to constantly monitor the situation. Get horizontal jumpers and use them when the cucumbers begin to ripen. The horizontal jumper is fixed to the posts in such a way that a large letter P is formed. At any time, you can pull the stem that is pulling the mesh downwards upward with its help.
Decorative techniques: ideas
Diagonal gratings, which are often found on wooden gazebos, give an original and stylish look. Most often, a tilt angle of 45 degrees is used, the slats intersect each other at right angles. Only the pitch of individual elements can differ. If it is frequent and does not exceed 10–15 cm, then a fairly dense screen is created that provides excellent protection from the sun and allows you to hide the interior. A wider spacing of slats of 15 - 25 cm can create an atmosphere of lightness and openness, then the interior of the gazebo practically merges with the surrounding landscape.
The direct arrangement of intersecting slats will look even more original; you can combine them with inclined ones, for example, on adjacent walls. Such structures can also be very successfully used to support climbing plants, then instead of walls the gazebo will have a real hedge. You can use several slats of different widths to create a non-standard complex pattern with different pitches and openings, you just need to show your imagination properly.
Bonded slats for sheathing, also called trellises, can be connected in different ways. The technology of connection and fastening to the frame will not be much different, but the choice of pattern is very diverse, it is practically not limited by anything. The already mentioned lattice patterns with inclined slats are called “diamond”, with straight slats – “square”, trellises diverging from the bottom up from the center – “mill”, inclined ones with alternating directions – “chevron”. There are other schemes, you can create your own design.
It is worth considering that wooden gratings are appropriate not only on the walls, but also on the roof of the gazebo. If you make the top of the structure from massive beams intersecting at right angles, and also add climbing plants along them, then such a project will look simply fantastic. Such a “roof” will not protect from rain and scorching sun, but will add lightness to any architectural solution for a garden gazebo. Often such lattice top floors are made in pregola, which have become especially popular in recent years.
Often, caring owners glaze gazebos in their suburban areas. Their advantages are obvious: they perfectly protect from cold and rain, you can cook food in them and organize family gatherings in any weather. A good example of glazed gazebos are Finnish closed versions with 6 or 8 walls and an internal stove. Internal decorative grilles can be glazed with ordinary mineral, organic, tempered glass or transparent polycarbonate.
The question often arises about painting the load-bearing elements of gazebos and their decorative grilles. Many owners, especially looking at the arrangement of modern courtyards, choose bright, catchy colors for their country buildings. This is not entirely correct, since any wood itself has a pleasant natural color and does not require painting.
Types of gratings
There are several types of gratings for arranging gazebos on a summer cottage or personal plot:
Wooden gratings have their own characteristics and can be of the following types:
- In the form of a rhombus. This shape is given to the product by slats installed diagonally (usually 45°).
- Chevron. In this case, the trellises form slats at an angle, which rest against the frame posts.
- Square. The planks are attached vertically and horizontally, forming a square decorative sheathing.
- Mill. In this version, the slats are inclined to form a fan-shaped pattern.
It is wooden trellises that are often used to arrange such a type of gazebo as a pergola.
Did you know? A pergola is a structure in the form of a canopy. Supports of this design are made of arched sections that are repeated and connected to each other by bars. Initially, the ancient Romans began to make them for grapevines, and then the structure began to be used to protect from sunlight in the heat and create shade.
The simplest garters
You don’t have to make a trellis for blackberry bushes, but tie it to an elementary support.
You can use it as:
- fence;
- frames and stands for bushes;
- different types of supports.
Fencing
Blackberries can be used as a hedge. To do this, plants are planted at a distance of 1 m from the fence with a height of about 2 m. As the bushes grow, branches are tied up on the fence, as well as on a trellis, distributing them in height.
Frame and stands
If your blackberry is a variety with short vines (up to 1.5 m), you can use frames and stands for bushes. You can buy them ready-made or build them yourself. These types of support rigs are simply placed on the plants immediately after planting. They can have different configurations: cone, cube, etc.
Supports and supports
For small-sized single bushes, you can use different supports for climbing plants, which are small mesh installations. You can also install separate sticks in the form of spears (forked at the top) supporting the fruit-bearing branches.
DIY supports for climbing plants - master class
Relaxing in the summer in a shady corner of the garden, hidden from the scorching sun by thickets of beautifully flowering vines, is the dream of many summer residents. To create such green screens on your site, you will need climbing plants and supports for them.
You can choose climbing annual plants or liana shrubs, in which only the leaves die off in winter. They can be used to decorate existing buildings on the site, for example, a gazebo, barn, porch of a house, facade, fence, or you can make various trellises, arches and other garden structures for climbing plants, which will serve as a support for them and create green rooms or sheds on the site.
Where to begin
To begin with, you can try planting sweet peas, reaching a length of 2-3 m, tricolor bindweed, with bright funnel-shaped flowers, morning glory, decorative beans, and climbing hops.
These plants germinate well, require minimal care and quickly grow around the support. Varieties differ in terms of flowering and various colors of flowers; basically, all of these annuals bloom until autumn. The secret of success is a sunny location, timely watering and fertilizing.
Always in fashion
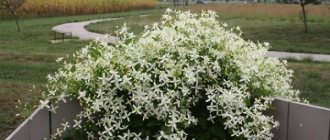
For those who have already decided on the options for vertical gardening of the site, perennial vines are more suitable. Clematis violet has stems 4-5 m long, the plant is decorated with large flowers of purple-red color. Clematis Jacquemman has flowers of various colors, stems 2.5-3 m long. A bright location, fertile soil, without stagnant water is suitable.
For spectacular flowering, clemetis need to be pruned depending on the group and covered for the winter. All clematis are divided into several groups according to flowering time - early spring, spring and summer, summer and autumn. Some clematis from these groups are not pruned at all, only broken shoots are removed, while others must be pruned. For example, clematis that bloom on old shoots in the spring are not pruned.
DIY plant support - master class
1. First of all, decide what size the lattice will be; it is better to immediately make it for the entire length of the plantings. Draw a plan on the ground, measure the required width between the vertical slats.
2. Lay out the slats according to the drawn diagram, mark the attachment points for the horizontal slats. At the bottom of the trellis, the distance between these slats can be narrower, so that young and short plants can easily cling, and in the middle of the trellis, make the distance larger and the same along the entire length to the very top.
H. At the intersection of horizontal and vertical slats, fasten them with two self-tapping screws.
4. It is better to paint the finished grille so that the structure does not fade or darken from rain. This grille can be secured with self-tapping screws to the wall of a house or gazebo. Another option is to attach it to poles or other supports in the garden.
OUR TIPS
It is better to plant several different varieties of peas, of different colors, or purchase a mixture of seeds at once.
Please note that sweet peas also have low compact plants about 20-25 cm high, some form bushes up to 30 cm.
Popular varieties of sweet peas for vertical gardening: “Melody Bicolor Mix”, stems up to 150 cm long, a mixture of colors, “Spencer Red”, stems up to 250 cm long, large red flowers, “Bonton lilac-violet”, stems up to 250 cm long , lilac-violet flowers, “Royal Family”, stems up to 250 cm high, fragrant flowers of different colors.
How to make a trellis for grapes with your own hands?
Almost all suburban private plots grow grapes. This culture is in great need of support, since its tendrils are constantly looking for something to grab onto in order to be able to grow upward. Therefore, a trellis for grapes is usually needed by all summer residents. This design is made using vertical posts made of high-quality dense wood. Several rows of strong wire are stretched between these pillars. It is to this wire that the grapes cling with their tendrils, holding the stem with leaves at a height.
Every grape lover can easily figure out how to make a trellis with their own hands. Step-by-step instructions are in the video at the bottom of this page. You can create such a trellis quickly; it is a simple design. The pillars should be placed at a distance of three meters from each other. If there are a lot of grapes on your site or they are of different varieties, you can build a double type of grape trellis for it. The essence of its installation is the same as that of the conventional version, but the pillars are made not of wood, but of reinforcement or a metal rod. This design can withstand heavy loads, but it is more difficult to manufacture. Therefore, such trellises are made either in factories or by vineyard owners, whose income depends on the correct location and growth of the grapes. For an ordinary summer cottage, a single trellis or a simple arch will be quite enough.
Advantages of using trellises in landscape design
- The purpose of a trellis in landscape design is not as clear as it seems at first glance. This structure really supports and directs the plants in the direction the gardener needs, but, in addition to this, the support has other advantages of use:
- any flowering or climbing crop, after being fixed on a trellis, will be able to maximize its decorative qualities, since it will not get dirty on the ground and get tangled with other plants;
- using supports of various shapes, you can hide unattractive places in the garden, as well as crooked and ugly walls of buildings and old fences;
- the horizontal construction of the trellis allows you to think about the high-quality placement of the roof, so it is sometimes installed as one or several walls of the gazebo;
- with the correct selection of plants for growing on a trellis, you can not only beneficially add greenery to your plot, but also create shade in the most suitable place for this;
- If desired, real labyrinths of plants can be created using supporting structures; you just need to place the products in the appropriate direction.
There are indeed many reasons for using trellises in landscape design, but one should not forget that the desired effect from their installation can only be achieved if the area is properly planned and the most suitable types of flowering and climbing plants are planted next to the support.
What can you grow?
Most people have a question not only about whether it is possible to grow grapes, but also what other plants the design can be applied to. It’s worth exploring the topic of grapes in more detail. This plant is characterized not only by different varieties, but also by great whimsicality in the conditions of its development, and therefore, in order for the fruits to be the way you want, you need to try.
Single-plane
The simplest type of this design for grapes is single-plane. Its peculiarity is that the entire growth of the bush is located in one specific plane. Among the advantages, highlight the uniform ripening of fruits, ease of care and simplicity of design. This type of trellis can also be used for growing climbing and bush trees. This design is held in place by pipes and wire (it is best to use aluminum or copper). Can also be made of wood.
Biplanar
The second, quite popular design on which grapes can be grown is considered to be two-plane. One row of grapes is grown on it, and it consists of two vertical structures. Gardeners say that the arrangement can be combined in different ways: placed in the letter “V”, parallel to each other, and so on. In this case, the grapes are distributed evenly on both sides (the number on one trellis depends on the number of sleeves). It is worth noting that this design is suitable not only for grape branches, but also for cucumbers and roses.
Most gardeners believe that growing grapes in such conditions is much easier than without them. This plant has a larger yield and a higher quality variety (due to weather conditions).
For roses
A flower garden of roses on your own site is wonderful! But is this design necessary for it, and is it possible to make it yourself? It’s worth noting right away that any trellis is used as a support, which means it will be no different for roses. Only many people wonder: why do this for roses? Thanks to this, the stems do not get excessively wet and are not trampled into the ground.
In windy weather, the stems of roses create a lot of pressure on the trellises, so they must be more stable than for other plants.
Do not forget that such devices for clematis and roses may be slightly smaller in size than for grapes. For clematis, it is most often made into an arch, since these are the flowers that decorate the entrance to the house.
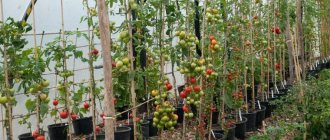
For cucumbers and tomatoes and other plants
For cucumbers, a two-plane design is used. This is very convenient, since this culture is developing and spreading very quickly. Installation will take you some time, but it is much more profitable than not having this device. Supports for cucumbers can protect against the spread of weeds, ensure there is no need to dig up beds and many other worries.
It should also be noted that the raspberry support has exactly the same design, and there are no “super differences”. It will be very convenient for you to “wrap” the branches of these plants around the structure. It is also worth saying that there will be no problems with pruning these bushes; collecting the fruits will be very convenient and simple.
Making a garden trellis
The main task is to correctly connect the two slats crosswise. This is best done using a square-shaped block. Moving along the rail and using the block as a measuring material, you need to secure several more slats along the entire length of the horizontal guide. Moreover, all of them must be secured with an offset, as shown in the figure. The correct displacement of the slats is done using an oblique guide, which is attached to the main one at an angle of 45°.
1c938b3860c9f13f18c905de2d7244d3.jpe
The remaining slats are attached using the same principle, after which the trellis is almost ready.
All that remains is to fill in the corners. This is done according to the same principle, only shorter slats are used for the corners. After completion of the work, the garden trellis is secured with an edging crossbar (possibly thicker) and installed in its intended place.
It will only take you a few hours to make a wooden trellis, and another half a day for painting or varnishing. After this, they can be used for their intended purpose.
In the example given, you must fill 9 slats with an offset on the main guide, and subsequently do the same to fill the entire plane. The trellis can be trimmed using an edging strip located at an angle of 90° to the additional guide. The corners on each side are filled with three pieces of wood of shorter length. Finally, slats are placed on both sides of the edge of the trellis along the perimeter - and the garden fence after varnishing or painting is completely ready.
What is a trellis
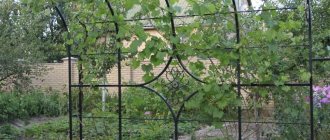
A trellis is an element of a garden or vegetable plot, with the help of which it is possible to achieve fixation of plants in the most acceptable position for the gardener. When decorating a site, a lattice structure is most often used than others, acting as a vertical support for tall and climbing crops.
If it itself has a bizarre shape or is supplemented with any figures, then, together with the plants themselves, it can serve as an excellent garden accent, attracting the attention of both the gardener himself and his guests. The trellises are attached to the walls of any garden buildings on the site, to pergola posts, or they are installed as an independent decorative element in the most suitable place for this.
Important! When creating a trellis, it is worth considering the future weight of the crops growing on it. The individual structural elements of the product must withstand the maximum weight of the vegetation, even if it also changes with the change of season (the maximum possible values are taken into account)
The individual structural elements of the product must withstand the maximum weight of the vegetation, even if it also changes with the change of season (the maximum possible values are taken into account).
Important! When creating a trellis, it is worth considering the future weight of the crops growing on it. The individual structural elements of the product must withstand the maximum weight of the vegetation, even if it also changes with the change of season (the maximum possible values are taken into account).. Classic trellises fixed to the wall of a residential building are often used to decorate the front entrance, especially if they have straight and diagonal shapes, due to which an original combination of shadow and light is created
This can be a very small structure intended only for one type of plant being grown, or a relatively long structure dividing the territory into several functional zones.
Trellis gratings in most cases are made of wooden slats, additionally framed by a decorative frame of beams with a wide cross-section. It is the frame that protects the product from deformation and provides it with sufficient stability
Classic trellises, fixed to the wall of a residential building, are often used to decorate the front entrance, especially if they have straight and diagonal shapes, due to which an original combination of shadow and light is created. This can be a very small structure intended only for one type of plant being grown, or a relatively long structure dividing the territory into several functional zones.
Trellis gratings in most cases are made of wooden slats, additionally framed by a decorative frame of beams with a wide cross-section. It is the frame that protects the product from deformation and provides it with sufficient stability.
Flower trellis
It is desirable that such a design look decorative . After all, it is placed closer to the entrance to decorate the area. In hardware stores you can find a variety of types of flower trellises, but if you wish, you can make them yourself.
Support for clematis
Clematis flower
The main requirement for such a trellis is increased strength.
After all, clematis lashes are quite weighty, and after rain their mass increases even more:
1When making a trellis for clematis with your own hands, you must take into account that only young shoots are able to cling to the supports. The old lashes will have to be tied up.
2In order for clematis to cover the trellis, the diameter of the support should not exceed 1-2 cm. But in order to withstand such weight, the lattice must be made frequent enough.
3The supports should be slightly rough, otherwise the clematis vines will simply slide off them.
4To show all the beauty of flowers, trellises for them are often made in the form of arches or semi-arches. Wood, metal, mesh or plastic pipes can be used as the starting material.
5 A vertically positioned trellis in the form of a frequent lattice of thin wooden slats looks very decorative.
6To make it, beams 22-23 cm long are dug into the ground at a depth of 40-50 cm. The distance between them is 60 cm.
7The internal frame and gratings are prepared from thin slats.
8To impart rigidity, such frames are reinforced with horizontally running strips and fasteners.
Trellis for climbing roses
These types of roses are not able to attach themselves to supports, since they do not have tendrils. Therefore, each bush is necessarily tied to a trellis in several places, with its simultaneous shaping and pruning.
Shoots of climbing roses are attached horizontally or in the form of a fan. Otherwise, the principle of creating do-it-yourself trellises for roses is similar to the previous ones.
A support made of thin wooden slats for climbing roses is attached to the fence
Decorative supports for them can be single, ordinary flat, arched or semi-arched, or consist of fragments of different shapes. Bright flowers look very original against the background of white plastic pipes or decorative metal lattice. You can also use colored plastic mesh made of fairly dense fiber.
Flower trellises can be of great service when separating any part of a site or zoning a space. With the help of arched supports, recreation areas are often equipped. Overgrown vines of plants can also hide the dilapidated walls of old buildings, the repair of which is never done.
Grill assembly
Classification of weatherproof wood paint for lattice coating.
Let's start filling it out. For this you will need the same slats as for the rebate. They need to be placed diagonally at an arbitrary but equal distance. To maintain the exact distance between the slats, it is convenient to use a wooden template. Accuracy and thoroughness in performing this stage of work will give the product beauty and grace, emphasizing the correct geometry of the elements.
We connect the 2 frames made in this way to each other so that the lattice slats intersect crosswise and press tightly against each other. We fasten the frames together with glue and screws or nails.
673b58afae8180064f5671388ca49283.jpe 59fe8e5af20b196c37af934822d1dec1.jpe
If you decide to make a more massive trellis for the base of climbing plants, and even more so, if you decide to completely block the opening or several openings of the gazebo with trellises, then it is not necessary to make a frame: the trellis itself is already a frame, giving the structure the strength and necessary rigidity from intersecting installation fragments among themselves. By choosing larger bars with a cross-section of 20x40 mm, they can be attached directly to the main frame of the gazebo, carefully trimming and adjusting the size of the bars to the location.
After the grille is assembled, if necessary, its surfaces are treated with sandpaper, and then the entire grille is varnished. Very often, the grilles on the gazebo blend perfectly with the surrounding landscape and buildings by highlighting them in a different color. Therefore, instead of varnish, you can use any weather-resistant wood paint.
http:
How to make a wooden cucumber stand yourself
It will take approximately two hours to make. The support should be erected after planting the seeds, but before the first shoots appear.
Here are instructions on how to make a support for cucumbers:
- Decide on the type of structure.
- Install the pillars, maintaining a distance of 1.5-2 m.
- Secure the supports at an angle of 70 degrees and anchor them with guy wires.
- Build a frame by nailing a horizontal cross member to the top of the support posts.
- Perform the sheathing. It is best to use thin slats 30 mm thick for this. The optimal cell size for cucumbers is 15*15 cm.
To build a trellis for cucumbers in open ground, experts advise choosing hardwood - chestnut, oak, ash, mulberry.
If properly designed, a cucumber trellis can adequately decorate your site, acting as a non-standard element of landscape design. Therefore, there is no need to spare time and effort on its construction.
Types of trellises
Trellis for blackberries can have different designs. Such a device can be purchased at specialized sales points or made with your own hands. Most users prefer making their own. This design does not require large financial investments, since it can be built from materials available on the farm. Making a trellis is quite simple, even without experience in this matter.
Did you know? In a number of European countries, blackberries are used only as an ornamental garden crop, and America grows the largest number of berries on an industrial scale.
There are the following types of trellises, depending on the type of structure:
- single-lane simple;
- two-way simple;
- T-shaped;
- V-shaped;
- S-shaped;
- negotiable;
- pergola;
- arch.
Single lane simple
This design is divided into several types:
- fan;
- vertical flat;
- free;
- inclined;
- horizontal.
In fact, all varieties are several pillars driven in at the beginning, middle and end of the row, 2–3 m high. Between them, a wire is stretched in 2 rows (the first is at a height of 50 cm from the ground, the second is 2 m). The only difference is the method of tying up the vegetation. This type of trellis is suitable for small plantations, since each branch needs to be fixed separately, which will be inconvenient for large areas due to its high labor intensity.
Two-way simple
The type of trellis in question is similar in design and size to the previous one. The difference lies in the location of the strips for fixing the lashes. The ropes are pulled at a distance of 50 cm from the soil parallel to each other. Do the same with the second row of ropes, located at a height of 2 m from the soil.
According to the type of fastening of ropes for fixing the lashes, two-lane structures are divided into:
- T-shaped;
- V-shaped;
- S-shaped.
T-shaped
In such a trellis, the posts on which the rope is held for fixation are made in the shape of the letter “T”. The bases are installed at the end and beginning of the row. The wire is attached along the outer edges of the poles in 3 rows (at a height of 50, 100, 150 cm). During the growth of the bushes, the shoots are fixed on both sides, which allows the central area to be left free.
In this design, the base is shaped like the letter “V”. Attaching the branches is carried out similarly to the previous option.
b6819541f85b42c08a0b5c36d6ef41e7.jpe
S-shaped
The essence is the same as in the two previous variations - the base is designed in the form of the letter “S”. Tension threads are attached to the upper, lower and central parts of the warp.
Did you know? Ripe blackberries have a mild laxative effect, while green ones, on the contrary, have
an astringent effect.
Negotiable
The moving, or reversible, trellis is a rather complex structure. Such devices are used in the USA in industrial plantings. They are adapted in such a way that when flowering begins, the frame with fixed branches turns almost parallel to the ground.
As the berries ripen, it is raised to a vertical position. The frame is driven by a rotating mechanism fixed next to the base, which can be designed according to one of the above options. The height of the structure is 3 m, and the length, depending on the area of plantings, can vary from 5–10 m to several kilometers. Reversible trellis at the time of flowering bushes:
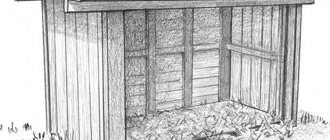
Pergola
A pergola is a kind of net or fence to which branches are tied as the bushes grow. This type of structure has a beautiful decorative appearance, which allows it to be used as a support for a hedge. If you install several of these structures in the form of a square, you can create an unusual gazebo. The height of the structure is 2.5–3 m, the width depends on the length of the row of plantings.
Arch
A trellis-arch allows you to form a beautiful row of blackberry bushes or a gazebo, which will act as a decorative element in the garden. The shoots are fixed parallel to each other, which allows for good illumination by sunlight. The height of the structure is about 3 m, the width is arbitrary.
Grape trellis
The quality and even the yield of grapes largely depend on the choice of trellises. The support for it is made mainly two-plane. Lightweight structures located in one plane are used only for young shoots, decorative or small varieties.
Single-plane trellises
Semi-arch design
Let us tell you in detail how to make a simple trellis for grapes:
1 For ease of collecting and caring for plants, supports should not be higher than human height. It is advisable that the grape bunches are located no higher than the winegrower’s eye level
2 The trellis can be made in the form of a straight columnar structure, an arch or a semi-arch. Arched structures are better illuminated by the sun, so the yield of plants with such cultivation will be greater. Columnar supports or semi-arches are used more often when there is not enough space
3 It is better to use metal as supports - this design will be more durable and will last much longer. After all, a grapevine can live up to 50 years! It will be a shame if one day it breaks along with a rotten wooden beam
4 For the simplest single-plane trellis, it is enough to use support pillars located at a distance of 3 m from each other. For them, holes with a diameter of 60 cm are prepared using a drill.
5 To strengthen the structure, it is better to concrete the pillars into the ground to a depth of 50-60 cm. To protect against moisture, before pouring the concrete solution, a layer of crushed stone is poured into the bottom of each hole
6 Vertical crossbars are attached to horizontally located supports by welding
Two-plane structures
Such trellises have a large plane, which allows the vine to grow in different directions . In this case, the plant receives more air and light, which significantly increases productivity.
It improves when tied to such supports and natural pollination. A well-grown tent creates shade, allowing you to protect the roots of the grapes from rapid evaporation of moisture.
Two-plane design
Externally, this design resembles the letter V attached to a small post. In its upper part there are horizontal crossbars.
1The principle of creating a two-plane grape trellis is similar to the previous one. The only thing to consider when arranging the supports is the space between the rows. For normal formation of the vine, it should be 1.5 m. A gap of 1.2 m is left between the bushes. Dessert varieties are planted at a distance of 1.5 m from each other. If the bushes are lush, it can be increased to 2 m. Between rows leave 1.5 m
2 The optimal height of the trellis is 2.2-2.5 m
3 The diameter of the metal supports is from 32 cm. It is better to make the outer pillars a little thicker
4 For fastening pipes, welding or metal corners and screws are used
5 The distance between the pillars is at least 2.5-3 m
6 Metal or wooden supports must be concreted into the ground
7 To protect metal or wood from moisture, the lower part of the pillars is treated with bitumen and wrapped with roofing felt
8Since the vine weighs a lot, the posts need to be given additional rigidity. To do this, 4-5 rows of intermediate, horizontal crossbars are attached between them, and a thick wire or cable is stretched. It is better to use copper or aluminum - iron wire will rust quickly and will have to be replaced frequently
8 To attach it to the posts, corners, rings or brackets are welded
Drawing of a grape trellis
Some winegrowers claim that the largest bunches of grapes grow on high supports. But this opinion is wrong. By raising the trellises to a very high height, you will only make it more difficult to care for the vine.
Unusual materials when creating a trellis
In an effort to save on materials or in the desire to repurpose unnecessary trash, we often find interesting solutions. We share them on the Internet and they gain popularity. For example, trellises made from plastic pipes and remnants of reinforcement structures have now become popular.
This technique is suitable for creating a super-strong frame. It can withstand even large quantities of ripe grapes.
To create the design you need:
- The armature is 300 cm long, 1 cm in diameter, made of iron.
- A plastic pipe with a length of about 60 cm and a width of 1.3 cm.
- Metal clamps with screw.
- Tool for working with metal.
The most important step is correct measurements and, based on them, accurate calculations. If you make a mistake here, the design may not work out or its appearance, stability, etc. will suffer. The above materials are enough for a trellis with a width of 250-300 cm. The length will vary depending on the number of plastic pipes.
Stages of creating a trellis step by step:
- the reinforcement is divided in half, each should be 150 cm long;
- 150 cm of reinforcement is placed in the corners of the future structure; they should go 40-60 cm into the ground;
- Every meter it is necessary to drive additional supports into the ground;
- pipes are placed on top of all protruding supports, which forms the basis for the structure;
- Next, using clamps, a longitudinal row is created, the distance between them should be about 70 cm.
The result is a very durable and, most importantly, safe structure. It can withstand even particularly powerful vines.
And most importantly, the materials for its manufacture often remain after country renovations, and the service life is much longer than that of structures made from natural materials. Since plastic is not subject to rotting, it is not afraid of moisture, dirt or temperature changes.
Wooden trellis
The simplest and lightest trellis design is considered to be rectangular, made of wood. The sizes may be different, but you need to remember that a support for grapes and a support for clematis are quite different. Let's look at how to do it now.
A wooden trellis is a simple structure. The final cost of the trellis depends on the materials you choose. A picket fence is best suited for these purposes. A special advantage of such a support is that it is an original addition to the garden plot at any time of the year.
Modern trellis
Note!
If there are building materials left after construction or renovation, then you should not throw them in the trash; they can be useful when creating trellises.
Preparation
To make a trellis you will need the following tools:
- screwdriver (or screwdriver);
- sandpaper;
- building level;
- brush.
From the materials you will need to select:
- 46 picket strips;
- 100 screws;
- 1-2 cans of varnish.
The amount of the specified material will be sufficient to create a standard support, since the average height of the picket fence is 1.7 m.
Note!
Before starting work, the picket fence should be inspected: if the elements are poorly planed, then they need to be additionally sanded with fine sandpaper.
Progress
Knock down a rectangle or square
You can collect the trellis directly on the ground, but professionals recommend using a wooden or plastic stand with a flat and smooth surface. The algorithm of actions consists of the following stages:
- A square is made from 4 slats. The ends are fixed to each other using screws. It is important to measure and maintain an angle of 90º. Each action is accompanied by a check using a building level in order to obtain high-quality support as a result.
- Then, moving from one rail to another, words to the right or vice versa, fix the picket fence.
- We turn the structure over and perform the same steps again to get a lattice as a result.
Stuffing slats
To protect the resulting trellis from rain and snow, it is necessary to cover it with 1–2 layers of varnish or paint, depending on the landscape design. Only after complete drying the support is installed in a permanent place. If we are talking about the wall of a house or outbuilding, then there is no need to fasten it tightly. The resulting gap will be a more successful option for climbing plants, since the stems will be able to weave freely without encountering obstacles on their way.
Grapes cling to the trellis
The trellis can also be installed directly on the garden bed. To do this, a couple of wooden posts are dug into the ground next to the plants, to which the structure is attached using nails or self-tapping screws. If you want to fence off a recreation area, you can use structures that are placed along the garden path. This original solution will look amazing.
For cucumbers
Note!
The described design can be suitable not only for roses and climbing plants; it can also withstand the load of many vegetables, for example, cucumbers.
Material selection
First of all, you need to choose the right type of wood. To create decorative grilles, the following are most often used:
- Ash. Beautiful, durable and resistant to adverse environmental influences. Easily processed. Many consider it the ideal choice.
- Oak. Strong and durable, bends well, looks attractive. However, it is a very hard material that requires experience to work with.
- Pine. Aesthetic, durable, pliable. The advantages include a pleasant pine aroma and disinfectant properties.
- Larch. Durable, resistant to dampness and rot, lasts a long time.
- Beech. It looks very beautiful due to its pinkish color, but is not resistant to moisture.
There is a plastic sheathing on sale that imitates natural wood. It doesn’t look as attractive and is less durable, but you can use it to quickly create a gazebo.
91a51dec95a01ce66c3391527237a69e.jpe
Selecting the type of trellis, calculating the material and tools
For creeping blackberry bushes, any type of trellis is suitable; for upright ones, one- and two-cavity ones (except for the reverse one), since their shoots are not so flexible. But it is best to construct a simple three-level, two-cavity support, which is considered universal and suitable for different varieties.
Tools for constructing trellises will be required:
- shovel;
- drill and drill bits for it.
To create a frame you can use:
- tree;
- polypropylene pipes;
- metal;
- wire or twine.
Tree
Wooden piles are most often used in small areas. They are quite stable and can withstand high tensile forces, but are subject to rotting processes too quickly (especially the part that is in the ground).
When using wooden beams to create a structure, they are pre-whitened along their entire length. The lower part, which will be buried in the ground (about 50 cm), is wrapped with water-repellent film.
Metal
Metal frames are more reliable than wooden ones, but are susceptible to corrosion
When choosing such material, you should pay attention to galvanized pipes and channels
Polypropylene pipes
The frame made of polypropylene pipes is very light, so constructing the trellis will take quite a lot of material. For example, when using wood and metal, you can install the bases only at the beginning and end of the row. If you use polypropylene material, you will have to install foundations between every 2 bushes. It is better to use them to make frames for low-growing varieties of blackberries.
Wire or twine
Both wire and twine can be used to secure branches. These materials are strong enough to support shoots along with the harvest.
Find out what blackberries on your site get along with and what they don’t.
Calculation of the length and height of the trellis depending on the selected type
All structures will have approximately the same dimensions in height - 2.2–3 m. The length of the frame depends entirely on the number of bushes in the row. If the area of plantings is quite large, then support pillars need to be installed not only at the beginning and end of the row, but also in the center, with an interval between them of at least 6 m. The length of the pile will be equal to the height of the finished structure + 60 cm (depth of the pit). For example, if you plan to make a trellis with a height of 2.2 m, then piles with a length of 2.2 + 0.6 = 2.8 m will be required.
Scheme of a three-level trellis:
Cucumber trellises
It is perhaps simply impossible to do without supports when growing this southern vine. The trellis provides normal ventilation to the lashes and protects them from rotting. And when searching for ripe cucumbers in the delicate and fragile stems creeping along the ground, there is a high probability of their damage.
Harvesting from the trellises is a pleasure - all you have to do is extend your hand
Using Arcs
Open high trellises in the form of trellises are used mainly in the southern regions, where spring shelter for these heat-loving plants is not required. In the rest of Russia, cucumbers are grown under high arches covered with film.
At the same time, they also serve as trellises - non-slip wire or rope is hung from them, hanging freely down. Cucumbers, growing up, cling to the string themselves with the help of antennae.
Short arcs can be raised higher above the ground by screwing them to wooden blocks or metal pipes using self-tapping screws.
Using supports with horizontal bars
To build such a structure, you can use any waste wood material, for example, an old picket fence.
The following building materials after renovation are also suitable:
1The site for planting is chosen in the most illuminated place, away from drafts.
2On both sides of the bed, a pair of pillars made of durable timber or metal is buried to a depth of 0.4-0.6 m. To prevent the supports from becoming loose, they are driven into the ground with a hammer.
3Horizontal crossbars are secured across the pillars.
4 Intermediate stakes are placed between the pillar supports at a distance of 15-20 cm.
5Between them, a mesh is pulled and secured with strong wire or ropes are hung. They are attached to the lower stakes near the ground, pulled up, thrown over a horizontal crossbar and secured on the opposite side of the bed and to the lower stake.
Wooden Trellis in the shape of the letter "T"
To create such a structure, several support pillars are prepared. To strengthen them, 2 inclined spacer bars are used.
T-shaped trellis
All pillar supports are connected to each other using the top crossbar. On each of the upper parts of the letter “T”, on both sides of the block, at a distance of 25 cm, nails are hammered, to which a long wire is screwed or a string is tied, freely falling down to the ground.
Small loops are made at its ends that will be thrown over young plants. You don't need to do anything else. In the future, the liana plant itself will cling to the nearest twine with the help of tendrils.
The rope should not be pulled too tight. Otherwise, the cucumbers, clinging to it and gradually pulling it, will simply tear themselves out of the ground.
Trellis for cucumbers
The design of such trellises can be any - they can be made in the form of a tent, hut, cabinet, or even a polyhedron. The lattice cells can be rectangular, square or triangular in shape.
Metal grid
A durable metal mesh can withstand the weight of even a large number of lashes. You can also use plastic mesh - it is quite strong and absolutely does not rot.
Mesh trellis
Let us describe step by step the process of making a trellis for cucumbers:
1To protect plants from the wind and prevent soil from spilling out of the ridge, it is better to prepare a wooden box, which is dug into the ground and then covered with earth on the sides.
2For the trellis, make a base in the form of two wooden or metal boxes.
3They are attached to the side support posts installed along the edges of the ridge using metal corners and self-tapping screws. The pillars are driven into the ground 40-60 cm.
4 Intermediate pillars are dug between them.
5Next, 2-3 horizontal crossbars are attached.
6 An arch-shaped trellis is more convenient - it can be easily covered with a film that will not cling to the corners of the structure.
7To give the metal mesh the shape of an arch, a log is placed in the center, and the edges of the mesh are brought together, adjusting them to the desired bend.
8 The mesh is attached to the posts from one edge of the bed to the other with thick-headed nails. They are hammered into the tree, then bent to form a loop, to which the mesh later clings. Try to bend the nails so that they do not catch on clothing. The plastic mesh can simply be screwed with strong wire.
L-shaped trellis in the form of a hut
Trellis in the form of a hut
This design is convenient because as the vines grow, the cucumbers sag perpendicular to the ground under their own weight and are immediately noticeable when harvesting.
To make it, a frame is assembled from metal or timber in the form of a hut, which is installed on the ground. To prevent the structure from being overturned, it is screwed to small support posts driven into the ground.
Construction of the foundation
Even if the future country pavilion is an open-type mobile structure, you will need a foundation. To install any structure, you need a hard, flat surface designed to bear a certain load.
Step-by-step instructions for creating a foundation:
- Clear the selected area.
- Dig a pit of the required depth.
- Place a layer of sand, old tires, stumps or tree cuts on the bottom (the material is selected depending on the method of constructing the base).
- All free space is filled with cement or concrete mortar.
- Next, they make the bottom trim and begin to build the frame of the gazebo.
What it is?
Often people have no idea what a trellis is, so the first thing you need to do is figure it out.
A trellis is a structure (very often in the form of a lattice) that supports plants. It should be noted that plant shoots are fixed in a certain way, which does not deform them and helps them develop better. The question arises, is it possible to do everything yourself or is it better to buy? You can buy this design in garden stores or order it online.
- The standard size is a grid of 1000x1500 cm.
- There is 1 piece in the package; you can also purchase special fasteners in the form of hooks in the kit.
- The price of the structure varies from 1,500 to 4,000 thousand rubles, depending on the height and width.
- In some cases, fasteners are included in the kit, but sometimes you have to buy them yourself.
After we have dealt with the main issue, now you have an idea of what a trellis is. Next, you should find out what types of it exist; many gardeners make such structures according to the types of plants for which they are used. Different types exist for:
- cucumbers/tomatoes;
- raspberries/blackberries;
- roses;
- grapes
There are other classifications. In particular, trellises for grapes are divided into single-plane, two-plane, for high-standard crops, arched, inclined and vertical. The choice of design depends on the type of climate, as well as the type of plants.
Design advantages
Naturally, before using trellises, you should think about what they can present to you, so we decided to tell you in more detail what advantages there are.
- Plant shoots are evenly exposed to sunlight and distributed.
- The quality of the berries increases due to sunlight and photosynthesis.
- Compared to growth under normal conditions, the level of fruiting of the plant on a trellis increases.
- More favorable conditions are created for plant pollination.
- Plant branches are not deformed. This is especially helpful when covering plants for the winter.
- With the industrial cultivation of grapes, blackberries, cucumbers and raspberries, it becomes possible to mechanize all processes for caring for them.
In addition to all the above advantages, thanks to convenient fastenings, plants are less susceptible to tangling and various diseases. If, for example, you grow climbing grapes, then it will allow you to evenly distribute its branches so that they do not get confused with each other. It is worth mentioning that this method is the best for natural decoration of the site.