What is a vermicomposter?
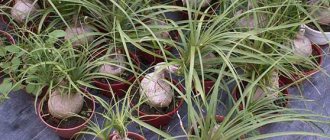
Vermicompost is sold in gardening stores; many gardeners use the fertilizer, but not everyone knows that it is a waste product of compost worms. A vermicomposter is the place where they live; people often call it a vermicomposter.
The simplest design for an apartment (house) consists of 2 containers that are placed on top of each other. In the upper compartment live domestic worms - compost producers. It should have holes around the perimeter of the walls for ventilation, and on the bottom for drainage of the liquid fraction - vermochay.
In country houses, outdoor structures are built from boards ; their shape resembles a high bed. They are used only for the production of vermicompost ; liquid fertilizer is not obtained in garden wooden vermicomposters.
Vermicomposter organization
There is no doubt that vermicompost is a very valuable fertilizer that does not require serious financial investments. At home, you can get vermicompost using a homemade vermicomposter, which can be made both at the dacha and in the apartment.
In the case of a private house, you can organize a compost heap or pit, or, if this is not possible, you will have to find a suitable container.
A wooden or plastic box or cardboard boxes with a depth of about 70-100 cm are suitable for this. But in the case of the latter, one must take into account that they will become damp over time, and therefore they will have to be rearranged into larger boxes. It is also worth taking care of some kind of lid for the container so that the worms do not crawl out, but with the obligatory holes for ventilation.
We recommend: Making a paper press with your own hands
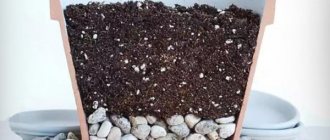
on the bottom of the box or box : a layer of crushed stone or just make a few small holes there. This is necessary so that the moisture does not stagnate, otherwise the worms may die. The container is then filled with ingredients for the nutrient mixture and heated for ten days until it is suitable for launching worms. You can test the readiness of the mixture by introducing 50-100 individuals into it and checking after a day - they should all be alive.
If the compost is ready, you can carefully lay out the remaining worms. Standard for making vermicompost: 700-1500 pieces per 1 square meter. For the first 1-2 months they will adapt to new conditions, after which they will begin to actively feed and reproduce. New compost must be added every 10 days to feed the soil.
Compost worms
Ordinary earthworms living in garden soil process organic residues, but their productivity is low. There is no point in using them to produce vermicompost. On the Internet it is not difficult to find suppliers of the compost worm Eisenia fetida, originally from California, their characteristics:
- main color red, tail yellow;
- length up to 10 cm;
- reproduce quickly;
- per day they consume food, the mass of which is ½ of their weight.
Reference!
The temperature of the air and substrate in the vermicomposter should not exceed 30°C.
You can put prospector worms into the vermicomposter; they do not reproduce as actively as adult Eisenia fetida, but they have their own advantages. The European variety easily processes shredded cardboard and sheets of rough paper.
Required Components
Like other fertilizers, vermicompost can be purchased in specialized stores, but not everyone is satisfied with its quality. What to do if the quality of the purchased vermicompost leaves much to be desired? Of course, make it yourself.
At home, vermicompost can be produced without any serious difficulties; you just need to know what components are needed for this.
Compost preparation
To produce vermicompost, two main components are needed: worms and a nutrient substrate where they will be kept. The latter is quite simple to create, since finding its components is not difficult:
- one part of rotted sawdust, hay or straw, tree leaves;
- one part of organic waste: lying cow manure or bird droppings, chopped vegetable peelings, leaves, tops, etc.;
- sand (about 5% of the total amount of compost).
Before adding worms to the substrate, it must be composted for ten days.
To do this, the mixture must either be warmed well in the sun, or peat and lime must be added to it (about 2% of the total mass). You can test readiness by throwing several worms into a container with compost, which should burrow deep. If they have not done so, then composting must continue.
We recommend: What can be made from glass bottles: ideas for crafts
Growing worms
Red Californian worms are most often used to produce vermicompost: they live a long time (from 10 to 16 years), actively reproduce and process organic waste well.
But it is necessary to take into account that at the same time they do not tolerate low temperatures well, and therefore additional insulation for the winter may be required for the place where they are kept. However, this is not the only species that can be used for the production of fertilizers. The market offers a fairly extensive selection, and if desired, you can even use ordinary red dung worms.
It all depends on how large volumes of the final product are required.
There are several important conditions regarding the keeping of worms that must be kept in mind. They are associated with the vital functions of these animals, and failure to comply with them can result in the death of the worms:
- The temperature should not fall below +12 and rise above +30 degrees. Of course, this condition may vary slightly for different types of worms.
- The optimal humidity is 70−80%, so the compost heap must be watered regularly. It is believed that if you squeeze suitable soil in your fist, a couple of drops of water will be released from it. But it is important not to overdo it, because the worms breathe through the skin, which is why they are quite capable of drowning. It is advisable to water with settled, clean water.
- The environment should be neutral - pH about 6−7.5.
- The container with compost should not be hermetically sealed: worms also need air.
- The compost heap or container must be shaded from sunlight, since ultraviolet radiation is harmful to worms. For the same reason, they prefer to go deep into the soil during the day and rise to the surface at night.
- When preparing plant waste to feed worms, you should be careful with citrus fruits, as they can acidify the soil.
Industrial model of a composter for an apartment
It is worth purchasing an industrial vermicomposter if you want to maintain a stylish kitchen interior. There are many good reviews about the Worm Cafe model. The device is not cheap, but durable, so it fully pays for itself.
The composter is produced by the Australian company Tumleweed. The bodies of the working containers and the tray for collecting liquid fertilizer are made of black plastic. The lower container is equipped with legs and a drain tap.
Working tray dimensions:
- length 0.57 m;
- width 0.39 m;
- height 0.75 m.
The set may include 2 or 3 worm containers. To launch, 1000 adults are needed. One working container is filled with vermicompost in 2-3 months. The tea is drained every week.
For feeding, use peelings of vegetables and fruits, coffee grounds, used tea bags and tea leaves, leftover side dishes, and cereals. During operation there is no unpleasant odor, the liquid fraction does not leak out, the kitchen (utility room) does not become dirty, flies and other insects do not infest.
The table shows vermicomposter models from different manufacturers.
| Manufacturer country | Model | Description | |
| Russia | Mini vermichok | volume (l) | 63 |
| rectangular trays (pcs) | 3 | ||
| price, rub) | 4500 | ||
| Australia | Can-O-Worms | round trays (pcs) | 2 |
| pallet with tap (pcs) | 1 | ||
| dimensions (cm) | 51*51*65 | ||
| price, rub) | 9280 | ||
| Australia | Eco Worms | volume (l) | 30 |
| width (cm) | 42 | ||
| height (cm) | 60 | ||
| diameter (cm) | 45 | ||
| trays (pcs) | 4 | ||
| stand on wheels (pcs) | 1 | ||
| Czech | Urbalive | wooden legs (pcs) | 4 |
| trays (pcs) | 2 | ||
| dimensions (cm) | 51*38,1*70 | ||
| price, rub) | 10700 | ||
| Australia | Wormfeast (ground) | volume (l) | 22 |
| diameter (cm) | 31,4 | ||
| height (cm) | 51,5 | ||
| price, rub) | 2000 | ||
House for worms
There are two ways to turn worms into your assistants. The first, the simplest: create optimal conditions for their reproduction in the soil. The main thing is not to poison the plantings with chemicals and mulch abundantly with organic matter, which is both a home and food for worms (judging by the letters, our gardeners are already doing this very successfully, which is sincerely pleasing). The second method is for those who have the opportunity to extract and accumulate organic matter in large quantities. In this case, it makes sense to organize a vermi-farm with a production volume according to your capabilities and desires. At the dacha or on a peasant farm, this will not take much time, but the benefits will be colossal.
How to make the simplest vermicomposter
The simplest design can be made from a large barrel or canister. A tap is cut into the bottom of the container to drain the liquid. To avoid damaging it, the barrel is placed on a stand. The filter for vermochay is brick chips (pebbles) and river sand.
The thickness of the filter layer of sand and crumbs is 25 cm. Humus 30 cm thick is poured onto it. Compost worms are introduced into it. To start a 200-liter barrel, 1,500 adults are required. When the substrate is moistened daily, liquid organic fertilizer accumulates quickly. In the summer, it is used for foliar feeding of vegetables in open and protected ground, fertilizing lawn grass, flowers, fruit trees and shrubs.
A barrel vermicomposter can be kept in a heated barn or greenhouse in winter, and outdoors in summer. To obtain a small amount of fertilizer, a similar design is made from 2 plastic buckets :
- a tap is installed into the lower one (manifold);
- in the upper one, ventilation holes with a diameter of about 2 mm are drilled over the entire area;
- they place one inside the other so that there is a gap between the walls, and place a stand on the bottom of the collector.
For assembly you will need a minimum set of tools: drill, drill bit.
Purpose of the vermicomposter
The second name for a vermicomposter is a worm composter. The main purpose of the device is to produce vermicompost (vermicompost) - an organic fertilizer in which the concentration of nutrients is several times higher than in ordinary plant compost or humus.
The raw material for its production is food waste, and worms turn it into fertilizer. Residues of food, crushed plants, paper, cardboard are placed in a vermochay, its residents process everything and the output is a dry fraction in the form of vermicompost, and a liquid fraction in the form of vermochay.
Humic acids and microelements included in organic fertilizer (tea, humus) increase the immunity of any flower and vegetable crop, improve the structure of the soil, increase its fertility, and promote the growth of beneficial soil flora.
About worms!
You need to feed compost worms into a purchased or home-made vermicomposter. We need earthworms with good reproduction, resistance to temperature changes, and easily withstanding changes in food.
For vermicomposters, purchase California compost worm starter kits . To launch, you need at least 1000 adult individuals. Prospector worms show good performance. They were bred in the laboratory by crossing a Russian earthworm with a Kyrgyz dungworm. Its characteristics:
- operating temperature range from 8 °C to 29 °C;
- temperature regime for reproduction from 8 °C to 10 °C;
- from one adult individual the yield of fertilizer is up to 100 kg, the offspring - 1500 new worms;
- adaptation to a new type of food is high.
Wormworm from boxes
Convenient vermicomposters are made from several cheese and curd boxes . The bottom one is used to collect liquid biofertilizer, all subsequent ones (from 2 to 6 pieces) are used to obtain vermicompost. Their number can be increased.
Reference!
Fresh manure should not be used as food; when overheated, it becomes very hot.
Preparing the work tray:
- using a marker, draw a grid with 25*25 mm cells on the bottom;
- use a drill to drill holes in each mesh node;
- if the side walls are solid, drill ventilation holes along the top edge.
For the collector tank, purchase a ball valve and cut it into the bottom. A stand for a vermicomposter is made from timber. Saw it into 3 parts, all parts are twisted together with corners using self-tapping screws.
Read also:
We water the tomato seedlings correctly so that they are strong and do not stretch out.
To get healthy and stocky tomato seedlings, it is important to know the intricacies of watering. Beginning gardeners who...
Fertilizer collection
On average, it takes worms about 4-5 months to produce vermicompost, after which they will need to be removed so that the fertilizer can be collected.
To do this, the worms are put on a hunger strike: the application of the next portion of feeding is delayed for 3-4 days. After this, they spread it in a thin layer on the soil surface, attracting the attention of hungry worms, which rise to the surface, after which it is enough to just remove the top layer of the substrate along with the invertebrates and move it to another place.
It is quite possible that over the next three weeks this procedure will have to be repeated 1-2 more times.
The remaining mass in the box needs to be pre-dried and then sifted, after which the finished vermicompost can be stored for long-term storage. Dry fertilizer can be stored for a year.
Why do you even need a worm bin?
And to drain excess moisture into a 200-liter plastic barrel buried in the ground with a wide lid, in which a drainage hole with a diameter of 15 mm is drilled in the center for the rod of the float indicator of filling (this lid is located above the soil level so that it does not flood with rain and flood waters).
For the same purpose, I installed a screen made from scrap materials above the barrel, inclined towards the box. The barrel was also tightly sprinkled and compacted with sand so that there were no gaps between its walls and the ground; if water gets in there, everything will float up like a float. In the box, where the liquid is discharged, for filtration, I placed a fine-mesh mesh in the form of a pillow, filled with small pebbles or expanded clay.
To avoid rapid rotting of the wooden elements of the box from contact with vermicompost, I thoroughly soaked them with an antiseptic before assembly ( my first worm container lasted three years ).
Now, based on many years of experience, I can note that if finances allow, then asbestos-cement or wood-chip-cement boards with a thickness of 10-20 mm will be an excellent material for the walls.
And the side walls of the worm pit, in order to avoid bursting with humus, every 1 m it is advisable to tie them through special spacers with thick knitting wire, which is used when casting foundations. Or you can weld the frame of the box from a metal corner - “five tens” (coating them with a protective agent against corrosion) and attach the walls to this structure.
I made my worm like this
I found a site on the site, raised 10-20 cm above the soil level and with a slope of up to 5° to drain excess moisture. I laid a metal mesh and a gravel cushion on it (this provided both drainage and protection from moles). Then I built a box from scrap materials (see picture). I used wooden pallets of the same size.
I fastened them together with self-tapping screws, plus I screwed boards with a cross section of 25×100 mm around the perimeter (for rigidity) on top and along the outer sides of the box. For ease of work, I made the walls about 1 m high. The width of the box is about 1.5 m. A separate topic is the arrangement of the bottom of the worm chamber. I made it in the form of a shallow tray with a slope and lined it with a durable thick film to collect excess moisture. Under it, at the bottom point of the tray, I placed a V-shaped tray with rounded edges (to protect the film from cuts) 15-20 cm wide and 50-60 cm long.