How to plan beds in a 3x6 greenhouse
A 3 by 6 m greenhouse is most often built on a small plot. It is necessary to arrange the beds in it rationally, so that you can freely use tools, harvest crops, import organic fertilizers and cultivate the land.
In two rows
Many gardeners believe that it is most convenient to arrange beds in two rows along the walls of the greenhouse 3x6 m. They are made along the entire length of the building. The width can be any, but you need to plan a suitable path so that it is comfortable to move along with a wheelbarrow.
In a small greenhouse, 3 by 6 m, high beds are made; their standard height with this arrangement is 30-40 cm. For ease of processing, it is better to plant vegetables in nests or in 2 rows. Many plants can be planted in a staggered pattern to save space.
Important! Tall crops are grown in one line.
Three rows
The beds in a 3x6 greenhouse can be distributed in 3 rows. Two are made along the side walls, and the third is in the center of the room. The distance between them is 50 cm. The standard width of the side beds is about 45-50 cm. A wide bed is made in the center - about 1 m.
When planting vegetables in a greenhouse 3 by 6 m with this method of organizing beds, it is necessary to ensure that each plant has enough food and lighting. Therefore, the crops are planted in one line on the sides, and in 2 rows in the center. In this case, tall varieties are planted in the central bed.
Making raised beds with your own hands
As already noted, high and warm beds are the optimal solution for a high yield of greenhouse plants. In gardening stores you can purchase ready-made collapsible galvanized boxes. But it won’t be difficult to make beds with your own hands.
Bricks, metal and polycarbonate sheets, and boards are used to construct the sides. Some gardeners prefer extraordinary solutions in the form of pieces of slate and plastic bottles. In any case, there is no ideal material, so everyone chooses the simplest and most affordable option for themselves.
It is advisable to make high beds warm. You can arrange warm beds in the following way. At the site of the future bed, a frame (box) of a bed 0.5 m high is installed. The bottom is filled with rotten wood and branches (or straw and sawdust), then a mixture of sand and peat is filled in and dry horse manure is laid on top. Each layer is poured with boiling water and urea. The topmost layer consists of humus or compost. Only the nutrient layer and manure must be replaced annually.
Some summer residents arrange artificial heating in their greenhouses using hot water or electricity. Such technologies make it possible to obtain early harvests even in the conditions of the Far East and Siberia.
The height of the ridges can vary from 20 to 50 cm, although the optimal height of the sides is 40 cm (according to Mittleider). When constructing high beds, it is necessary to take into account the rapid drying out of the soil and consider a method for quick and effective watering (ideally an automated drip irrigation system).
To obtain a good harvest in limited greenhouse conditions, you need to take into account the environmental characteristics of the crops grown. So, beds for tomatoes are well suited for adjacent parsley, but are contraindicated for peppers and eggplants. Cucumbers go well with beans.
The recommendations presented will help you properly make beds in a greenhouse to obtain an early and high harvest. Setting up garden beds with your own hands is not difficult, as long as you plan everything in advance, even before purchasing the greenhouse itself.
Video on the topic:
Principles of forming beds in a 3x6 greenhouse
There is no optimal bed layout, since a 3x6 m greenhouse is small. It requires rational use of all possible space. In addition, it is important to consider the height of the plants, the quality of lighting and the material from which the greenhouse itself is made. There are a lot of aspects, you need to familiarize yourself with them.
To the cardinal points
First of all, when placing beds, you need to remember the cardinal directions. In a 3x6 m greenhouse, all plants should be evenly illuminated. The photo clearly shows the movement of the sun and the quality of lighting at any time of the year. These rules are simple and easy to remember.
Attention! The beds in the greenhouse are arranged from north to south. This is how all vegetables will receive maximum light and heat, which is important for unheated greenhouses.
Depending on the height of the plants
The optimal location of the beds depends on the height of the crops grown. In a 6x3 m greenhouse, tall plants should not block the light of low-growing varieties.
It is convenient to work in properly organized beds, harvest them and spray them. Tall crops in a 3 by 6 m greenhouse are placed from east to west, then they receive sufficient lighting in the morning and do not interfere with other plantings.
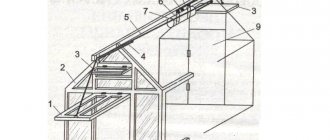
Taking into account the greenhouse design
To make the ridges correctly, you need to take into account the features of the structure itself. In a standard 3x6 m greenhouse with a gable roof, plantings are organized in three rows. In this case, the paths are formed by 40 cm, and the rest of the area is for planting. The tallest plants are planted directly in the center, and medium-sized ones are placed along the edges.
If a 3 by 6 m greenhouse has an arched structure, then it is most convenient to make 2 rows of plantings with a path in the middle. Low and medium-sized crops are grown in such a room. They are planted along the walls.
Georeferencing
The geographical location is a fundamental factor, but all the features of the site should be taken into account: relief, shadow from trees and buildings. If everything is clear with the choice of a sunny place, then with a slope you need to adhere to the rules.
Related article:
Do-it-yourself vegetable garden for lazy people: tips for gardeners
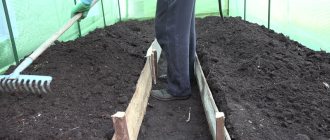
It is possible to locate a 3 by 6 greenhouse on a sloping area, but the beds should be laid out strictly horizontally, that is, across the slope line. This is necessary so that when watering the water does not drain and is absorbed into the soil evenly. For a standard 3x6 greenhouse, it is not always possible to place beds across the slope and along the structure at the same time. In this case, there is no alternative and the selected site will have to be leveled before construction.
Beds in a greenhouse according to Mittleider
Typically, in a 3x6 m greenhouse, beds are formed with free width, depending on the crops grown. They are made in 2 or 3 rows. Here, many beginners make typical mistakes, assuming that 20 cm is enough for passes. However, this is not so. The tops of overgrown plants will quickly fill up all the free space; instead of a rich harvest, the gardener will look for ways to combat numerous diseases. After all, for normal development you need good air exchange and lighting. This can only be achieved with sufficiently wide passages.
The Mittleider bed forming system will come to the rescue. They are easier to process; vegetables rarely get sick with this method of planting, since they are well blown with air. The essence of the method is to leave wide paths of 90 cm between the ridges, and make the ridges themselves 45 cm each. This is very similar to the classic planting option, but there are some differences:
- The beds and row spacing are located at the same level.
- An earthen border 10 cm high is formed along the edges of the ridge.
- Plants are planted in two narrow lines, and free space is left between them. You only need to loosen the plantings, do not touch the row spacing.
This method of organizing beds is well suited for planting low-growing crops, herbs, strawberries, and onions.
Comment! According to Mitlider, beds can be not only above ground. Shelving structures can be arranged in the same way.
Placing beds horizontally and vertically
The arrangement of the beds in the greenhouse – their horizontal and vertical arrangement – also depends on what exactly the plants are grown in. Thus, seedlings in pots, which are needed to limit the root system, take up the least space. In addition, such plants are easy to move from place to place as they grow. In general, pots and boxes are very convenient if several crops are grown in a greenhouse at once, but for tomatoes, for example, only traditional earthen beds are suitable. Simple beds are also indispensable for tall plants.
If not on an industrial scale, the most successful placement in it is considered to be shelving. Shelves and racks make the most of the space for the growth of almost any plant, and the only useless space that remains is under the racks themselves.
Vertical beds
Many summer residents have moved away from standard ground beds and are setting up shelving structures. In a 3x6 m greenhouse, with this approach all free space will work. However, this method of planting has its own characteristics.
Plants on the racks need to be arranged so that the upper tiers do not shade the lower ones, and there is enough warmth and light for everyone. There are some tricks here:
- On the lower shelves they place pots with mature crops that are not so demanding of light.
- The upper shelves are occupied by young plants and seedlings that need increased lighting.
- The rack is made no more than 50 cm deep so that the shelves do not shade each other.
Racks can be standard, with the same width of shelves along the entire height, or others. They are made according to the pyramid principle, so that the bottom shelf is wider than the rest.
The location of the beds relative to the cardinal points
So, if the plants themselves are not tall, then you can arrange the beds in any traditional way. But tall crops should be placed from the western side to the eastern side, so that the lowest morning sun rays can penetrate along the rows and illuminate the cultivated plants evenly.
If the landscape of the site is uneven, then it is better to locate the greenhouse in a place where there is a slope to the south - the ripening of vegetables in this place will be the most optimal. Moreover, if the greenhouse in this area is inclined, the beds in it need to be made across the slope itself - this way solar energy will be distributed among the plants to the maximum.
How to make beds in a 3x6 greenhouse
To properly lay out the beds, you need to follow the instructions, then in a 3x6 greenhouse it will be as comfortable as possible for the plants and the gardener. First you need to stock up on the necessary materials:
- fertile soil;
- boards or sheets of slate;
- sawdust or straw;
- rotted manure;
- tools.
Next, proceed according to the given algorithm:
- Make precise markings on the site of future beds. In a greenhouse 3 by 6 m, dig trenches of the required length and width.
- Install a fence made of boards along the perimeter of the ridges. Side height – 17-20 cm.
- Make legs from the beams and deepen them 25 cm into the soil.
- Fill the resulting box with sawdust or straw, layer thickness – 10-15 cm.
- Cover with a second layer of manure and compact well. Layer height – 25 cm.
- It is good to pour hot water over the contents of the box so that it completely saturates the bottom layer. Leave the beds for 2-3 days.
- The last layer is fertile soil, its height is 30 cm.
Fertilizers can be placed in layers in the box. They use bird droppings and water everything with Baikal solution. Decomposition processes will proceed more intensely, which will have a good effect on soil fertility.
The passages between the beds must be well compacted and covered with straw, sawdust, sand or non-woven material. It is convenient to walk on such paths and easy to care for. Weeds practically do not grow in the aisles, and those that have sprouted are easy to remove, because the roots of the plants are unable to hold on to the mulching material. You can do it a little differently by first covering the paths with film, and only then with mulching material. Weeds will not be able to break through the film and will die.
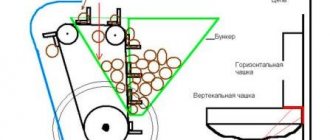
After the beds are completely arranged, you need to think about the irrigation system. It is best to spread out the droppers. This will greatly facilitate the work of the summer resident. If there is no such system, then you can install a storage tank, from where water will be automatically supplied to the beds.
In heated greenhouses 3 by 6 m, after the formation of beds and watering, a heating system is installed. The pipes are laid out around the perimeter of the building and connected to the boiler.
You can plant cultivated plants in the garden no earlier than after 2-3 weeks. All this time it should be under a black film.
For unheated greenhouses 3 by 6 m, the bottom layer can be made from coarse materials so that they take longer to rot and generate more heat. Rotten boards, stumps, tree bark, pieces of cardboard and other organic debris are placed on the bottom. You can water the plantings with an infusion of fermented grass.
Such fertile beds can be arranged in any greenhouse 3 by 6 m. It does not matter at all what soil it is built on:
- rocky;
- swampy;
- sandy.
You can create conditions suitable for crop growth yourself. These beds have many advantages, and one of them is the absence of pests. The harvest from warm beds, even in an unheated greenhouse, is harvested 2-3 weeks earlier than usual.
Warning! A warm bed will last 2-3 years, after which it needs to be filled again.
Warm beds
Compost beds are used to increase productivity. There is no need to plow the soil in them. When organic matter rots, heat is released, thanks to which the soil warms up very well and the process of crop growth is accelerated. A lot of carbon dioxide accumulates above the compost layer, which is so necessary for photosynthesis. Due to the fact that inside the high beds in the greenhouse is higher than the environment, early seedlings are successfully planted on them. As a result, plants can bear fruit longer.
How to make warm beds in a greenhouse with your own hands? First of all, you need soil. Gardeners prepare it themselves or purchase a ready-made substrate. You need to stock up on slate, boards, sawdust or straw. The main fertilizing layer is manure.
- At the site of the future bed, they dig a trench of the required width. The depth must be at least 50 cm. The bottom of the pit must be well leveled.
- Formwork is installed along the walls of the trench using any material: boards, slate, bricks or polycarbonate.
- The bottom of the beds is covered with various waste, which can be fallen leaves, rotted tree bark, straw fillers, dust, and wood chips. The thickness of such litter should be 10-15 cm. To protect plants from rodents, a special mesh can be laid at the bottom of the trench. Instead of sawdust, you can use rotten boards.
- A bed of plant waste is covered on top with manure that is beginning to rot. The height of the manure layer reaches 20 cm. Boiling water is poured on top so that all layers are saturated. This technology allows you to start the fermentation process. Manure is sometimes replaced with grass humus. The heating pad is covered with black film for heating. After this, the ridges are left alone for a period of 3 to 7 days.
- Next, the film is removed, and the bed is covered with fertile soil, 30 cm thick. Plants can be planted.
The standard height of a warm bed in a greenhouse is 20 cm. If the gardener’s plans include planting early varieties of crops, then the height of the bed in the greenhouse should reach 80 cm.
Once laid, a warm bed can last for 4 years. Then it is disassembled and a new one can be made on its basis. How to use a warm bed ?
- 1 year. The ground temperature is the highest. Such conditions are very suitable for watermelons, melons, and zucchini. It is not recommended to plant root crops and greens in the first year of operation of a warm bed.
- 2nd year The soil temperature decreases; it becomes insufficiently high for watermelons, pumpkins and melons. You can plant zucchini, tomatoes, cucumbers, cabbage.
- 3rd year. The nitrate content in the soil becomes low. You can plant potatoes, onions, radishes, and carrots.
- 4 year There is a minimum of organic matter in the soil. We plant greens and legumes.
Hydroponics: necessary equipment for growing vegetables at home
Options for arranging beds in a 6x3 greenhouse
When growing plants vertically, it is convenient to place beds in a 3x6 greenhouse on one side traditionally, as shown in the photo, and on the other in a terraced manner.
A different type of plant is grown on each terrace. These can be various low-growing crops.
The beds can be arranged in 3 rows. The central one is set aside as a greenhouse, where first early crops are grown, then tomatoes. The side rows are left for medium-sized plants.
Alternatively, in a 3 by 6 greenhouse, plantings can be arranged in the shape of the letter “W” or “P”. This is very convenient, the plants receive enough light and nutrition, and it is easy to work with them.
In a standard 3 by 6 m greenhouse, it is convenient to make beds in 2 rows, and use the free upper space for plants in pots. You can grow cascading strawberries this way.
In an arched greenhouse you can make hanging boxes for planting seedlings or herbs. This allows you to save free space and get maximum benefits.
One large bed in the center of the greenhouse looks good; it can be accessed from all sides. Vegetables are easy to care for and harvest.
At the request of the gardener, you can form ridges of the “bosquet” type. They are suitable for low-growing plants and greenery. The paths are decorated with boards or other material; the shape of the beds can be any:
- square;
- triangular;
- hexagonal.
Multi-tiered plantings
To grow low-growing crops, a multi-tiered method is used, when the beds are arranged on racks in several tiers. This method allows the most efficient use of the greenhouse volume, including its upper space.
Related article:
How to arrange warm beds at the dacha
The soil is poured into boxes located on the rack. The distance from the surface of the soil in the box to the next tier should be three times the height of the plant to ensure sufficient lighting and ventilation. The number of tiers depends on the height and configuration of the greenhouse.
Typically, this method is used for growing seedlings or herbs in winter heated greenhouses, so you need to add a few centimeters to the distance between tiers to attach phytolamps.
Proper arrangement of beds between greenhouses
It happens when it is not possible to build greenhouses on one site for any type of plants that you want to grow in your garden. Then each gardener begins to stuff the greenhouses with different sprouts, creating a flower garden. On one side there are tomatoes, a little further on there are cucumbers, and across the path there is something for dessert. It’s worth forgetting about this situation and putting the greenhouse in great order from the very beginning.
Classification of plants in greenhouses and beds:
- In terms of endurance. Adaptation of plants to cold, heat, increased solar activity.
- Plant height and size. You shouldn't grow large bushy cucumbers next to small fluffy radishes. Shade from a larger plant can have a negative effect on a shorter plant.
- Compatibility with neighbors. For example, eggplants and tomatoes will not be able to find a common language when ripening in the same greenhouse and beyond. It is also worth considering how many years certain crops have been planted in one place. For example, beets cannot be planted for 4 years in a row in the same place.
- Sequence. Many vegetables are incompatible not only in proximity, but also in order. Cucumbers will never grow after radishes, and tomatoes should not be planted in the ground after potatoes. Some vegetables are not at all friendly with each other, both in proximity and in absentia.
You can plant some plants in greenhouses, and some between them, protecting them from the wind or strong sun. For example, eggplants are “terrible misers”; they rarely tolerate other crops nearby. Rebuilding a greenhouse just for one crop or planting everything with eggplants and then throwing away the excess is not logical.
It is better to plant them outside the greenhouse space, but modestly and alone.
Arranging vegetables in a greenhouse is a lot of work and a scientific achievement. It is very difficult to choose the best options, given the availability and variety of greenhouses and options for seating each resident in his own bed, from spiral beds to an ordinary grandmother’s bed, with land on the sides. It all depends on the financial component, the amount of available space and space in the greenhouse, as well as on imagination and desire.
Growing crops in a greenhouse is much easier, because you don’t have to worry about night frosts. The scorching sun is not so scary if the greenhouse is made of a frame and glass. Many pests will not be able to get into the greenhouse, and most importantly, you will not have to run around the entire garden from bed to bed, watering everything. You can simply concentrate some plants in one place and take care of them gradually.
Dependence of the location of the beds on automation
If automatic watering and heating systems are built into the greenhouse, this decides a lot regarding the placement of the beds themselves. After all, it is important that the same hose with automatic drip irrigation reaches all plants and is located conveniently, and that the heating device does not scorch nearby greenery. That is why experienced gardeners recommend first drawing up a plan of all communications in the greenhouse, and only then drawing on it the approximate location of the beds.
Also, if the greenhouse uses a misting device or heat wires, either the soil beds must be raised or shelving and stands must be used.
Arrangement of beds if heating is necessary
The most common type of beds is above ground, raised by 20 cm and kept from falling apart by boards. But for early ripening crops that are planted in early spring and for which average daily temperatures are still insufficient, you can prepare high beds in a greenhouse - 80 cm vertically. Their walls are also fenced off to prevent crumbling, although the walls of the greenhouse themselves can in this case serve as the walls of such beds. In addition, the side facing south must be painted black for greater absorption of solar heat. Various wastes are placed at the bottom of all of them, which emit additional heat from the debate. These are the warmest beds in the greenhouse, if you do not use any special equipment. And they need to be placed closer to the water source (a barrel, for example), because... They require the most water for irrigation.
There are, of course, more modern ways to heat the soil - for example, electric, when heating cables are placed directly into the ground. Such beds must already be placed according to the electrical diagram that comes with the heating system being sold. Or pipes with warm air are dug directly into the soil.
Models of greenhouse beds
There are different options for beds that can be arranged in a greenhouse with dimensions of 3x6 m. Their location and types are discussed in detail.
Vertical
The arrangement of such beds can be done in two ways at once. The choice depends on the plants that will be grown there:
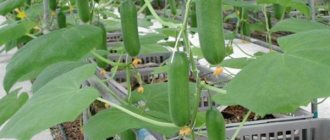
- option 1. Trellis, supports and a vertical mesh are installed - plants can stretch upward along it. The bed is great for cucumbers, zucchini and other cucurbits;
- option 2. Plastic pipes with pre-made holes, which are filled with fertile soil, are installed vertically. It will be convenient to grow strawberries and other small-sized vegetation in such beds. An important condition is a fibrous and shallow rhizome.
Low
The simplest option. To create such beds, it is enough to fence off the plants from the common passage. A border strip or a low slate fence will help you do this. At the same time, this will protect the beds from trampling.
Hanging
To arrange this version of the beds, containers, flower pots or even pieces of plastic pipes are used as a base. They are hung from hooks using twine or thick wire. Hanging beds are very convenient for growing strawberries, herbs or seedlings of various vegetables. This is another option for rational plant placement.
Such beds are usually placed at the top of the greenhouse along the perimeter, or in tiers on the side wall.
Elated
The height of such beds ranges from 20-80 cm. Their main advantage is the ease of caring for plants and ease of heating. In addition, moisture will remain in the soil much longer. Although, in the case of this choice, more water will be required for irrigation.
You need to put straw or dry leaves on the bottom. Pour hot water over them, then cover them with a layer of manure. And only then pour the soil. To protect it from crumbling, it will be useful to reinforce the sides with wood, brick or slate. Raised beds are best suited to boggy soil.
Terraced
Here it is assumed that the boxes will be installed in the form of a pyramid. That is, one above the other. Perfect for growing greens and low-growing vegetables - onions, lettuce, radishes and so on. Such beds are also called stepped beds. They are recommended to be installed in a greenhouse that is located on a sloped area. This way the plants will receive the maximum possible amount of light.
It should be noted that vertical, suspended and terraced beds provide the most efficient use of space. However, they will need to be provided with auxiliary lighting. In addition, they require fertilizer and watering more often.