Soil for irises
Irises are planted in monochrome or mixed flower beds. They go well with delphinium, phlox, lilies, and edelweiss. The crop belongs to the group of perennial plants, so it is important to choose the right soil for planting. Landing is related to the choice of location. The rhizome of the flower grows in depth and width, forming various root shoots on the central part. This feature suggests that planting away from competing plants is recommended.
Iris prefers sunny open areas without drafts. Light shading in the afternoon will benefit the plant, but deep shade will cause growth to stop. The soil for flowers is prepared in advance. Soil characteristics affect flowering. In acidic soil, the flower will not bloom, but will be able to grow green. The ideal option is to create conditions where the soil has a neutral or slightly acidic reaction.
Considering that the crop belongs to the category of perennials, the gardener must constantly monitor the acidity level of the site selected for planting. Timely change of fertilizers or addition of certain elements helps to maintain acidity levels at the required level. Loamy or sandy loam soils are preferred for the crop. Therefore, heavy soil should be fertilized with compost or peat, and sand added if necessary.
Reference! The plant tolerates low temperatures well and is resistant to drought, but cannot tolerate waterlogging.
Reason 7. Irises suffered during hibernation
If irises are not covered with protective material for the winter, their flower buds can be severely damaged by frost. In this case, the plant itself will develop as usual, and you will not immediately understand that it is not feeling well after an unsuccessful winter. Even frost-resistant Siberian irises may lose their ability to bloom. Therefore, cover the plants for the winter with spunbond or spruce branches.
Do not cover the flower beds too early, otherwise the plants will die and will not bloom. It is better to do this with the beginning of frost, approximately in the middle - second half of November.
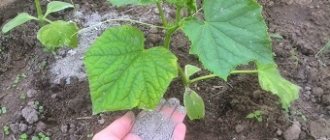
First of all, inspect the rhizome of the plant without digging it out of the ground. You can rinse the roots a little with water to make it easier to see the damage. The dark soft parts should be alerted and should be carefully cut off with a sharp knife to the living tissue. Sprinkle the cut areas with coal and then dig into the ground. If the damage is large, you will have to completely dig up the bush and separate the surviving parts.
Types of fertilizers for irises
Feeding iris is one of the mandatory growing conditions. During the season it is necessary to feed the flower several times. Let's look at the types of fertilizers and decide what to feed the irises at different times of the year.
Complex fertilizers
Compositions that contain more than two components are called complex. The basic components of the complexes are: nitrogen, phosphorus, potassium. The danger of using complexes is that if there is a deficiency of one element, an overabundance of another element may occur. Garden plants must be fertilized with complexes in early spring. This reduces the possible risk of over-fertilizing irises.
Phosphorus fertilizers
Phosphorus is necessary for a flower during flowering and active budding. You can notice a lack of phosphorus by the appearance of the plant. The root system first suffers from a lack of phosphorus. Weakness of the rhizome leads to the appearance of a faint purple color along the edges of the leaves. To compensate for the lack of phosphorus, it is recommended to use superphosphate, dimophos or phosphate rock.
Potash fertilizers
Before flowering begins, the crop is fed with a mixture of potassium-phosphorus fertilizers. Potassium sulfate or potassium salt is used as a potassium base. An excess of potassium is no less dangerous than a deficiency. It can be judged by the density of the leaves. If the leaves are thin and the lower leaves begin to curl, then there is too much potassium. Nitroammofoska is a complex composition in which the potassium content is increased. Its mass fraction is 28%. You can feed irises with nitroammophoska 2 times: in early spring and during bud setting. In this case, you cannot use other complexes so as not to create an excess of elements.
Nitrogen fertilizers
Nitrogen-containing compounds are necessary for a flower when it is actively growing green mass. The plant needs nitrogen most in the spring after winter, when energy and strength are needed for an early start of growth. An excess of nitrogen can completely prevent the formation of buds. If there is too much nitrogen, the plant grows rapidly, the leaves and internodes on the stems begin to thicken and increase in size. Active growth of greenery prevents budding processes from starting.
Attention! Nitrogen is excluded during flowering and during the period before winter preparation.
Urea activates protein synthesis. Feeding irises in the spring includes a mandatory one-time addition of a urea solution. In addition, the urea solution helps prevent pests and diseases of the root system.
Organic fertilizers
At the stage of preparation for wintering a perennial crop, it is necessary to take into account the condition of the soil. In order for the plant to successfully overwinter, it is necessary to apply a nutrient-type fertilizer. Organic matter saturates the soil and makes it more nutritious. Thanks to timely fertilizing with compost, weakened irises can be revived. Caring for them in the fall is associated with the need to create comfortable conditions for the root system to rest.
Wood ash. The most favorite organic fertilizer for the crop is wood ash. It is useful and absolutely safe. Ash is scattered around the stems in a thin layer at different stages of development. The process does not take much time: there is no need to dig in or water the ash.
Compost. You need to be careful when adding compost. Only aged, ready-made compost is suitable for the culture. It is applied at the stage of preparation for winter or after the snow melts. The rule for adding compost is to fertilize loose, moist soil.
Attention! Fresh manure or humus cannot be used as organic fertilizer. This leads to an overabundance of elements and provokes rotting of the roots of the culture.
Mineral fertilizer
Dry mineral fertilizers provide excellent results. This is something convenient and easy to fertilize irises with in spring or autumn.
Ammonium nitrate. Saltpeter is applied under the bush in the spring. Application with dry granules ensures dosed distribution of elements. The roots receive as much fertilizer as needed. It is almost impossible to create the effect of an excess of dry saltpeter.
Common mistakes and recommendations
When growing irises, inexperienced growers may make some mistakes. Most often, incorrect actions are as follows:
- Overfeeding flowers. The consequence of the error is the cessation of flowering when a powerful bush grows.
- Simultaneous application of nitrogen fertilizers and ash. In spring, it is difficult for irises to immediately absorb these elements.
- Fertilizing on dry soil. In this case, there is a danger of burning the roots of the culture.
- Add nitrogen with each fertilization. Complexes with this substance should be introduced into the soil only in early spring.
- Use of fresh manure. For irises, such fertilizer in most cases becomes destructive, provokes the development of fungal diseases and rotting of the root system.
You can get good, abundantly flowering bushes if you use the advice of experienced summer residents:
- Use phosphorus in early spring. An excellent remedy would be an infusion of minced fish (200 g per 5 liters of water), which is poured over the leaves of the plant every other day. A couple of weeks before flowering, the procedure is stopped.
- In summer, it is useful to scatter wood ash on the surface of the soil around the irises, 60–100 g for each bush.
- In the fall, when digging the beds, add organic matter. In the form of humus dissolved in water (1 kg per 10 l), or chicken droppings (300 g per 10 l).
Read more Irises have bloomed: what to do next with them, care after flowering
In addition, when applying fertilizers, you should take into account the location of the roots of the crop. In bearded irises, they are partially on the surface of the ground, so when performing the procedure you should try not to touch them. To protect bushes from pests after flowering, they should be sprayed with Bordeaux mixture or malathion solution.
To protect irises from insects and diseases, treating bushes with ash will help.
Terms and rules for feeding irises
What you fertilize irises with determines whether the plants will bloom and how they will survive the winter. According to the calculations of technologists, garden crops require 3 complete feedings: in the spring, during flowering and after it. Experienced flower growers understand that this setting can be adjusted by accompanying circumstances.
First of all, you need to pay attention to what the iris looks like. Feeding will help make up for the lack of elements that impede growth and development, or eliminate an excess, if any.
Methods for preparing fertilizer
If you don’t want to spend money on finished products, you can make them yourself. Getting all the necessary ingredients is not difficult. The main elements are phosphorus and potassium. To create a potassium-phosphorus additive you will need only two components: ash and water .
You can make wood ash yourself or buy it at the store. For 20 liters of water you need 2 kg of fertilizer. The mixture should be allowed to brew for 3-4 hours. One square meter of soil will require 0.5 liters of prepared liquid.
How to feed irises in spring
Spring is the beginning of work on the garden plot. The program for introducing elements must be thoughtful and planned. A plant that has weakened in winter should not be exposed to aggressive influences.
Early spring after winter
After the snow melts and warm air temperatures set in, the soil needs nitrogen-containing compounds. The best option is to apply complex mixtures based on nitrogen. In March, urea, ammonium sulfate, and azophosphate are added. In addition, the soil is enriched with compost and the acidity level is adjusted. If the soil is acidified after winter, then liming is carried out. The soil is dug up at a depth of 20 cm with dolomite or lime flour and allowed to rest for 7-10 days.
Attention! Over-acidified soil prevents the plant from absorbing useful elements. The growth and development of the stem and rhizome stops, and water is not absorbed.
Spring feeding in May
The next feeding will be the introduction of phosphorus-potassium compounds, which actively provoke the ovary of buds. During this application, nitrogen is completely eliminated.
When planting in the garden in spring
During the first spring planting, the soil is mixed with chalk, lime, and wood ash. After several diggings of the prepared soil, potassium-phosphorus mixtures are added, which will help the rhizome to quickly adapt.
After transplantation at the dacha
Transplantation in the spring is associated with a change in the rules for applying nutrient mixtures. If the bulb is transplanted to a new place, then ammonium nitrate is added. This technique helps increase the plant's endurance and quickly adapt to new soil.
Features of care
Irises tolerate drought and cold well, however, in order to achieve beautiful flowering it is important to carry out certain agrotechnical measures.
Upon landing
It is necessary to plant irises in the ground for the first time in the summer (late June - early July) or in the fall before the first frost. Before the onset of cold weather, the plant already begins to lay buds, and in late spring you can already admire their flowering.
Flowers must be planted in fertilized, light and non-acidic soil, deepening the rhizome by 5-7 cm and the bulb by 10-12 cm (depending on the variety, irises can be rooted or bulbous).
Planting root irises in the ground:
- Dig holes 5-7 cm deep.
- Distribute the rhizome evenly throughout the hole. Part of the rhizome should be on the surface of the soil.
- Compact the roots. The central root must be sprinkled with sand (a layer of 1.5-2 cm), only then compact all the others.
- Moisten the soil if it is dry.
To plant bulbous irises, you need to prepare a hole at least 12 cm deep.
During the budding period
During bud setting, in addition to fertilizing, the plant needs additional watering and regular loosening of the soil. It is better to water irises in the evening (1 liter of water per plant) so that the moisture is retained in the soil for as long as possible. It is important to avoid getting water on the buds and leaves to prevent the development of bacterial and fungal infections.
Watering can be combined with the application of fertilizing and fertilizers, diluting organic and inorganic substances in the water. After watering, the resulting crust on the soil surface should be loosened using a garden rake.
The development of buds is favorably affected by complex fertilizers containing microbiological and organic substances (yeast, photosynthetic and lactic acid bacteria).
Attention! During the budding period, weeds must be carefully removed so that they do not interfere with the development of buds.
During flowering
During the period of active flowering, it is necessary to stop all feeding and fertilizers. Caring for flowers comes down to regular watering (as the soil dries out) and loosening the soil. In case of drought, the amount of watering is increased to twice a day (morning and evening). To maintain the decorative appearance of flowering plants, it is recommended to remove dry leaves and faded inflorescences.
Weeds are removed as they germinate - it is better to do this manually, so as not to accidentally damage the roots located on the soil surface with a hoe. It is important to prevent the occurrence of bacterial and fungal diseases of the plant. If rot of the roots (bulbs) or leaves is detected, it is necessary to treat the plant with a 2% solution of foundationazole, injecting it under the root. To prevent damage to irises by pests (slugs, cutworms, thrips), it is necessary to treat them with a 1% solution of Bordeaux mixture or 10% karbofos.
After flowering
3-4 weeks after the end of flowering, it is necessary to cut off all flower stalks. If a warm autumn is predicted, then you can give the irises a chance to bloom again. To do this, you need to carefully remove all dry leaves and inflorescences, leaving only healthy and green ones. Before the arrival of cold weather, all leaves are cut off and burned to prevent the proliferation of pests that have already laid their eggs.
Trimmed bulbous irises are left to overwinter in the ground - they tolerate cold well without additional shelter. However, part of the bulb should not be on the surface, otherwise it may freeze in severe frosts.
The roots located on the surface should be sprinkled with a 1-2 cm layer of soil and mulched with a 7-9 cm layer of peat. In severe frosts, the rhizomes of irises should be covered with spruce branches. It is better to dig up young rhizomes for the winter and transplant them into pots with sand, which are then removed to a cool, dry room.
Important! Disinfection of the roots and bulbs of irises with a weak solution of potassium permanganate before transplanting them into pots is mandatory - this will prevent rotting of the roots!
How to fertilize irises for lush flowering
Growing flowers involves the expectation of lush blooms. Airy buds, painted in different shades, help make garden areas of any type attractive. Work on obtaining lush color begins in advance.
how to feed irises for lush flowering
Before flowering
Feeding before the formation of buds on the stem will allow you to get full flowering. Agrofoska is something that can be used to fertilize irises before the buds appear. This mixture contains magnesium and sulfur, which help the stem gain strength for budding.
Before flowering
The phosphorus-potassium mixture is applied as a top dressing, which ensures the lush color of the crop. It is recommended to take superphosphates or potassium sulfates, and also prepare the mixtures yourself. To increase buds and actively form them, it is recommended to add phosphorus. To properly apply fertilizer, you need to wait until the soil warms up well. If you add the mixture to the soil after rain or after a cool night, you can provoke phosphorus poisoning.
During budding
To avoid pest invasion of flowers when they are actively blooming, it is recommended to use wood ash for soil treatment. Take 100-150 grams per plant. product and scattered over the surface of loosened soil.
After flowering
Autumn is the time when the third wave of fertilizing is carried out, which the iris needs. Fertilizer is applied 20-25 days after flowering. At this stage, the flower begins to actively prepare to lay buds for the next season. Superphosphate and potassium salt are used at the rate of 60 g. + 30 gr. For 1 sq. m. landing. To prevent root rotting, add sulfur powder to the soil.
Fertilizer application timing
Irises should be fed at a certain time, which depends on the stage of plant development. There are deadlines for applying any type of fertilizer, so before adding substances to the soil, you should study some recommendations. It is best to perform the procedure three times a year: in early spring, during the formation of buds and after they wither:
- It is advisable to carry out the first feeding in March or April, during loosening. Fertilizers based on phosphorus, nitrogen and potassium in a ratio of 2:3:2.5 are suitable for this. You can use azofoska, urea or ammonium sulfate.
- The second feeding is carried out in late spring, in May. It is carried out at the moment when buds begin to form on the bushes. At this time, it is worth fertilizing the irises with potassium and phosphorus compounds. Nitrogen is not needed during this period.
- The last feeding should be done in July or August, when the irises begin to lay flower buds. For abundant and lush flowering next year, you can fertilize the plants with potassium salt, superphosphate or sulfur.
Read more Planting irises in open ground in summer
Feeding irises with folk remedies
Sometimes, if the requirements are met, the plant does not bloom lushly. There may be several reasons for this. Regular feeding may not produce results if the nutrients are poorly absorbed or do not reach the rhizome due to the characteristics of the soil. In this case, folk recipes come to the rescue.
Ash
Ash is a complete mineral composition that contains potassium, phosphorus and alkali. Ash enriches the soil, helps garden flowers set buds, maintains a comfortable soil acidity level, and protects plants from insect attacks. Ash can be used repeatedly, since it is not included in the flower feeding schedule. The shelf life of ash is not limited, but gardeners recommend using ash that has not been stored for more than 1 year.
Yeast
Using yeast to stimulate growth and flowering is an effective folk method. It is used when the plant stops growing or does not produce lush flowering, provided that it is provided with proper care. Yeast solutions are used to water the plant at the roots, excluding watering from above.
Possible diseases and pests
If you follow the recommendations for planting and carry out regular care, the plants will be strong, and diseases and pests will bypass them.
Weakened flowers can be affected by the following diseases:
- Bacterial rot. The main reasons for the development of the disease are the application of too much nitrogen fertilizer, dense plantings, and increased soil moisture. Symptoms of damage: softening of the bases of the leaves, their yellowing, drying out, lodging, and an unpleasant odor from the plant. It is possible to cure this disease only in the initial stages of development. It is better to resort to its prevention: planting seedlings on hills, in well-drained holes. Treatment can be done by dusting with doxycycline, lincomycin, penicillin.
- Fusarium. Signs of the development of the disease are the formation of depressed spots and rotting of the rhizome. Subsequently, the root becomes dark brown and dries out. Diseased plants must be immediately removed from the site, and the ground under them should be watered with copper oxychloride. Spray healthy bushes with Previkur and Topsin-M.
- Leaf spotting. Reasons for the spread of the disease: dense plantings, high soil moisture, lack of phosphorus. The disease manifests itself in the formation of brown spots with a dark edge on the leaves. After symptoms appear, it is necessary to treat the area with preparations containing copper, systemic fungicides, for example, “Strobi”, “Ordan”, and fertilize with calcium nitrate using a foliar method.
- Gray rot. May affect rhizomes and stems. It develops actively during periods of high humidity. Signs of infection: browning and moldy coating of the stem, stunted plant growth, death of the above-ground part. The fight is carried out by treating with Oxychom and Topaz.
- Rust. You can suspect an infection if brown stripes appear on the foliage. You can cure irises from this disease by using the preparations “Strobi”, “Topaz”, and Bordeaux mixture.
The most dangerous pests for irises are:
| Insect name | Symptoms of the lesion | Prevention and treatment |
| Iridescent cutworm |
| Double treatment in early spring with karbofos (10%). The interval between spraying is one week. |
| Gladiolus thrips |
|
|
| Medvedka |
|
|
| Slug |
|
|
| Wireworm |
|
|
Thus, it is recommended to plant irises from late summer to mid-autumn, depending on the climatic conditions in the region. The main thing is that their flowering period ends. In order for plants to grow successfully and delight the eye with their beauty, it is necessary to select a good site, follow planting technology and regularly care for them.
Varieties and types
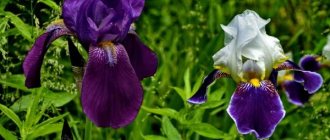
The bearded iris has gained wide popularity due to the presence of shaggy hairs on the petals. This type of irises comes in different sizes (dwarf, tall, table and others).
An important point when growing is that this type of iris needs to be planted on sand. To do this, sand is poured into the bottom of the prepared hole (in a small layer) and then laid out, carefully distributing the rhizome. The planting should not be deep.
The Siberian iris grows up to 80 cm in height, with flowers up to 10 cm, of various colors. The natural color of this species has many shades from blue to dark purple.
As for some hybrid varieties, there are:
white (Snow Queen),
pink (Imperial Opal),
yellow with white trim (Batts and Shuga).
With all this variety, there is a significant disadvantage of this type - there is no aroma at all.
Japanese iris (its other name is xiphoid) has large flowers (about 25 cm in diameter), which are most similar to orchid flowers.
Iris Evansia is one of the large species (about one meter in height), drought- and frost-resistant. The flowers are lacy, have a bright yellow center and a white (dark purple, blue-violet and others) border.
The clear difference from other species of the swamp iris is the fact that this iris grows only in moist soil. For this reason, it is most often used to decorate ponds.
Dwarf iris - reaches only 15 cm in height, has wide leaves and yellow or purple flowers.
Dutch irises (xyphyllum) are a hybrid variety first bred in Holland. They grow to a height of no more than 50-60 cm. The flowers have different shades of petals: white, yellow, orange, blue and purple.
It is winter-hardy, but in severe winters it requires additional shelter. Often this type of irises is used for cutting, forming bouquets.
Iris spuria is a very interesting flower, which in Latin “spuria” means “false”. It got its name for its external similarity to Dutch irises.
The main advantage is that the flowering period is longer (several weeks). The “life” period of one flower is a week.
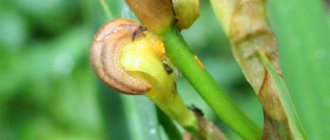
Bacteriosis or soft rot of iris rhizomes
One of the dangerous diseases that affects irises is soft, bacterial, rot of rhizomes. The plant dies if the infection is severe.
Signs of this disease are rotting of the leaves at the base of the rhizomes, while the leaves remain green and simply fall out in whole fans. The rhizomes themselves turn into a foul-smelling slurry inside. Affected bushes should be completely dug up, all damaged areas should be cut out, reaching healthy tissue, and the cutting tool should be disinfected each time.
The bushes are divided, the cut areas are sprinkled with crushed coal, and then they are laid out in the sun with their rhizomes facing up for one to two days to warm them up thoroughly. You should not be afraid that the irises will dry out. Such procedures are a way of salvation for sick plants. After that, the cuttings that have dried out and warmed up are transplanted to a new area and watered.
The soil in the contaminated area is disinfected with a solution of potassium permanganate, and the contaminated material is burned. With moderate damage to the rhizomes when the disease is noticed, it is possible to save irises in almost one hundred percent of cases.
Why don't irises bloom?
If you do not care for irises correctly, they may not bloom. So why don't irises bloom? There are several reasons for this. The main ones include:
- Incorrect landing.
- Lack of space. After 5 years, the plants grow so much that they must be replanted.
- Lack of light - in this case, replanting irises becomes a necessity.
- No pest control.
- Poor soil, which is not at all suitable for these species.
- Failure to comply with wintering rules.
Attention! Now that everything is known about transplanting irises to another place in the summer, as well as about the features of their care and cultivation, all that remains is to purchase shoots of these excellent plants and enjoy their flowering in your dacha. https://www.youtube.com/embed/mPUDqEOkTN0