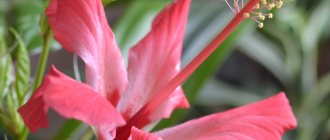
Description of the plant
Tillandsia in the wild
This plant received its name in honor of the Swedish botanist E. Tillands (1640 - 1693). In the wild, tillandsia is found most often in the tropical and subtropical regions of the American continent - in the southern USA, Mexico, Argentina and Chile, and it grows in the most unexpected places - in semi-deserts, swamps, savannas, mountainous areas, in the tropics and subtropics. It can be found even on the border of permafrost. There are many types of tillandsia: double-edged, which grows in Costa Rica; bulbous, found everywhere from Mexico to Brazil; Lindens - in Ecuador; horned - in the tropics of southern America. The shades of the original tillandsias are also varied: from blue-blue to yellow-green. Different varieties of tillandsia vary greatly in external characteristics and in their growing conditions.
Spectacular and catchy, these flowers amaze with their originality and diversity. Currently, the genus Tillandsia has united more than 400 species of flowering herbaceous plants: both perennials and annuals, both terrestrial species familiar to us, and epiphytes that are completely different from them.
In this article we will look at those types of tillandsias that belong to potted, or as they are also called, green tillandsias. They are more reminiscent of the familiar herbaceous plants from the Bromeliaceae family than epiphytes and are more often grown at home as indoor flowers.
Tillandsia plant in nature
Air plants belong to the genus Tillandsia and there are over 650 species!
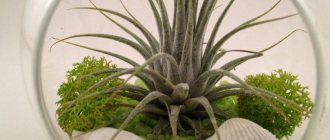
Most tillandsias are epiphytes. They grow on other plants such as trees or branches. Tillandsia does not grow in soil like most plants we are used to.
Their roots serve to anchor themselves to another plant. This is purely a means of attachment and they are not parasitic. They do not receive any water or nutrients from their host plant.
The Tillandsia plant is actually a member of the Bromeliad plant family. Their natural habitats can range from tropical forests, mountains and even deserts throughout Central and South America.
Tillandsias, with thinner leaves, grow in areas that receive quite a lot of moisture.
Tillandsias, which have thicker leaves, grow in regions where there is much less rainfall.
Potted (indoor) tillandsia
Indoor tillandsia does not have a very developed root system. The flower produces a massive dense rosette of narrow long scaly or smooth leaves with sharp tips. The dimensions of the leaves are as follows: up to 15 mm wide, up to 40 cm long. The color of the leaves is dark green, sometimes with a red-brownish tint.
The exotic beauty usually blooms in the summer, but depending on the conditions, this can happen in the fall and even in winter. Flowering can last up to two or more months. At this time, a tall peduncle of bright color appears on the tillandsia, usually crimson-pink. Its shape is original and similar to an ear. The bracts surround the inflorescences quite tightly. Each flower consists of three petals of bright blue, indigo or violet. The color scheme of inflorescences varies among different varieties of plants. So, the bracts are not only pink, but also purple, red, yellow, orange, lilac - that is, all the brightest acrylic tones, thanks to which tillandsia always looks dazzling.
This plant is also unusual in that its flowers bloom one by one. It is very rare that two or more flowers open at once. But during the entire flowering period, up to 20 of them can open. The flowers fade quickly. As they dry, they are cut off. The same is done with wilted foliage. But the spike with elegant bracts stands for quite a long time, up to 5 months, surrounded by dark green foliage and gives tillandsia a magnificent decorative appearance. The peduncle dies over time and acquires a light green color. Tillandsia babies—daughter rosettes—are formed in the axils of the leaves, and the mother rosette dries up. The next flowering will already be in the grown daughter rosettes. Thus, tillandsia is rejuvenated, and you will admire its flowering for at least another five years.
How to water tillandsia
Despite the name "air plant", Tillandsia cannot survive on air alone in your home! Tillandsias need watering, but since they don't grow in soil, your method of watering these plants will be a little different than what you're used to!
There are 3 main ways to water your tillandsias. Light misting that does not completely hydrate your entire plant will not be sufficient for growth.
Here are 3 ways you can choose to water your tillandsias:
Kinds
Let's look at the most popular types of tillandsia with photos.
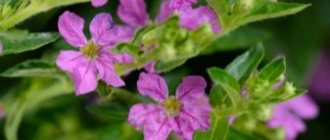
Blue (Tillandsia cyanea)
Blue Tillandsia (Tillandsia cyanea)
Blue Tillandsia (Cyanea) is the most popular flower for home care. It forms a bizarre rosette of grass-like leaves, the color of which varies from a reddish base to brown-striped plates. The height of the rosette reaches 30 cm. In summer, a flat spike with dense bracts, arranged in a bizarre pattern, grows from the center of the rosette. The fantastic coloring and shape of the bracts seem artificial. Blue or light blue flowers with rhombic petals bent to the sides bloom gradually, as if a wave rolls along the ear from its top to the base. The bracts are painted in bright lilac or pink tones.
This may be interesting: Bougainvillea - growing at home
Tillandsia lindenii
Tillandsia Lindena is similar to blue Tillandsia, but more graceful and beautiful. Its spike is more rounded, not so dense, and the bracts are only soft pink or reddish in color. The flowers of this tillandsia are also bright blue, three-petaled. The leaves are thinner and collected in relatively loose rosettes.
Tillandsia dyeriana
Tillandsia duera
The inflorescence of Tillandsia Duera resembles the yellow autumn leaf of an acacia tree. Elegant, very beautiful plant. It develops in the form of a rosette of tongue-shaped, flat and long leaves, tightly arranged, as if wrapped, around the base of the peduncle. In the center of the rosette, on a thin short peduncle, a symmetrical inflorescence grows with loose, double-rowed leaf-shaped oval bracts of orange or red shades.
Tillandsia Anita
Tillandsia Anita is an ornamental hybrid of blue Tillandsia. It is also popular for home care. Its dense rosette consists of narrow scaly leaves with pointed ends. Flat, wide inflorescences are attached to short peduncles and consist of pink or purple bracts, on which bright blue flowers open in turn. Flowering lasts a short time, but the bracts retain their decorative effect for a long time, until they become light green.
Tillandsia tricolor
Tillandsia tricolor
Another species is Tillandsia tricolor. Its linear, long (up to twenty cm), narrow (no more than 1 cm) scaly green leaves form a dense rosette. Peduncles are thin, long and erect. Inflorescences in the form of a spike can be both simple and complex (several ears). The ears consist of leathery, oval-shaped stipules, which have sepals, like a traffic light, in three colors: at the bottom they are bright red, in the middle they are light yellow, and at the very top they are green. In summer, large flowers bloom, the petals of which grow up to 7 cm in length and are colored purple.
Tillandsia Flabellata
Tillandsia Flabellata
The rosette of this Tillandsia species is formed by narrow, long, green leaves. Spectacular tubular bracts of bright orange-red color give the plant a decorative appearance.
Planting and caring for tillandsia
- Flowering: usually in summer, sometimes for several months, but after flowering the rosette dies.
- Light: Green-leaved species require bright, indirect light from March to September and direct sunlight from October to February, but can grow in partial shade. Plants with silver leaves should be kept in partial shade at all times.
- Temperature: in summer – 22-30 ˚C during the daytime and 15-18 ˚C at night, in winter – within 14-15 ˚C. The upper temperature threshold for tillandsia is 34 ˚C, the lower is 10 ˚C.
- Watering: melt, rain or filtered water at a temperature of at least 20 ˚C is poured into the center of the rosette formed by the leaves. In summer, watering is frequent, in winter - rare. The substrate is watered only after it has completely dried.
- Humidity: Plants with green leaves require daily spraying and moistening with water. Twice a month, wash this tillandsia under a warm shower. Particularly moisture-loving species can only live in a florarium.
- Fertilizing: once every month and a half from September to March, a fertilizer solution for orchids or for bromeliads, which does not contain copper and boron, is added to the outlet with irrigation water. The concentration of the solution should be four times weaker than indicated in the instructions.
- Dormant period: in some species it begins in winter, but in most plants this period is not clearly expressed.
- Replanting: epiphytes do not need replanting, and plants with green leaves are replanted once every 2-3 years, but the top layer of substrate in their pots should be renewed every spring.
- Reproduction: seeds and children.
- Pests: Mealybugs, whiteflies or scale insects.
- Diseases: viral and fungal infections from improper care.
Read more about growing tillandsia below.
Home care
Now we’ll tell you how to properly care for tillandsia.
Temperature
Tillandsia is a tropical plant that loves warm conditions all year round. For its successful growth and flowering, the ambient air temperature in the room in the summer should be in the range of 25 - 28°C, and in the winter - not lower than 18 - 20°C. In summer, you can take pots with these flowers to the balcony, since it is known that tillandsias are great lovers of fresh air and frequent ventilation of the room in which they live. They are not afraid of light warm drafts, but they must be protected from cold, especially icy drafts, just like any indoor plants. It is advisable not to sharply change the temperature of the flower during ventilation.
Lighting
Tillandsia requires the brightest possible light, but it must be protected from direct sunlight at any time of the year. It is especially important during flowering to protect the peduncle and flowers from direct sunlight - otherwise, the tropical star will quickly fade. Light levels should be the same year-round. This is achieved by moving the pot from place to place, or using artificial lighting. Note that tillandsias love natural light more than artificial light. They should be placed on the window sills of southern, eastern or western windows. With insufficient lighting, tillandsia leaves lose their decorative properties, and the inflorescences become pale and unattractive. If you really cannot do without lighting, it is better to use daylight diffused light lamps - tillandsia mistake them for natural light. If you take the plant to the balcony in the summer, make sure that they are protected not only from direct sunlight, but also from possible precipitation - cold rain can destroy the plant. Watering.
Watering
Particular attention is paid to watering home tillandsia. In the summer, the plant must be watered directly into the middle of the rosette, moisten the leaves, and spray them regularly. Even fill the sockets with water so that they are well saturated with moisture. Afterwards, drain off the excess water. Make sure that the soil in the pots is always moist, but not wet. Lack of watering can cause leaf tips to dry out and become rounded. Overdrying of the root system will cause the leaves to drop. Sometimes, instead of watering, the entire pot with the plant is immersed in water overnight. In the morning, let the water drain freely - this way the earthen lump is saturated with moisture in abundance. It is necessary to water with warm, settled water. Sometimes, to soften the water, you can add a few drops of citric or acetic acid to it.
This may be interesting: Cyclamen (Alpine violet) - home care
In the warm, dry season, the plant is watered every day. In rainy, cool weather - less often, maybe once a week. In winter, reduce watering and ensure that the soil dries well between waterings. During flowering, tillandsia should be watered carefully, trying to prevent water from getting on the peduncle.
It is important not to spray during the period of active flowering and during the cold season.
Air humidity
Tillandsias like slightly increased air humidity, in the range of 60 - 80%. The air in a city apartment usually corresponds to this indicator, with the exception of the winter months, when heating makes it too dry. To increase humidity, regular spraying of moisture around the plant is necessary. There are humidifiers - buy and use them. Otherwise, irrigate the room yourself using a sprayer three times a day. In addition, place the flower pot in a tray with damp expanded clay or pebbles. During flowering, it is necessary to spray very carefully so that water does not fall on the peduncle. With such care, tillandsia will delight with its flowering for the maximum time allotted for this.
The soil
Tillandsia will not grow in ordinary garden soil. The correct soil for planting tillandsia can be purchased at the store. Suitable soil mixture for flowering orchids. But if you decide to prepare the soil yourself, then take leaf soil, peat and chopped sphagnum moss in equal quantities, and add a little crushed charcoal. It is also good to add a mixture of fine spruce or fir bark, humus and sand. The main thing is that the substrate is loose.
Fertilizers and fertilizing
Potted tillandsias are fed once every two weeks in spring and summer with fertilizers for flowering indoor plants, for example, orchids. It is advisable to reduce the concentration of the solution by half from the norm specified in the instructions. Fertilize should be done carefully, in a damp substrate. Unlike watering, you should not pour fertilizer into the outlet - its base may rot.
It is better to use foliar feeding - by spraying the leaves, since it is the leaves of tillandsia that better absorb fertilizers. To stimulate flowering in tillandsia, you can spray its leaves several times with growth stimulants.
Useful properties of tillandsia
Tillandsia concentrates the energy coming from the external environment (people, objects), improves it, and during flowering generously distributes positive charges. The energy of the flower is directed from the roots to the stem; surrounding leaves and flowers in an invisible spiral, powerful energy flows spread around the plant.
You feel a surge of strength next to him. The flower brings great benefits by purifying the air and absorbing extraneous noise in the room. In South American countries, hard leaves of plants are used to weave furniture and stuff pillows and mattresses with them.
Transplanting and choosing a pot
When the plant has grown in width to the very walls of the pot, and the roots begin to peek out from the drainage holes, it is time to transplant the tillandsia into a new pot. Usually, two to three years pass from planting. Every spring you just need to replace the top layer of the substrate with new soil. To transplant tillandsia, prepare a wide but shallow pot, as the flower develops in a specific way. Growth and daughter rosettes replace the mother ones, and growth occurs mainly in width. The root system of tillandsias is not too powerful and superficial. In a deep pot it will suffer from waterlogging. When replanting, remove the plant carefully, trying not to injure even the slightest roots. The rhizome does not hold the lush rosette of tillandsia well in loose soil. But try to compact the soil well and give the plant as much stability as possible.
For young plants that have grown from children or side shoots, replanting will be required no earlier than after a couple of years.
If you bought a tillandsia in a store already with a peduncle, we recommend not to replant it. Place the pot with the tropical plant in a bright, warm place, and do not touch the flower until it fades. It’s another matter if the purchased specimen has not yet collected inflorescences. We recommend transplanting it into a new, more suitable pot within a week from the date of purchase. Carry out the transplant using the transshipment method, carefully, together with a lump of earth. Try not to injure the fragile roots. Fill the free space with suitable soil. At first, about a week after transplantation, spray the plant several times a day with warm, settled water, do not water. While the root system gets accustomed to the new pot, the tillandsia will receive enough moisture through the leaves.
Diseases and pests
Sometimes difficulties arise when growing tillandsia: the flower is attacked by diseases and pests:
- Tillandsia leaves have become soft and limp - low temperature (move to a warm place);
- Tillandsia roots rot – soil is waterlogged (reduce watering);
- Tillandsia does not form new rosettes - there are few nutrients (renew the soil, feed);
- gray spots on tillandsia leaves – a fungal disease (spray the leaves with a fungicide solution, covering the soil);
- the tips of the leaves turn brown - watering with hard water (water with settled, filtered water);
- the leaves have turned brown or brown – root rot due to waterlogging (the plant dies);
- leaves die off - a natural physiological process;
- slow growth of the bush in the absence of a bract - little light (move to a brighter place);
- flowers turned white - excess light (shade);
- loss of turgor and change in leaf color - sudden temperature changes;
- leaves covered with limescale - watering with hard water (take settled and filtered water at room temperature);
- brown spots on the leaves – sunburn (shade the flower);
- dropped leaves - changes in lighting or temperature, root rot;
- leaves curl, wrinkle, die - lack of moisture.
Weakened tillandsia can be affected by pests: whitefly, scale insects, and mealybugs. Treating the leaves with a fungicide after wiping with a soap solution will save you from them.
Reproduction at home
Tillandsias are propagated in two ways: vegetatively, with the help of side shoots (children) and by seeds, although the seed method rarely leads to the desired results.
Peculiarities of reproduction by children
The optimal time for vegetative propagation is spring or summer. You already know that tillandsia itself annually forms from one to several children to replace the faded rosette. Thanks to this, the flower always has new rosettes capable of flowering - they can simply be separated during replanting. True, do not rush into separation: you can only separate those “babies” whose size is at least half the mother’s socket. Sockets that are too small and weak may not survive on their own.
This may be interesting: Bauhinia: growing an orchid tree at home
When 4 to 6 leaves appear on the side shoots and adventitious roots are formed, they can be carefully separated from the base of the flower and planted in separate pots filled with a mixture of sand and peat in equal parts. Sprinkle the cuts with crushed charcoal. Place the pots with shoots in a slightly shaded place with an air temperature of 22 - 25°C. After a couple of months, young, strong plants are transplanted to a permanent place in a pot with soil, as for adult plants. Flowering will begin in two years, maybe a little earlier. If tillandsia refuses to bloom, spray it with zircon solution - this will stimulate it to bloom.
If only one or two children have formed, you can leave them in the same place by carefully trimming and removing the dried mother plant. Soon new full-fledged tillandsias will grow in the flowerpot, which in two years will give you bright colorful inflorescences with flowers.
Seed propagation method
If you managed to get tillandsia seeds yourself or purchase them in specialized stores, you can try to propagate it by seed. You need to know that propagation using seeds takes a long time.
The seeds have sprouted
Prepare a container with a lid or other container for germinating seeds. Fill it with a soil mixture of sand and peat. Spread the seeds, not too thickly, over the surface, gently moisten them with a small spray bottle and close the lid of the container or cover another container with plastic wrap. Place your crops on a well-lit windowsill with an air temperature of at least 25°C. Shoots should appear a month after sowing the seeds. Flowering of such plants usually occurs after five years.
Reproduction of Tillandsia Anita
To propagate Tillandsia Anita, amateur flower growers recommend one method - separating the daughter rosettes after flowering. Sowing seeds may end in failure.
Daughter rosettes on a plant
Seeds
Tillandsia can be grown from seeds, but only from a reliable source. It is difficult to fertilize bromeliads on your own, and they also need cross-pollination. It is even more difficult to bring the seeds to full maturity. But Tillandsia Anita is a hybrid, and it is not possible to find information about which atmospheric species took part in the pollination of Tillandsia cyanea.
Seeds are germinated as follows:
- prepare a peat-sand mixture;
- fill it with a wide, shallow container with holes for water outflow;
- Tillandsia seeds are laid out on the substrate and pressed lightly;
- spray with warm water from a household spray bottle and cover with glass;
- kept in a bright place at a temperature of 18-20 ° C;
- ventilate the greenhouse daily, remove condensation, check the humidity of the substrate;
- When shoots appear, the glass is removed, spacers are installed on the sides of the bowl, and covered with a transparent film - with its help you can maintain high humidity.
When 2-3 true leaves appear (after 3-4 months), tillandsia sprouts are planted in individual containers. They are filled with a mixture of peat, crushed bark, sphagnum moss and crushed activated carbon tablets.
Comment!
The seedlings will bloom no earlier than in 5 years.
By division after flowering
After flowering, daughter rosettes are formed on Tillandsia Anita. If the mother plant feels satisfactory, they do not need to be planted. After 2-3 years, the formed wide bush will produce several flower stalks.
Daughter rosettes should be separated as late as possible - ideally when they reach half the size of the mother plant. By this time they will be independent tillandsias, only small and with roots.
The daughter rosettes are carefully separated from the old plant, using a knife if necessary. Before planting, wait 2-3 hours until the wound surface is covered with callus in the open air. Or they treat it with crushed activated carbon.
Small plants are planted in individual containers, where they can spend their entire lives. A mixture for bromeliads or orchids is used as a substrate. You can prepare it yourself using the following ingredients:
- sphagnum moss;
- processed and crushed bark of coniferous trees;
- pure charcoal or activated carbon;
- peat;
- sand;
- expanded clay
The first three components are required. You cannot use garden soil, compost, humus, or substrates for other crops.
You can not plant Tillandsia Anita in a pot, but attach it to a piece of driftwood, a large piece of cork bark, or a special stand for orchids and bromeliads. Typically, the support is partially or completely wrapped in a layer of sphagnum moss or coconut fiber.
Comment!
The daughter rosettes will bloom no earlier than in 2-3 years.
Potted planting
Transplantation is done in the spring, every 2–3 years. This is the season when you need to buy a flower.
There is no point in replanting a flowering tillandsia purchased in a store, since after flowering it dies, forming lateral shoots. We need to wait for them to grow and plant them.
Rules for transplanting non-flowering potted tillandsia:
- Soil preparation. The soil should consist of large fractions measuring 1–2 cm. Mixtures that contain sticky and fibrous particles should not be used. Even if the package in the store says “for Bromeliads,” you need to read the ingredients. The presence of humus, peat, and soil is unacceptable. Tillandsia roots will rot in such mixtures. You can use pieces of bark as soil or mix them with river stones. Coconut chips and akadama or ceramis granules are also suitable. The last two components are natural clay that does not get wet in water. Large fractions of the substrate will provide air access to the roots.
- Choosing a pot. A small and shallow container with a diameter of about 10 cm is suitable. The main thing is that the pot must be stable and not tip over under the weight of the flower. Charcoal can be used as drainage, which will protect against root rot and mold.
- The principle of transplantation. Even potted herbaceous tillandsia needs roots only to absorb moisture from the air and that which flows down the leaves, as well as to anchor it in place. Therefore, when replanting, you should not be afraid of damaging the roots. If Tillandsia needs it, it will grow new ones. You can even temporarily put it with bare roots in a cup, and nothing will happen. Therefore, when replanting, we calmly free the plant from the old soil and place it in a new pot, at the same depth at which it grew before.
- Watering: from a spray bottle with warm, settled water inside the outlet or by immersing the pot with the drainage holes in water for 20 minutes.
Tillandsia is immersed in a new substrate and the rosette is sprayed
To plant an indoor flower at the same depth, you need to clasp it with your fingers near the ground, turn the pot upside down and remove the plant with its roots. Then, without moving your fingers, lower it down with the roots, lightly shake off the soil, place it in a new pot and fill it up so that your fingers are again above the surface.
The soil
Land plants need loose soil that allows water to pass through well.
A ready-made substrate for orchids or bromeliads , purchased in a store, is suitable.
You can prepare the mixture yourself by taking leaf soil, peat and crushed sphagnum moss in equal proportions.
Good drainage is necessary - it should occupy a third of the pot.
It is useful to add charcoal to the drainage mixture. This will help prevent the development of fungi that cause rotting of the plant roots.
Tillandsias are successfully grown in the following soil composition:
- Leaf humus;
- Crushed pine bark;
- Peat;
- Fern roots;
- Sphagnum moss.
The components of this soil mixture are taken in equal parts.
Atmospheric or epiphytic group
The epiphytic group includes more than a hundred plants that mostly live in their natural environment. Only a few varieties and varieties have been adapted for home culture, which we will consider below.
Xerographics
An unusual epiphyte with rather wide ash-gray leaves, curved at the ends. It is considered one of the largest representatives of Bromeliads - in its natural environment the rosette can grow up to 1 m in height. The peduncle is red with greenish stipules; flowering lasts about a month.
Gardener
A narrow-leaved plant consisting of a spreading rosette of greenish-gray color. The leaves at the edges are curved in such a way that drops of dew flow down to the center, thereby providing nutrition to the flower. The peduncle is powerful, pinkish in color.
Silver
The rosette of this epiphyte consists of long, about 10 cm, thread-like leaves covered with thin gray scales that appear silvery in sunlight. The peduncle is graceful, producing several small blue-red flowers.
Sitnikovaya
It is distinguished by long, up to 50 cm, hard leaves of a greenish-gray color, through which moisture flows to the center of the rosette. The socket itself consists of several parts. The peduncle is long and quite powerful, with a red bract producing several small purple flowers that are fragrant for about two months.
Usneiformes
An unusually decorative epiphyte with very thin and graceful thread-like stems hanging down several meters. It is noteworthy that the leaves of the plant are small, only 5-7 cm long, but due to the numerous intertwined stems they form lush gray-green cascades. The epiphyte blooms in summer with bluish or yellow flowers.
Tricolor
A beautiful plant with an almost round and voluminous rosette. This effect is created by outward curving linear leaves in green, yellow and reddish hues. Several greenish-red flower stalks with purple flowers emerge from the center of the rosette.
Jellyfish head
The rosette of this epiphyte really looks like a representative of marine fauna. The writhing, swollen leaves, widened and tightly closed at the base, resemble tentacles. The color of the leaves is gray-green, the peduncles are flat, purple, flowers are up to 3 cm in length, of a blue-violet hue.