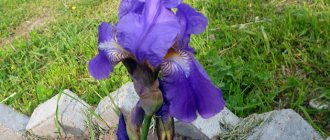
The other day I passed by one area where, on the street side, the owners of hostas, in contrast to the evenly trimmed lawn, made a whole composition - there are dozens of these bushes there. Thanks to the juicy variegated leaves, all this looks very decorative.
How to plant a hosta
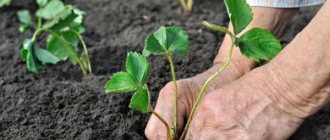
Planting hostas in open ground in spring
I must say that recently, in my opinion, hostas have become more widely used in landscaping. Even in flower beds at the entrances of multi-storey buildings, they are now found quite often. Unpretentiousness and decorativeness over a long period of time are the main factors of this trend.
Features of hosta propagation by dividing the bush
Dividing a bush is considered the simplest way to propagate plants, which does not require, for example, growing cuttings or layering or special care for them. However, this also has its own subtleties: the main rule is to do everything carefully so as not to damage the mother bush. Therefore, it is recommended to pay attention to a few tips from experienced gardeners:
- It is best to divide a hosta bush when the plant is already quite mature. The shrub must be at least 3-4 years old. You can navigate by 2 main signs - the bush has become spreading, lush, the main thing is that the crown has stopped actively growing, it seems to have begun to shrink.
- You should not often divide the same bush. This is a stressful situation that the host should not be subjected to often. Therefore, an interval of 2-3 years should be observed, otherwise the bush will not grow well.
- The most important thing in the process of propagating hostas by dividing the bush is precision and accuracy of movements. The bush will inevitably be injured, but if everything is done carefully, the damage will be minimal. To do this, you should also use garden tools - for example, for a small bush, a knife with teeth is suitable, and for a larger plant, a hacksaw.
- Since separation creates wounds, they should be immediately sprinkled with wood ash. The instruments themselves also need to be disinfected. To do this, you can use any alcohol-containing composition or a weak solution of potassium permanganate with a concentration of 1-2%.
You need to divide the bush carefully, after untangling the young roots
Hosta seed propagation method
In the case of propagation by seeds, the appearance of plants with traditional green leaves cannot be avoided - this is how the law of character splitting manifests itself. However, such a turn, on the contrary, may be of interest to experimental flower growers. Seedlings grow very slowly, forming small leaves with a diameter of 1–1.5 cm in the first year. In the second year, the leaves increase somewhat, but are not uniform in the crops. At this time, the leaves appear the typical color of the future bush. The yield of seedlings with variegated, heterogeneous coloring is very small. This indicator can be increased by using seeds from plants that have leaves of different colors and intensities.
Sowing is carried out with seeds that have not undergone stratification. Shoots appear quickly, but unfriendly (some seeds do not germinate for a long time). Very often, seeds lose their viability after several months of storage, so it is better to sow immediately after collection. Each variety has a certain yield of viable seeds, with different ripening times. Seeds suitable for sowing are dark in color. Interesting varieties for seed propagation: “Sharmon”, “Revolution”, “Allegan Fog”, which have shading, spots, specks, can produce many variegated seedlings. However, the percentage of viable seeds for these varieties is still unknown.
When is the best time to divide a hosta: in spring or autumn?
Many gardeners agree that it is best to divide the hosta in the spring or summer, so that by the fall the new bushes have time to take root. However, if the deadline has already passed, you can start dividing the bush even in September. It is necessary to have time to meet the warm period in such a way that frosts occur only in a month.
In addition, it is convenient to divide the hosta in the fall, because the plant is already entering a quiet period - metabolic processes are suspended, juices do not move so actively in the tissues. Therefore, at such a moment the least harm will be done to the host.
When can hosta be divided and planted in the spring?
In spring, the optimal period is considered to be the beginning of May. It is important that there is no longer any threat of return frosts. Therefore, in Siberia and the Urals, dividing a hosta bush sometimes has to be done only in the summer or early autumn.
Is it possible to divide the hosta in the summer?
In summer you can choose any period - June, July, August. The sooner you start dividing the bush, the faster it takes root in the new place. If you perform this procedure in hot weather, the hosta will require additional watering.
Advice! To make the soil retain moisture better, it can be mulched with pine needles, hay, sawdust and other available materials. A similar procedure is carried out in the fall to prepare the roots for winter.
When to plant a hosta by dividing the bush in the fall
It is advisable to divide the hosta in the fall in the first half of September. It is important to calculate the time so that there are at least 3-4 weeks left before the first frost. Therefore, the timing of dividing the bush depends on the specific region:
- In Siberia and the Urals - the end of August or the very beginning of September.
- In the middle zone - mid-September.
- In the southern regions - late September or early October.
You can divide the bush at any warm time of the year, but at least a month before frost
Where is the best place to replant the hosta?
When choosing a site for a hosta, you need to take into account that it is not only a shade-tolerant, but also a shade-loving plant, although today many varieties have been bred that develop well in open sunny areas.
For hybrid hostas, the best place would be an area lit by the sun only until noon.
It should be borne in mind that hostas with green leaves are less light-loving than variegated varieties, and plants with blue foliage that prefer partial shade become green in bright sun or shade. Cultivars with golden, yellow and white leaves should receive direct sunlight only in the mornings or evenings. Hostas with dense, leathery leaves are much more tolerant of sunlight than species and varieties with delicate and thin foliage, which are best planted where the sun shines no more than 4 hours a day.
How to properly divide a hosta
Propagating hosta by dividing the bush is quite simple. There are 2 options:
- Small hostas are dug up or cut out at a distance of 10 cm from the center (that is, move 10 cm away from the main shoot).
- A larger hosta is dug up by marking a circle with a radius of 35 cm from the center.
There is no need to dig up the ground first - on the contrary, it is better not to disturb the soil so that it remains dense. If the shovel is old, it is better to sharpen it further.
Site selection and soil preparation
In order for the divisions to feel as comfortable as possible, they should be planted at the same depth as the mother bush. When choosing a location, pay attention to several points:
- most hostas like weak or even strong shade;
- it is better to place them in places protected from strong winds;
- It is preferable to choose small hills rather than lowlands in which melt water and precipitation accumulate.
The composition of the soil can be any, always with humus or compost. Moreover, there is no need to give fertilizers right away - they are usually applied for the next season. The soil does not require special preparation, since the hosta is an unpretentious plant. It takes root even on dry sandy and heavy clay soils.
How to dig up and divide hosta bushes
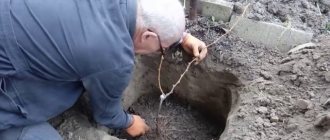
It is optimal to separate in cloudy weather. If the day is sunny, it is better to start the procedure in the evening. The instructions are as follows:
- Along the perimeter of the tree trunk circle (diameter from 10 to 35 cm), the soil is cut using a sharp shovel.
- You need to go about 1 bayonet deep, moving closer to the center all the time, so that you end up with a layer of earth along with the roots.
- When the soil is completely cut, take the bush and hit the surface several times so that the excess soil falls off.
- If there is a lot of soil left on the surface, it is better to wash it off with water pressure. Thanks to this, you can see the peculiarities of the structure of the roots and divide the bush as carefully as possible.
- Next, carefully untangle the roots and divide them into several parts, cutting them with a knife. In this case, the movement should go towards and away from you, and not to the sides - otherwise the roots may crumble.
- If you plan to divide it only into 2 parts and get 1 small shoot, you can cut it off with a shovel from the side without injuring the entire root.
Important! You need to divide the bush so that as a result, as many sprouts as possible remain on each division (optimally 5, minimum 2-3). Then each daughter will take root well, thanks to which it will be possible to breed many beautiful hostas.
It is convenient to cut small rhizomes with a sharp knife, filing them with light movements
Planting divided bushes
To plant hostas in a different place in the fall after dividing the bush, you will need:
- humus;
- garden soil;
- garden knife;
- sharp shovel;
- mulch - hay, sawdust or peat;
- 2-3 buckets of water.
The landing instructions are as follows:
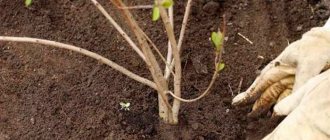
- Dig several holes at a distance of 40-50 cm - depending on the characteristics of the variety (it is better to prepare them 2 weeks in advance). Their depth is small - up to 30 cm.
- Fill with a mixture of garden soil and humus.
- Root the cuttings and sprinkle them with soil.
Advice! After planting, several leaves are removed from the top of the plant, as this increases survival rate in the new location.
If propagation is carried out in the spring, it is better to leave all the leaves so that the hosta continues to grow confidently.
The divisions can be planted next to the mother plant and transplanted to a permanent place the next season.
Growing hosta from seeds
The seed propagation method for hostas is considered the most unpopular due to the long time it takes to grow plants. Seedlings achieve even a minimal decorative effect only from the age of four, and full-fledged bushes are formed only after 6 years.
But the main reason for the rare use of this accessible, but requiring a lot of patience, method is that varietal hosts do not retain their characteristics and color features and produce offspring with a wide range of colors and leaf sizes using this method of propagation.
The seed method is used for hosta species and if it is necessary to obtain a large number of seedlings with any characteristics (for example, when filling the soil in decorative areas).
Hostas are not sown in open soil, or even in greenhouses or greenhouses. For this crop, sowing seedlings under controlled growing conditions is preferable. For the plant use low, wide containers with good drainage holes.
For diving, choose containers with a depth greater than the diameter and allowing for bottom watering. The hosta substrate is suitable for a standard one, from among the ready-made universal substrates for growing seedlings with neutral pH values and good water permeability. The soil must be treated with a solution of fungicides, calcined or disinfected in any other convenient way.
For this plant, it is advisable to use freshly harvested seeds, because they lose their viability very quickly. Typically, varietal hostas and self-collected seeds have a wide variation in quality and viability, so the seeds are selected and sorted: it is believed that only dark seeds are suitable for sowing.
Hosta seeds do not need stratification or any other treatment, but if the freshness of the seeds is questionable or there is a desire to speed up germination, you can resort to two methods:
- carry out stratification at a temperature of about 5 degrees Celsius for 1-1.5 months;
- treat the seeds with growth stimulants immediately before planting, soaking them in a warm solution according to the manufacturer’s instructions for 30 minutes.
The sowing process is quite simple:
- The substrate should be slightly moist. It is advisable to lay drainage at the bottom of the containers. The soil is not compacted, but leveled.
- Seeds are laid out in 2-3 pieces. in small holes or superficially on leveled soil. The seeds are buried or covered with soil by 6-8 mm and sprayed again.
For hosta seedlings, it is necessary to maintain a temperature of about 20 degrees Celsius and light soil moisture using bottom watering. Covering with film or glass is desirable, as is good lighting. Shoots appear unevenly, the first ones appear after 2 weeks.
Diving is carried out after the first leaf appears. The top layer of soil is always sand. Seedlings prefer bottom watering, moderate temperatures and hardening.
In the first two years, hostas form miniature leaves and require very careful care. You can plant hostas in seedling beds for growing in the garden in the first year, but it is easier to grow the plants as container plants during the first year, and transplant them into the ground in the second year.
Transplantation of seedlings into the soil when grown by seedling method is carried out after late return frosts have disappeared and after long-term hardening (in June). Only in the third year can they be transferred to a permanent place, but it is better to grow hostas in a seedling bed until the fourth year and the formation of at least small, but decorative rosettes.
Caring for seedlings after transplantation is similar to caring for cuttings.
Hosta propagation rules - tips and tricks for the home and garden from NewsForever.ru
How to divide a hosta bush without digging
You can propagate the hosta by dividing the bush without even digging it up completely. Thanks to this, he is injured to a lesser extent. The instructions are as follows:
- Take a sharp shovel and dig only from one side.
- Using a knife, separate one small part. It is first cut off from the plant itself.
- Then an acute angle is formed (towards you) - the result is a triangle.
- Then the resulting void in the ground is filled with soil mixed with humus.
- It is not necessary to cover the cut with ash, since it will not come into contact with air. But after the procedure, the plant needs to be watered well.
Propagation by seeds
The seed method of obtaining another plant is rarely used by ordinary gardeners, because it is very labor-intensive and has a low survival rate. More often it is chosen by breeders to develop new varieties.
When propagated by seeds, varietal characteristics are not transferred from the mother bush, therefore the main purpose of this propagation method is to obtain a new subspecies.
Obtaining hosta from seeds takes a long period and includes several stages: from pre-sowing preparation of planting material to planting germinated seedlings in open ground.
The shape of the seeds is oblong. Brown color. Length ranging from 0.5 to 1.0 cm. They are located in yellow seed pods that form instead of faded buds.
Seeds begin to be collected 7-8 weeks after pollination, towards the end of summer. Readiness is determined by the brown color of the boxes, which dry and open at the stage of full ripening.
You can collect seed from the fruits before they begin to rot, within 3-5 days.
Seed storage rules
The seeds are dried for 5-10 minutes in an oven at a temperature of about 300°C until the moisture has completely evaporated. Next, they are cleaned of lionfish and placed in a refrigerator for 30 days.
Warmed and hardened planting material is stored at 10-40°C in a dry, dark place in small bags, preferably fabric bags, in small portions, 30-50 pieces each.
Seeds do not lose their germination rates for 2 years.
Preparation
Hosta does not have a high germination rate. Only 70% of the seeds germinate, so before sowing they are treated with growth stimulants, for example, aqueous solutions of Epin and Zircon, soaking for 15-20 minutes.
Reproduction of hostas by cuttings step by step photo
The best option for germinating seedlings is a plastic container with organized drainage holes in the bottom. Before sowing, it is treated with boiling water or a weak solution of potassium permanganate (potassium permanganate).
A ready-made flower substrate or a self-prepared soil mixture is suitable for growing, to which perlite and peat must be added.
Technology
Before planting, the bottom of the container is laid out with drainage and covered with soil, compacting the voids. The seeds are sown on the surface, sprinkled with a layer of earth up to 1 cm thick on top.
The shelter is not removed from the greenhouse until the seedlings are strengthened, ventilating daily for 1-2 hours.
To create a greenhouse effect, plantings are covered with plastic film or protective glass. The container with seedlings is placed in a warm place with a temperature level of about 20-25°C, away from direct sunlight.
Seedling care
Watering is carried out as the soil dries, avoiding stagnation of water.
The first shoots appear in the second or third week.
When 2-3 leaves are formed, the plantings are planted, transplanted into individual containers or thinned out, leaving only the strongest shoots.
When transplanting seedlings, change the soil mixture to a more fertile one. After picking, the top cover is removed and after 5-7 days the seedlings begin to harden - take them out into the open air for 2-3 hours at an ambient temperature of at least 18°C.
Plant care
Further care is quite simple:
- Immediately after transplantation, water well (a bucket per plant).
- Mulch with sawdust, peat or hay.
- If propagation of hostas by dividing the bush is carried out in the fall, it is useful to hill up the plants and put a large layer of mulch (in the south you don’t have to do this, but for other regions it is important).
It is not necessary to fertilize, since humus has already been added to the hole. In addition, this plant does not require constant feeding. If the bush was propagated in the fall, there is no need to add fertilizer: the last time it is applied is only at the end of August. And in September, metabolic processes in tissues slow down - the plant is preparing for a dormant period.