The elegant calla lily is one of the most exquisite representatives of the Araceae family on the planet. The unusual shape of the flower and the variety of shades that nature generously endowed the plant with made it a unique symbol of beauty, chastity and greatness. This is confirmed by the high popularity of the flower among florists - it is indispensable when creating wedding bouquets. The homeland of calla lilies is South Africa, which is the cradle of many exotic species of the Araceae family. Translated from Greek, this name means “beautiful.” It is difficult to come up with a more expressive term to describe the emotions that this plant evokes. Let's talk about the characteristics of the flower and its preferences, and listen to professional advice on growing calla lilies. Let's learn about the most optimal ways to propagate crops.
Calla: description of the plant type, maintenance, care
Poets of all times have sung the beauty and tenderness of calla lilies. Regardless of the breeding characteristics of the plant, the flowers are characterized by straight, long petioles and wide basal leaves growing from a thick rhizome. The inflorescence, consisting of a spadix and a spathe, is located on a leafless “arrow” stem. The spathe is a luxuriously bright, funnel-shaped bract that surrounds a small spadix, completely covered with small flowers. Single bright green arrowhead-shaped leaves reach 8-15 cm in length and 5-10 cm in width. The color of the leaves is even, some species are characterized by light inclusions. Growing calla lilies in the garden or at home brings an amazing feeling of touching the creation of a small miracle - a magnificent plant.
Calla flowers - types
Calla lilies can be divided into two groups: tree-like and deciduous (Eliota and Remani).
Calla Amethyst
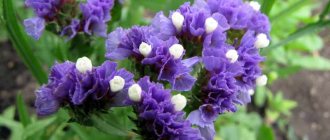
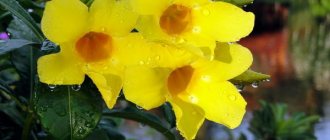
This variety has lilac flowers like the color of a violet. The unforgettable smell of the sea will delight you in your home. Some varieties have a white (cream) flower in appearance. The height of the bush reaches 120 cm. Flowering lasts for at least 2 months. The long peduncle has always been popular for decorating palaces.
Calla Vermeer
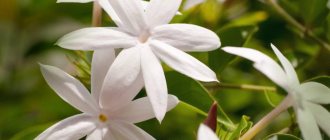
A white blanket with a pinkish tint in the middle looks great in combination with a bright lemon cob growing from the center, creating a unique ornament, especially in composition with other flowers. Green decorative leaves interspersed with white add even more charm to the flower. This species does not exceed 60 cm.
Calla Remanna
A gentle pink blanket seems to wrap a yellow cob. Some hybrid forms are found with dark-colored flowers in shades of red and pink. The height reaches 50 cm. From this species, breeders have bred many hybrid forms of variegated flowers.
Calla Elliott
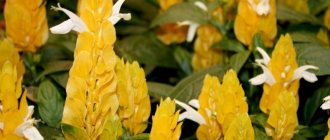
Basically the flower consists of a yellow spathe and a red border on the outside. Heart-shaped leaves with numerous white spots. It reaches a height of 50 cm. It grows well on windowsills and prefers a lot of light.
Growing calla lilies
Despite their high decorative value, these flowers are not very demanding, but certain conditions dictated by the plant must be met to obtain truly magnificent healthy specimens. An unpretentious and hardy crop grows on any soil, but prefers light, breathable, neutral sandstone or loam. Well-fertilized with organic matter, fertile soil is the key to successful and rapid cultivation of crops. Calla lilies can be propagated by vegetative methods (splitting the bulb) or by seeds.
How to propagate calla lilies at home in pots
Zantedeschia is a flower that you want to look at again and again. Therefore, every gardener will not mind at all growing it on his property. How does Zantedexia reproduce? This happens in three ways: seeds, children and dividing the tuber.
Reproduction by children is the most reliable and probably the simplest method of reproduction. During the annual transplantation of a flower, its children are separated from the “mother” tuber. Small nodules and rhizomes are rooted in damp sand with the addition of peat.
Dividing the tubers is the second effective way. However, by division you can not only propagate the plant, but also provide the flower with active and lush flowering. Only in this case, you should not use cutting tools. The tubers are simply divided or broken by hand into several parts, making sure that there are buds on each piece. The fracture sites are powdered with coal powder.
Propagation by seeds can also give good results. But, for this event to be successful, fresh fertilized soil should be prepared. Growing a tropical flower from seeds is used less often than forcing it from tubers.
Seed propagation is a labor-intensive process that requires some skills. It happens that seeds change their species characteristics. This occurs due to cross pollination when two different species grow side by side.
The second problem with harvested seeds is that they quickly lose their viability. Therefore, they need a quick landing. The seeds are placed in light sandy-peat soil in early spring and covered with film.
Seedlings grown from seeds develop very slowly and bloom only in the fifth year.
After planting seeds and tubers in the ground and the emergence of seedlings, for all methods of propagation, they are planted in separate pots.
What time to transplant feces
It is better to replant the plant after flowering, when the cover begins to change its bright color to green. The main points that gardeners need to remember when replanting a plant are:
- preparing a wide and spacious container;
- presence of nutrient substrate;
- providing the plant with good drainage.
Annual replanting is important for the plant, since calla lilies are one of the indoor plants that greatly deplete the soil during the flowering period. Depending on the size of the tuber, it needs to be deepened into the ground by approximately 10-15 cm.
When purchasing calla tubers in stores, it can be difficult to understand where the apical buds are located. In order not to make a mistake, they need to be treated with a special substance that promotes the active growth of the plant. Then, place it in a warm, not very bright place, where the plant will sprout after a while.
A novice gardener should be reminded that calla lilies begin to bloom only after 2 years of active growth. Its first flowers are not brightly colored. Flowering occurs over a very long time. With sufficient lighting and proper care, calla lilies bloom from late autumn to early spring.
Planting with bulbs
Growing calla lilies from a bulb is the easiest way to obtain a beautiful flowering plant that thrives in the garden. Callas reproduce well by dividing the rhizome. The bulb, not being the root itself (the correct name is rhizome), when it accumulates a sufficient supply of nutrients, produces a sprout, which, as it develops, turns into the very stem on which an elegant flower will bloom. Like many bulbous plants, callas reproduce by forming new baby bulbs. Under good growing conditions, feces can spread over a large area of the site. This is how calla lilies grow in the wild. The plant's homeland is the South African savannah, which has given the kalam incredible endurance and high reproductive ability. Therefore, this process cannot be started in a garden plot; it is necessary to periodically dig up excess bulbs, otherwise the crop will be constantly divided, and the flowers will become smaller over time and lose their decorative qualities.
Calla lilies diseases
Callas suffer from mosaic disease, the causative agent of which is the potato virus X. White spots of varying sizes appear on the leaves of diseased callas, which eventually merge into stripes running along the veins, and the leaf blade curls. A sick plant grows and blooms worse. The pathogen is only slightly transmitted by sap. It mainly spreads when grafting tubers, in which it does not lose activity for a long time.
Dear readers! Callas are a wonderful decoration for your garden! Their tenderness and subtle sensuality will undoubtedly decorate any corner of the garden! We are waiting for your comments!
Calla: all about the plant, rules of care and cultivation
Planting calla lilies with bulbs is a simple process. They are unpretentious and take root in any soil, provided that it is well drained. Rhizomes are susceptible to rotting, so air permeability is necessary for the proper development of the plant. Requirements for the planting site: the place must be sunny, slight periodic shading is possible, it can be easily tolerated by the crop. The bulbs are planted in a row strictly horizontally with the bottom down, and sprouting shoots up into a prepared small hole up to 10 cm deep with an interval of 0.15 m from each other. Plantings are generously watered to facilitate rooting. The birthplace of any culture determines the conditions for its growth. So is calla lily. The plant's homeland is the hot tropics, therefore all types of calla lilies - southerners who do not tolerate the slightest frosts well, and temperate Russian latitudes, where the air temperature drops below 0 C°, are inappropriate for planting these crops.
Pests and care difficulties
Calla Zantedeschia is resistant to pests, but violation of the rules of care leads to their defeat.
- Too low humidity leads to attacks by spider mites, whiteflies and aphids. On the surface it looks like a sticky coating. The leaves curl, the tips begin to dry, and the buds turn yellow. To eliminate the problem, the surface is treated with Actellik or Commander and the humidity is increased.
- Gray or root rot - occurs as a result of excess moisture. Do not overdo it with watering, otherwise the tuber will begin to rot and become covered with necrotic rot. The leaves and peduncle fade. The solution to the problem is to immediately change the substrate to a dry and fertile one and treat the surface of the bush with fungicides. Dry leaves and peduncles are cut off.
- Anthracnose - brown spots on the surface of the leaf blade. The spots spread quickly, and the plant can be saved if measures are taken at the initial stage of the lesion. The affected leaves are torn off, and the surface of the bush is treated with fungicides. Bacteria begin to multiply in the soil, so if the flower cannot be saved, it is thrown away along with the substrate.
- Bacterial rot - infection is very similar to the previous one. The peduncle at the root and the leaves at the base darken and remain constantly moist. It is practically impossible to save the plant.
- Dry leaves are caused by poor watering, humidity, or direct sunlight.
- The tips of the leaves dry out - excess or insufficient fertilizer.
- There is no flowering - there are several reasons: an excess of nitrogen in the feed, insufficient lighting, the pot is too small for the tuber, the presence of a large number of children, insufficient watering during the growing season. Also, the tuber can grow at the very top of the soil, then side shoots will begin to develop instead of a peduncle. One of the important rules for successful flowering is the presence of at least 2 months of dormancy. As you can see, by eliminating the shortcomings described above, your calla flowers will definitely bloom with lush and long-lasting blooms.
Seeds and seedlings
Planting seeds for planting calla lilies precedes their germination: this is the best way to speed up the process of obtaining seedlings. It's simple: place the seeds on a flat plate or saucer in a folded damp paper napkin and put them in a cool, dark place. It is necessary to maintain a certain level of moisture in the napkin, without allowing it to dry out or get too wet, which can lead to rot. The seeds should show signs of growth after a few days. Having selected the hatched seedlings, they begin sowing.
3.Planting and care in open ground
Callas are unpretentious and quite easy to grow both in open ground and at home. When caring for a flower, it is worth remembering that all its parts are poisonous and when in contact with plants it is better to use protective gloves, and wash your hands thoroughly with soap after any work. Species such as Ethiopian calla and Remanna calla are often grown in the garden.
↑ Up,
When purchasing, you should pay attention to the appearance of the planting material - the bulbs should be dense, with a yellow surface, a pronounced growth point. If there are mechanical damage or soft areas, it is better to refrain from purchasing. If similar areas have already been discovered at home, then the rotten areas are cut out with a sharp knife, leaving only healthy tissue. The wounds resulting from such pruning are treated with brilliant green.
You should not purchase tubers that are wrinkled and have lost a lot of moisture - in such plants they will simply recover in the first year, and the first flower stalks will decorate such a bush only next year.
↑ Up,
Planting in the garden is carried out in the spring - in early May, when the threat of night frosts becomes minimal. The flower prefers sunny areas or light partial shade during the daytime. Midday sun can burn plant leaves.
Before planting, leaf or turf humus and rotted manure are added to the soil as additional nutrition. From mineral fertilizers, you can add superphosphate granules. The area for planting calla lilies should have loose soil without stagnant melt and rain moisture. River sand is usually mixed into too heavy clay soil - it preserves the loose structure of the soil and makes it moisture-permeable.
The pH level of the soil should be acidic. If the soil on the site is neutral or alkaline, it is spilled with a weak solution of some household acid - citric, acetic, etc.
↑ Up,
The calliper loves the presence of earthworms in the soil - they loosen the soil, making it breathable and light.
The planting depth will depend on the diameter of the tuber - the larger it is, the deeper the tuber should be planted. In heavy soil, it is worth reducing the planting depth, and in sandy soil, increasing it slightly.
The area is dug up and the weeds are pulled out along with the roots. For planting tubers, prepare holes about 8-10 cm deep and leave a distance of about 30 cm between the holes. For dwarf varieties, this distance can be reduced to 15-20 cm.
↑ Up,
At the bottom of the holes, you can place a small drainage layer of river sand 1-2 cm high. The tubers are pre-soaked for half an hour in a weak solution of potassium permanganate with the addition of growth-stimulating drugs, and then placed in the holes, covered with earth and lightly compacted.
The area is watered with warm water and mulched with the appearance of the first sprouts 5-7 cm high. Mown grass, sawdust, and tree bark are used as mulch.
↑ Up,
If the sprouts do not appear for too long - within 4 - 5 weeks - there is nothing wrong with that. The fact is that first of all, plants grow their root system and only then begin to form leaves.
Special preparation carried out at home will help speed up the process and get buds earlier. Tubers are planted in pots at the end of March or early April and watered little by little. 7 - 10 days before planting in the garden, the plants are taken outside for several hours a day, constantly increasing this time.
↑ Up,
After such hardening, the flower is watered abundantly and a day later transferred to the prepared planting holes along with a lump of earth. Transshipment should be carried out extremely carefully, without injuring the emerging sprout and minimally disturbing the root system.
↑ Up,
3.1.Water and fertilize
When planting, calla lilies are watered abundantly, but the second watering is carried out only when the first shoots appear or when the soil surface is completely dry. Watering is carried out in the morning and evening hours using warm water.
It is not advisable for drops to get on flowers and bedspreads - it is better to apply water directly under the root of the flower. If wet leaves are exposed to sunlight during the daytime, this will lead to burns. After watering, the soil at the base of the plants is carefully loosened and weeds are removed, and then the mulch layer is renewed.
↑ Up,
When growing flowers in the garden, 2-3 feedings per season are enough. The first is carried out with the appearance of the first leaves, the second - as soon as the peduncle appears. The third feeding will be advisable only when grown in poor soil and is carried out immediately after flowering.
Whitewing responds positively to both mineral compositions for flowering plants and organic fertilizers in the form of well-rotted manure and humus.
↑ Up,
3.2.When to dig and how to store bulbs
Calla lily tubers are dug out of the ground and sent for storage when the very first night frosts appear. The root system is carefully shaken off soil residues, and the tubers are immersed in warm water with the addition of a few crystals of potassium permanganate for half an hour. Next, the plants are laid out for 2 - 3 days in a warm and ventilated place to dry.
After drying, the tubers are placed in a cool, dry place at a temperature of about 5 - 7 degrees for another couple of weeks. During this period, the above-ground part will dry completely and it can be trimmed with a sharpened sterile pruner.
↑ Up,
For permanent storage, the tubers are placed in small boxes and covered with a layer of barely damp sand. The boxes are sent to a cool and dark place - for example, to a cellar. Tubers are taken out weekly and inspected for rot or disease - the bad ones are discarded.
If there is no cellar, then storage can be carried out in the refrigerator, wrapping the tubers in newspaper sheets and placing them on the lowest shelf.
↑ Up,
Planting seedlings
Sowing seeds for seedlings is carried out in small pots or containers. If garden soil for planting is not prepared, you can buy ready-made soil at a gardening supply store. It is considered optimal to sow a pair of seeds in one container (with a depth of 1 cm). Excessive watering is unacceptable - at this stage there is still a high risk of rotting. Therefore, the soil should be moistened moderately. And it’s better to do this through the holes at the bottom of the pot. The appearance of sprouts is the second stage in the process of growing callas.
To obtain healthy plants, strong shoots are left, but weak and lightly colored shoots must be removed.
Callas in a wedding bouquet
Oddly enough, the fashion for creating wedding bouquets from calla lilies came not so long ago. Before this, people gave great priority to signs and superstitions and did not allow their daughters to go to the altar with such a bouquet.
There is another indisputable fact that can scare the bride. Calla lilies at a funeral symbolize not the end, but the beginning, namely the beginning of a new, albeit afterlife. At weddings, a bouquet of calla lilies also symbolizes the beginning.
A terrible comparison, isn't it? But don’t be afraid, a wedding bouquet of calla lilies will help both the bride and the groom start a new, peaceful and love-filled life.
This bouquet fits perfectly with the bride’s dress, it emphasizes her beauty and gives her confidence in her choice.
Any wedding bouquet is considered a talisman, so during the wedding the bride should not let it out of her hands. And, by the way, if the bride intends to throw a bouquet, then it is advisable to prepare the same one, maybe even an artificial one, so that the real one will always be nearby as a talisman.
Transplanting seedlings to a permanent place
Seedlings that have grown and gained strength can be planted in a prepared place in the garden plot. Planting seedlings is almost no different from planting bulbs, only the holes should be somewhat deeper, since the roots will require more space to accommodate them.
Before planting, each seedling is inspected; for better rooting, experts recommend treating the root system with a biostimulant solution. This should be done carefully, being careful not to injure the roots or cause any other damage to the fragile sprout. When transplanting, calla lily seedlings should be watered. You can add a solution of peat-humic fertilizers to the water for irrigation to avoid the occurrence of diseases and other complications in the new place.
Varieties
When choosing the variety of your future pet, preference should be given to the shade of the stipule you like. They practically do not differ in conditions of detention or other parameters.
Eliott
Eliott's callas are also distinguished from other species by their heart-shaped leaves with small specks. Flowers rise to a height of up to half a meter.
In the Yellow Corner variety they are sunny in color, and the specks on the leaves are pale yellow. The Black-Eyed Beauty variety is creamy yellow with white spots.
Ethiopian
The most popular type of calla lily, widely distributed both in cut form and in flowerpots. For bouquets, they are grown in fields or in greenhouses, where the height of the flower stalks reaches a meter. In the limited space of the pot, its dimensions are slightly smaller. The stipule is white, and the flowers on the cob are bright yellow.
The leaves of the Ethiopian calla lily are green, with a glossy shine, and they remain that way even during the rest period.
Hybrid varieties adapt more easily to indoor conditions. For example, the Zhemchug variety is the shortest - the peduncle is only half a meter. Ethiopian calla Nicolai is distinguished by a green tint of the edges and base of the bract, and its size exceeds 10 cm in diameter.
Remanna
Calla Rehmann reaches a maximum size of 70 cm. The leaves are narrow compared to other species. The color of the bract can be pink, red or lilac . In winter, it drops all its leaves and rests.
Interesting varieties are Vecherok with red and black stipule color and Chameleon with peach and gold.
Vermeer
The Vermeer variety is a hybrid of Elliott calla lilies. Its cover is two-tone: on the outside the shade remains classic white, but on the inside the funnel takes on a purple hue. The yellow cob looks especially bright against this background. The specks on the surface of the leaves are white.
Mix
Calla mix is a composition of various varieties that differ in the color of their stipules. With simultaneous flowering, the abundance of colors on the windowsill looks original and is even more pleasing to the eye.
Landscape designers create flower beds, alpine slides and implement any other ideas in a similar way.
How to care for a flower?
The basic rules for caring for flowers are regular weeding, surface loosening and watering. Due attention should be paid to watering a flower such as calla. The plant's homeland - South Africa - left its mark on the structure of the plant. The crop will undoubtedly require a significant amount of moisture and will not tolerate dry periods or the gardener’s neglect of watering - the main aspect of proper flower care. The plant should be watered regularly, especially in the summer heat. If there is a small pond on the garden plot, the best option, as well as a successful decorative move, would be to create flower beds with calla lilies on the banks of the reservoir.
Calla lily propagation methods
There are several ways to propagate calla lilies: seeds, shoots and tubers.
Tuber.
This propagation method involves separating daughter tubers from the mother root. Daughter tubers measuring 1-1.5 cm in size can be purchased in the store, or separated from the mother tubers at the end of February - beginning of spring, during the planting period.
Choose a tuber that is hard and dense (like a new potato), otherwise it will not produce flower stalks in the first year.
The babies are separated with a sharp knife and stored in containers or on the surface of dry soil at a temperature of 7 degrees.
Some gardeners store the tuber in the refrigerator in a tray, turning it regularly.
After a month and a half, the tuber is planted in the ground, deepened by 4 cm, and watering begins to gradually increase. The temperature is raised to 20-24 degrees. The soil is kept moist.
The tubercle on the tuber symbolizes the top from which the peduncle will pierce.
Starting in June, calla tubers are planted in open ground.
Holes of 10-12 cm are made on the site at a distance of 20-50 cm, depending on the variety.
The dormant period begins with the first frost. The tuber is dug up, the entire above-ground part is cut off, leaving 2-3 leaves. After a month, the leaves will dry out, but will give all their accumulated strength to the tuber.
The tuber overwinters in a dry, dark place at a temperature of 5-7 degrees. If you live in a warm climate zone, you can cover the calla lilies with polyethylene for the winter, protecting them from precipitation without digging them up.
By shoots or division of the bush.
In the fall, the bush is dug up and the baby is carefully separated without shaking off the soil, then planted in a small container.
Important! For this method, only Ethiopian calla and its hybrid forms with a tree-like root system are suitable.
In this form, the baby winters at a temperature of 10-15 degrees and average humidity. The earth is kept moist. With the onset of spring, young shoots will appear from the root, and at the beginning of summer the flower can be planted in an open area. Children with young shoots can be purchased at a flower shop in early spring.
Seeds.
Propagating calla lilies by seeds is not a simple and thankless task. This method is suitable for experienced flower growers. The seeds have poor germination and you will have to wait quite a long time.
To increase germination, before planting, the seeds are soaked for 6 hours in a natural biostimulant (potassium humate solution).
There are several ways to germinate seeds. You can spread it on top of damp paper, covering another and periodically moistening the seeds from a spray bottle.
Moss is also used. The moss is pre-moistened and the seeds are laid out on the surface, covered with paper or loosely with polyethylene on top. Moss retains moisture longer and prevents the seeds from drying out. The temperature is maintained at 22 degrees for 6-8 days. During this time, the seeds should germinate.
Sprouted seeds are sown in a container with soil, and the soil is constantly moistened until the weather warms up. At the end of spring - beginning of summer, seedlings are planted in open ground.
If Calla seeds are immediately planted on the plot, most of them will die.
Feeding
Growing calla lilies and caring for them requires periodic feeding. In the southern regions of Russia, professional gardeners achieve year-round flowering of the crop. A similar effect can be achieved by gradually planting plants, using competent technology and rational fertilizing. It is believed that calla lilies should receive fertilizer once a year, but this is not enough for constant flowering. Monthly fertilizing with any organic matter with additional mineral fertilizers will ensure regular flowering of calla lilies. It is important not to overfeed the crop and carefully monitor the condition of the leaves: blackening of the edges will indicate an excess of nitrogen. Now, knowing how to properly care for calla lilies, we will learn about the intricacies of growing the crop at home.
Calla lily care
About calla lilies they usually write: “blooms from October to April.” This simply cannot be! December, January and February in the homeland of calla lilies - South Africa - are summer, hot and sometimes dry. It is during this period that calla lilies go into a dormant state. It awakens to life in the fall, when the air temperature does not exceed +20.. +22 °C, and rain falls. Therefore, the peak of calla flowering occurs in our summer (June-July-August) - accordingly, during the mild South African winter.
Why torture a living being by imitating “our” winter as “their” winter, disrupting the natural life schedule of a flower for six months? Moreover, returning to the usual cycle for calla lilies opens up a completely new opportunity for us - to decorate the garden with these wonderful plants. Not winter, but real. Feel free to release the calla lilies into the wild!
The “flower” of a calla lily is the covering leaf (veil) in which the yellow “candle” of the inflorescence-cob is wrapped. Real calla flowers are small and inconspicuous, but extremely fragrant . Their aroma is reminiscent of vanilla.
Do not overwater the tubers, do not dry out the rhizomes!
The underground part of the calla lily is either not described at all in the literature, or it is spoken about in a vague way. Either calla lilies have tubers, or rhizomes, or “tuberous rhizomes.” It turned out to be very simple. In some plants, those descended from Ethiopian calla lilies, the underground part is a rhizome. Others, whose ancestors are Calla Elliott and Calla Rehmann, have tubers. Both of them feel great in the garden.
Indoor callas
Despite its exotic origin, calla lilies (the plant's homeland is the South African tropics) adapt perfectly to life in pots on windowsills. The preferences of a culture do not change with changing growing conditions: calla lilies growing at home need more abundant watering than free garden species, but the system of transplanting and fertilizing changes radically for a plant such as indoor calla lilies. Care and its features are as follows. The houseplant will have to be replanted into new soil every year: depletion of the soil in the pots can provoke the opposite effect of the applied fertilizers. Indoor callas are responsive to monthly feeding with liquid solutions of complex fertilizers; in summer they need to be fed more often - 2 times a week. To maintain the soil in normal condition and to avoid diseases, it is necessary to use peat-humic fertilizers, which must be used in accordance with the instructions supplied with the product.
Description of calla lilies
Calla (lat. Cálla ) is a genus of perennial shade-tolerant wetland or coastal herbaceous plants of the Araceae family (Araceae). The genus is the only representative of the subfamily Calloideae and includes only one species - the marsh whitewing (Calla palustris L.).
Its distribution ranges from temperate to tropical regions throughout the northern hemisphere. It is found in many regions of Russia, from Europe to Siberia and the Far East.
A marsh plant, it lives along the marshy banks of reservoirs and rivers, in swampy and damp places. It is grown as an ornamental plant and used in landscape design.
For abundant flowering, plants need a period of rest (from mid-May to the end of July), so watering during this period is greatly reduced; in July-August, they are transplanted into large pots or greenhouse soil in a nutritious mixture of clay turf soil with humus, after which the watering is increased and the plants are regularly fertilized alternately with mineral and organic fertilizers. The air temperature in greenhouses in autumn should be +8.. +10 °C, with the beginning of flowering it is recommended to increase it to +12.. +15 °C.
Calla (Calla). © Eric Hunt
Kinds
Callas are conventionally divided according to color tones into the following varieties: white, red, pink, yellow, blue, purple and black. Symbolizing purity and innocence, the white calla lily is surprisingly elegant.
A plant is a flower, the care, cultivation and maintenance of which are not as burdensome as it seems at first glance. Calla gratefully responds to care and repays a hundredfold, creating a bright holiday, incredible and amazing.
Choice of colors and shapes
The calla lilies themselves look magnificent. For decoration, you can simply add some beautiful ribbon, openwork lace or a small string of pearls.
A wedding bouquet of calla lilies in white and black colors looks elegant and unusual, which is perfect for a wedding in the art nouveau style (checkerboard design).
Colored calla lilies will wonderfully complement a bride's outfit in a Greek style or in a mermaid dress, especially when using colored decorative elements. Due to the presence of a wide variety of shades of calla lilies, they are easy to match with catchy and bright accessories: jewelry, shoes, belt, etc.
Plant diseases and pests
Like many other indoor flower plants, calla zantedeschia can be affected by certain diseases and attacked by various pests.
Spider mites are one of the most common harmful “enemies” of calla lilies, but they infect the plant most often when it is located in a room where dry air is constantly present. The castings become flabby, and over time they may even fall off.
Aphids, thrips and whiteflies also pose a great danger to the flower. As a result of the negative impact of these pests, active deformation of the leaves occurs, and then the plant may die completely.
Calla zantedeschia is a flower that can give joy to everyone who dares to grow it. Yes, it will take a lot of effort and time for the flower to “give” its beauty to the surrounding world to the maximum. But the expended energy is worth it to then contemplate with tenderness and indescribable admiration all the beauty and charm of a lushly blooming plant.
Origin and botanical description of the plant
The homeland of flowers of the aroid family (Arumaceae), from which indoor calla lilies (lat. Calla) were bred as a result of selection, is the tropical forests of South Africa. Before the appearance of the selection miracle, in central Europe one could find the whitewing (Virgin's help), belonging to the same family.
In nature, this perennial herbaceous plant prefers wetlands. The indoor flower, unlike the calliper, is larger in size. The oval-heart-shaped leaves reach a length of 6-14 cm and a width of 5-12 cm. Sometimes their rich green color is diluted with splashes of white.
One shoot can have from 10 to 20 leaves tending upward. Peduncles grow from 50 to 100 cm in height, depending on the plant variety. The root system consists of thickened hollow tubers located close to the soil surface.
The plant is decorated with truly graceful flower stalks topped with large funnel-shaped flowers of various colors. The lush green leaves and oddly shaped flowers make it popular among home greenhouse enthusiasts.
The color of the petals varies from snow-white to black. Among them: lemon, bright yellow, pink, red, burgundy, lilac, purple.
How to replant callas
In the process of replanting home calla lilies, you should take into account important nuances on which the further growth of the flower depends:
- When planting in a new pot, you do not need to add a lot of soil, as this may cause the roots to begin to rot.
- Between transplants, the top layer of soil should be replaced with new soil at least once.
- After changing the substrate, the roots experience severe stress, which is manifested by a long lack of growth. In this case, you should not take any measures, you just need to provide comfortable conditions for the plant.
- Damage to the tuberous skin can destroy the flower ; it must be handled very carefully when planting.
- Calla lilies belonging to the same species can coexist in one pot, and it is better to plant a mix of calla lilies of different colors of bracts in different pots. Different species are capable of suppressing each other's growth.
- Transplantation is carried out annually.
Calla is demanding on the capacity of the pot. The extensive root network does not tolerate crowded spaces in which flowers may not appear. Even high-quality fertilizers will not help. Therefore, one plant should have 20 x 20 cm of soil.
This video shows how to transplant Calla.
Callas prefer soil that is porous, that allows air to pass well to the roots and does not retain moisture. Before transplanting a flower, you need to prepare a suitable substrate: mix sand and humus in equal proportions and add 2 parts of leaf soil.
To replant a plant, add a layer of drainage to the bottom of the new pot and a layer of substrate on top of it. The roots are carefully straightened and covered with soil until the leaves begin.
Necessary conditions for cultivation
In order for home calla lilies to develop properly and delight the eye with abundant flowering, it is necessary to strictly follow the rules of caring for them. First of all, this concerns the watering regime, lighting and soil fertility.
Air humidity
Since in natural conditions this plant grows in places of high humidity, it also requires regular, abundant watering and periodic spraying with clean water at home.
During the growing season and flowering period, the drying of the soil in the pot should not exceed 1 cm of white calla (Ethiopian variety). For multi-colored varieties, drying of the earthen coma up to 2-3 cm is allowed. Lack of proper watering negatively affects growth and flowering.
It is best to use settled (filtered) water at room temperature for irrigation. Regular watering prevents excessive flooding. Excess moisture should be removed from the pan so that the roots do not rot from excess water.