Description of astilbe and its varieties
The stems of the plant are erect and can reach a height of 2 m. They die off in late autumn. The flower has a powerful rhizome. The leaves are green, sometimes with a reddish tint.
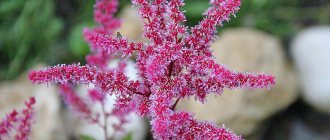
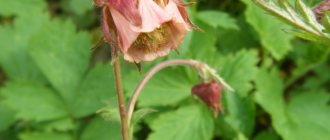
The flowers of the plant are collected in voluminous fluffy panicles or pyramids. The color scheme is very diverse and includes white, red, pink, orange, purple and other shades. Flowering usually begins in summer. The shapes of the inflorescences differ depending on the variety. They are:
- diamond-shaped;
- paniculate;
- pyramidal;
- drooping.
Breeders have developed more than 200 varieties of astilbe. The most popular varieties are: Chinese, Japanese, Arendsa, and simple-leaved.
Astilbe Arends has about 40 varieties. This type is characterized by: powerful bushes 1 m high, inflorescences in the form of a pyramid or ball of pinkish, white, red hue. The flowering process usually begins in July and lasts about 45 days.
Astilbe Arends
Chinese hybrids reach a height of 1.1 m. Their leaves are large, the inflorescences reach a length of up to 40 cm. The flowers are purple, lilac or white. Representatives of the Chinese hybrid love sunny areas.
Japanese astilbe grows up to 80 cm. It has pink or white panicle-shaped inflorescences that bloom in June. All varieties withstand winter.
The simple-leaved variety is a bush up to 55 cm high. The inflorescences look slightly drooping. Their colors are represented by coral, white and pinkish shades.
Astilbe is used in landscape design in group and mixed compositions. Low-growing species are used to decorate borders and ponds.
Astilbe goes well with ferns, hostas and heucheras.
Astilbe in composition with other flowers
Planting and care in the garden
Astilbe is a perennial that does not require bright sunlight for its development. If you need to revive a shady corner of the garden, you can plant one of the types of astilbe, the care of which is simple and not labor-intensive, and its decorative qualities are quite high. Astilbe blooms beautifully in low light conditions and has beautiful openwork foliage, which allows it to remain attractive throughout the growing season.
Astilbe should preferably be planted in humus-rich soil with close groundwater and a semi-shaded location. Immediately after planting, astilbe requires abundant watering in dry weather, and mulching in spring and autumn. Astilbe rhizomes grow vertically, the surface becomes bare over time, so the plants must be covered with peat for the winter. To preserve the decorative appearance, annual fertilizing is necessary, the schedule of which depends on the degree of soil moisture. If it is dry, it is not recommended to use mineral fertilizers; it is better to use compost and peat. On moist soils in spring, plants are fed with complex fertilizer, and after flowering - with phosphorus and potassium.
With proper care, astilbe does not lose its decorative effect for 5-6 years, after which the bushes must be divided. At the same time, it is not necessary to completely dig them up; it is enough to simply rejuvenate the bush by separating part of it, then sprinkle the cut area with ash and fill the vacated space with fresh soil.
Features of planting astilbe
Astilbe is grown from seeds at home and then transferred to the ground.
Sowing seeds
Seeds are planted in March-April. To do this, prepare a special soil mixture of sand and peat in equal proportions. The substrate is processed in a hot oven or microwave to kill all bacteria. Another sterilization option is to place the soil in the refrigerator for several days.
It is advisable to disinfect the seed material. To do this, you need to put the seeds in a solution of Fitosporin. The drug will allow you to grow healthy and strong seedlings.
For sowing, choose tall cups - about 15 cm. The step-by-step algorithm for planting seeds is as follows:
- The containers are washed with hot water and filled with substrate.
- Pour a 10 mm thick layer of snow or ice from the freezer.
- Seeds are sown on the snow.
- After the ice cover turns into water, the grains will end up in the ground.
- The containers are covered with a bag and placed in the refrigerator for three weeks.
The cold should stimulate seed germination. After germination, the containers are transferred to a warm, illuminated place.
Growing seedlings
To grow strong seedlings, you need to create a certain microclimate for them:
- temperature – 17-24°C;
- daylight hours about 13 hours;
- regular watering;
- providing access to fresh air.
If the length of daylight is not enough, the seedlings should be illuminated with artificial lamps. Watering is carried out at the root with warm, settled water.
Astilbe seedlings
2-3 weeks before transferring to the ground, seedlings should be hardened off. To do this, the container with young plants is kept for several hours on the loggia or balcony. Gradually, the duration of the plant's stay is increased. This will help astilbe quickly get used to outdoor conditions.
Planting in open ground
The transfer of seedlings to open ground occurs in May-June, when warm weather sets in. Shaded areas near buildings or fences are suitable for astilbe. The flower will feel good next to trees and shrubs.
If you plant the plant in a lighted area, flowering will be shorter.
Astilbe loves loamy soil and areas with high groundwater. Before planting seedlings, the area must be dug up and fertilized with compost in the amount of 2 buckets per 1 m².
On a note! The time for transplanting seedlings into open ground depends on the region. It is necessary to wait for stable warm weather, when the frosts have already ended.
The process of planting young plants involves the following sequence of actions:
- Holes are dug in the area with a depth of 25 cm and dimensions of 20x20 cm. A distance of 32 cm is left between them.
- 1 tbsp is poured into the pits. l. diammophoska and 1 glass of ash.
- Water it all generously with water.
- The seedling soil is also moistened and pulled out of the pots.
- The bushes are deepened so that the growth buds are underground at a depth of 4 cm.
- Astilbe roots are covered with earth and compacted.
- The soil is mulched with peat.
Astilbe, growing from seeds.
You can grow a flower with seeds if they are of high quality.
Of course, it takes longer to get an adult plant in this form. But it's very interesting. The seeds of this flower are very small. You need to work with it carefully. You can sow in February or early March. For planting, you can use a low bowl. Loose soil is placed there; I used purchased soil for seedlings. the seeds are distributed over the moistened surface and are not sprinkled or embedded in the soil.
The bowl is covered with glass and sent to the bottom shelf of the refrigerator for 21 days for stratification. Then our greenhouse can be moved to the window, into the sun. After about two weeks, sprouts appear. Small and fragile, you can’t tell from them that these will be big beautiful bushes. You need to water them with a sprayer and try not to break them with a stream of water.
When the first three leaves have appeared, you can pick in different containers. In regions with a mild climate, they can be planted in the garden in mid-May. But I didn’t do this, I just took the containers out into the garden in a shady place, and the plants overwintered at home.
When they are already a year old, they can be planted in the ground in the spring, but for the winter, young bushes are covered with compost, peat or spruce needles.
Only in a year will I know what color my astilbes from seeds will be. Because with such reproduction they bloom only in the third year.
Plant care
Watering
It is necessary to monitor the level of soil moisture. The intensity of irrigation depends on the frequency of precipitation. When they fall out, watering is reduced. In hot weather, water the plant twice a day.
Before watering, it is advisable to loosen the soil and remove weeds - this will facilitate the absorption of moisture and nutrients. The bushes need to be hilled.
Top dressing
During the season, fertilizer is applied 3 times:
- in the spring after the snow melts;
- in June;
- after flowering.
For spring feeding, nitrogen fertilizer is best suited. It stimulates the growth of new shoots well. During hilling, rotted compost is added to the soil. As for mineral supplements, it would be useful to use ammonium nitrate or urea. To do this, it is enough to dissolve 20 g of the substance in 10 liters of water.
Before planting, the soil is fertilized
The second feeding is done using saltpeter. For a bucket of water you need to take 2 tbsp. l. fertilizers The last fertilizing is carried out with superphosphate. 30 g of the substance is applied by irrigation or directly into the soil.
Transfer
Although rare, there are cases when astilbe needs to be transplanted. After some time, the roots may come to the surface and dry out. This causes the plant to dry out or bloom poorly. The number and size of inflorescences decrease.
If the plant begins to look worse and has not been replanted for a long time, you can update its appearance by replanting.
On a note! Replanting can be replaced by regular soil renewal. It is enough to add fresh soil mixture including fertilizers.
Autumn work
Since astilbe flowers retain their beauty for a long time, they are not cut off in the fall, but left semi-dry until winter. In order to prepare for wintering, the stems are cut to the root.
Shrub trimmings are sprinkled with dry leaves or covered with spruce branches. If there is a lot of snow in your area, then covering the astilbe is not necessary. The plant can withstand frosts down to -30°C.
Soil for astilbe
The soil for this plant is an important factor for getting used to a new planting site and the key to the splendor and beauty of its flowering. In addition to the soil composition itself, astilbe also needs to choose a place “under the sun” or in the shade (depending on the variety), surrounded by climbing Indigoletta roses.
Astilbe can grow on any soil, but the plant will have abundant lush flowering and strong stems if it is planted on soils with a high level of groundwater. The most undesirable thing for a plant is dry or quickly drying soil.
What is important for soil for astilbe:
- the presence of phosphorus and potassium in the mineral composition of the soil (at least in the top layer of soil);
- Before planting in the beds, the holes need to be fertilized with complex fertilizers (no more than 30 g) and bone meal (2 handfuls). If sowing or planting cuttings will take place in a hole for a flower, then this 30 cm depression must also be fertilized with flour and nutrients (they can be replaced with humus). The fertilizer mixture must be mixed with soil and water. It is advisable to sprinkle rhizomes and cuttings with mulch before planting.
Astilbe propagation
Astilbe has two methods of reproduction:
- dividing the bush;
- kidneys.
Reproduction by dividing the bush is carried out in the following stages:
- At the beginning of spring, you should dig up the astilbe, tear off the leaves and dead parts of the roots;
- Then you need to divide the bush into two parts, each of which must have at least 3 buds.
- Planting is carried out with an interval of 30 cm between plants.
- Seedlings require daily watering.
- Astilbe will bloom by August.
Reproduction by buds will take longer. To do this, shoots are cut off along with part of the root in early spring. The cut areas are treated with ash. The cut stems are placed in a mixture of gravel and peat for rooting. Cover the planting with film to create a greenhouse. The plant is planted in open ground no earlier than a year later.
Dividing an astilbe bush
Astilbe transplant
Replanting an adult astilbe bush is carried out throughout the season. This culture tolerates changes in growing location and dividing the bush well, but it is better to replant astilbe in cool weather and calm weather.
How to transplant astilbe:
- Prepare planting material. To do this, an adult bush is dug up with a ball of earth and divided into several parts with a shovel or scissors. You can also not dig up the entire bush, but carefully separate part of the bush.
- Dig planting holes and clean the seedlings. For planting, select healthy, strong cuttings with three buds at the base of the root.
- Immediately before planting, the rhizome is treated with a root former. New bushes must be planted no closer than 40 cm from each other.
- The soil in the planting pit is enriched with nutrients. To do this, the excavated soil is mixed with humus or mineral fertilizers.
- Planting depth. The width and depth of the planting hole should be 20 cm larger than the size of the root.
- After planting a new bush around the trunk, the soil must be lightly trampled and watered with 10-15 liters of clean, non-cold water.
Replanting astilbe is necessary for the development of a strong and flowering bush. For this purpose, it is carried out every 3-4 years. If the bush is not divided, its rhizomes age, the buds gradually die off, and flowering becomes rare.
Substrate and containers for homemade astilbe
If indoor astilbes are purchased blooming, “ready-made,” replanting them is not a desirable process. The plant will spend energy on adaptation, the flowering period will be reduced to a minimum and the full beauty of potted astilbe will not be appreciated. Therefore, after a period of mandatory quarantine, astilbes from flower shops are simply placed in more decorative pots or other methods of decorating containers are used. Plants are transplanted into the soil. But plants transferred from the garden or purchased in divisions require the correct selection of both substrates and containers.
Any of the universal substrates will be suitable for indoor astilbes. Loose, nutritious, neutral or slightly acidic soil (pH 5.5-6.5) is quite suitable. If you prepare the soil mixture yourself, then mix sand, humus and turf soil in equal proportions, or use a soil mixture made up of equal parts of leaf, turf soil and compost with half a part of sand.
Indoor astilbes are not grown in large tubs or containers. In order for plants to reveal all the beauty of flowering, use strong, large cuttings or seedlings that can grow in containers with a diameter of 12 to 15 cm. In such containers, rhizome growth will not occur to the detriment of not only flowering, but also leaf mass.
A universal substrate is suitable for indoor astilbe.
Larger containers will lead to the fact that plants will take a long time to adapt, grow roots, bloom sparingly, will not remain compact and, due to their gigantic size, will look sloppy. Of course, for a greenhouse or winter garden you can plant astilbes in larger containers, but in this case the effect of a living bouquet will not be preserved. The exception is mixed complex compositions in flat, wide containers from different types of plants.
Description of the plant
The perennial belongs to the Saxifraga family and grows naturally in East Asia, the islands of Japan, and on the American continent.
The height of the bush varies from 20 to 150 cm, the leaves are large, with a beautiful shine. In wild varieties, there is no gloss on the surface of the leaf blades, hence one of the versions of the name of the flower: in Latin, “astilbe” means “without shine.” Another version, on the contrary, emphasizes the beauty of the bush and foliage of the plant, and is based on the Greek words “a” - very” and “stilbe” - shine.
The flowers are small, collected in inflorescences of various shapes and textures. The length of the panicle inflorescences is from 8 to 50-60 cm. The variety of colors is impressive:
- pink;
- red;
- purple;
- white;
- cream;
- purple;
- lilac;
- crimson;
- coral;
- lilac.
The flowers have a pleasant aroma, and there is a fragrance in the garden when the plant blooms. The flowering period is long, from June to August, but we note that not only the flowering plants are beautiful, but also the bushes themselves. The openwork leaves of astilbe effectively set off the bright fluffy panicles, which makes the perennial a decoration for any homestead.
Not so long ago, astilbe was known to few gardeners and flower growers, but now it is experiencing a time of popularity. There are more than two hundred species and even more varieties of the plant, although only a small part of this splendor is cultivated in gardens. Scientists E. Lemoine (France), G. Arends (Germany), V. Reis (Holland), O. Poletiko (Russia), V. Nesaule (Lithuania) made a great contribution to the selection of astilbe.
There is a division into 12 groups in which various varieties of astilbe are classified, but flower growers and landscape designers are guided by simpler classifications. Our review presents classifications of plants according to various criteria, gives descriptions, characteristics and photos of some varieties and varieties, as well as the most famous series of astilbe.
Height classification
Plant bushes reach different heights, this is important to know when planning plantings on the site
So, there are the following groups:
- Dwarf astilbe (height no higher than 30 cm). Popular varieties among them are Pumila, curly Liliput and Perkeo.
- Low-growing varieties (height up to 60 cm). This group of plants is often combined with dwarfs. Varieties: snow-white Washington, Aphrodite with crimson panicles, Younique White.
- Medium-sized astilbes (bush height - from 60 to 100 cm). Famous varieties: Dusseldorf (pink-purple), creamy white Weisse Gloria, Anita Pfeifer with salmon-colored flowers.
- Tall plants (over a meter). These include the Arends hybrid (pink), Garnet (red), Diamond (white).
Classification by flowering form
Astilbe inflorescences differ not only in length and color, but also in density and the length of the flower petals.
The following groups are distinguished:
- Astilbes with drooping panicles (usually varieties from the Lemoine and Thunberg groups). The inflorescences sway gracefully on flexible branches, hanging down.
- Plants with paniculate-shaped inflorescences (towards the tip of the inflorescences the length of the branches decreases by a cone). Most varieties of the Arends group have such panicles.
- Pyramidal shape of inflorescences. The deviation of the side branches is at a right angle. Varieties: Thunberg astilbe, Mont Blanc and others
- Diamond-shaped inflorescences. Such panicles are formed in plants of varieties belonging to the Japanese astilbe group.
Classification by flowering time
With the right choice of location and care, astilbe blooms profusely and for a long time. But varieties differ in terms of timing, and this must also be taken into account when choosing plants.
Early varieties bloom in June, flowering of other varieties (middle terms) occurs at the “top of summer” - July, and the latest astilbes begin to delight flower growers already in August.
Scientific classification of plant
Breeders have developed many hybrid forms of astilbe, which are classified into groups. The so-called scientific division includes 12 groups, including hybrids of Arends, fringed, Lemoine, Take, Thunberg and others. More details about the astilbe varieties of these groups are described in the next section.
Conditions for growing astilbe
The crop does not cause any special trouble for the gardener when growing it - moreover, once planted, it survives any type of weed from its place of growth and does not require weeding. But some features of agricultural technology should still be taken into account.
To plant astilbe in open ground, the place should be in light (sparse) shade or semi-shaded - open sun does not contribute to the health of the plant. But even when planted under large trees with dense shade, it also grows and blooms poorly.
Note. Some white and pale pink varieties of astilbe, which bloom beautifully in sunny places, should be excluded from the list of shade-tolerant plants. But at the same time, due to the intensity of flowering, its duration is reduced.
Astilbe feels good in places with high air humidity, near water: near a pond, near a fountain. But moderate, constant soil moisture is also quite sufficient. If the groundwater at the planting site is high and the soil is characterized by high humidity, then there is no need to imagine better conditions.
In addition to depending on the level of soil water, astilbe respects soil that is deeply loosened or dug up (to remove rhizomes of weeds), fertilized with humus compost, peat (well decomposed) or manure (sufficiently rotted), based on the calculation of 2 buckets/m2.
When planting astilbe in a group, the distance between plants should be from 30 (minimum) to 50 (maximum) centimeters, depending on the height of the variety, which can be about 50 or about 120 cm.
Pests and diseases of indoor astilbe
Homemade astilbes are considered completely resistant to pests and diseases. There is a risk of using or purchasing an infected plant that was damaged in the garden or flower center, as well as loss of the bush as a result of the spread of rot due to waterlogging.
If there are signs of infection, you need to adjust care and immediately begin treating with fungicides or insecticides. When transplanting into open soil, the plants are inspected and damaged parts are removed.
Astilbe in combination with other garden plants
Periwinkle planting and care in open ground photo
Being beautifully flowering perennials, astilbes, planted in combination with other shade-loving crops, are able to decorate a garden area with both their large white, lilac, pink, red, burgundy, carmine, violet-red and cherry panicles, as well as shiny, lacy and lush foliage - coloring from dark green to burgundy and bronze on reddish petioles.
Excellent neighbors for astilbes, which bloom their leaves in May, can be both early flowering plants: corydalis, snowdrops, scillas, and Adonis adonis, lilies of the valley, irises, tulips, hosts, ferns, aquilegia, kupena, Rogersia, Volzhanka.
Next to the openwork astilbe bushes, the bushes of podophyllum, bergenia, and hellebore look interesting due to the difference in structure, color and density of their leaf blades.
The crop looks beneficial when planted along the edges of lawns, along the banks of a reservoir, in rock gardens, in ridges, and in mixborders located in partial shade.
Astilbe in landscape design Photo compositions
Hosta and astilbe in landscape design photo of flowers in a flower bed
Creating a unique composition with astilbes is not at all difficult, especially if you use the classic combination with hostas: you can plant ordinary green hostas or variegated ones with white edges on the leaves, which will add a little exoticism. Ferns and lilies will look beautiful next to each other.
Astilbes and hostas in landscape design photo mixborder
Rustic flowers like matron's veil will look good next to them. By the way, night violet will add charm not only to its appearance: its aroma will fill the area, which you will especially like if there is a bench nearby.
Astilbe photo of flowers in a flowerbed combination with hostas and irises
Not only will planting hosta be a very beautiful combination with astilbe, you can also place irises, flowering barberry, creeping juniper, and decorative leafy shrubs nearby. The composition will turn out very natural, the look will simply relax.
Astilbes in the garden design photo variety Astilbe japonica 'Peach Blossom' combination with bladderwort
Delicate pink astilbe looks luxurious against the background of purple vesicle or elderberry. As they say, you don’t want to take anything away or add anything.
Astilbe Japanese, hybrid and Arendsa in a general planting photo of a flower bed
The combination of different varieties of astilbe with different shades of flowering is beautiful, and spurge can be planted as background plants.
Astilbe in garden design Astilbe Japonica group 'Europa' photo of mixborder
An original combination would be planting together with astilbes and aruncus hosts, or volzhanka. The result is a delicate composition with various types of paniculate inflorescences. Just an airy mood!
Astilbe varieties
There are many types of astilbe. Alas, when choosing material for sowing, it is not always possible and necessary to rely on the photo on the packaging. There are several species that have gained particular popularity among gardeners; their parameters, color and flowering time are described below.
The most popular varieties of astilbe:
- Arendsa Astilbe is a perennial, pyramidal or spherical bush, reaching a height of one meter. The color of the leaves is dark, tall peduncle, crowned with lilac and snow-white, scarlet and pinkish flowers.
- Chinese astilbe. This plant is also a perennial. It can be both small and large. Reddish hairs give the leaves a bronze tint. Dense inflorescences reach a length of thirty centimeters, the inflorescences are crowned with small flowers of lilac, pinkish and snow-white flowers. This variety blooms from early to late summer.
- Japanese astilbe. A round bush will not grow more than eighty centimeters in height. The leaves are bright green and shiny. The inflorescences are shaped like panicles and reach thirty centimeters in length. They come in snow-white and pink colors. Already in June, this variety begins to bloom buds.
- Simple-leaved astilbe does not grow more than half a meter in height. It can be used both as a flower bed and as a container plant, since astilbe is very compact. The variety begins to bloom in early June. The inflorescences are loose, the color range is limited to pink, white and coral.
- Astilbe David. The bush is quite large, sometimes reaching one and a half meters in height. The leaves are light in color but with dark veins. The shades of the buds are red and purple. Blooms luxuriantly from July to August.
Planting false spirea
Astilbe planting and care in open ground implies the need to adhere to certain factors. The first factor is the place in which the flower will grow. It is desirable that it be partial shade. This will ensure a high density of flowers and bright colors. Shadow is detrimental to the plant.
The second factor is the planting season. Astilbe is planted in open ground either in mid-spring or in the first ten days of September.
The development of the plant will depend, in turn, on the following factors: heat; humidity.
Depending on the variety of plant, its height changes. Low-growing ones grow in height no more than 30 cm. Tall ones are considered to be those that have dimensions from 50 cm to 2 m.
Before planting, the soil is processed and cultivated. The first thing you need to do is dig up the area where you plan to grow false spirea. Next you need to remove debris and weeds. The soil needs feeding. The best fertilizing option would be compost or peat. Manure will also work. For 1 sq. m of territory you will need a solution of fertilizers with water in the size of one bucket.
Astilbe in design
Landscape designers very often use this plant in their projects, since the astilbe flower can confidently be classified as a highly decorative crop. It does not need annual planting or replanting; its root tolerates winter well under the snow. The green part grows back every year. The following plants look great next to astilbe:
- irises;
- ferns;
- hosts;
- bergenia;
- cuffs;
- Rogers;
- bells;
- anemones;
- aquilegia;
- daylilies.
In the spring, while the leaves of the astilbe have not yet hatched, the empty space can be temporarily filled with bulbous crops - tulips, daffodils, scylla, etc. Various ornamental shrubs harmonize well with flowering astilbe bushes. Very successfully, with the help of astilbe, you can decorate an alpine slide or complement a mixborder near a pond.
Sowing seeds for seedlings
The seed material of this flower must be stratified. You need to start doing this in February. In one month, you need to create conditions in the apartment that are close to natural, in which plant seeds overwinter. This procedure will greatly increase seed germination.
Mix peat and sand in equal parts in a wide container, and lay a thin layer (1 cm) of snow on top, on which you need to place the seeds. The snow will melt and the seeds will begin to sink into the moist soil. When the seeds are completely in the ground, place the container in a cool place. After three weeks, move the container to a bright and warm place.
You can grow seedlings immediately after stratification.
The soil should not dry out, but it should not be too wet either. A spray bottle or sprayer will be an ideal tool for watering sprouts. After the first shoots appear, begin to carefully water them using a syringe at the root. Dive, pinch off one third of the root, seedling, after two true leaves appear. At the end of spring, more or less mature seedlings can be planted in the garden. It is better to plant in the shade.