Planting season
The choice of the season when it is better to plant thuja - in spring or autumn - depends on local climatic conditions. If you plant a tree in August, then at least 2.5 months must pass before the onset of cold weather. During this time, the plant should have time to take root in its new location and regain its strength. After this, wintering is not scary.
The plant should be planted in early spring, in March, as soon as the air and soil warm up. If you delay, the seedlings will take root less well when it’s hot outside.
In this case, the following conditions must be met to help the plant take root:
- When planting, it is necessary to preserve the earthen ball around the root shoots in which the seedling grew in a pot.
- Simultaneously with planting, complementary feeding is carried out with a mixture consisting of turf, peat and sand.
- It is recommended to add about 50 grams to the soil during planting. nitroammofoski. The dosage can be increased depending on the number of bushes planted.
To understand how to properly plant or replant thuja in the fall, you need to know about certain subtleties of autumn planting.
Firstly, you need to remember that this plant cannot be planted too late in the fall, because it will be quite difficult for a fragile seedling to survive the winter. Ideal dates are September, early October, before persistent frosts appear.
When carrying out autumn planting, you need to take into account some features:
- A bush unprepared for new conditions of existence may not survive them. The soil near the tree trunk should be insulated with fallen pine needles or a layer of compost, which will protect it from the first frosts.
- Fallen snow will need to be removed from branches that are not yet strong, as they may break under its weight.
What to do with thuja in winter
Winter is ahead of the seedlings, and in order for them to survive it without problems, they need to be prepared: before the onset of cold weather, insulate the plants themselves and the soil under them. In the first year after planting, in the fall, all thujas need to be insulated until they fully adapt.
How to prepare thuja for winter
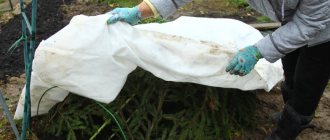
Insulate the soil under conifers by pouring straw, peat, shavings and wood leaves on it. The thickness of the protective layer should not be less than 6-8 ms. The plants themselves are wrapped in agrofibre to protect the branches from frost, snow accumulation and sunburn. Insulation in the fall is carried out no later than a steady cold snap begins.
Covering with burlap helps protect young trees from cold and sunburn.
Is it necessary to cover thujas for the winter?
Plants that have just been planted in the fall need shelter the most. Small thujas can often freeze in winter, because they have not yet grown properly. Mature trees, if they grow in a region where winters are not very cold, can do without shelter. In northern regions, it is recommended to cover plants in the fall every year.
Is it necessary to water thuja in winter?
If everything is done correctly, mulch is laid on the ground under the thujas, the soil moisture level will be exactly as needed. In winter it snows and rains, the ground is never dry. Trees do not need additional watering; at this time they consume little moisture because they are at rest. In addition, its excess in winter may not benefit the plants, but on the contrary, the roots of the tree may begin to rot.
How to cover a thuja for the winter in Siberia
In regions with snowy winters, thujas need shelter not only from frost, but also from snow accumulation. In young plants, the branches are fragile and bend; under the weight of snow they can break, and the crown will become deformed.
How to make a shelter in the fall:
- Gather the branches together, directing them towards the central part of the tree.
- Tie the plant with twine in a circle from bottom to top, without tightening it too much.
- Wrap the thuja in agrofibre or burlap.
Attention! You cannot use film that does not allow air to pass through. Under such material the tree will die by spring.
To protect plants from heavy snowfalls, you can build a frame in the fall:
- Place 2-3 metal arcs above the tree at an equal distance from each other so that they intersect above its top.
- Place a dense covering material on top of the frame that allows air to pass through well. Secure it on supports to prevent it from being torn off by the wind.
Low thujas can be covered with improvised materials, for example, boxes.
Gardening stores may sell covers for covering plants. They are convenient to use; you just need to put them on the tree and straighten them. The covers are durable and will last for several years.
Protecting thuja from the sun in winter
The bright winter sun also poses a danger to young seedlings. Active radiation can cause burns on tree branches, and needles can burn out and dry out. The reason that thuja sheds its needles in winter is usually due to too active solar radiation. To protect from the sun, thujas will need a shelter made of white agrofibre, which will reflect the rays.
Landing rules
To grow thuja, it is recommended to take seeds that are inside the cones and ripen in the autumn. The process of growing a seedling will be long and will take about 5 years, but a bush that originally grew in local soil will be more adapted to climatic conditions.
It is also an excellent option to purchase thuja seedlings from local nurseries and trusted gardeners - in this case, the quality of the planting material is guaranteed.
Before planting thuja, it is necessary to pay attention to the choice of location and soil quality, since these factors play an important role in the future development of the crop.
Selecting a location
Thuja is not picky. But when choosing a place to plant it, you should consider some points:
- The tree must be protected from dry and cold winter winds;
- Thuja does not tolerate excess moisture well, so in areas where groundwater comes too close to the surface, the tree may die.
- The place for planting thuja should not be under the scorching sun. It is optimal if the tree grows where bright sunlight alternates with shadow. This will help avoid dehydration of the conifer.
- Too dark places are also undesirable, since in them the thuja quickly loses its visual appeal.
Another point that needs to be taken into account when planting thuja is drafts, or rather the lack thereof. The evergreen tree does not tolerate drafts, so it is better to choose a protected area.
Soil quality
The plant is undemanding when it comes to soil, but nutritious fertile soils are considered the best soil for it. You can enrich the soil by adding turf soil, peat and sand.
It is favorable for this plant when there is plenty of moisture, otherwise the thuja begins to turn yellow and crumble.
If you choose the right place to plant this plant in compliance with all the requirements, it will require only minimal care, while always remaining an evergreen decoration of the landscape.
How to plant thuja in the fall
When starting to plant, you need to pay attention to the choice of seedling and the place where it will grow. How the tree will take root in the fall and how it will continue to grow depends on both.
Choosing a landing site
It is important to choose a site for the tree that is best suited for it, because in this place it will grow throughout its life. If it is chosen incorrectly, this will affect the growth and development of the plant and its decorativeness.
Thujas grow well in areas constantly illuminated by the sun, they feel good in partial shade, but here they are not so lush, with a weak crown. Therefore, they should not be planted next to tall plants or houses. Trees with a pyramidal and cone-shaped crown are very decorative; they can be planted in any part of the garden, near paths and low buildings.
The type and quality of soil are not particularly important for thuja. It can grow in sandy loam, loamy, and peat soil with a slightly acidic reaction. However, the best substrate is considered to be a mixture of peat, leaf soil and sand in a 2:1:1 ratio. It is important that the soil is moisture-absorbing, but not wet, and especially not swampy. Thuja will not grow in damp soil.
Selection of seedlings
Before you make a purchase in the fall, you need to inspect the seedling you like. A healthy plant should have a crown that is not very elongated, strong roots that are not dried out, without mold spots, a strong trunk with bark that has no signs of disease. The needles should be green, without a red tint. If the thuja is grown in a container, then you won’t be able to inspect the roots; you need to pay attention to the above-ground part.
It is best to buy thujas in containers
Planting process
For a standard size seedling, a planting pit with a diameter of 0.7-0.9 m and a depth of 0.5-0.6 m is suitable. For a larger seedling, the dimensions of the pit can be increased. During digging, the top layer of soil must be set aside separately. The distance between neighboring plants should be from 1 m. More is possible if the size of the seedling or variety requires it. On the day of digging, organic matter is added to the hole: 1-1.5 buckets of humus or rotted compost and 1-3 kg of ash. Mix the fertilizer with the soil in a ratio of 1 to 1.
Sequence of planting work in autumn:
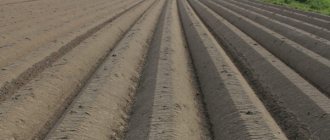
- Drainage material is poured into the bottom of the dug hole - broken brick or slate, small pebbles, crushed stone and expanded clay. Drainage layer – 10-15 cm.
- The soil removed during digging is placed on it.
- A layer of leaves 3-5 cm thick is poured on top.
- Then the soil is poured again.
- Alternate layers of leaves and soil until the height reaches the level at which the seedling should be placed.
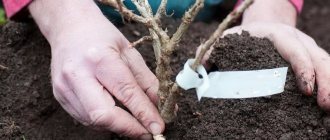
- Place the thuja in the center of the hole, straighten the roots if they are not in an earthen coma. The root system of a thuja grown in a container cannot be touched.
- Fill all the free space with soil and tamp it down a little.
- The height of the poured soil should be 5-8 cm above the root collar, then it will settle. It should be located slightly above (about 3-4 cm) the ground level. After the soil settles, it will sink and end up exactly where it is needed. The correct location of the thuja root collar is of great importance. Mistakes made during deepening can negatively affect the further growth of the tree.
- Water the plant with clean water or a solution of a root formation stimulator, for example, “Kornevina”.
After planting is completed, you need to mulch the surface of the earth within a radius of 0.5 m from the thuja trunk with organic material - leaves, straw, fallen pine needles, crushed bark or pine nut shells. The organic layer should be approximately 5 cm.
The root system of a thuja grown in a container should remain intact
Step-by-step planting instructions
Initially, a hole for the bush is prepared; its depth should be at least 70 - 80 cm, the optimal diameter is about 100 cm, however, these indicators can be adjusted depending on the size of the earthen ball in which the root shoots are located.
If you are planting not just one, but a whole series of bushes at once, then additional rules must be taken into account:
- A free space of at least 1 meter must be maintained between planted miniature species.
- The distance between large rocks should be increased to 5 meters, since over the years they grow greatly and increase in diameter.
- When creating hedges, the distance between bushes is no more than a meter, regardless of their species and expected size.
Planting is carried out according to the following scheme:
- A small amount of soil into which organic fertilizers have been added is placed at the bottom of the prepared hole. It is recommended to add wood ash.
- Drainage is placed at the bottom. This is especially useful on heavy clay soils. Part of the soil is mixed with sand or broken bricks.
- The bush is carefully immersed inside the hole, while care must be taken not to damage the earth ball. The root collar of the plant after immersion in the hole should be strictly at the same level with the soil surface.
- Garden soil is mixed in equal quantities with peat and sand, after which the hole is filled with this mixture. It is best to pre-heat the sand, since it often contains various parasites that can cause dangerous diseases.
- The soil poured into the hole should be lightly compacted, after which it is abundantly moistened with water.
After watering, when the soil settles, it is necessary to add more soil, then compact the root zone and mulch. When mulching, you should not touch the trunk and branches, as under the influence of moisture they will quickly rot and get sick.
Protection from diseases and pests
Conifers, including thuja, are susceptible to infection with fungal diseases. The infection can destroy the plant in a short time. Signs of fungal diseases that you need to pay attention to are yellowing and then falling of the needles.
In order not to wait for the possible appearance of the disease, already in the fall, after planting, you need to carry out preventive spraying of thuja with various fungicides. Among folk remedies, the Bordeaux mixture, consisting of copper sulfate and lime, has the same effect. In both cases, just one spray is enough. The next treatment will be needed in the spring.
Pests of thuja:
- bark beetle;
- cypress and thuja aphids;
- scale insects;
- spider mites.
Treating them in the fall will also not harm the young plant. Various insecticides designed to control these types of pests can be used. One autumn spraying is usually enough to destroy pests, prevent them from overwintering and starting to reproduce with the onset of warm weather.
Care after landing
The process does not end with planting, since in order to create comfortable and favorable conditions, the thuja will require subsequent care, which will consist of watering, fertilizing and pruning, as well as organizing wintering.
Watering
For a month after planting the thuja, it needs weekly watering (1 liter of water per 20 cm of height). Also, daily sprinkling will have a beneficial effect on its growth. This is vital for a tree whose crown evaporates a large amount of moisture. In the hot season, you need to water the thuja at least twice a week.
Feeding
In autumn, adding soil will help provide the plant with the reserves of strength it needs for a successful winter. For these purposes, you can use wood ash or compost. This will have a beneficial effect on the soil around the tree and will provide the conifer with strong immunity in the future.
Also used to feed thuja:
- Complex fertilizers for conifers.
- Organic fertilizers (slurry, compost) and various green manures. Potash fertilizers (potassium salts, sylvinite). This type of fertilizer allows you to avoid yellowing of the needles, which is caused by a lack of calcium in the soil.
- Potassium fertilizers provoke intensive growth of thuja, so they should not be applied in the fall. They are suitable as top dressing for weak and stunted seedlings.
- Nitrogen fertilizers - they provoke increased tree growth, so they cannot be used before autumn planting in the ground. This is a good option for winter feeding of thujas growing in pots or containers.
The amount and frequency of fertilizing depends on the age of the tree and the composition of the soil. In any case, fertilizers should be applied in strict accordance with the instructions.
Trimming
Decorative pruning of thuja can be done in early spring or late summer. This event involves removing no more than a third of the shoots. All dry, diseased and damaged branches are removed in the spring during sanitary pruning.
The most important thing when pruning thuja is regularity. The shape of the crown must be adjusted little by little, but constantly. This work should not be carried out during rain or wet weather. This will result in open wounds appearing on the tree that will not heal for a long time.
To properly trim a thuja, read the approximate description of this procedure:
- trimming the top of the bush is necessary to correct the direction of the branches;
- when forming a dense spherical bush, cut off those branches that are more different from the rest of the shoots;
- systematically remove annual growth to maintain basic shape;
- Perform complete pruning when many old branches form;
- if adjustments to the thuja occur frequently, reduce the amount of fertilizing applied.
Wintering
In the middle zone, western thuja is most often grown, since the eastern one does not take root due to frost. However, evergreen conifers cannot be completely covered. This threatens yellowing and drying of the foliage.
Young plants are given shelter in the form of a hut made of boards, followed by wrapping with lutrasil. But this applies to very small specimens that are completely buried under the snow. Further, these activities are not carried out, otherwise in the spring you will have to cut off most of the branches with brown needles.
Large plants have their crowns tied up to prevent them from breaking under the weight of snow. The branches are tied in several places and not tightly. In winter, during snowfall, you need to remove snow from the branches so that it does not turn into ice.
Mulching is a mandatory procedure in pre-winter preparation.
Covering the root zone retains moisture and protects the roots from freezing. If in the spring it is discovered that the bark of a tree is cracked, which often happens with sudden changes in temperature, then such places are covered with garden varnish.
Caring for thuja in autumn
It is believed that these are unpretentious plants, and with good care they will not cause trouble to their owners. Small thujas need careful care in the fall; they need to be protected from the sun, if it is still hot enough, and from gusty winds, gusts of which can damage the seedling.
In the first 2 weeks after planting the thuja, in the fall, water frequently - every 2-3 days, if the weather is hot - every other day or every day.
Attention! If autumn is rainy and the soil is already damp, watering is not required at all. Despite their love of moisture, thujas cannot tolerate wet soil.
When the soil begins to dry out, loosening is carried out. It needs to be carried out shallowly, the roots of the seedling are located close to the surface of the earth, you must try not to touch them. A layer of mulch laid in the fall will better retain moisture, so you will need to loosen it less often.
Basic mistakes when landing
When planting this plant, the same typical mistakes are made as when growing most other varieties of coniferous bushes:
- Damage to the earthen ball during transplantation into open ground. Abundant watering of the soil the day before replanting the thuja can help prevent this. It is also recommended to wrap the earthen ball in burlap or any other non-synthetic material, and then securely tie it with wire to fix the shape. In this case, when planting, it will be enough to remove only the wire; the burlap will still rot after being in the ground for a long time.
- Incorrect determination of the size of the planting hole. The earthen lump should not only enter into it without hindrance, but there should also be free space on all sides, into which the palm of an adult man can easily enter.
- Violation of planting technology, which consists of filling the root collar of the bush with soil. The plant is cleared of soil to the required level or air drainage is required.
- Ignoring the individual requirements of a certain breed for conditions. Thuja has a number of varieties, each of them has its own characteristics. You need to check them with the seller before making a purchase; it is for this reason that it is recommended to purchase planting material only from professional breeders and trusted sellers.
Planting thujas in the fall does not present any particular difficulties. If you take into account all the nuances and do not neglect the advice on caring for young plants, the likelihood of their survival will be high.
Selection of seedlings
In order to get only a high-quality and beautiful adult thuja plant, it is worth paying increased attention to the issue of choosing a young seedling, which it is advisable to buy only in specialized nurseries. Firstly , in such places there is a much greater chance of purchasing the specific variety you are interested in, and secondly , if any problems arise in the future during the process of growing the crop, you can always contact the seller and clarify the points that interest you.
Important! To find out about the true condition of the selected thuja seedling, some gardeners resort to a little trick. Try to gently squeeze the needles in your hand for a couple of seconds and then release: if they quickly return to their original state, you can buy such a plant, everything is fine with it.
Today, there are two main types of young seedlings on sale, each of which will have its own characteristic external features that you should pay attention to when purchasing them. Plants with a closed rhizome are always sold in a container (pot or some other container) and are considered a more rational solution due to increased protection of the root system during cultivation and transportation to the point of sale.
Moreover, such thujas are much easier to transplant to a permanent place of growth (by transshipment), the main thing is to remove the rhizome with an earthen lump immediately before planting in the chosen place: if you leave the open rhizome for longer than 10 minutes, the roots will begin to dry out, which is negative in the future will affect the viability of the young seedling.
Did you know? In Latin, the word “Thuja” has an ancient Greek root, which allows the word to be interpreted as “incense.” This is not surprising, because in ancient times tree branches were actually used for fire pits in sacrifice rituals.
Thujas with open rhizomes are usually sold in bags and without an earthen ball. Of course, their cost is much lower than the previous option, but there will be more trouble when planting, especially if the plant was purchased in advance and still needs to be stored somewhere.
True, no matter which option you like, it is important to remember some general rules for choosing a quality thuja seedling:
- It’s good if it’s a plant 3–4 years old (such specimens take root faster).
- All parts of the thuja should have their natural color, without yellowness, too dry or, conversely, too soft areas, both on the shoots and on the trunk itself.
- It is desirable that the crown of the plant has a regular, symmetrical shape, then in an adult thuja it will be lush and beautiful.
- Plants with an open rhizome should have elastic and elastic roots, without traces of mold, rotting or disease (you can even smell the roots to make sure there is no putrefactive odor or damp aroma). To assess the condition of the rhizome of a closed seedling, look at the drainage holes located in the lower part of the container: the rhizome should not stick out from them, otherwise it can be assumed that the thuja was in the container for a very long time and could not fully develop due to the tightness. The natural color of healthy roots is white and pink, but a brown tint should alert you.
- The needles of a thuja seedling suitable for planting normally have a rich green color, and the exception may be varieties with golden or yellowish needles, which is inherent in them at the genetic level. Brown color indicates poor care of the young plant, especially if the needles fall off.
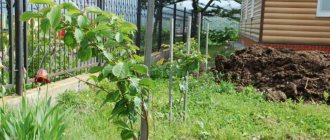
Use of Thuja western Smaragd in landscape design
This evergreen beauty occupies a special place in landscape design. Single plantings look beautiful surrounded by granite and perfectly complement the paths. Japanese gardens look original, supplemented with such coniferous crops.
Hedges look great with this type of tree. Thuja Smaragd looks great in a pot.
Decorate the entrance to your site with Tuami by placing a suitable pair of seedlings on both sides of the entrance gate. Evergreen compositions are often created in the garden by mixing coniferous plants with perennial crops.
Arborvitae are excellent for forming attractive topiary. Rock gardens are also supplemented with coniferous representatives. This variety can be combined with other conifers; it is better to avoid deciduous crops.
Thuja occidentalis Smaragd has a fibrous root system, so you should be extremely careful when choosing neighboring plants. It is recommended to give preference to representatives with a rod system. These are Rhododendrons, Lilacs, Hibiscus. You can also choose Junipers, for example, Blue Chip or Blue Arrow.
Propagation of thuja by cuttings
Thuja is very easy to propagate from cuttings. Even novice amateur gardeners can do this task.
The best time for cuttings is considered to be autumn. In spring and summer, the cuttings often dry out and do not have time to take root. This part of the article describes the main thing that needs to be done in order for you to grow a healthy thuja: planting and care in the fall. Western Smaragd globulus is not a very demanding plant. All that remains is to listen to some advice again and be patient a little.
- You need to find the strongest side shoots of the plants and tear them off with a sharp movement. Try to leave a so-called “heel” (a piece of bark) at the tip of the branch.
- All lower needles must be removed. After this, the cuttings are planted in pots. They are deepened 2-3 centimeters into fresh soil. It is best to mix leaf soil, sand and peat in equal parts. The remaining foliage should not touch the ground.
- In order for the cutting to take root faster, it must be dipped in a solution of the Heteroauxin preparation before planting. After planting, the cuttings are covered with transparent containers (you can, for example, use jars). Pots with seedlings are placed in a greenhouse in a non-sunny but bright place. Cuttings need daily ventilation. If the humidity level is too high, the sprouts may rot. In such conditions the cutting will remain until the onset of summer.
- If new shoots appear on the cuttings, it means your shoot has taken root. However, there is no need to immediately transplant it to a permanent place. As soon as the first warm days arrive, you need to start hardening the thuja. The plant is left outside for several hours.
As you already understand, planting and propagating thuja Smaragd and further caring for the plant will not require any significant effort from you.
Which type and variety is better to choose?
The rich assortment of shops and nurseries is tempting and attracts the buyer with the unusual shape of the crown, the color of the needles, and promises of no problems in caring for the tree. However, the colorful needles quickly fall off and the bush dies, despite the buyer following the growing tips. This means that the variety was not adapted to the conditions of the middle zone.
Important! When purchasing a seedling with a closed root system, gently pull the trunk. A specimen grown in a pot sits firmly and was not inserted by an unscrupulous seller before sale!
To increase the viability of thuja in your climatic conditions, be guided by the following rules when choosing:
- You can purchase seedlings only from a local producer; they are zoned, i.e., adapted to wintering in harsh conditions. Do not chase the cheapness of goods in spontaneous markets, check their origin;
- choose strong seedlings with a crown color characteristic of the variety, elastic and lively needles that do not fall off;
- give preference to the unpretentious classics - of all the variety, only frost-resistant folded, heather and western thujas will survive. They will easily tolerate long-term negative temperatures typical of the middle zone. They are not afraid of short-term summer droughts and shade;
- It’s difficult to choose from hundreds of species; decide in advance on your preferred shape, height and growth rate, and your search will narrow down.
Popular varieties of pyramidal and conical shapes that have proven themselves in central Russia include:
- medium-sized conical Smaragd;
- fast-growing Brabant;
- tall columnar Columna;
- low-growing heather Elvangera golden;
- spherical with transition to pyramidal Rheingold;
- ovoid with a transition to a cone, low Erikoides;
- miniature Kan-kan;
- large conical Sunkist;
- motley Zebrina.
The experience of growing spherical thujas in the Moscow region has replenished many ornamental gardening collections with interesting and durable specimens.
Among them:
- dwarf Danica;
- short Teddy;
- low Globoza;
- slow-growing Europa Gold;
- miniature Hosery.